
Today we are building a very useful project in which we can control the LED lights using our voice through Smart Phone. In this project, we will send voice commands from Smart Phone to Raspberry Pi using Bluetooth Module and Raspberry Pi will receive that transmitted signal wirelessly and will perform respective task over the hardware. We can replace the LEDs with the AC home appliances using relays and can build a Voice Controlled Home Automation Project.
Components Used:
- Raspberry Pi 3 (any model shall work)
- Bluetooth Module HC-06
- Bread board
- 100 ohm Resistors (3)
- LED’s (blue, red, green)
- Connecting wire
- Power Supply
- Ethernet cable
- Android Phone
Bluetooth Module:
Bluetooth module consists two things one is Bluetooth serial interface module and a Bluetooth adaptor. Bluetooth serial module is used for converting serial port to Bluetooth.

How to operate Bluetooth module:
You can directly use the Bluetooth module after purchasing from market, because there is no need to change any setting of Bluetooth module. Default baud rate of new Bluetooth module is 9600 bps. You just need to connect rx and tx to controller or serial converter and give 5 volt dc regulated power supply to module.
Bluetooth module has two modes one is master mode and second one is slave mode. User can set either mode by using some AT commands. Even user can set module’s setting by using AT command. Here is some commands uses are given:
First of all user need to enter AT mode with 38400 bps baud rate by pressing EN button at Bluetooth module or by giving HIGH level at EN pin. Note: all commands should ends with \r\n (0x0d and 0x0a) or ENTER KEY from keyboard.
After it if you send AT to module then module will respond with OK
AT à Test Command
AT+ROLE=0 à Slave Mode select
AT+ROLE=1 à Master Mode select
AT+NAME=xyz à Set Bluetooth Name
AT+PSWD=xyz à Set Password
AT+UART=<value1>,<value2>,<value3> à set Baud rate
Eg. AT+UART=9600,0,0
Pin Description of HC-06 Bluetooth Module:
1. STATE à Open
2. Rx à Serial receiving pin
3. Tx à Serial transmitting pin
4. GND à ground
5. Vcc à +5volt dc
6. KEY à to enter in AT mode
Working Explanation:
Working of this Voice Controlled LEDs project is very easy. In this project we have used three LEDs of different colors (Blue, Red and Green). A HC-06 Bluetooth Module is used for receiving voice commands output in string format. Raspberry Pi receives that incoming string from Bluetooth Module and compares with predefined string and performs respective task.
In this project, to provide the voice commands to Raspberry Pi from our Smart Phone, we have used AMR Voice App in Android Phone (Android Meets Robots : Voice Recognition).
AMR Voice App installation and configuration:
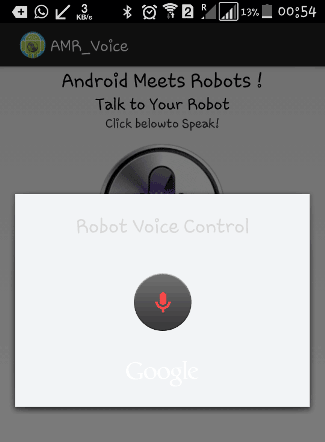
AMR Voice App can be downloaded and installed from the Google Play Store. You also need to install Google Voice App for this project. AMR Voice app takes the voice as input and converts it into text string using Android mobiles internal voice recognition (Google Voice App) and sends this converted text serially over Bluetooth.


Now open the AMR voice app, go in option menu and connect it to Bluetooth module by clicking over ‘Connect Robot’:
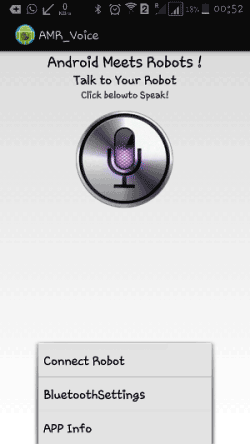

Now user can tap over the Mic symbol on mobile screen and speak predefined Voice commands to operate the LEDs:
1. “blue light on” (only blue LED turned on)
2. “blue light off” (only blue LED turned off)
3. “red light on” (only red LED turned on)
4. “red light off” (only red LED turned off)
5. “green light on” (only green LED turned on)
6. “green light off” (only green LED turned off)
7. “all lights on” (blue, red and green LEDs turned on)
8. “all lights off” (blue, red and green LEDs turned off)
9. “blink” (all LEDs start blinking with a 100 millisecond time period)
Then AMR voice app records this voice and sends it to Google Voice app to convert it into the text string format. Now this converted string is sent to Raspberry Pi via Bluetooth module and Raspberry Pi reads this string from UART port and store in a string in the code. And then compare it with predefined strings, if any match occurs then Raspberry Pi takes a respective action or performs a task.
Circuit Explanation:
Circuit of this project is very simple, which contains Raspberry Pi 3 Board, LEDs and Bluetooth Module (HC-06). Raspberry Pi reads the Bluetooth Module and control the LEDs accordingly. LEDs Blue, Red and Green are connected at GPIO 17, 27 and 22. Rx and Tx of Bluetooth Module are directly connected to Tx and Rx pins of Raspberry Pi. Remaining connections are shown in circuit diagram.

Raspberry Pi Configuration and Python Program:
We are using Python language here for the Program. Before coding, user needs to configure Raspberry Pi. You can check our previous tutorials for Getting Started with Raspberry Pi and Installing & Configuring Raspbian Jessie OS in Pi.
After that you need to run following commands to run latest updates on Raspbian Jessie:
sudo apt-get update
sudo apt-get upgrade
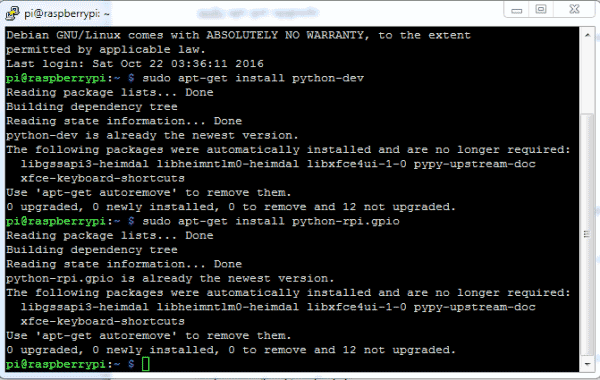
After it we need to install Raspberry Pi GPIO development tool, it can be installed by following commands:
sudo apt-get install python-dev
sudo apt-get install python-rpi.gpio
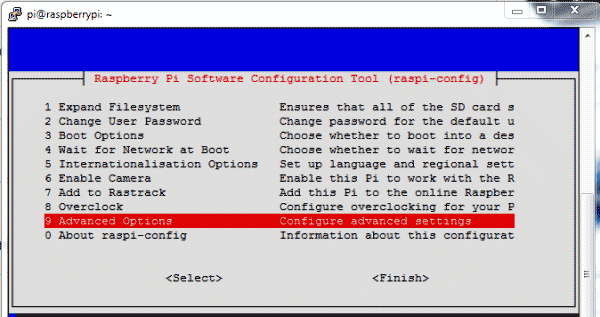
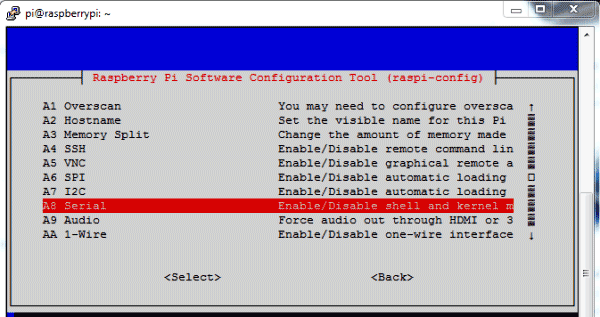
Then user needs to configure serial port of Raspberry Pi. Here we have used Raspberry Pi 3 for this project. So user needs to configure serial port according to their Raspberry Pi version. For Raspberry Pi 3, first user needs to disable console login via serial port, through RPi Software Configuration Tool. Open it by using below command:
sudo raspi-config
Then go to ‘Advance Options’, select ‘Serial’ and ‘Disable’ it.
After this we need to disable inbuilt Bluetooth of Raspberry Pi 3 by adding dtoverlay=pi3-miniuart-bt at the end of /boot/config.txt file:
sudo nano /boot/config.txt
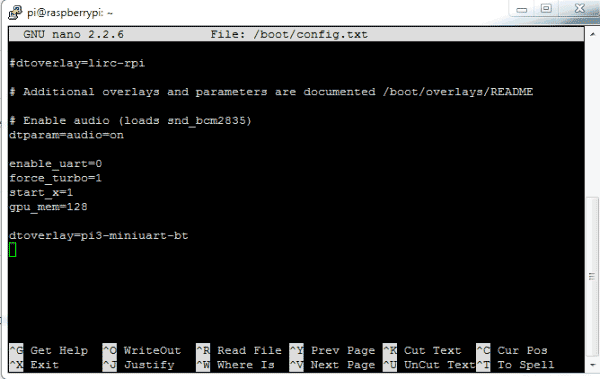
After adding the line reboot Raspberry Pi by issuing sudo reboot command.
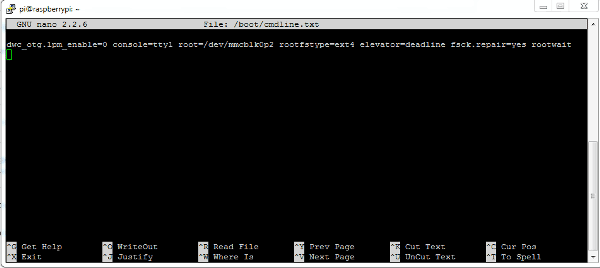
Finally login in Raspberry Pi again and configure /boot/comline.txt file:
sudo nano /boot/comline.txt
And edit the file as below:
dwc_otg.lpm_enable=0 console=tty1 console=serial0,115200 root=/dev/mmcblk0p2 rootfstype=ext4 elevator=deadline fsck.repair=yes rootwait
Now you can run the Python program given below in Raspberry Pi and you are done! Program is easy and can be easily understandable.
So here we have completed building our Voice Controlled Devices using Raspberry Pi. You can further enhance it and modify it for controlling AC home appliances by adding relays.
Complete Project Code
import serial
import RPi.GPIO as GPIO
import os, time
led1=17
led2=27
led3=22
GPIO.setwarnings(False)
GPIO.setmode(GPIO.BCM)
GPIO.setup(led1, GPIO.OUT)
GPIO.setup(led2, GPIO.OUT)
GPIO.setup(led3, GPIO.OUT)
GPIO.output(led1 , 0)
GPIO.output(led2 , 0)
GPIO.output(led3 , 0)
Serial = serial.Serial("/dev/ttyS0", baudrate=9600, timeout=2)
data1=""
data=''
while 1:
  while data != '#':
    data = Serial.read(1)
    data1+=data
  print data1
  if data1.find("blue light on")>0:
      GPIO.output(led1 , 1)
      print "Blue Light on"
  if data1.find("blue light off")>0:
      GPIO.output(led1 , 0)
      print "Blue Light Off"
  if data1.find("red light on")>0:
      GPIO.output(led2 , 1)
      print "Red Light on"
  if data1.find("red light off")>0:
      GPIO.output(led2 , 0)
      print "red Light Off"
  if data1.find("green light on")>0:
      GPIO.output(led3 , 1)
      print "Green Light on"
  if data1.find("green light off")>0:
      GPIO.output(led3 , 0)
      print "Green Light Off"
  if data1.find("all lights on")>0:
      GPIO.output(led1 , 1)
      GPIO.output(led2 , 1)
      GPIO.output(led3 , 1)
      print "All Lights on"
  if data1.find("all lights off")>0:
      GPIO.output(led1 , 0)
      GPIO.output(led2 , 0)
      GPIO.output(led3 , 0)
      print "All Light Off"
  if data1.find("blink")>0:
      for k in range (100):
        GPIO.output(led1 , 1)
        GPIO.output(led2 , 1)
        GPIO.output(led3 , 1)
        time.sleep(0.1)
        GPIO.output(led1 , 0)
        GPIO.output(led2 , 0)
        GPIO.output(led3 , 0)
        time.sleep(0.1)

  Serial.flush();
  data="";
  data1="";
Comments
can't we use blutooth of rpi
This Project is meant for all Raspberry Pi models which don't have Bluetooth.
Interesting
can we use HC-05 bluetooth module?
Check this one : Smart Phone Controlled Home Automation
Hello there,
i have some trouble while doing voice recognition.. Can u teach me how to using or making coding for phyton. cant i just used voice recognition and not using bluetooth? plzz help me..
I have one problem. the above code run at whether python 3 or terminal.
As the new Raspberry Pi 3 model B has built-in Bluetooth, do i still require to get this external Bluetooth Module HC-06? If I do not require, do I still follow each and every step stated above to build this project or there is some modifications? Please advise. Thanks.
You can also use internal Bluetooth of RPi 3, follow this procedure to connect using internal bluetooth: Controlling Raspberry Pi GPIO using Android App over Bluetooth
When i run the above code in python 3, it shows a syntax error. At line 22 "print data1". Saying "Missing parentheses in call to 'print'." Please advise. Thanks.
How the program code get in to raspberry pi,what is the procedure.how the voice get detected,there is any special device.is the code is correct
Check this one: LED Blinking with Raspberry Pi and Python Program
i want raspbeery pi3
At line 22 "print data1". Saying "Missing parentheses in call to 'print'." Please help us .TQ
i have connected the hc06 module with raspberry pi 3.followed the same steps as told but iam not able to get the input.i mean my pi is not reading
the data sent from the app
First disable the inbuilt bluetooth of RPi as described in the tutorial.
while data != '#':
data = Serial.read(1)
data1+=data
how can we compare # as after it everything becomes comment
so the code in not enterring the control on the while loop
sir my project name is voice controlled home automation using raspberry pi. we completed our project half only that means we install OS for raspberry pi,but our voice command is coded for python code is not completed plz give me that python code details our project
i want to try above project with respberry pi 3 with in build bluetooth so the code is giving me error can u pls help us to get code which uses in build bluetooth of respberry pi
can we perform this project without hc06 module? baco'z pi 3 have already bluetooth interface.
first i want to know is the numbering of pins in the code is number of bin header or number of gpio pins
second how can i identify that my bluetooth module is run and recieve data
third i bought bluetooth module and when i connect it i t to pi isearch on the phone and it was hc-06
is that enough to recognize the model of the module that it is hc06
and what the baud rate i should run on
i use pi3 model b
and what i should write in sudo nano /boot/comline.txt
please help me
If you are using Bluetooth module then first disable the inbuilt bluetooth of RPi as described in the tutorial.
Import error: no madule serial is not defined like ima getting pls can u resolve it
How can I study voice control raspeery pi projects
with program tutorial?
Please,give advice.Thank
I have raspberry pi 3 model B. Please give the program for operation with voice commands with inbuilt bluetooth..
In program it is showing error in "import RPi.GPIO as GPIO" this command please help me..
Can i do this using bluetooth headphones instead of android phone
How to setup the Bluetooth module hc-06 on raspberry pi 3? can give more details explanation. Also is there any correction for the python code? because some error occur with the coding
Be it Hc-05 or HC-06 the method is same as far as i know. What error are you getting?
Sir, please make a tutorial on how to connect it to a appliances, and where to put the python codes. please
Where to paste the code?
please answer..
sadam,
when the program sends a '#' sign.
I used built-in bluetooth with Blue Term and a program in the article
"Controlling Raspberry Pi GPIO using Android App over Bluetooth". additionally I chose "google writing voice in android settings keyboard. Its good work with my voice!.
I do not need to use ARM-Voice and "#"
Can i use blue,red and green lamps instead of leds?
Yes you can. But ofcourse you have to add a driver circuit
Sir? I follow all the step that required above. but it doesn't work.
But when I connect my bluetooth HC-06 to my android, and send command nothing happened.
I already connected the pins to GPIO from my module. and the Led's.
but nothing happened. please help me.
Make sure the bluetooth connection is successful.
https://circuitdigest.com/microcontroller-projects/controlling-raspberr…
You might have to try this basic tutorial to understand about BT and I before doing this one
And edit the file as below:
dwc_otg.lpm_enable=0 console=tty1 console=serial0,115200 root=/dev/mmcblk0p2 rootfstype=ext4 elevator=deadline fsck.repair=yes rootwait
Just copy and paste? how to edit this?
I have an Error on pairing the HC-06 to Raspberry Pi 3 (Model B)
Do I need to pair my HC-06 Bluetooth module to the Raspberry Pi 3 Model B after I disable my inbuilt bluetooth.
Good day!
I can't run the program please help.
from comline.txt do I need to copy the baudrate of 9600. change the 115200
this is not working in my rpi3 and it is compile successfully but nothing is received by bluetooth module... what is the prblm in this.....help me.....
How to use the inbuild bluetooth system of Raspberry Pi3 for this project instead of using the external bluetooth module? Please help me..
Is the app still available?
I completed everything above this project. But still the python program showing error. And also I didn't get the output. So please help me soon.
Only if you state what error you are facing people here might be able to help you.
There is no point in asking for help like this
The bluetooth module(hc-06) in my circuit is not powering on. When i remove Vcc and plug it back on, there is a sudden blinking for 2 seconds which comes to a stop. I did everything as stated above and disabled the inbuilt BT. Is there any probable fix?
All BT modules should blink when powered properly. If not check your power supply and polarity, if they are good then most likely the module is damaged.
Also what do yo mean by it comes to a stop? does it turn off or stay on? If it stays on it means it has paired with your mobile
I have a problem in coding there are syntax error I am doing the same project
I don't have Bluetooth Module, so can I use I use Raspberry pi's Bluetooth?

I want to study full python programming....