

Finding the right ESP32-S3 development kit often means compromising between functionality and deployment readiness. With so many ESP32-S3 dev kits out there, we have been searching for a ready-to-deploy module that doesn’t require extra work like designing enclosures or 3D printing cases. These things can significantly increase the deployment time. One such kit we found is Espressif’s ESP32-S3-BOX-3.
CircuitDigest presents the Smart Home & Wearables Project Contest 2025! Win exciting prizes worth up to ₹7,00,000 and receive free development boards through our partnership with DigiKey. For registration, dive into contest details.
This isn't just another development board thrown into a generic case. The ESP32-S3-BOX-3 development board is a modern kit designed for AIoT, Edge AI, and industrial IoT projects. The ESP32-S3-BOX-3 runs on the ESP32-S3 chip technology, and it is housed in an attractive, pre-assembled case to ensure you can get started without any extra work. You also have plenty of options to expand to easily customise for different project scenarios. It is compatible with Espressif’s software platform choices, such as ESP-BOX, ESP-SR, ESP-Rainmaker, and ESP-Matter, enabling everything from quick prototypes up to full-featured IoT applications. With such a clean design and flexible features, this modern kit is certainly a worthy addition to the development board category.
With all these features, it makes a perfect choice for our upcoming Smart Home and Wearable Project Challenge, where you can win prizes of up to Rs. 7,00,000. You can also win a development board and some cool goodies just by sharing your project ideas. So don’t forget to check out the Smart Home and Wearable Project Challenge for more details.
Let’s take a closer look at the ESP32-S3-BOX-3.
What's Included in the ESP32-S3-BOX-3 Development Board Package?
The unboxing is a little interesting as we get a lot of usable accessories with the ESP32-S3-BOX-3 kit. Below you can see the unboxing image.
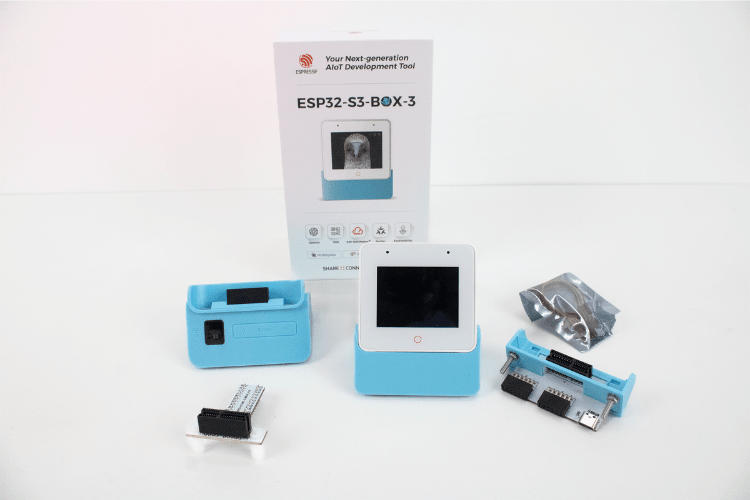
This dev kit comes with the following accessories,
| ESP32-S3-BOX-3: | The main unit that can work on its own |
| ESP32-S3-BOX-3-DOCK: | A functional accessory serving as a stand for the main box |
| ESP32-S3-BOX-3-SENSOR: | A functional accessory showcasing sensor applications |
| ESP32-S3-BOX-3-BRACKET: | An adapter accessory for mounting the main box to other devices |
| ESP32-S3-BOX-3-BREAD: | An adapter accessory for easy connection of the main box to a standard breadboard |
| A USB-C: | Power cable |
| RGB LED Module and Dupont Wires: | For testing |
We received all this in a little big box. Inside were foam moulds holding all the accessories in place. It’s nicely packed. It might be tricky to perfectly place all the components back in the same spot again. Sometimes it gets confusing to repeat, as all the accessories are tightly packed. So, remember the positions of components while taking them out.
Next, let’s look at the feature that makes us more excited about this dev kit.
Key Features of the Espressif ESP32-S3-BOX-3
To make this development kit outstanding and usable for AI and IoT applications, it comes packed with a rich set of features.
ESP32-S3-BOX-3 Quick Reference
| ESP32-S3 Dual-Core Microcontroller – | Powerful dual-core Xtensa 32bit LX7 processor running up to 240 MHz with built-in Wi-Fi and Bluetooth connectivity. |
| Generous Memory Configuration – | 512 KB SRAM and 384 KB ROM for robust application development, plus 16 MB Octal SPI PSRAM and 16 MB Quad SPI External Flash for extensive storage. |
| Advanced AI Capabilities – | Built-in neural network processing, acoustic algorithms, and computing acceleration for vector operations, complex numbers, and FFT calculations. |
| 2.4-inch Colour LCD Display – | Crisp 240 x 320 pixel resolution display with SPI interface running at 40 MHz, driven by ILI9342C controller for vibrant visuals. |
| 10-Point Capacitive Touch Screen – | Multi-touch support for intuitive user interaction and gesture recognition. |
| Wireless Connectivity – | 2.4 GHz IEEE 802.11b/g/n Wi-Fi with Bluetooth 5 LE and Bluetooth mesh support for versatile IoT applications. |
| High-Quality Audio System – | Dual microphone setup with EST2210 ADC model, mute support, 8 Ohm 1W speaker with NS4150 PA model, and ES8311 codec for crystal-clear audio processing. |
| Advanced Motion Sensing – | 3-axis gyroscope and 3-axis accelerometer (ICM-42607-P sensor model) for motion detection and orientation tracking. |
| Versatile Interface Options – | USB Type-C port for power, USB download/JTAG debug, and general USB device functions, plus Goldfinger connector for I/O expansion. |
| User-Friendly Controls – | Onboard Reset, Boot, and Mute buttons with Power LED and Mute LED indicators for easy operation and status monitoring. |
| Experimental High-Speed PSRAM – | 120 MHz PSRAM speed capability for demanding real-time applications. |
| Compact and Lightweight Design – | Measuring just 61 x 66 x 16.6 mm and weighing only 292g, perfect for portable projects. |
| Flexible Power Options – | USB-C power input (5V - 2.0A) with no battery dependency for continuous operation. |
| Professional Development Support – | Ships with FreeRTOS and supports ESP-IDF SDK for professional embedded development. |
On the software side, it can be programmed with ESP-IDF or Arduino IDE, and it supports various AI frameworks for machine learning applications. The combination of powerful processing capabilities and rich sensor integration makes it ideal for voice recognition, image processing, and intelligent IoT projects.
ESP32-S3-BOX-3 Applications and Use Cases
Let me add some of the possible applications of this ESP32-S3-Box-3 development board, which will give you a better idea.
- Smart Home Control: Voice commands, touch interface for lights, appliances, and security systems
- Voice Assistants: Custom wake word detection, speech recognition, and audio response systems
- Industrial HMI: Machine control panels, process monitoring, and operator interfaces
- AI Edge Computing: Real-time object detection, facial recognition, and predictive analytics
- Interactive Displays: Digital signage, information kiosks, and customer engagement systems
- Healthcare Monitoring: Patient vitals tracking, medication reminders, and wellness applications
- Educational Projects: IoT learning platforms, STEM demonstrations, and programming tutorials
- Motion Control: Gesture recognition, orientation sensing, and movement-based interfaces
- Audio Processing: Sound analysis, noise monitoring, and acoustic pattern recognition
- Wireless IoT: Remote monitoring, data collection, and cloud-connected applications
- Prototyping Platform: Rapid development of AI-powered devices and smart solutions
- Environmental Sensing: Climate monitoring, air quality tracking, and automated responses
ESP32-S3-BOX-3 Development Board: Physical Overview
Now that we know all the features, let’s move to the physical overview. Since the Espressif Systems esp32 s3 box 3 aiot kit comes with multiple accessories, we'll look at each part, starting with the main unit.
ESP32-S3-BOX-3 Main Unit
The main highlight of the ESP32-S3-BOX-3 is its compact form factor with a boxy design.
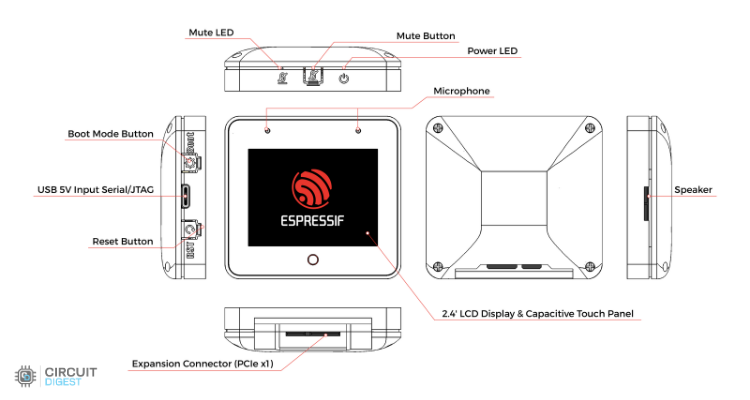
Above, you can see all the peripherals marked in the orthographic view.
It has some unique built-in peripherals like a small 2.4” LCD with capacitive touch support, a pair of microphones at the top of the front screen, a customizable touch button (marked as O) below the display, a speaker on the right, a boot mode selection button, a reset button, and a USB Type-C port on the left side. On the top, you’ll find a mute button, power and mute LED indicators, and finally, a beautiful PCIe X1 connector where all the accessories can be attached.
And now, let’s look in detail at each component and some of the internals.
Microcontroller
- Chipset: ESP32-S3
- CPU: Dual-Core Xtensa® 32-bit LX7, up to 240 MHz
- SRAM: 512 KB
- ROM: 384 KB
- PSRAM: 16 MB (Octal SPI, 120 MHz experimental)
- External Flash: 16 MB (Quad SPI)
Memory & AI Features
- AI Support: Neural Network, Acoustic algorithm support
- Acceleration: Vector, Complex number, FFT, etc.
Wireless
- Wi-Fi: 2.4 GHz, IEEE 802.11 b/g/n
- Bluetooth: Bluetooth® 5 LE, Bluetooth® mesh
Display
- Type: 2.4-inch TFT LCD
- Resolution: 320 × 240 pixels
- Driver IC: ILI9342C
- Interface: SPI, up to 40 MHz
- Touch: Capacitive, 10-point
GPIO Connections:
- DC → GPIO4
- CS → GPIO5
- SDA → GPIO6
- SCK → GPIO7
- RST → GPIO48
- CTRL → GPIO47
Audio Input
- Microphone: Dual mic
- ADC: ES7210 (High-performance 4-channel audio ADC)
- Interface:
- Config via I²C (0x40)
- Audio via I²S
GPIO Connections:
- I²S_MCLK → GPIO2
- I²S_SCLK → GPIO17
- I²S_LRCK → GPIO45
- I²C_SCL → GPIO18
- I²C_SDA → GPIO8
Audio Output
- Codec: ES8311 (Low-power mono audio codec)
- Amplifier: NS4150B (3W mono Class-D audio amp)
- Speaker: 8 Ω, 1 W (driven via NS4150B)
- Interfaces:
- Config via I²C
- Audio via I²S
GPIO Connections:
- I²C_SDA → GPIO8
- I²C_SCL → GPIO18
- I²S_MCLK → GPIO2
- I²S_SCLK → GPIO17
- I²S_LRCK → GPIO45
- I²S_CODEC_DSDIN → GPIO15
- PA_CTRL → GPIO46
Controls & Indicators
- Mute Button: Hardware switch (buffer + D flip-flop to cut ADC line & power)
- Status Pin: GPIO1 (MUTE_STATUS_L)
- Onboard Buttons: Reset, Boot, Mute
- Onboard LEDs: Power LED, Mute LED
Security
- Chip: ATECC608A (Crypto chip)
- Features: Hardware encryption, TLS acceleration, secure cloud authentication
- GPIO Connections:
- I²C_SCL → GPIO18
- I²C_SDA → GPIO8
Sensors
- Type: 6-axis motion sensor (3-axis gyro + 3-axis accelerometer)
- Model: ICM-42607-P
- Interface: I²C (0x68)
- GPIO Connections:
- I²C_SCL → GPIO18
- I²C_SDA → GPIO8
Interfaces
- USB Type-C: Power, USB download, JTAG debug, general USB device functions
- Goldfinger (PCIe x1 style): Provides GPIO & power I/O expansion
- OS / SDK
- OS: FreeRTOS
- SDK: ESP-IDF
Power
- USB-C Input: 5 V, 2.0 A
- Battery: Not available
Outline
- Dimensions: 61 × 66 × 16.6 mm
- Weight: 292 g
That’s all packed inside the ESP32-S3-BOX-3 itself. Now, let’s move on to the kit accessories.
ESP32-S3-BOX-3 Accessories Comparison
| Accessory | Primary Function | Best Use Case |
| DOCK | Stand with Pmod headers, USB-A port | Desktop projects, USB peripherals |
| SENSOR | Temp/Humidity, Radar, IR, Battery | Environmental monitoring, portable apps |
| BRACKET | Mounting adapter | Retrofitting existing devices |
| BREAD | Breadboard adapter | Prototyping and testing |
ESP32-S3-BOX-3-DOCK Expansion Module
ESP32-S3-BOX-3-DOCK is designed to serve as a stand for the ESP32-S3-BOX-3 via its gold fingers and offers versatile expandability. It features two Pmod™ compatible headers, allowing users to connect additional peripheral modules. These headers provide 16 programmable GPIOs and can supply 3.3 V power to peripherals. There is one USB Type-A port for connecting devices such as USB cameras (up to 720p resolution), USB drives, and other HID devices. Another USB Type-C port is dedicated to 5 V input power only.
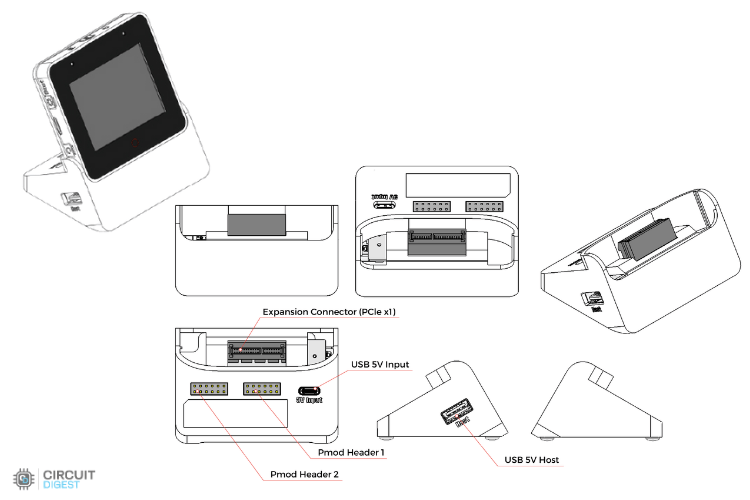
Here’s the orthographic view of the dock. It looks simple, but it actually has four different connectors. Let’s dive into their technical details.
Connectivity Interfaces
- 12-pin Female Headers (2x)
- I/O Count: 8 I/O per header
- Compatibility: Pmod™ Compatible
- Power Output: 3.3V
- Supported Protocols: GPIO, I2C, SPI, UART, RMT, LEDC, etc.
- USB Type-A Port (1x)
- Power Output: 5V
- Functionality: USB Host capability
- Compatible Devices: USB cameras, USB storage devices, HID devices
- Usage: Connect diverse USB peripherals
- USB Type-C Port (1x)
- Power Input: 5V
- Functionality: Power input only
- Usage: Dedicated power supply for the dock
Expansion Slots
- PCIe Connector (1x)
- Type: 36-pin, 1.00mm (0.0394") pitch
- Card Compatibility: Accepts 0.062" (1.60mm) thick cards
- Mounting: Vertical mounting goldfinger connector
- Usage: Hardware expansion and custom modules
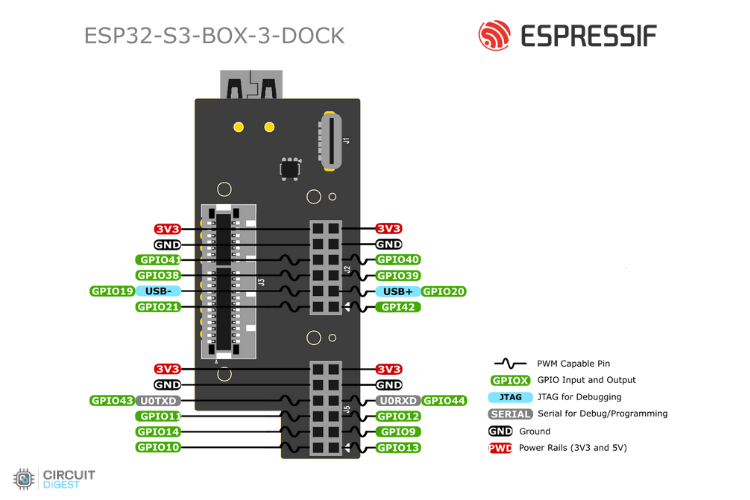
Next is the pinout diagram of the dock. There’s also a label on the dock itself for quick reference.
Next, let’s look at the ESP32-S3-BOX-3-SENSOR.
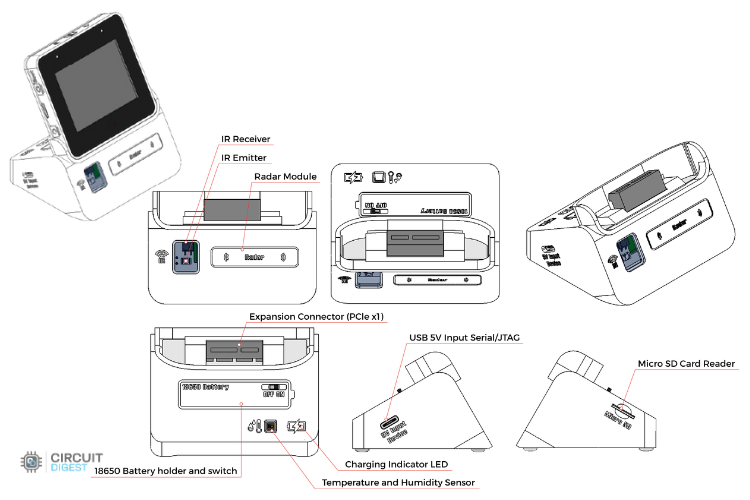
ESP32-S3-BOX-3-SENSOR
ESP32-S3-BOX-3-SENSOR is a versatile accessory integrating a Temp & Humidity sensor, IR emitter and receiver, radar sensor, 18650 rechargeable battery slot, and MicroSD card slot. It enables users to create a wide range of innovative projects easily. You can integrate multiple sensors for detection and control, use the rechargeable battery for portability, and expand storage with a MicroSD card (up to 32 GB).
Below you can see the Orthographic View of the ESP32-S3-BOX-3-SENSOR.
Sensing Capabilities
Radar Sensor - MS58-3909S68U4 (1x)
- Operating Frequency: 5.8 GHz
- Power Consumption: 40 μA (ultra-low power)
- Detection Range: Approximately 2 meters
- Application: Human presence detection
- Technology: Microwave radar sensing
- RI_SDA - IO41, RI_SCL -IO40, RI_OUT - IO21
Infrared Sensor Array (2x)
- Emitter: IRM-H638T IR emitter tube [GPIO39]
- Receiver: IR67-21C/TR8 receiver tube [GPIO38]
- Range: Up to 4 meters effective distance
- Application: Infrared control and remote sensing
- Configuration: Paired emitter-receiver setup
Temperature & Humidity Sensor - AHT30 (1x)
- Temperature Range: -40°C to +120°C
- Temperature Accuracy: ±0.5°C
- Humidity Range: 0% to 100% RH
- Humidity Accuracy: ±3% RH (at 25°C)
- Application: Environmental monitoring and climate control
- AHT21_SCL - IO40, AHT21_SDA - IO41
Storage & Power Management
- External Storage (1x)
- Type: MicroSD card slot
- Maximum Capacity: 32GB
- Usage: Data logging, firmware storage, media files
- SD_DAT0-IO9, SD_DAT1 - IO13, SD_DAT2-IO42,SD_DAT3-IO12,SD_CMD-IO14,SD_CLK-IO11
Battery System (1x)
- Type: 18650 rechargeable lithium battery slot
- Voltage: 3.7V nominal
- Usage: Portable operation and backup power
- BAT_MEAS_ADC-IO10
Power Control Switch (1x)
- Type: 2-speed toggle switch
- Function: Battery charging and discharging protection
- Safety: Prevents 18650 battery damage from over-discharge
Status & Interface
- Charging Indicator LED (1x)
- Red State: Battery charging in progress
- Green State: Battery fully charged
- Usage: Visual battery status monitoring
USB Type-C Port (1x)
- Power Input: 5V
- Functions: Power supply, USB data transfer, JTAG debugging
- Compatibility: Standard USB device functions
PCIe Connector (1x)
- Type: 36-pin, 1.00mm (0.0394") pitch
- Card Compatibility: 0.062" (1.60mm) thickness
- Mounting: Vertical goldfinger connector
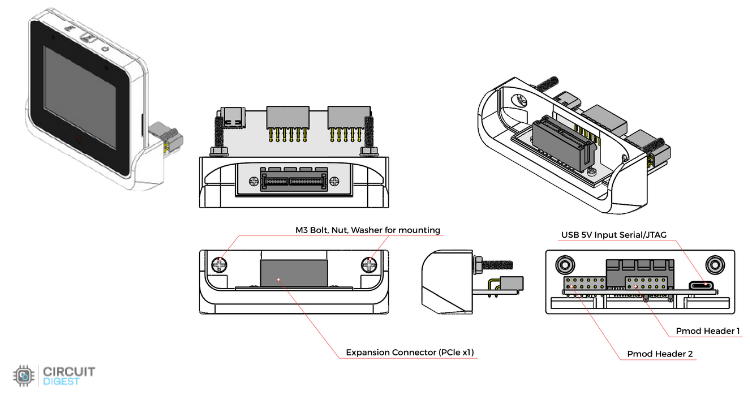
ESP32-S3-BOX-3-BRACKET
ESP32-S3-BOX-3-BRACKET helps mount the ESP32-S3-BOX-3 to other devices, unlocking many possibilities for turning non-smart devices into smart ones. Installation is straightforward; just prepare two mounting holes and a slot using the provided template. By leveraging its two Pmod™ compatible headers, you can add wireless connectivity, voice control, and screen control features. The bracket allows you to maximise the potential of your non-smart devices.
Below is the orthogonal view of ESP32-S3-BOX-3-BRACKET,
Connectivity
- 12-pin Female Headers (2x)
- I/O Count: 8 I/O per header
- Compatibility: Pmod™ Compatible
- Power Output: 3.3V
- Protocols: GPIO, I2C, SPI, UART, RMT, LEDC, etc.
USB Type-C Port (1x)
- Input Voltage: 5V
- Functions: Power supply, USB download, JTAG debug
- Usage: Development and general USB device functions
PCIe Connector (1x)
- Specifications: 36-pin, 1.00mm (0.0394") pitch
- Card Support: 0.062" (1.60mm) thickness cards
- Type: Vertical mounting goldfinger
Mounting Hardware
- M3 Mounting Bolts (2x)
- Bolt Size: M3 threading
- Includes: Bolt, nut, and washer per set
- Purpose: Secure mounting and component assembly
- Usage: Attach materials and fasten components together
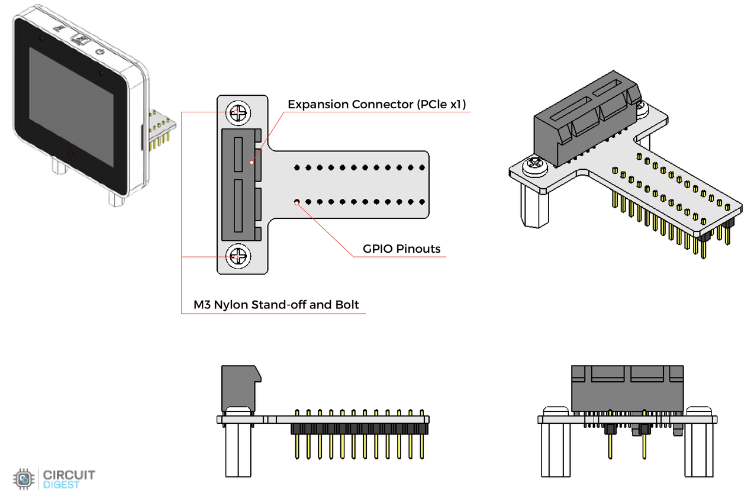
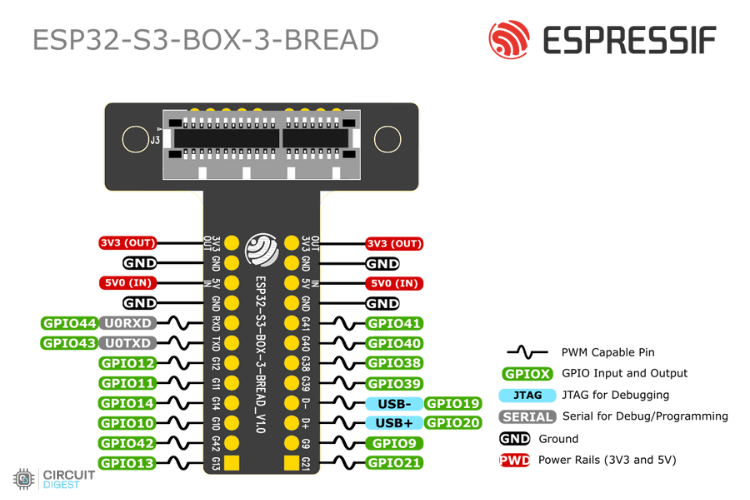
ESP32-S3-BOX-3-BREAD
ESP32-S3-BOX-3-BREAD is an adapter that lets you easily connect the ESP32-S3-BOX-3 to a standard breadboard. It’s ideal for makers and DIY projects, using a high-density PCIe connector and two rows of 2.54 mm pitch pins to expose the ESP32-S3’s 16 programmable GPIOs.
Interface Headers
- 12-pin Male Headers (2x)
- I/O Configuration: 8 I/O pins per header
- Power Specifications: 3.3V output, 5V input capability
- Protocol Support: GPIO, I2C, SPI, UART, RMT, LEDC, etc.
- Design: Male connector for breadboard compatibility
Development Interface
- USB Type-C Port (1x)
- Input Power: 5V
- Functionality: Power input, USB download, JTAG debugging
- Usage: Development programming and general USB device operations
Expansion
- PCIe Connector (1x)
- Format: 36-pin, 1.00mm (0.0394") pitch
- Card Thickness: Accepts 0.062" (1.60mm) cards
- Mount Type: Vertical goldfinger connector
- Application: Hardware expansion and prototyping
Key Differences from Other Variants
- Male Headers: Unlike other variants with female headers, this uses male pins for direct breadboard insertion
- Dual Voltage: Headers support both 3.3V output and 5V input
- Prototyping Focus: Designed specifically for breadboard-based development and experimentation
With this, you should now have a solid understanding of the ESP32-S3-BOX-3 and its accessories, along with the pinouts and used IOs.
ESP32-S3 Development Board Schematic and Technical Documentation
Espressif has provided plenty of documents for the esp32-s3-box-3 development board. If you are new to development or programming and want to learn more, the documents are worth reviewing. There is a "docs" section in their GitHub repo that contains a “docs” section with everything from a hardware overview to PCB and schematic files.
Keep in mind, the native support is for ESP-IDF.
Through Espressif's official repo, you can access the complete schematic for the ESP32-S3 development board, PCB design files, a bill of materials (BOM), and details about hardware documents. Still, if you know the pins and have some basic knowledge, you can use the Arduino IDE to program the ESP32 S3 Box 3.
Getting Started: ESP32-S3-BOX-3 Tutorial [Factory Default Firmware]
The ESP32-S3-BOX-3 comes with ready-to-use firmware that supports offline voice wake-up and speech recognition in both Chinese and English. With the ESP-BOX mobile app, you can set up AI voice interactions and create custom commands to control your smart devices. The firmware also includes several sensor demos and supports IR learning, so the box can even act as a controller for your home air conditioners. This ESP32-S3-BOX-3 tutorial will guide you through every step.
Initial Setup and Power-On
⇒ Step 1: Powering the Device
Power on your device using the USB-C cable. Once powered, within a few seconds, you will see the Boot Screen Animation.
⇒ Step 2: Learning the Basics
After the first successful boot, you will see a quick guide provided by the device, like the four screens shown below.
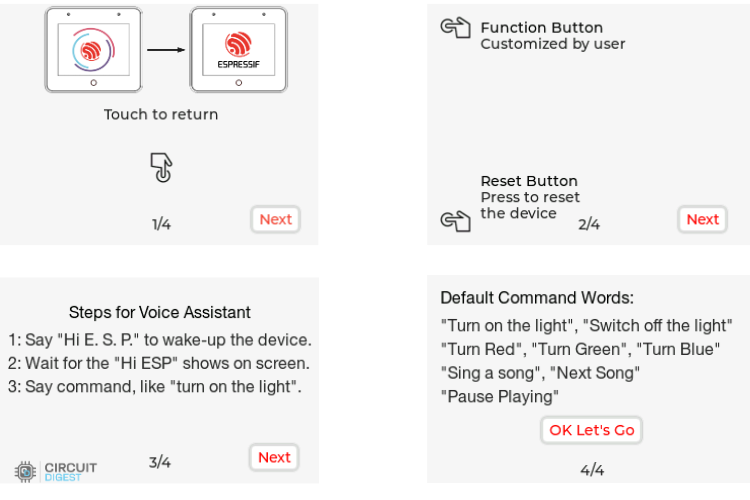
The first two pages of the quick guide give an overview of the buttons on your ESP32 S3 box 3. Press the Next button to proceed to the next page.
The following pages explain how to use AI voice control. Tap OK, Let’s Go to access the menu.
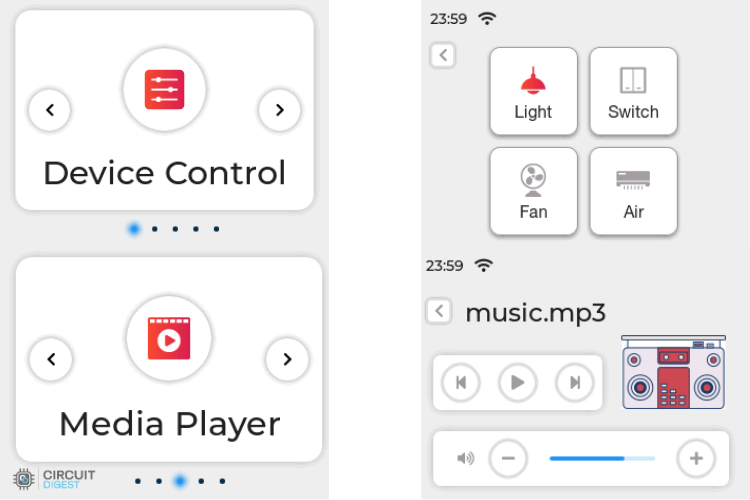
⇒ Step 3: Main Menu Exploration
The menu has six options: Sensor Monitor, Device Control, Network, Media Player, Help, and About Us. You can navigate between these options by swiping left or right.
For example, to access the Device Control screen, tap on Light to toggle the light on or off. After that, return to the menu, go to the Media Player screen, and either play music or adjust the system volume.
Testing Factory Firmware
⇒ Step 4: Quick Testing
Device control and voice commands are a quick way to test the Espressif ESP32-S3-Box-3. To continue, you need to connect the provided RGB Light to the dock’s header pins.
Connections are shown in the image below:
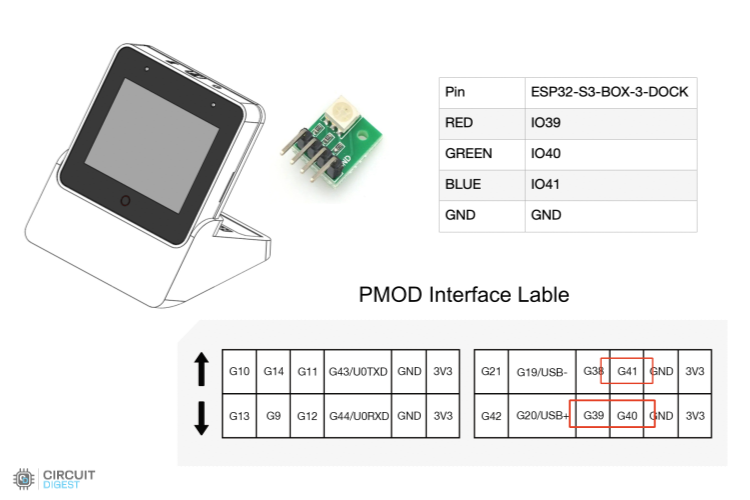
Now, in the UI, go to Device Control. By pressing the Light button, you can turn the light on or off.
You can also use voice commands like,
"Turn on the light"
"Switch off the light"
"Turn Red"
"Turn Green"
"Turn Blue"
The LED will respond. Don’t forget to say the wake word before giving commands.
Connecting to ESP-BOX Mobile App
⇒ Step 5: Advanced Feature Testing
So far, all features have been tested offline. Now, let’s move online with a few simple steps.
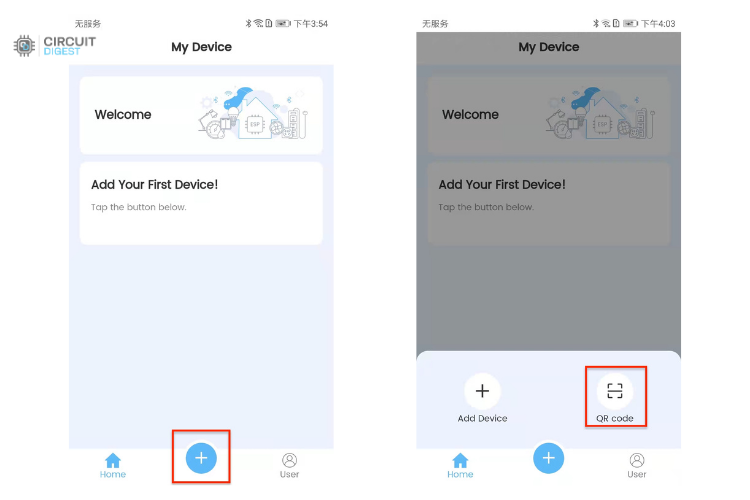
First, download the ESP-BOX app to your phone. It’s simple: go to Network, and in the top-right corner, click the button to install the app. You will see a QR code to download it.
![]()
After installing the app, sign in with your ESP-BOX account. Turn on Bluetooth on your phone, tap + at the bottom of the screen, and scan the QR code on your device to set up the network.
After adding the device, you will see prompts like these in the image below.
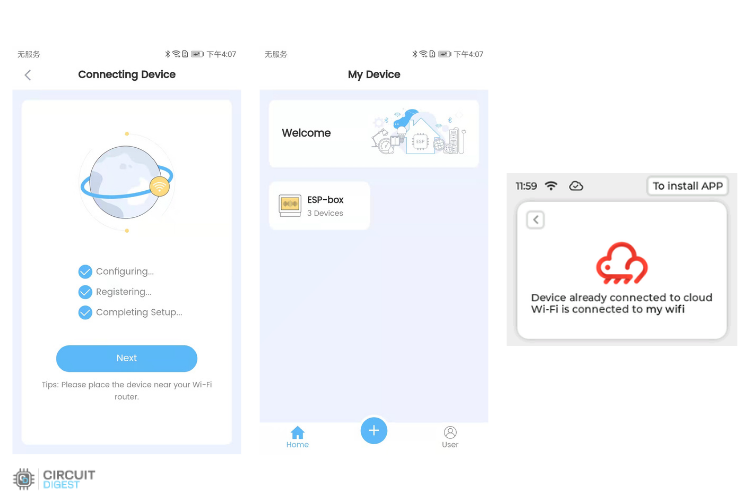
Remember:
- Do not exit the QR code page during network setup.
- Connect the device to 2.4 GHz Wi-Fi, not 5 GHz, and enter the correct password.
- An incorrect password will trigger "Wi-Fi Authentication Failed."
- Long-press the Boot button (Function button) for 5 seconds to clear network information and restore factory settings. If the QR code or Bluetooth does not work after resetting, restart your device using the Reset button.
After successfully adding the device, select it in the app. You can control the device here as well. Unlike the first time, it uses ESP RainMaker for communication.
Tap on the icon to access the Config Menu. Here, you can configure pins directly.
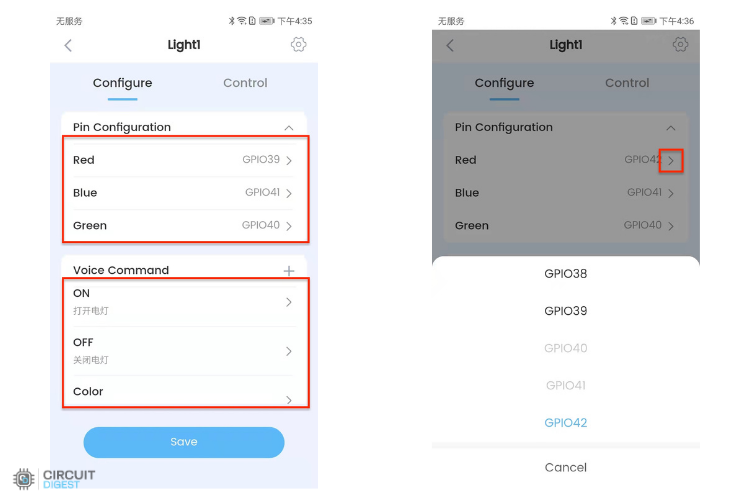
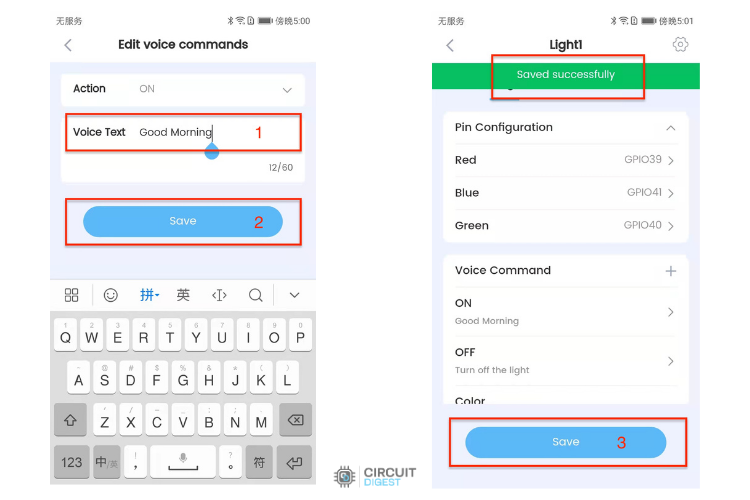
In Voice Command, you can add custom commands. Enter the text and its action, for example, set "Good Morning" to turn on the light. Click Save to return to the previous screen, then click Save again.
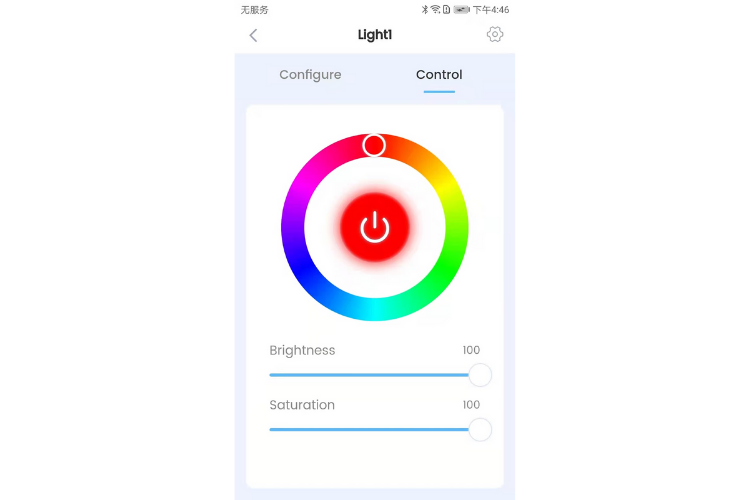
In the Control tab, you can directly configure the LED from the app, adjusting colour, brightness, and saturation.
Working with Sensor Accessories
⇒ Step 6: Testing the Given Accessory
Among the accessories provided, the sensor module is the most unique, as it includes multiple sensors to work with, while the others mainly extend connectors for breadboard use. Additionally, it supports different orientations and mounting options.
The ESP32-S3-BOX-3-SENSOR is a versatile accessory that integrates a Temperature & Humidity sensor, a pair of IR Emitters and Receivers, and a Radar sensor. It allows users to easily create sensor networks and other sensor-based applications. The built-in firmware provides a real-time display of temperature and humidity, demonstrates human presence monitoring through a 2.4 GHz radar, and includes an IR learning interface. This lets you use the ESP32-S3-BOX for IR learning of your air conditioner, enabling remote control. The learning feature also works with other in-home IR controllers, such as fans, TVs, and projectors, making the experience interactive and engaging.
Temperature and Humidity Sensor
Go to the Sensor Monitor. The interface will prompt you to insert the sensor accessory.
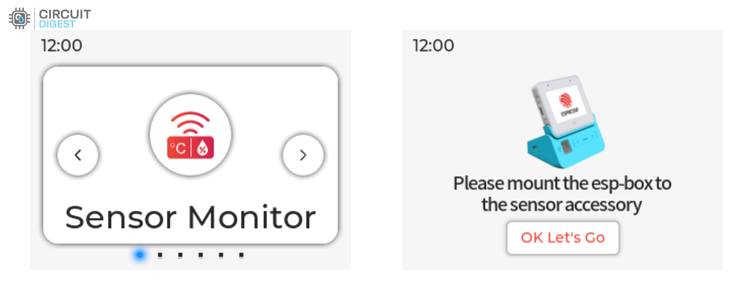
After mounting the accessory, you will be able to see the temperature and humidity readings on the screen.
Radar Feature
To use the radar, enter the Sensor Monitor screen and tap the ON/OFF button to enable or disable radar monitoring. When the radar switch is ON, a red body icon will appear if a person is detected in front of the device. The icon will turn gray if no one is detected within two minutes.
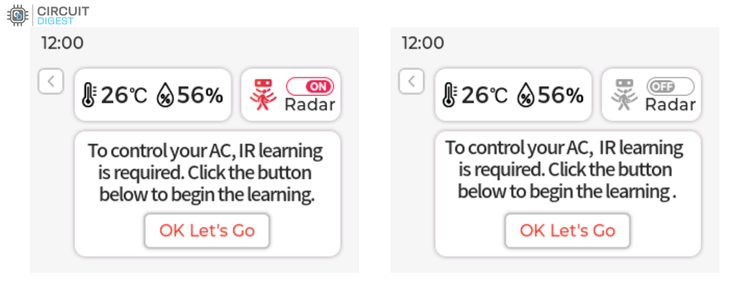
IR Learning
Below the temperature, humidity, and radar functions is the infrared learning module. Currently, this module can only learn the ON/OFF function of a remote controller. Follow the interface instructions to iteratively learn the ON/OFF command of your remote a total of four times. After successful learning, the interface will confirm it.
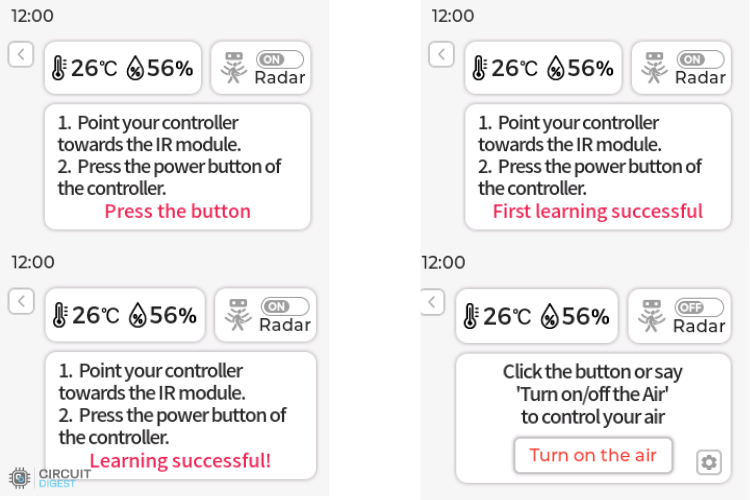
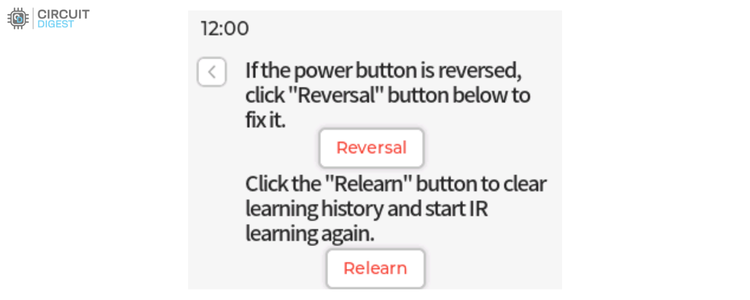
Perform an ON/OFF test on your air conditioner by pointing the ESP32-S3-BOX-3-SENSOR toward it. If the air conditioner’s ON/OFF behaviour is opposite to what you expect, click the Reversal button to correct it. You can also click Relearn to learn commands from other remote controllers.
Remember
When the ESP32-S3-BOX-3 is not mounted to the ESP32-S3-BOX-3-SENSOR dock, the entire Sensor Monitor function will not work.
While using the built-in firmware with the ESP32-S3-BOX-3-DOCK, avoid hot-plugging the dock or switching to the Sensor Accessory, as this may cause the accessory to be unrecognised. Simply power the ESP32-S3-BOX-3-SENSOR again to restore normal operation.
Due to the power limitations of the infrared emitter and differences among air conditioner brands, the effective range for IR learning has been tested to be between 1 and 1.5 meters.
The features of the Box are not limited to the factory firmware; it’s mainly for demonstration purposes. To truly unleash the power of this device, you need to use ESP-IDF. I wouldn’t recommend the Arduino IDE, as many components supported in ESP-IDF don’t have full support in the Arduino IDE. To access all features, it’s best to stick with ESP-IDF.
There are up to 10 example programs available in Espressif’s official ESP-BOX Git repository,
- chatgpt_demo
- esp_joystick
- factory_demo
- image_display
- lv_demos
- matter_switch
- mp3_demo
- usb_camera_lcd_display
- usb_headset
- watering_demo
These samples illustrate different aspects of what the board is capable of, and provide useful ideas to get you started with your own projects.
This development board offers plenty of functionality within a compact, ready-to-use board. Regardless, if you are prototyping or building larger applications, it's worth analysing what each application provides. For now, take some time to work through the examples to see how they relate to your own project ideas.
So, enjoy exploring this dev board! With it, you can do a lot and really learn while having fun.
