
IoT based devices are getting increasingly popular among us, it is estimated that there will be around 1.5 billion devices connected to the internet by the year 2022. Hence, the engineers of the future are keen to learn how to build IoT devices, supporting that there are numerous development boards to enable quick IoT prototyping. We have used various popular boards such as Arduino, ESP8266, ESP32 and Raspberry Pi to develop IoT Projects, which you can check in this section.
As we know most of the IoT devices have to be connected to the internet to begin operation. While prototyping or testing our IoT Projects we can easily hardcode the Wi-Fi SSID and Password in our program and make it work. But when the device is handed over to the consumer, he/she should be able to scan and connect to own Wi-Fi Network without changing the program. This is where the ESP8266 Wi-Fi manager will be helpful, this Wi-Fi manager function can be added to the existing program to provide an option for the users to scan and connect to any Wi-Fi network and once the connection is established the device can perform its normal function until the network connection has to be changed again.
In this project, we are going to use NodeMCU, and program it to operate in two different modes, namely Access point (AP) mode, and Station (STA) mode. In AP mode, NodeMCU will work like a Wi-Fi router emitting its own Wi-Fi signal, you can use any smartphone to connect to this Wi-Fi network and open a web-page in which we can configure the new Wi-Fi SSID and Password, once the new credentials are set the NodeMCU will automatically get into Station mode and connect to this new Wi-Fi. The new Wi-Fi SSID and Password will be remembered so that the device get connected to this network every time its normally powered on again.
Components Required
- NodeMCU
- Breadboard
- Pushbuttons
- LEDs
- Connecting wires
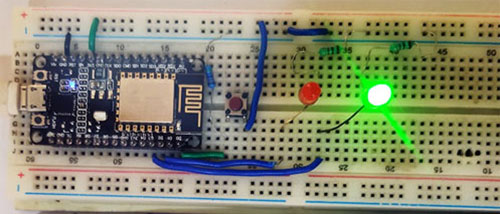
Circuit Diagram

To indicate, whether the module is in station point or in the access point, I have used two LEDs. If the Red LED is blinking, it represents that the module is in station mode, and there is an active wifi connection to which it is connected. If Green led is glowing, it represents that the module is in access point mode and waiting for the user to configure with the available wifi network. The push-button is used to switch between the Access point and station mode, if the button is pressed while powering on the device, then NodeMCU will enter Access point mode, where the new Wi-Fi credentials can be entered. Once the device connects to a Wi-Fi network, it will blink a red LED as shown below. More on this is discussed in the programming section.
Later you can replace the red led blinking section with the actual working of your project. Say for example if you have built a device to measure temperature and humidity then instead of blinking the red led you can perform this function.
Code Explanation
Before entering into the coding, there are certain libraries, which have to be downloaded. Use the below links to download the libraries and add them to your Arduino IDE
Once the libraries are added, we can begin our programming. The complete program for this project can be found at the bottom of this page, the explanation of the same is as follows. We begin our program by adding the required header files.
#include <ESP8266WiFi.h> //https://github.com/esp8266/Arduino #include <WiFiManager.h> //https://github.com/tzapu/WiFiManager
We are going to code in such a way that, when powering up the module, if the switch is in ON state, it will set the ESP to Access Point (AP) mode and resets the saved settings. It will stay in this mode until unless the user uses a Wi-Fi-enabled device, and connects it to this access point. When connected to this access point, it will redirect the user to a web page, where the user can configure to new SSID and password. After setting the credentials, the ESP will reboot itself and works as a Station (STA) mode.
With the new SSID and password, which is given by the user on the webpage, it tries to form a connection, and if the connection is established, our connection process is completed successfully. If the establishment of the connection is failed, the process is repeated from the beginning.
The below code will be activated only when the module is powered along with the switch in on state. This part of the code resets the setting and runs the ESP in access point mode. If the connection is established the connection process is done, and the program goes to the void loop().
void setup() {
    // put your setup code here, to run once:
    Serial.begin(115200);
    pinMode(trigger,INPUT);
    pinMode(LED,OUTPUT);
     pinMode(power,OUTPUT);
    if(digitalRead(trigger) == HIGH){
    digitalWrite(power,HIGH);
    WiFiManager wifiManager;
    wifiManager.resetSettings();
    wifiManager.autoConnect("CIRCUIT DIGEST WiFi Manager");
    Serial.println("connected :)");
  }
}
The next part of the code is used to know the status of the WiFi connection. It will check the code continuously and indicates the user whether if it is connected to any WiFi network. If the red light blinks continuously, it represents that the connection is established. If Green led is blinking, it shows that the ESP is not connected to a network, and previous settings have been reset. Even if the power is given to the module, and neither of the LEDs is glowing, then it means that the module has lost its connection with the network.
void loop() {
  if (WiFi.status() == WL_CONNECTED)
        {
          digitalWrite(power,LOW);
          while(WiFi.status() == WL_CONNECTED){
            digitalWrite(LED,HIGH);
            delay(500);
            digitalWrite(LED,LOW);
            delay(200);
          }
        }
        else {
          digitalWrite(LED,LOW);
        }
NodeMCU Wi-Fi Manager Working
The complete working of this tutorial can be found in the video linked at the bottom of this page. You can also follow the steps below to check if the program is working as expected.
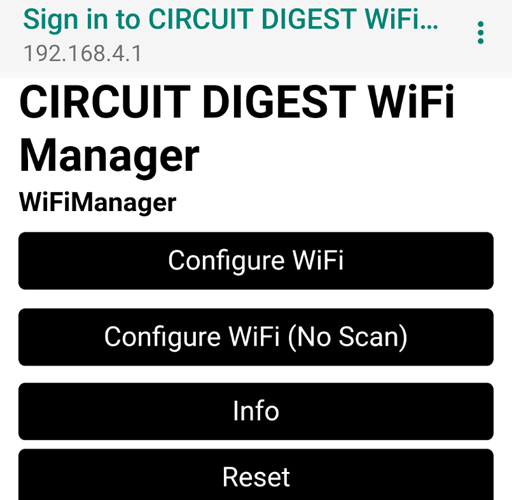
Step 1: Connect the power to the module along with the switch pressed ON. Green LED will start glowing to indicate that the ESP module is in Access Point (AP) mode as shown below
Step 2: Use any wifi-enabled device, to connect with this access point. Select manage router option, it will redirect to a web page. Select Configure Wi-Fi.
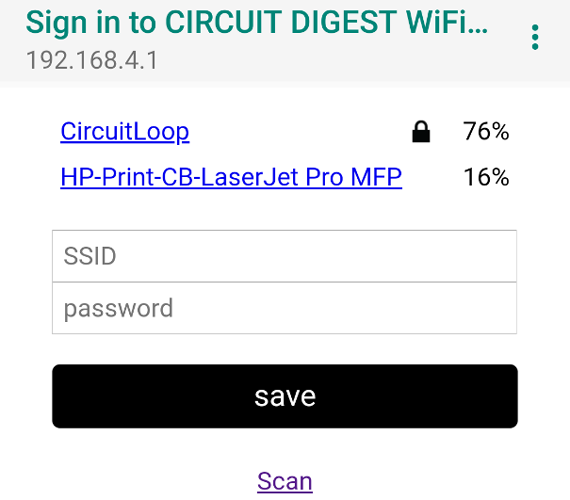
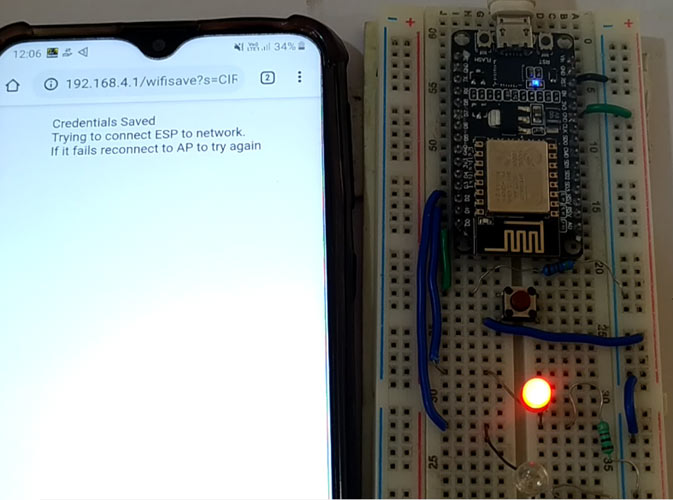
Step 3: The ESP will scan and show all the available networks. Select the desired network and enter the password.
Step 4: If the red LED starts blinking it indicates that the ESP has connected to the Wi-Fi network.
Step 5: If the establishment of the connection is failed, start from step 1.
In this way, we can remove the burden of coding every time whenever you need to connect to a new network. Hope you understood the tutorial and learned something useful, if you have any question please feel free to leave them in the comment section below or use our forums for other technical questions.
Complete Project Code
#include <ESP8266WiFi.h>          //https://github.com/esp8266/Arduino
//needed for library
#include <DNSServer.h>
#include <ESP8266WebServer.h>
#include <WiFiManager.h>         //https://github.com/tzapu/WiFiManager
#define trigger D0
#define LED D2
#define power D3
void setup() {
    // put your setup code here, to run once:
    Serial.begin(115200);
    pinMode(trigger,INPUT);
    pinMode(LED,OUTPUT);
     pinMode(power,OUTPUT);
    if(digitalRead(trigger) == HIGH){
    digitalWrite(power,HIGH);
    WiFiManager wifiManager;
    wifiManager.resetSettings();
    wifiManager.autoConnect("CIRCUIT DIGEST WiFi Manager");
    Serial.println("connected :)");
  }
}
void loop() {
  if (WiFi.status() == WL_CONNECTED)
        {
          digitalWrite(power,LOW);
          while(WiFi.status() == WL_CONNECTED){
            digitalWrite(LED,HIGH);
            delay(500);
            digitalWrite(LED,LOW);
            delay(200);
          }
        }
        else {
          digitalWrite(LED,LOW);
        }
}
Comments
Hi dear firends
How I can connect my nodemcu to the my mobile phone hotspot?
suppose that , I will make a device that it must connect to the internet , but there is no any wifi router there, just the user has a mobile phone,how can user connect the nodemcu to the his/her mobile phone hotspot and insert user name(hotspot name find) and password?

If it is implement in esp8266-01 instead of NODEmcu, will it save credentials and module will re-connect automatically even if power is come back?
tnx