

“Sadly, in the name of progress, we have polluted the air, water, soil and the food we eat”. So monitoring the air quality is very crucial now days because of pollution. For designing an air quality monitoring system we need durable and reliable air quality sensor. Although there are many Air Quality parameters but the most important are CO2 and TVOC. So for sensing CO2 and TVOC, we are using CCS811 Air Quality Sensor.
In this tutorial, we are going to show you that how to sense TVOC and CO2 using CCS811 air quality sensor with Arduino. Also, you will learn to interface CSS811 with Arduino. You can also check out how to Measure Carbon Dioxide in PPM by Interfacing Gravity Infrared CO2 Sensor with Arduino
Material Required
- Arduino UNO
- CCS811 Air Quality Sensor
- Potentiometer (10k)
- LCD 16*2
- Breadboard
- Connecting Wires
Circuit Diagram

CCS811 Air Quality Sensor
CCS811 Air Quality Sensor is an ultra-low power digital gas sensor which integrates a MOX (metal oxide) gas sensor to detect a wide range of VOCs (Volatile Organic Compounds) for indoor air quality monitoring with an integrated MCU (Micro-controller Unit). MCU consists of ADC (Analog-to-Digital Converter) and I2C interface. It’s based on an ams unique micro-hotplate technology which empowers highly reliable solutions for Gas Sensors, with low power consumption.
In our circuit, we are using this sensor for sensing TVOC and CO2 available in the environment and displaying the data on 16*2 LCD.
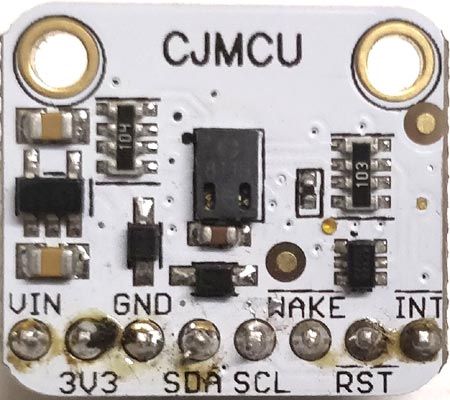
Pin Configuration
|
Pin No. |
Pin Name |
Description |
|
1 |
Vin |
Input Supply (3.3v to 5v) |
|
2 |
3V3 |
3.3V output Pin for external use |
|
3 |
Gnd |
Ground |
|
4 |
SDA |
This is I2C clock pin |
|
5 |
SCL |
I2C data pin |
|
6 |
WAKE |
Wakeup Pin of sensor, should be connected to ground in order to communicate with the sensor |
|
7 |
RST |
Reset pin: When connected to ground the sensor reset itself |
|
8 |
INT |
This is interrupt output pin, used to detect when a new reading is ready or when a reading gets too high or low |
Application
- Smartphones
- Wearables
- Home and Building Automation
- Accessories
Code and Explanation
The complete Arduino code for TVOC and CO2 Measurement using CCS811 Air Quality Sensor is given at the end.
In the below code, we are defining the libraries for 16*2 LCD and CCS811 Air Quality Sensor. For downloading the library "Adafruit_CCS811.h" for CCS811 follow this link.
#include <LiquidCrystal.h>
#include "Adafruit_CCS811.h"
Below we have defined Pins for connection of 16*2 LCD with Arduino.
LiquidCrystal lcd(12, 13, 8, 9, 10, 11); /// REGISTER SELECT PIN,ENABLE PIN,D4 PIN,D5 PIN, D6 PIN, D7 PIN
Adafruit_CCS811 ccs;
Below we have set up LCD and CCS811 air quality sensor and calibrated it for the showing correct temperature, as shown in the below code,
void setup() {
  lcd.begin(16, 2);
  ccs.begin();
  //calibrate temperature sensor
  while(!ccs.available());
  float temp = ccs.calculateTemperature();
  ccs.setTempOffset(temp - 25.0);
}
In the below code, we used functions “ccs.available()” (Function is already defined in library) to check if there is some data coming. As we get the data we are able to calculate the temperature and display it on 16*2 LCD.
Further if CCS is available and ccs.readData() is returning false then we get the CO2 value using function ccs.geteCO2() and TVOC value using ccs.getTVOC(), as shown in the below code. Hence, we have received the value of air quality parameters using CCS811 air quality sensor.
void loop() {
  if(ccs.available()){
    float temp = ccs.calculateTemperature();

    if(!ccs.readData()){
      int co2 = ccs.geteCO2();
      int tvoc = ccs.getTVOC();
      lcd.setCursor(0, 0);
      lcd.print(String ("CO2:")+ String (co2)+String(" PPM"));
      lcd.setCursor(0, 1);
      lcd.print(String ("TVOC:")+ String (tvoc)+String(" PPB "));
      lcd.print(String("T:"+String (int(temp)))+String("C"));
      delay(3000);
      lcd.clear();
    }

    else{
      lcd.print("ERROR");
      while(1);
    }
  }
}
Complete Arduino code is given below. Code is simple, all the work is done by its library itself and we have used functions defined in the CCS library to get the values of CO2 and TOVC.
Also, check:
Complete Project Code
#include <LiquidCrystal.h>

#include "Adafruit_CCS811.h"
LiquidCrystal lcd(12, 13, 8, 9, 10, 11); /// REGISTER SELECT PIN,ENABLE PIN,D4 PIN,D5 PIN, D6 PIN, D7 PIN

Adafruit_CCS811 ccs;
void setup() {

  lcd.begin(16, 2);

  ccs.begin();

  //calibrate temperature sensor

  while(!ccs.available());

  float temp = ccs.calculateTemperature();

  ccs.setTempOffset(temp - 25.0);

}
void loop() {

  if(ccs.available()){

    float temp = ccs.calculateTemperature();

    if(!ccs.readData()){

      int co2 = ccs.geteCO2();

      int tvoc = ccs.getTVOC();

      lcd.setCursor(0, 0);

      lcd.print(String ("CO2:")+ String (co2)+String(" PPM"));


      lcd.setCursor(0, 1);

      lcd.print(String ("TVOC:")+ String (tvoc)+String(" PPB "));

      lcd.print(String("T:"+String (int(temp)))+String("C"));
      delay(3000);

      lcd.clear();

    }

    else{

      lcd.print("ERROR");

      while(1);

    }

  }
}
