
By Ann Theressa Babu
This project presents a prototype of a solar-powered wearable vital monitoring system designed to support individuals who work for long hours in outdoor and physically demanding environments. The system uses the Analog Devices MAXREFDES117 optical heart-rate module to measure heart rate and blood-oxygen saturation using photoplethysmography (PPG) signals.
An ESP32 microcontroller processes the physiological signals and displays real-time vital parameters on a compact OLED display. The measured heart rate and SpO2 values are analyzed to identify patterns associated with physiological strain, enabling the system to flag conditions such as fatigue, dehydration risk, and heat stress. Audible alerts are generated when abnormal physiological conditions are detected, providing immediate feedback to the user in addition to visual indicators. An audible indication is also used to signal improper sensor placement, helping maintain measurement reliability during operation.
The device is designed with a solar-assisted power architecture, in which a small solar panel is used to recharge a lithium-ion battery through a dedicated TP4056 charging module, enabling extended operation with minimal dependence on manual charging. This power approach supports the concept of continuous monitoring during long outdoor work shifts.
Traffic police, construction laborers, delivery riders, municipal staff, and street vendors often work in harsh environments with high heat, pollution, and long hours, yet their health is rarely monitored. Recent incidents – such as the Kerala police commissioner who collapsed during a Republic Day parade due to heat-related strain – highlight how prolonged hours of outdoor activity are vulnerable to sudden fatigue and physiological stress. This project demonstrates a low-cost, wearable health-monitoring concept that can provide early warning of physiological strain and encourage timely rest or intervention, thereby improving safety and wellbeing for essential frontline workers.
Components Required
| Component Name | Quantity | Datasheet/Link |
| Analog Devices MAXREFDES117 Module | 1 | View Datasheet |
| ESP32 DEVKIT V1 Development Board | 1 | - |
| OLED Display | 1 | - |
| Piezo Buzzer | 1 | - |
| Li-ion Battery | 1 | - |
| TP4056 Charging Module | 1 | - |
| Monocrystalline Solar Panel | 1 | - |
| DC DC Boost Converter | 1 | - |
| Perfboard | 1 | - |
| Soldering Iron | 1 | - |
| Soldering Lead | 1 | - |
| Soldering Flux | 1 | - |
| Multimeter | 1 | - |
| Screwdriver | 1 | - |
Circuit Diagram
The circuit diagram of the project, made with EasyEDA, is attached here.
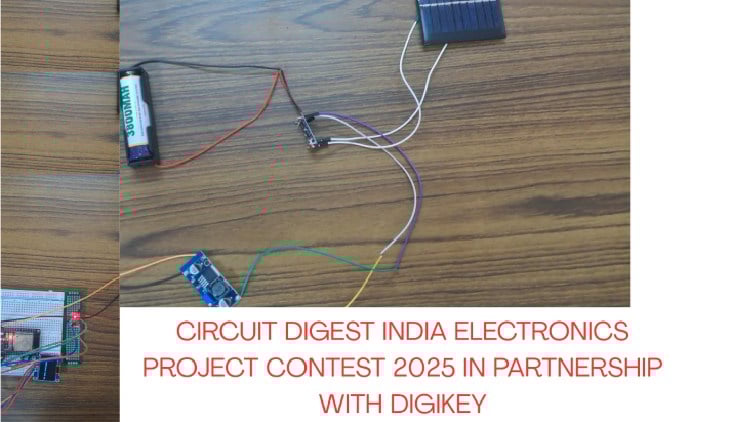
Hardware Assembly
1.Connect the battery to the charging module: The 3.7 V lithium-ion battery is connected to the TP4056 charging module by wiring the battery positive terminal to BAT+ and the negative terminal to BAT−. This battery acts as the power source for the system.
2.Attach the solar panel for charging: The output terminals of the solar panel are connected to the IN+ and IN− pins of the TP4056 module. This allows the battery to be charged using solar energy when sunlight is available.
3.Link the charging module to the boost converter: The output of the TP4056 module is connected to the input of the DC-DC boost converter (XL6009E1). This step passes the battery voltage to the voltage regulation stage.
4.Set the boost converter output voltage: Using a multimeter in DC voltage mode, the output of the boost converter is measured and adjusted to approximately 5V by rotating the onboard adjustment screw. This adjustment is completed before connecting the ESP32 to prevent damage.
5.Power the ESP32 development board: The regulated 5 V output from the boost converter is connected to the VIN pin of the ESP32 DevKit V1, and the ground is connected to the ESP32 ground pin, supplying power to the microcontroller.
6.Connect the biosensor module: The Analog Devices MAXREFDES117 biosensor module is connected to the ESP32 using the I2C interface. The SDA and SCL lines are connected to GPIO21 and GPIO22, respectively, while power is supplied from the ESP32’s 3.3 V and GND pins.
7.Connect the OLED display: The OLED display module is connected to the same I2C lines as the biosensor. Its SDA and SCL pins are connected to the ESP32, and it is powered using 3.3 V and GND from the ESP32.
8.Add alert and indication components: An active piezo buzzer is connected to GPIO15 pin on the ESP32. It provides audible feedback during system operation.
9.Assemble the prototype structure
10.Check connections and power on the system
Code Explanation
Code Implementation
The firmware for the system is developed using the Arduino IDE and runs on the ESP32 microcontroller. The code integrates three main functional blocks: sensor data acquisition, physiological condition analysis, and user feedback through display and alerts.
Required Software Libraries
The following open-source libraries are used to support sensor communication, signal processing, and display control:
SparkFun MAX3010x Sensor Library
Used to interface with the MAXREFDES117 optical biosensor and acquire PPG data from the red and infrared LEDs.
HeartRate Library
Provides peak-detection functionality to estimate heart rate from the PPG waveform.
Adafruit SSD1306 Library
Used to control the 128×64 OLED display and render text and graphics.
Adafruit GFX Library
A core graphics library required by the SSD1306 driver for text formatting and display rendering.
Adafruit BusIO Library
Handles low-level I2C communication required by the display library.
Wire Library
The built-in Arduino I2C library used for communication between the ESP32, biosensor, and OLED display.
Sensor Data Acquisition
The MAXREFDES117 optical biosensor communicates with the ESP32 using the I2C protocol. Infrared (IR) and red light PPG signals are continuously read from the sensor. The IR signal is primarily used to detect the presence of valid physiological data, while both IR and red signals are used to estimate heart rate and blood oxygen saturation (SpO₂). A basic validity check is applied to the IR signal. If the signal strength is below a defined threshold, the system assumes that no reliable measurement is available and displays a neutral message (“No data available”) instead of reporting incorrect values.
Heart Rate and SpO₂ Estimation
Heart rate is calculated by detecting peaks in the PPG waveform using a beat-detection algorithm. The time interval between successive beats is converted into beats per minute (BPM). Unrealistic values are discarded to improve stability. SpO₂ is estimated using the ratio of red and infrared signal intensities. The calculated value is constrained within a realistic physiological range to reduce the effect of noise and motion artifacts.
Physiological Condition Flagging
The measured heart rate and SpO₂ values are analyzed to identify patterns associated with physiological strain. Based on predefined ranges, the system classifies the user’s condition into categories such as:
- Normal
- Fatigue risk
- Dehydration risk
- Heat stress
- Circulatory stress
This classification is intended to flag potential risk conditions rather than provide medical diagnosis.
Display and Alert Handling
An SSD1306-based OLED display is used to show real-time heart rate, SpO₂, and the current physiological status. The display is updated periodically to provide clear and readable information. An active piezo buzzer is controlled by a GPIO pin on the ESP32. The buzzer generates a short audible alert only when abnormal physiological conditions are detected. No audible alert is produced when sensor data is unavailable, preventing unnecessary or misleading alarms.
Key Features
Real-time vital monitoring
- Continuous measurement of heart rate and blood oxygen saturation using PPG sensing.
Physiological stress indication
- Identification of patterns associated with fatigue, dehydration risk, heat stress, and circulatory stress.
Clear visual feedback
- OLED-based display of vital parameters and system status.
Context-aware audible alerts
- Audible alerts generated only during abnormal physiological conditions.
Reliable data handling
- Validation of sensor data to avoid displaying incorrect readings.
Low-power wearable concept
- Designed for battery-based, solar-assisted operation in outdoor environments.
Expandable software architecture
- Supports future integration of wireless communication, web dashboards, and machine-learning-based analysis.


Complete Project Code
#include <Wire.h>
#include "MAX30105.h"
#include "heartRate.h"
#include <Adafruit_GFX.h>
#include <Adafruit_SSD1306.h>
// ---------------- OLED ----------------
#define SCREEN_WIDTH 128
#define SCREEN_HEIGHT 64
#define OLED_RESET -1
Adafruit_SSD1306 display(SCREEN_WIDTH, SCREEN_HEIGHT, &Wire, OLED_RESET);
// ---------------- SENSOR ----------------
MAX30105 sensor;
// ---------------- BUZZER ----------------
#define BUZZER_PIN 15
// ---------------- VARIABLES ----------------
float heartRate = 0;
float spo2 = 0;
long lastBeat = 0;
// ---------------- BUZZER FUNCTION ----------------
void beepShort() {
 digitalWrite(BUZZER_PIN, HIGH);
 delay(300);
 digitalWrite(BUZZER_PIN, LOW);
}
// ---------------- SETUP ----------------
void setup() {
 Serial.begin(115200);
 Wire.begin(21, 22);
 pinMode(BUZZER_PIN, OUTPUT);
 digitalWrite(BUZZER_PIN, LOW);
 // OLED init
 if (!display.begin(SSD1306_SWITCHCAPVCC, 0x3C)) {
   while (1);
 }
 display.clearDisplay();
 display.setTextColor(WHITE);
 display.setTextSize(1);
 display.setCursor(0, 25);
 display.println("Initializing...");
 display.display();
 // Sensor init
 if (!sensor.begin(Wire, I2C_SPEED_FAST)) {
   display.clearDisplay();
   display.println("Sensor error");
   display.display();
   while (1);
 }
 sensor.setup();
 sensor.setPulseAmplitudeRed(0x1F);
 sensor.setPulseAmplitudeIR(0x1F);
 delay(1000);
}
// ---------------- LOOP ----------------
void loop() {
 long irValue = sensor.getIR();
 long redValue = sensor.getRed();
 display.clearDisplay();
 // ---------- NO VALID DATA ----------
 if (irValue < 10000) {
   display.setTextSize(1);
   display.setCursor(0, 25);
   display.println("No data available");
   display.display();
   delay(800);
   return;
 }
 // ---------- HEART RATE ----------
 if (checkForBeat(irValue)) {
   long delta = millis() - lastBeat;
   lastBeat = millis();
   heartRate = 60.0 / (delta / 1000.0);
   if (heartRate < 40 || heartRate > 180) {
     return; // discard unrealistic values
   }
 }
 // ---------- SpO2 ESTIMATION ----------
 static float irAvg = 0;
 static float redAvg = 0;
 irAvg = 0.95 * irAvg + 0.05 * irValue;
 redAvg = 0.95 * redAvg + 0.05 * redValue;
 float ratio = redAvg / irAvg;
 spo2 = 110.0 - 25.0 * ratio;
 if (spo2 > 100) spo2 = 100;
 if (spo2 < 85) spo2 = 85;
 // ---------- CONDITION FLAGGING ----------
 String status = "Normal";
 bool abnormal = false;
 if (heartRate > 110 && spo2 < 94) {
   status = "Heat stress";
   abnormal = true;
 }
 else if (heartRate > 110) {
   status = "Fatigue risk";
   abnormal = true;
 }
 else if (spo2 < 94) {
   status = "Dehydration risk";
   abnormal = true;
 }
 else if (heartRate < 50) {
   status = "Circulatory stress";
   abnormal = true;
 }
 // ---------- BUZZER (ONLY IF ABNORMAL) ----------
 if (abnormal) {
   beepShort();
 }
 // ---------- OLED DISPLAY ----------
 display.setTextSize(1);
 display.setCursor(0, 0);
 display.println("Vitals");
 display.setTextSize(2);
 display.setCursor(0, 14);
 display.print("HR:");
 display.print((int)heartRate);
 display.setCursor(0, 38);
 display.print("Sp:");
 display.print((int)spo2);
 display.print("%");
 display.setTextSize(1);
 display.setCursor(0, 56);
 display.print(status);
 display.display();
 // ---------- SERIAL ----------
 Serial.print("HR: ");
 Serial.print(heartRate);
 Serial.print(" BPM | SpO2: ");
 Serial.print(spo2);
 Serial.print(" % | ");
 Serial.println(status);
 delay(800);
}
