
Development in Arduino and Arduino IDE has always been easy and fun with their simple user interface. The Arduino IDE is open-source and free to use Development Environment with all features like write, compile and upload the code to Arduino Boards. It is based on Java and runs on major OS like Windows, OS X and Linux. But with all its simplicity and large community, it doesn’t have some features which an experienced developer will require for fast development that can reduce the development period. There are many development environments available for Arduino, but all have some advantages and disadvantages. Today, we will be starting with PlatformIO development environment which is easy to use and has added features compare to Arduino environment.
What is PlatformIO?
The PlatformIO is a Python based open source ecosystem for IoT development and a cross platform IDE with a unified debugger runs on Windows, Mac and Linux. PlatformIO comes with library manager for platforms like Arduino or MBED support along with unit testing and firmware updates. The PlatformIO supports a number of Platforms, Frameworks, Boards like Arduino, ESP32, ESP8266 and comes with number of examples and libraries. It is independent of the platform in which it is running and it requires only Python Installed on the computer.
Advantages of PlatformIO
The PlatformIO features rapid development with its features like C/C++ Code Completion and Smart Code Linter for rapid professional development which is not there in the Arduino IDE. In addition to this, the PlatformIO offers the theme support with dark and light colors for development on anytime. It also comes with Smart Code Navigations and Code Formatting. The core features include the Multi-platform Build System, Library Manager, Serial Port Monitor etc.
The Unified Debugger with a support for the multiple architectures and development platforms allows to debug multiple embedded boards with Zero-Configuration. The PlatformIO Unified Debugger has features like Conditional Breakpoints, Expressions and Watchpoints, Memory Viewer, A hot restart of an active debugging session. The PlatformIO Core is written in Python 2.7 and works on Windows, macOS, Linux, FreeBSD and even ARM-based credit card sized computers like Raspberry Pi, BeagleBone, CubieBoard, Samsung ARTIK, etc. Apart from this the PlatformIO has File Explorer which helps organizing the files when the project grows to a certain level and organizing becomes necessary.
Setting up PlatformIO for Arduino Uno
Using PlatformIO is very simple and requires few steps to get started. The PlatformIO requires Python installed on the computer since as explained above that the PlatformIO core was written in Python 2.7. Note that the PlatformIO does not support Python 3 so it is recommended that install Python 2 version and then proceed for setting up PlatformIO IDE. The PlatformIO is an IDE plus it provides official packages (plugins, extensions) for the most popular IDEs and text editors.
Today we will install PlatformIO to such text editor like Atom and Visual Studio Code. In official documentation of Platform IDE it states that the PlatformIO IDE for VS Code (Visual Studio Code) offers better system performance, and users have found it easier to get started. So we will set-up PlatformIO in Visual Studio Code. The VS Code is a well-known text editor with number of extensions allowing us to develop in different programming languages.
Let’s start setting up the PlatformIO to start developing code in Arduino UNO. There are steps involved which are explained below:
- Firstly install the Visual Studio Code from its official website. The installation steps of Visual Studio Code will not be explained here but you can find it on VS Code website. There are general steps involved just like installing any other software on Windows OS.
- The Visual Studio Code will look like following when it is successfully installed.

- Next Step includes installing the PlatformIO using VS Code Extensions. For this you need go to Extensions Icon on the top left corner of the VS Code. There is square Box Icon which is the 5th icon on the top left corner. Just click on that and one search box will appear just beside that where you can find many extension for different programming languages like C/C++, C#, Python, PHP, Go, JavaScript, TypeScript and Node.js etc.

- Search For “PlatformIO” in the extension search box and you will see PlatformIO Icon with Name and Description. Just click on it and Install it. It may take some time installing toolchains and other dependencies. Dependencies include C/C++ environment as Arduino development is mostly done on C/C++.

- When the installation is completed, you will see the following interface. The Interface includes all the necessary navigation such as creating New Project, Import Arduino Project, Open Project, Project Examples etc. It is recommended to restart the VS Code Editor after the installation of PlatformIO.

This finishes the installation steps of PlatformIO. Now the PlatformIO is installed and ready to use. Just like Arduino IDE, we will start with the Blink Program and try to upload the Blink Program in the Arduino UNO.
Programming Arduino UNO using the PlatformIO IDE
The PlatformIO interface will be explained concurrently while programming Arduino UNO. Here we are programming Arduino for blinking LED using the PlatformIO. The same can be done using Arduino IDE. Follow the below steps below to create a new project for blinking LED.
- Select “New Project” tab from the quick access menu.

- Name the project (Here it is ‘Blink’). Search and Select the board which is Arduino UNO. Since we are working in Arduino framework, so the framework selected will be Arduino. After filling all details just click on Finish.

- The Project will start getting created by collecting resources and other dependencies.

- When project is successfully created, you will get the prompt message as “Project has been successfully initialized” with all filled details.

- To open the created project, just scroll down the Home Menu of PlatformIO and you will see all list of the projects created from beginning. At the right corner of created project click on ‘Open’ to open the project and start editing.

- When the project is opened, initially it will look like its hidden, but don’t worry, the PlatformIO has file explorer feature where all the files of current project will be found. Just go to the top left corner and open the ‘Untitled (Workplace)’. When click on it, all files will appear as dropdown menu. To find the text editor to edit the ‘Code’, select ‘src’ and the open ‘main.cpp’. The text editor mode will appear on the Home Screen with opening a new Tab. Here you can write all codes of Current Ongoing Project.
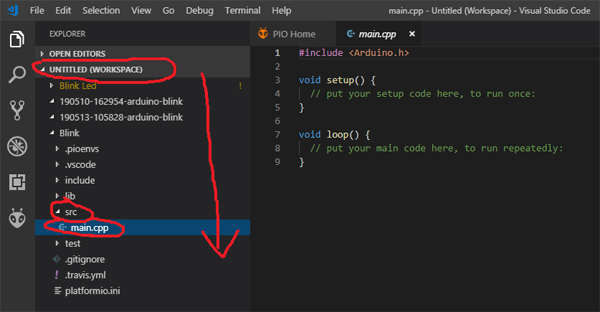
- Simply write the Blink Code for Arduino UNO. Note that, the PlatformIO doesn’t have the default access to Arduino libraries, so everytime you write the code for Arduino, always include Arduino library i.e. “#include <Arduino.h>” at the beginning of program.

- The next step would be compiling and uploading the code. To do so, let’s look at the functions provided by the PlatformIO. Also the PlatformIO selects the COM Port by default. But you can also change the Port if it is not the desired COM port. The change of COM port will be explained later in this tutorial. PlatformIO has functions like Build, Upload, Upload to Remote Device, Clean, Test, Run Task, Serial Monitor, New Terminal. All the functions can be found in the left bottom corner of the Editor. When you Hover over the icons, the functions will be shown.

- To Build the Sketch, click on ‘Build’ and to upload the sketch click on the ‘Upload’ Icon. When the upload is done, you will be able to see the time taken to upload with all other details and a message saying “Success”. The code is uploaded successfully and you will be able to see the Blinking of LED in the Arduino Board.


To select or change any COM Port, just go to the PlatformIO Home Screen and then go to the Devices, here you can see all the available devices connected. Select appropriate COM port and follow the same procedure to Upload the sketch.

Programming STM32 Board using the PlatformIO IDE
Programming the STM32 Board will have exactly similar steps like Programming Arduino UNO explained above. The difference will be selecting the Board for STM32 when opening a new project for STM32. The good thing about the PlatformIO is, it doesn’t need any external package for any board to download separately, it automatically downloads all the packages and makes it easy for us to select a board and go to editor. We will use external JLink/ JTAG/ STLink/ Serial Programmer to upload sketch to STM32. STM32 can also be programmed with Arduino IDE. Proceed with following steps to program it with PlatformIO.
- Just name the Project (Here it is ‘Blink STM32’). Then select the board for STM32 i.e. ‘BluePill F103C8(Generic)’. Then select Framework as Arduino. Click on Finish and wait for some time as initially it will take time to download the packages and dependencies for board STM32.

- Once Set Up, the next project creation time will be less compare to first. Now Simply go to Untitled(Workspace) -> src -> main.cpp in the left file explorer.
- Now the upcoming steps will be important as it needs to be decided that which programmer we should use for programming the STM32 Board. There are many programmers available such as JTAG, STLink, JLink, Serial etc. All will work but you need to configure the ‘platformio.ini’ configuration page or file.
- In this Project, we are using Serial Programmer CP210x USB to UART Bridge. We already have done Programming STM32F103C8 Board using USB Port, o most of steps will be taken from there only. You can visit the link and find more about this.
- Firstly, Connect Serial Programmer to STM32 Board with following pin mapping and connect it to PC.
|
USB to Serial Programmer |
STM32 Board |
|
5V |
5V |
|
Gnd |
Gnd |
|
Rx |
A9 |
|
Tx |
A10 |
- Now go to the project explorer and open ‘platformio.ini’ page and change the statement as shown in the picture. The upload_protocol will tell that which programmer should use (STLink, JLink, Serial etc). The upload_port selects the COM port. You can find by going to ‘Devices’ in Home Page. Change the COM port according to your COM port.

- Go to the ‘main.cpp’ and change the program to Blink program. Now just upload the program and it will show success message and time taken to upload. Now the LED will start blinking connected at PC13 pin of STM32 board.

This finishes the complete tutorial on programming the Arduino UNO as well as STM32 Board using PlatformIO. If you have face any difficulties while following the steps then please write to our forum or comment below.
Complete Project Code
#include <Arduino.h>
void setup() {
// initialize digital pin LED_BUILTIN as an output.
pinMode(LED_BUILTIN, OUTPUT);
}
// the loop function runs over and over again forever
void loop() {
digitalWrite(LED_BUILTIN, HIGH); // turn the LED on (HIGH is the voltage level)
delay(100); // wait for a second
digitalWrite(LED_BUILTIN, LOW); // turn the LED off by making the voltage LOW
delay(100); // wait for a second
}
