
The aim of this project is to monitor a Lithium Battery Bank remotely in a solar installation. It traces current individually for each Battery Pack. It also communicates with solar charger and calculates live values of power going to home and battery bank. It includes a web server with charts, internal historical data, and optionally can also upload data to Thingspeak and Blynk.
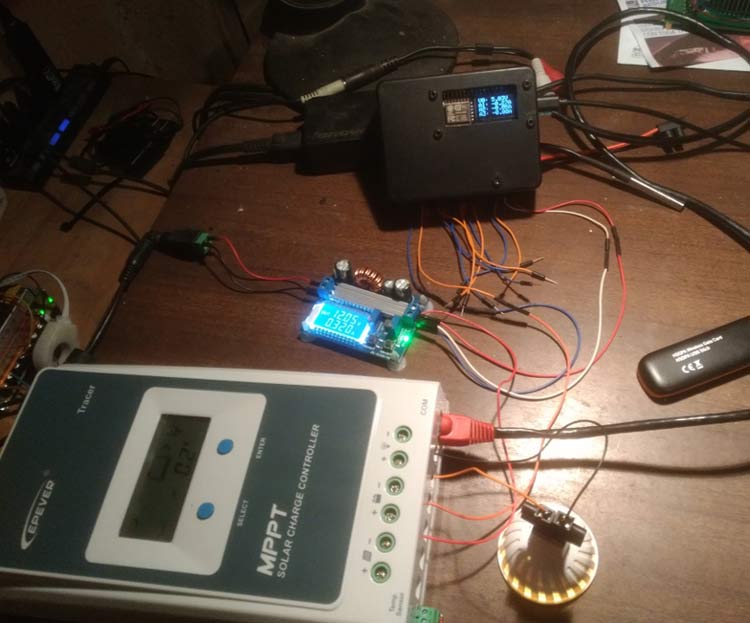
This IoT project is part of an experiment, to check the behavior and lifetime of Li-ion battery packs (BMS included) connected in parallel at a solar installation. The Lithium Battery Chemistry used here is not LiFePo4 3.65V/Cell what is usually recommended for solar installations, but the regular Li-ion batteries 4.2V/Cell, with more capacity and operating risks. As can be seen in the photo above, Battery Packs are placed inside safety bags bellow and the Battery Analyzer and everything is in the roof. The solar controller used here is Tracer 2206AN.
Hardware used:
- ESP8266 with OLED display board
- DHT11 Temperature and Humidity sensor
- DS18B20 external Temperature Sensor
- ADS1115 16 bit 4 channel Analog Input Boards (2x) (To read values from current and voltage sensors)
- ACS712 5V 20A Hall Effect current meters (5x)
- Voltage Sensor <25V Voltage Divider 5V
- DC-DC Voltage Converter Step-down Module 4-24V->5V (To supply ESP8266 board)
- Solid State Relay Module (optional, to control an AC Load via Web)
- TTL-to-RS485 Converter Module 3.3V-5V (To communicate with Solar Charger)
- Epever Tracer 2206AN (Solar Charger MPPT 20A)
- Lithium Battery Packs LiitoKala 24V 12ah 6S6P (5x) (Lithium Battery Bank, total capacity 1250 wh)
Note that the Current sensors are rated at 20A but probably it's too much for sensor board. There are thermal switches for each battery pack limiting current to 10A. 5x10 = 50A, approx. 1000 Watts maximum power.
Schematics:
The complete circuit diagram for this Lithium ion battery monitoring system is shown below

The NodeMCU (D-duino) board is powered by a DC-DC buck converter which converters the output voltage of the battery pack to 5V. The 3.3V regulated DC output pin on the board is used to power the DS18B20 and RHT03 sensors. The schematic also shows how the 5 Lithium batteries (each 24V) is connected through the ACS712 current sensor to monitor the current through each battery. The output analog values form these current sensors are measured by the ADS1115 ADC modules for higher resolution, the obtained result is then transferred to the ESP board through I2C Communication. You can also refer to this Energy monitoring project where ACS712 was used in a similar way. We have also used a voltage sensor module to monitor battery voltage. This project only monitors the complete battery pack voltage, you can check this cell voltage monitoring project if you have to monitor voltage of each battery.
You can note how the Solar panel (24V 500W) is connected with the battery pack through a MPPT Solar Controller to charge the battery pack from solar energy. The Solar controller communicates through RJ45 so we have used XY-017 TTL to RS485 converter to communicate between the Solar controller and the ESP8266 board.
Program for ESP8266:
In this lithium ion battery monitor, the ESP8266 (D-duino) is programmed to read the current and voltage of the battery pack and also communicate with the solar charger to calculate live values of power going to home and battery pack. We have also set up a Webserver to chart historical data and visualize the parameters. We have also programmed an option to upload these values to ThingSpeak and Blynk to monitor them remotely over the internet. If you are new to ThingSpeak and Blynk you can refer the below two projects.
Once the basics is understood the program is self-explanatory. The complete program for this project can downloaded from below link. You can use the Arduino IDE to directly upload this code into your ESP board.
Notes about the program
Make sure you include the following library packages into your Arduino IDE before you compile the code
- Adafruit_ADS1015 (Analog Inputs)
- NtpClientLib (NTP Client with DST support)
- TimeLib (Time functions)
- Adafruit SSD1306 - OLED Display Driver
- RemoteDebug - Telnet debug logs
- Modbus Master – for MODBUS communication
For Modbus RS485 communication with Tracer, these references from dpoulson and jaminNZx have been very useful
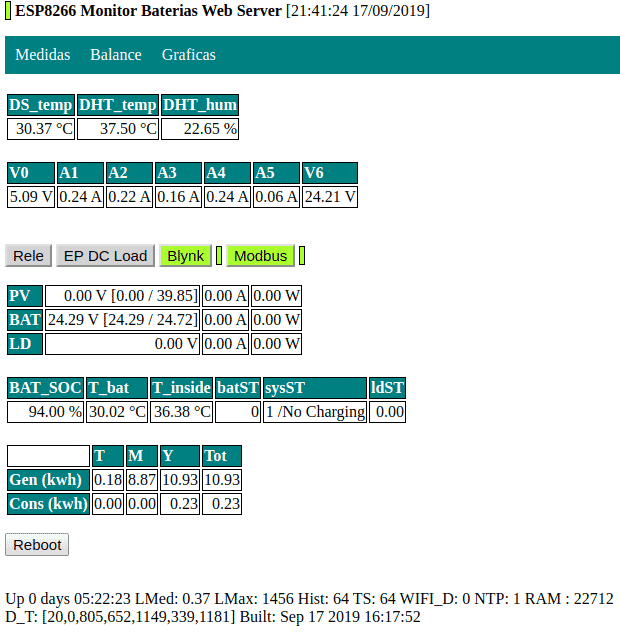
ESP8266 Embedded Web server:
The web server page shows the Raw Measures from current meters and values obtained from MODBUS Communication with charger. It provides an option to directly control an AC Solid State Relay and DC Load output in solar charger. It also provides an option to enable/disable Blynk or Modbus communications. The complete web server page for lithium ion battery monitoring system is shown below
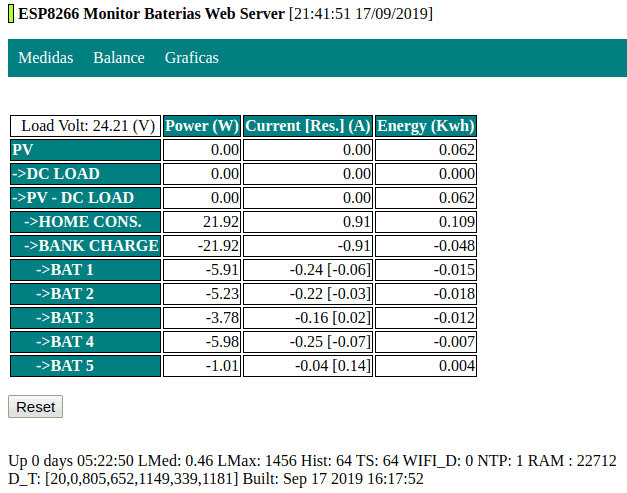
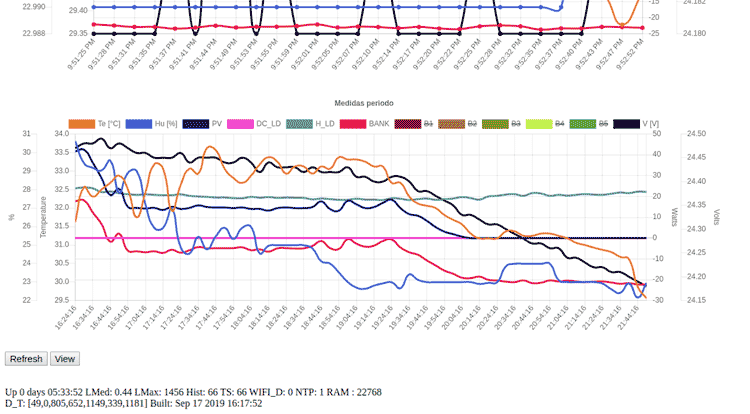
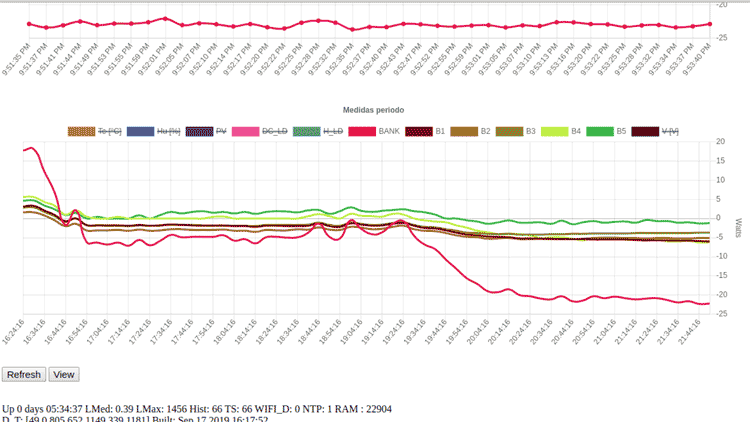
The below image shows the Power Distribution values from Photovoltaic Panels to Home, Battery Bank and Packs:
The live data plotted as a chart on the web server is shown below
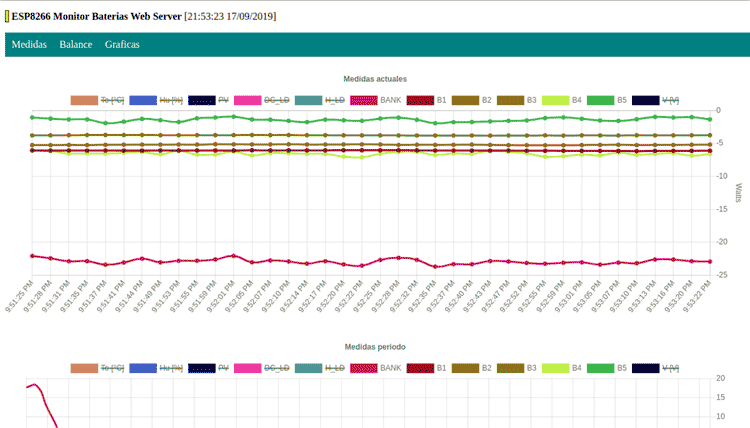
It is also possible to view historical data by selecting a required data and time. This enables the system to be monitored remotely at any instance of time.
Communicating with Mobile App (Blynk)
As told earlier the program for this lithium battery monitor also allows us to communicate with a mobile app called Blynk for remote monitoring. You can download the application from Play store or Appstore. The snapshot of mobile application is shown below
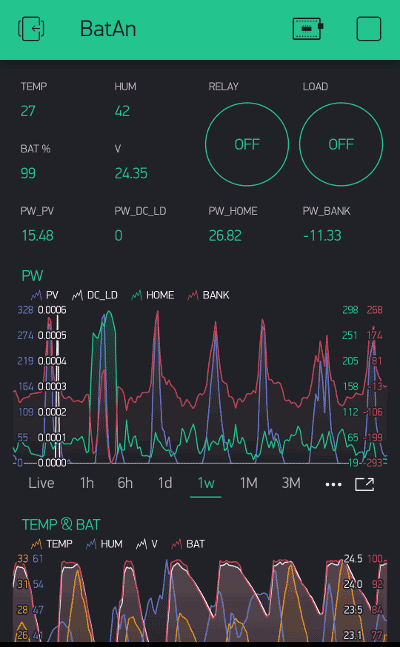
Once you have downloaded the Blynk app you can scan this QR code below to get ready-to-test project set-up.

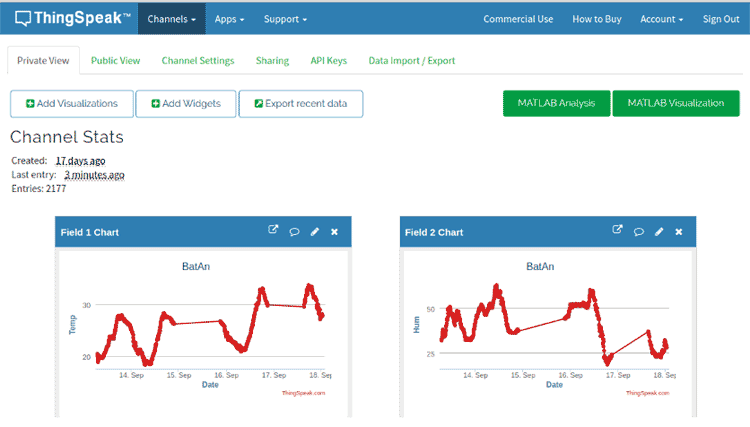
Communicating with ThingSpeak
ThingSpeak is a popular IoT analytics platform. We have also programmed our ESP to send the monitored values to ThingSpeak. The ThingSpeak dashboard is shown below.
Complete code for this lithium battery monitor can be downloaded from here.
Hope you understood the project and would make use of it while building your systems. If you have any questions please feel free to leave them in the comment section or use our forums for other technical questions.
