
As we know that IoT revolution has started from last few years, since then ESP series Wi-Fi modules become very popular among hobbyists and industries. It is a very small chip and can be embedded in small devices. Also, it is cost effective and anyone who knows the basics of Arduino programming can program it and use it in their projects to make it an IoT enabled device.
To take you one step ahead towards IoT development, today we will make our own web server to host a webpage and control any appliance remotely from anywhere in the world. Here we will use ESP12E NodeMCU as webserver, although any ESP module can be used if you are using an ESP32 development board you can check out the ESP32 webserver tutorial. Learn more about various ESP modules and their projects here.
Before starting our programming, let’s see what is Webserver and how it works?
What is a Webserver and How it works?
In simple terms, Web server is a place where we can store the web pages , process them and deliver them to the web clients. Now, what is web client? It is nothing but a web browser installed in our mobiles and PCs. A protocol is used to establish and transfer information between web client and server. This protocol is known as Hypertext Transfer Protocol (HTTP).
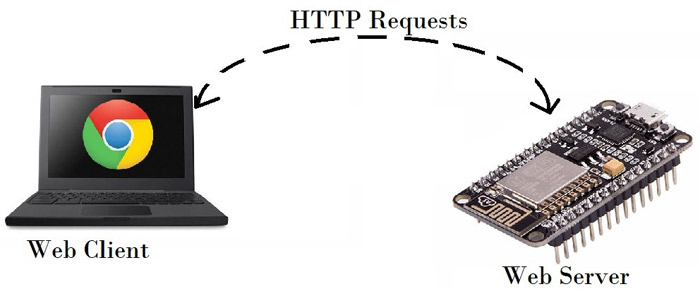
In this protocol, communication is initiated by making a request for a particular web page using HTTP GET request and the server responds with the content of that web page. If server does not respond it will through an error message i.e. 404 Error. Webpages delivered by the server are mostly in HTML coding.
All the websites are hosted on some webserver, mostly Linux based operating system is used on webservers. Any computer can be converted into a webserver, provided that it is connected to the network. We have previously done many webserver projects with different microcontrollers. Raspberry pi already have inbuilt Wi-Fi module so it doesn’t need any other hardware to turn it into a webserver, whereas other microcontroller needs some network connecter (ESP module) for a webserver.
- How to Setup Webserver on Raspberry Pi and Host a WordPress Website
- Controlling an LED with Raspberry pi Node.js Webserver
- Connecting ESP8266 with STM32F103C8: Creating a Webserver
- IOT Based Dumpster Monitoring using Arduino & ESP8266
Today we will build a webserver using NodeMCU ESP12. First, lets see the operating modes in the ESP modules.
Operating Modes in ESP Modules
Most of us think that ESP can only connect with exsting Wi-Fi networks but wait!!! ESP is more than you think. It can also set up own network and allows other devices to connect directly to it. This is possible because ESP modules can operate in three different modes namely Station mode, Soft Access Point mode, and both at the same time. This helps in making mesh network where you have more than one ESP modules and want to establish connection between these.
Let’s see the different modes to know more about them:
1. Station (STA) Mode
When ESP module connects to an existing Wi-Fi network i.e. network created by your router then this is a Station mode (STA). In this mode ESP gets IP from wireless router to which it is connected. Using this IP address, ESP will set up a web server and send the web pages to all devices which are connected with the existing WiFi network.
2. Soft Access Point (AP) Mode
In this mode, ESP creates its own Wi-Fi network and sets SSID and IP address to it and acts like Wi-Fi router. Unlike WiFi router, it is not connected to a wired network. Using the generated IP address, it will send web pages to all devices which are connected with its own WiFi network. Also, the maximum number of devices that are connected to the ESP is limited to five. This is same like converting it to a Wireless access point.
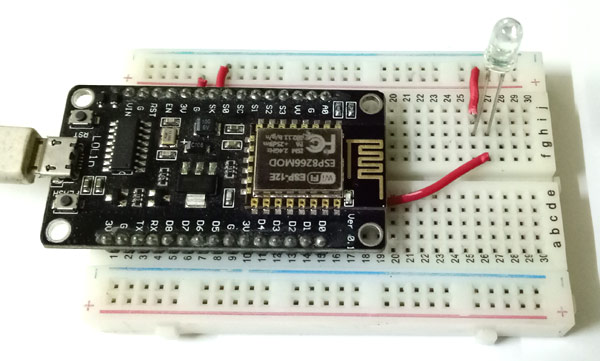
In this tutorial, we will make a ESP12E web server using both the modes for controlling an LED.
Requirements
- ESP12e (or any ESP module will work)
- LED
- Breadboard
- Jumber wires
Circuit Diagram

Code Explanation for NodeMCU Web server in Station Mode
Here we will use Arduino IDE to program our ESP12. So, make sure you have downloaded ESP8266 board files. If there is no esp8266 boards in the tool menu then follow the previous tutorial on NodeMCU.
Let’s see the coding part for the NodeMCU webserver.
First of all, we will include ESP8266WiFi.h library for accessing the Wi-Fi functions.
#include <ESP8266WiFi.h>
Declare variables for the Wi-Fi SSID, password and other variables for storing the temporary information inside the code.
const char* ssid = "nodemcu";
const char* password = "12345";
String header;
String LED1State = "off";
const int LED1 = D0;
Next, we declare an object of WifiServer library, so we can access its functions. The argument for the instance formed will be the port number where the server is listening. Since 80 is the default port for HTTP, we will use this value.
WiFiServer server(80);
In Void setup() function, we will initialize the baud rate, LED output and will connect the module with the Wi-Fi using WiFi.begin(ssid, password); function.
void setup() {
  Serial.begin(115200);
  pinMode(LED1, OUTPUT);
  digitalWrite(LED1, LOW);
…
..
  WiFi.begin(ssid, password);
  while (WiFi.status() != WL_CONNECTED) {
    delay(500);
    Serial.print(".");
  }
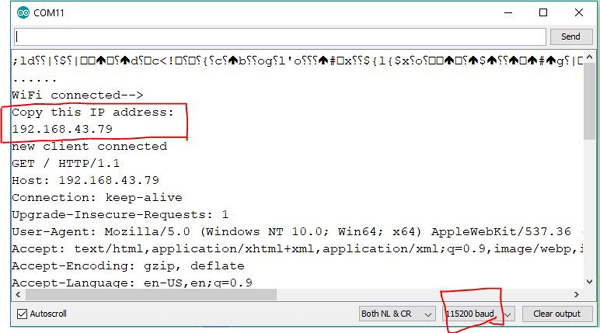
After this, we will print the local IP address in serial monitor using WiFi.localIP(); function and then start the web server using server.begin(); function.
Serial.println("");
  Serial.println("WiFi connected-->");
  Serial.println("Copy this IP address: ");
  Serial.println(WiFi.localIP());
  server.begin();
}
In void loop() function, we will listen to the incoming clients using server.available(); function and store the incoming data to a string variable and print the data on serial monitor.
void loop(){
  WiFiClient client = server.available();
  if (client) {
    Serial.println("new client connected");
    String currentLine = "";
…
….
HTTP headers always start with a response code (e.g. HTTP/1.1 200 OK) and a content-type so the client knows what's coming and then a blank line.
            client.println("HTTP/1.1 200 OK");
            client.println("Content-type:text/html");
            client.println("Connection: close");
            client.println();
Now, we will do the action i.e. we will check the request and turn on/off the LED accordingly.
            if (header.indexOf("GET /LED1/on") >= 0) {
              Serial.println("LED1 on");
              LED1State = "on";
              digitalWrite(LED1, HIGH);
            } else if (header.indexOf("GET /LED1/off") >= 0) {
              Serial.println("LED1 off");
              LED1State = "off";
              digitalWrite(LED1, LOW);
            }
Next, we will design our web page using html and send each line using client.println() function.
client.println("<!DOCTYPE html><html>");
client.println("<head><meta name=\"viewport\" content=\"width=device-width, initial-scale=1\">");
client.println("<link rel=\"icon\" href=\"data:,\">");
To decorate your page you can use CSS to style the buttons and background. You can change the properties in the below lines.
client.println("<style>html { font-family: Cairo; display: inline; margin: 0px auto; text-align: center; background-color: #ccffb3;}");
client.println(".button { background-color: #006699; border: none; color: white; padding: 16px 40px;");
client.println("text-decoration: none; font-size: 35px; margin: 2px; cursor: pointer;}");
client.println(".button2 {background-color: #555555;}</style></head>");
If you want to display a picture on the webpage, you have to design a SVG image using this online svg maker tool . Generate a svg code from that page and paste it inside client.println() as shown in below line.
client.println("<svg width=\"300\" height=\"80\"><text fill=\"#00bfbf\" font-family=\"serif\" font-size=\"24\" id=\"svg_1\" stroke=\"#000000\" text-anchor=\"middle\" transform=\"matrix(1.35388 0 0 1.42308 -6.66283 -8.67308)\" x=\"86.5\" xml:space=\"preserve\" y=\"41.5\">Circuit Digest</text></svg>");
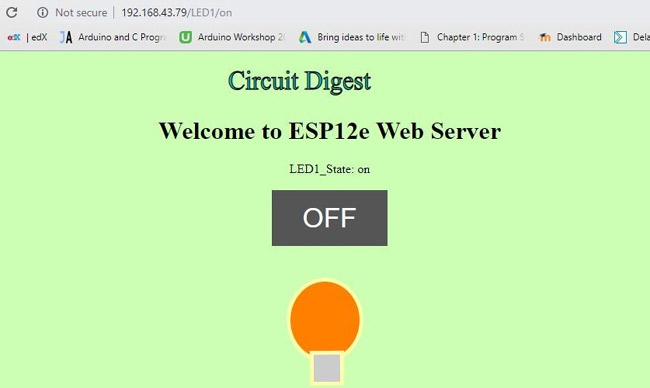
client.println("<body><h1>Welcome to ESP12e Web Server</h1>"); //Webpage heading name
To display the current LED state we need the state from the above code where we have turned on/off the led. If the LED1State is off, it displays the ON button and attach the message ( "/LED1/on\") with that button using <a href> html tag.
client.println("<p>LED1_State: " + LED1State + "</p>");
if (LED1State=="off") {
client.println("<p><a href=\"/LED1/on\"><button class=\"button\">ON</button></a></p>");
Below html line is used to display a bulb svg image.
client.println("<svg width=\"500\" height=\"300\"><ellipse cx=\"258.5\" cy=\"125.5\" fill=\"#ffffff\" rx=\"47\" ry=\"52\" stroke=\"#ffffaa\" stroke-width=\"5\"/><rect fill=\"#cccccc\" height=\"40\" stroke=\"#ffffaa\" stroke-width=\"5\" transform=\"rotate(-0.485546 261 187.5)\" width=\"39\" x=\"241.5\" y=\"167.5\"/></svg>");               …
..
Similarly, make html code for off button.
Now, we have completed all the required code, finally finish it by sending html end tag with empty client.println().
client.println("</body></html>");
client.println();
Complete code for NodeMCU Webserver is given in the end of this tutorial. Connect the NodeMCU with the laptop and choose the board & port correctly and then hit the Upload button. Learn how to program ESP12E with Arduino IDE here.
After uploading the code, open the serial monitor. Make the baud rate of serial monitor as 115200. You will see the IP address in the monitor, just copy this IP and paste it in the browser.
You will see a webpage in your browser as shown below. To test the page, connect an LED to your NodeMCU pin D0 and click ON button, LED should glow. You can also watch the actions in Serial Monitor.
This is how we can control an LED using Station mode in ESP module. Now, we will see Soft Access Point web server.
NodeMCU Web server in Soft Access Mode
You don’t need to change the whole code for this mode. Just change few lines in void setup() function to make the ESP12E work as AP mode.
In void setup(), we have to include the functions which are used to enable the AP mode WiFi.softAP(ssid, password) and get the server IP using WiFi.softAPIP() function. Just paste the following code in place of previous setup function and it is ready to work.
void setup() {
Serial.begin(115200);
pinMode(LED1, OUTPUT);
digitalWrite(LED1, LOW);
WiFi.softAP(ssid, password);
Serial.println();
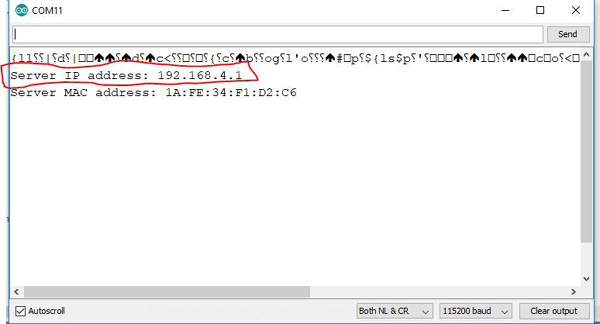
Serial.print("Server IP address: ");
Serial.println(WiFi.softAPIP());
server.begin();
}
Upload the code after editing the previous one. Then same as previous, open the Serial monitor and copy the server IP address.
Now, open Wi-Fi settings in your smartphone or laptop. There will be a Wi-Fi network with the SSID name and password that you had given in the beginning of the code. Connect your system with this network and open the browser and paste the IP address in it.
You will see a same web page as you observed previously.
Now, you can control your appliances using ESP as Soft access point.
To control Home appliances with this webpge, you just have to replace the LED with Relay and you will be able to control any AC appliance wirelessly.
Complete Code and demonstration Video is given below.
Complete Project Code
#include <ESP8266WiFi.h>
const char* ssid = "********";  // Enter SSID here
const char* password = "*******";  //Enter Password here
// Variable to store the HTTP request
String header;
String LED1State = "off";
const int LED1 = D0;
WiFiServer server(80);
void setup() {
  Serial.begin(115200);
  pinMode(LED1, OUTPUT);
  digitalWrite(LED1, LOW);
 Serial.print("Connecting to ");
 Serial.println(ssid);
WiFi.begin(ssid, password);
while (WiFi.status() != WL_CONNECTED) {
    delay(500);
   Serial.print(".");
 }
// Print local IP address and start web server
 Serial.println("");
  Serial.println("WiFi connected-->");
  Serial.println("Copy this IP address: ");
  Serial.println(WiFi.localIP());
  server.begin();
}
void loop(){
  WiFiClient client = server.available();
  if (client) {                             // If a new client connects,
    Serial.println("new client connected");
    String currentLine = "";                // make a String to hold incoming data from the client
    while (client.connected())
      if (client.available()) {             // if there's bytes to read from the client,
        char c = client.read();
        Serial.write(c);
        header += c;
        if (c == '\n') {                    // if the byte is a newline character
          if (currentLine.length() == 0) {
            client.println("HTTP/1.1 200 OK");
            client.println("Content-type:text/html");
            client.println("Connection: close");
            client.println();
            if (header.indexOf("GET /LED1/on") >= 0) {
              Serial.println("LED1 on");
              LED1State = "on";
              digitalWrite(LED1, HIGH);
            } else if (header.indexOf("GET /LED1/off") >= 0) {
              Serial.println("LED1 off");
              LED1State = "off";
              digitalWrite(LED1, LOW);
            }

            // Display the HTML web page
            client.println("<!DOCTYPE html><html>");
            client.println("<head><meta name=\"viewport\" content=\"width=device-width, initial-scale=1\">");
            client.println("<link rel=\"icon\" href=\"data:,\">");
            client.println("<style>html { font-family: Cairo; display: inline; margin: 0px auto; text-align: center; background-color: #ccffb3;}");
            client.println(".button { background-color: #006699; border: none; color: white; padding: 16px 40px;");
            client.println("text-decoration: none; font-size: 35px; margin: 2px; cursor: pointer;}");
            client.println(".button2 {background-color: #555555;}</style></head>");

            client.println("<svg width=\"300\" height=\"80\"><text fill=\"#00bfbf\" font-family=\"serif\" font-size=\"24\" id=\"svg_1\" stroke=\"#000000\" text-anchor=\"middle\" transform=\"matrix(1.35388 0 0 1.42308 -6.66283 -8.67308)\" x=\"86.5\" xml:space=\"preserve\" y=\"41.5\">Circuit Digest</text></svg>");

            // Web Page Heading
            client.println("<body><h1>Welcome to ESP12e Web Server</h1>");
            client.println("<p>LED1_State: " + LED1State + "</p>");
            // If the LED1State is off, it displays the ON button
            if (LED1State=="off") {
              client.println("<p><a href=\"/LED1/on\"><button class=\"button\">ON</button></a></p>");
              client.println("<svg width=\"500\" height=\"300\"><ellipse cx=\"258.5\" cy=\"125.5\" fill=\"#ffffff\" rx=\"47\" ry=\"52\" stroke=\"#ffffaa\" stroke-width=\"5\"/><rect fill=\"#cccccc\" height=\"40\" stroke=\"#ffffaa\" stroke-width=\"5\" transform=\"rotate(-0.485546 261 187.5)\" width=\"39\" x=\"241.5\" y=\"167.5\"/></svg>");
            } else {
              client.println("<p><a href=\"/LED1/off\"><button class=\"button button2\">OFF</button></a></p>");
              client.println("<svg width=\"500\" height=\"300\"><ellipse cx=\"258.5\" cy=\"125.5\" fill=\"#ff7f00\" rx=\"47\" ry=\"52\" stroke=\"#ffffaa\" stroke-width=\"5\"/><rect fill=\"#cccccc\" height=\"40\" stroke=\"#ffffaa\" stroke-width=\"5\" transform=\"rotate(-0.485546 261 187.5)\" width=\"39\" x=\"241.5\" y=\"167.5\"/></svg>");
            }
            client.println("</body></html>");
            client.println();
            break;
          } else {
            currentLine = "";
          }
        } else if (c != '\r') {
          currentLine += c;
        }
      }
    }
    header = "";
    client.stop();
    Serial.println("Client disconnected");
    Serial.println("");
  }
}
Comments
Hi,
Do you have any coed to add an analog input to the webpage.
Thanks
Your code doesn't even compile it throws an error straight away:
Arduino: 1.8.12 (Windows 10), Board: "NodeMCU 1.0 (ESP-12E Module), 80 MHz, Flash, Disabled, All SSL ciphers (most compatible), 4M (no SPIFFS), v2 Lower Memory, Disabled, None, Only Sketch, 115200"
Web_Server_Example_2_Station_Mode:96:1: error: expected declaration before '}' token
}
^
exit status 1
expected declaration before '}' token
This report would have more information with
"Show verbose output during compilation"
option enabled in File -> Preferences.
Not a very helpful tutorial!

Why you have used slashes"\" in
Pls reply soon.