
LoRa is a wireless Radio frequency technology introduced by a company called Semtech intended to be used to transmit bi-directional information to a long-distance without consuming much power. If you are new to LoRa, then learn about LoRa and LoRaWAN Technology and check LoRa interfacing with Arduino and Raspberry pi.
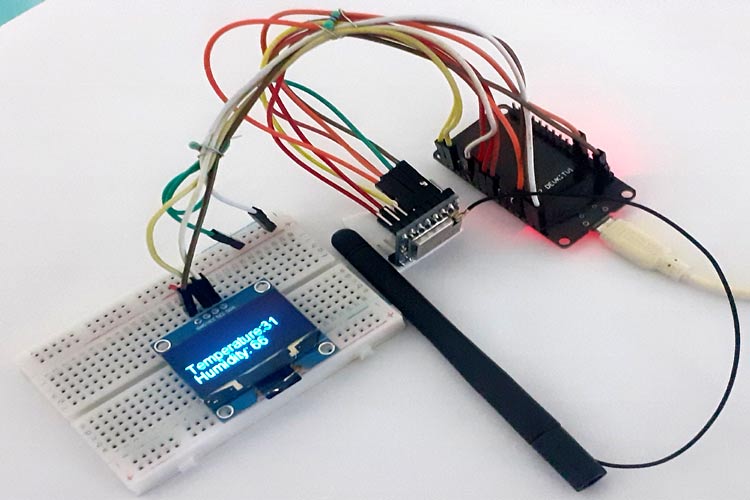
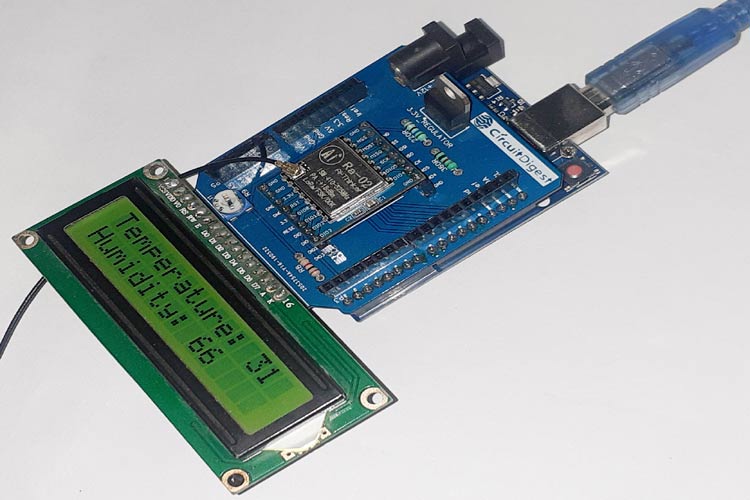
In this tutorial, we will learn how we can use the LoRa module SX1278 with ESP32. Here we will use two LoRa modules- one with ESP32 and another with Arduino Board. ESP32 LoRa setup will request the weather data from an API for any given city and send it to the Arduino LoRa setup. Then Arduino LoRa will receive the data and display it on 16x2 LCD. So ESP32 LoRa will act as a transmitter and Arduino LoRa as a receiver. An OLED is also connected at ESP32 to display the temperature and humidity on the sender's side.
Components Required
- ESP32
- Arduino Uno
- Arduino Lora Shield
- LoRa -02 SX1278 Module (2)
- 16*2 LCD Module
- OLED Display Module
- Breadboard
- Jumper Wires
Arduino LoRa shield can be built by following the link, where you can find Gerber files for PCB and all the required steps to build it.
Circuit Diagram
Circuit diagram for the LoRa transmitter/Server and Receiver/Client section is given below. In this project, we are going to send weather data from the ESP32 module to Arduino Uno using the LoRa SX1278 module. The temperature and humidity data will be read from the internet using an API with the ESP32 module and then sent to Arduino using the LoRa module.
Transmitting Side- Interfacing LoRa with ESP32
On the transmitting side, we are using ESP32 with the LoRa module and OLED Display. Circuit diagram for the same is shown below.

Complete connections are given in the below table.
| LoRa SX1278 Module | ESP32 |
| 3.3V | 3.3V |
| GND | GND |
| NSS | D5 |
| DIO0 | D2 |
| SCK | D18 |
| MISO | D19 |
| MOSI | D23 |
| RST | D14 |
| OLED Pin | ESP32 Pin |
| Vcc | 3.3v |
| GND | GND |
| SCL | D22 |
| SDA | D21 |
We previously used OLED in many applications; follow the link to learn more.
Receiver Side- Interfacing LoRa with Arduino UNO
On the Receiver side, we are using the Arduino Lora Shield that we earlier designed for Lora Based GPS Tracker project. You can follow this article for the Gerber file and other information on the LoRa shield.
This shield consists of the SX1278 433MHz module with a 3.3V regulator designed using LM317 Variable regulator. The Shield will directly sit on top of Arduino providing it LoRa capabilities. The complete circuit diagram for the LoRa Arduino Shield is given below:

API Link for Getting the Weather Data
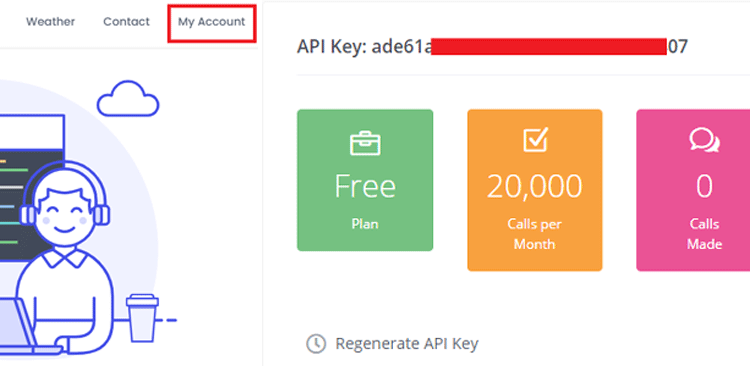
As mentioned earlier, an API link is needed to request weather data from the Internet. Here we are going to use the Weather API, which has a very simple to use API that allows us to retrieve weather information. So sign up in the website to get the API link.
After sign up, Go to the ‘My Account’ and get the API. An API key is used to make requests to get the data.
Now go back and click on “API Explorer”
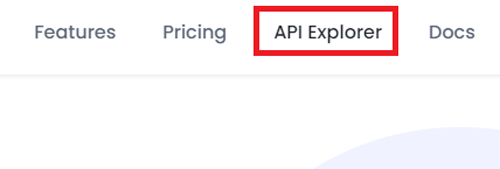
Now on API explorer page, enter the API and the City name.
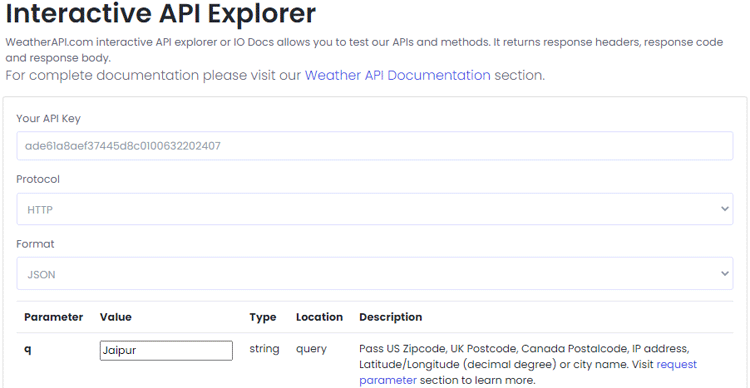
Then scroll down and click on the ‘Show Response’ button to make a request. It will give you the API key.

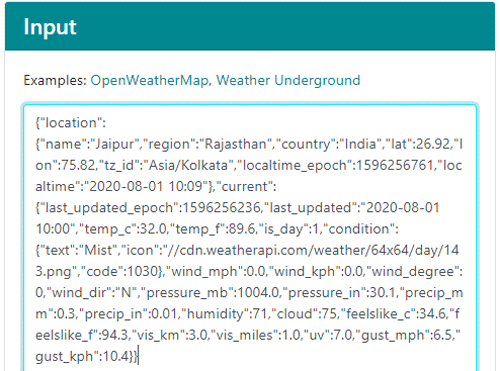
Now paste your API URL into a new browser tab and the output of that query will look like this (JSON data):

After getting the JSON data, generate the code by which we can read the JSON data and phrase it according to our needs. For that, go to the ArduinoJson Assistant and paste the JSON data in the Input section.
Now scroll down to the parsing program and copy the code section that is useful for you.
ESP32 LoRa Transmitter Code
Complete code for the LoRa transmitter and receiver side is given at the end of the document. Here we are explaining some important snippets of code.
First, include all the required libraries. SPI.h is used for SPI communication between ESP32 and LoRa, Wire.h Library is used for communication between I2C devices. You can download the required libraries from here:
#include <HTTPClient.h>
#include <WiFi.h>
#include <ArduinoJson.h>
#include <SPI.h>
#include <LoRa.h>
#include <Wire.h>
#include<SH1106.h>
Then create an instance for the OLED display that includes the Address and pins where the display is connected.
SH1106 display(0x3c, 21, 22);
After that, enter the Wi-Fi name and password. ESP32 needs the internet connection as it is getting the weather data from a website.
const char* ssid = "Wi-fi Name";
const char* pass = "Password";
In the next lines, define the pins where the LoRa Module is connected.
#define ss 5
#define rst 14
#define dio0 2
Now enter the API link that is generated earlier. Using this link, we will get the temperature and humidity data for Jaipur City.
Const char* url = "http://api.weatherapi.com/v1/current.json?key=ade61a8aef37445d8c0100632202407&q=Jaipur";
Inside the setup function, initialize the Serial Monitor at a baud rate of 115200 for debugging purposes, and also initialize the OLED display and LoRa communication with the begin() function.
  Serial.begin(115200);
  Serial.println(ssid);
  WiFi.begin(ssid, pass);
  while (WiFi.status() != WL_CONNECTED)
  {
    delay(500);
  }
  LoRa.setPins(ss, rst, dio0);
  while (!LoRa.begin(433E6)) {
  }
  LoRa.setSyncWord(0xF3);
}
Now inside the void loop() function, we will check if the JSON file is received by ESP32 and printing JSON data on the serial monitor using the following lines.
int httpCode = https.GET();
  if (httpCode > 0) {
    String payload = https.getString();
    char charBuf[500];
    payload.toCharArray(charBuf, 500);
    Serial.println(payload);
After that, use the phrasing program that is generated using the ArduinoJson Assistant. This phrasing program will give us temperature and humidity data for Jaipur.
const size_t capacity = JSON_OBJECT_SIZE(2) + JSON_OBJECT_SIZE(3) + JSON_OBJECT_SIZE(8) + JSON_OBJECT_SIZE(23) + 490;
  DynamicJsonDocument doc(capacity);
  const char* json = "{\"location\":{\"name\":\"Jaipur\",\"region\":\"Rajasthan\",\"country\":\"India\",\"lat\":26.92,\"lon\":75.82,\"tz_id\":\"Asia/Kolkata\",\"localtime_epoch\":1595741089,\"localtime\":\"2020-07-26 10:54\"},\"current\":{\"last_updated_epoch\":1595740520,\"last_updated\":\"2020-07-26 10:45\",\"temp_c\":31,\"temp_f\":87.8,\"is_day\":1,\"condition\":{\"text\":\"Mist\",\"icon\":\"//cdn.weatherapi.com/weather/64x64/day/143.png\",\"code\":1030},\"wind_mph\":0,\"wind_kph\":0,\"wind_degree\":0,\"wind_dir\":\"N\",\"pressure_mb\":1008,\"pressure_in\":30.2,\"precip_mm\":0,\"precip_in\":0,\"humidity\":66,\"cloud\":50,\"feelslike_c\":32.2,\"feelslike_f\":89.9,\"vis_km\":5,\"vis_miles\":3,\"uv\":8,\"gust_mph\":7.2,\"gust_kph\":11.5}}";
  deserializeJson(doc, json);
  long current_last_updated_epoch = current["last_updated_epoch"];
  const char* current_last_updated = current["last_updated"]; //
  int current_temp_c = current["temp_c"]; // 31
  int current_humidity = current["humidity"]; // 66
Now in the last step, send the temperature and humidity values to LoRa receiver.
LoRa.beginPacket();
LoRa.print("Temperature: ");
LoRa.print(current_temp_c);
LoRa.print("c");
LoRa.print("Humidity: ");
LoRa.print(current_humidity);
LoRa.endPacket();
Arduino LoRa Receiver Code
Similarly, add the library for the LoRa module and LCD and define which pins the LCD is connected to.
#include <SPI.h>
#include <LoRa.h>
#include <LiquidCrystal.h>
constintrs = 8, en = 7, d4 = 6, d5 = 5, d6 = 4, d7 = 3;
LiquidCrystallcd(rs, en, d4, d5, d6, d7);
Inside the void loop function, we receive the data packets from the transmitter module. After receiving the packets, Arduino starts reading them as characters and print them on the LCD. When it receives the keyword “c,” it prints the remaining information on the second line.
void loop() {
intpacketSize = LoRa.parsePacket();
if (packetSize) {
Serial.print("Received packet '");
while (LoRa.available()) {
char incoming = (char)LoRa.read();
if (incoming == 'c')
      {
lcd.setCursor(0, 1);
      }
else
      {
lcd.print(incoming);
      }
Working of ESP32 LoRa Setup
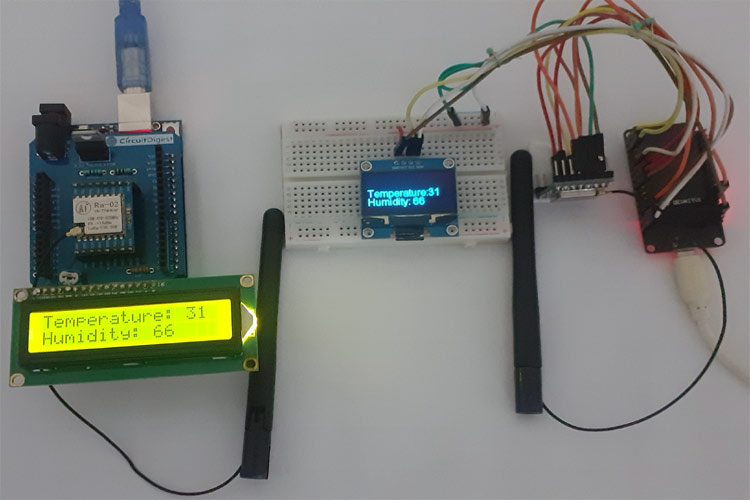
Once the hardware and program are ready, upload the below given codes in ESP32 and Arduino modules. Transmitter module will send the temperature and humidity values to Receiver Module. And receiver LoRa module will display them on LCD connected to Arduino as shown below.
Complete code along with the video for this ESP32 LoRa project is given below.
Complete Project Code
Arduino Code:
#include <SPI.h> //SPI Library
#include <LoRa.h> //LoRa Library
#include <LiquidCrystal.h> //Library for LCD
const int rs = 8, en = 7, d4 = 6, d5 = 5, d6 = 4, d7 = 3; //Mention the pin number for LCD connection
LiquidCrystal lcd(rs, en, d4, d5, d6, d7);//Initialize LCD method
void setup() {
  Serial.begin(9600); //Serial for Debugging
  lcd.begin(16, 2); //Initialise 16*2 LCD
  lcd.print("Arduino LoRa"); //Intro Message line 1
  Serial.print("Arduino LoRa"); //Intro Message line 1
  lcd.setCursor(0, 1);
  lcd.print("Receiver"); //Intro Message line 2
  delay(2000);
  if (!LoRa.begin(433E6)) { //Operate on 433MHz
    Serial.println("Starting LoRa failed!");
    lcd.print("LoRa Failed");
    while (1);
  }
}
void loop() {
  int packetSize = LoRa.parsePacket();
 // lcd.print("LoRa");
  if (packetSize) {     // If packet received
    Serial.print("Received packet '");
    lcd.clear();
    while (LoRa.available()) {
      char incoming = (char)LoRa.read();
      if (incoming == 'c')
      {
        lcd.setCursor(0, 1);
      }
      else
      {
        lcd.print(incoming);
        Serial.print(incoming);
      }
    }
  }
}

ESP32 Code:
#include <HTTPClient.h>
#include <WiFi.h>
#include <ArduinoJson.h>
#include <SPI.h>
#include <LoRa.h>
#include <Wire.h>
#include<SH1106.h>
SH1106 display(0x3c, 21, 22);
const char* ssid = "Galaxy-M20";
const char* pass = "ac312124";
int count;
//define the pins used by the transceiver module
#define ss 5
#define rst 14
#define dio0 2
const char* url = "http://api.weatherapi.com/v1/current.json?key=ade61a8aef37445d8c0100632202407&q=Jaipur";
void setup() {
  Serial.begin(115200);
  delay(2000);
  Serial.println("Connecting to ");
  Serial.println(ssid);
  WiFi.begin(ssid, pass);
  while (WiFi.status() != WL_CONNECTED)
  {
    delay(500);
    Serial.print(".");              // print ... till not connected
  }
  Serial.println("WiFi connected");
  Serial.println("LoRa Sender");
  LoRa.setPins(ss, rst, dio0);
  while (!LoRa.begin(433E6)) {
    Serial.println(".");
    delay(500);
  }
   // Change sync word (0xF3) to match the receiver
  // The sync word assures you don't get LoRa messages from other LoRa transceivers
  // ranges from 0-0xFF
  LoRa.setSyncWord(0xF3);
  Serial.println("LoRa Initializing OK!");
  display.init();
  display.flipScreenVertically();
  display.setFont(ArialMT_Plain_10);
}
void loop() {
  HTTPClient https;
  String data;
  https.begin(url);
  int httpCode = https.GET();
  if (httpCode > 0) { //Check for the returning code
    String payload = https.getString();
    char charBuf[500];
    payload.toCharArray(charBuf, 500);
    //Serial.println(payload);
  const size_t capacity = JSON_OBJECT_SIZE(2) + JSON_OBJECT_SIZE(3) + JSON_OBJECT_SIZE(8) + JSON_OBJECT_SIZE(23) + 490;
  DynamicJsonDocument doc(capacity);
  const char* json = "{\"location\":{\"name\":\"Jaipur\",\"region\":\"Rajasthan\",\"country\":\"India\",\"lat\":26.92,\"lon\":75.82,\"tz_id\":\"Asia/Kolkata\",\"localtime_epoch\":1595741089,\"localtime\":\"2020-07-26 10:54\"},\"current\":{\"last_updated_epoch\":1595740520,\"last_updated\":\"2020-07-26 10:45\",\"temp_c\":31,\"temp_f\":87.8,\"is_day\":1,\"condition\":{\"text\":\"Mist\",\"icon\":\"//cdn.weatherapi.com/weather/64x64/day/143.png\",\"code\":1030},\"wind_mph\":0,\"wind_kph\":0,\"wind_degree\":0,\"wind_dir\":\"N\",\"pressure_mb\":1008,\"pressure_in\":30.2,\"precip_mm\":0,\"precip_in\":0,\"humidity\":66,\"cloud\":50,\"feelslike_c\":32.2,\"feelslike_f\":89.9,\"vis_km\":5,\"vis_miles\":3,\"uv\":8,\"gust_mph\":7.2,\"gust_kph\":11.5}}";
  deserializeJson(doc, json);
  JsonObject location = doc["location"];
  const char* location_name = location["name"]; // "Jaipur"
  const char* location_region = location["region"]; // "Rajasthan"
  const char* location_country = location["country"]; // "India"
  JsonObject current = doc["current"];
  long current_last_updated_epoch = current["last_updated_epoch"];
  const char* current_last_updated = current["last_updated"]; //
  int current_temp_c = current["temp_c"]; // 31
  int current_humidity = current["humidity"]; // 66
  Serial.print("Temperature: ");
  Serial.println(current_temp_c);
  Serial.println("Humidity: ");
  Serial.println(current_humidity);
  Serial.print("Sending packet: ");
//  Serial.println(counter);
  //Send LoRa packet to receiver
  LoRa.beginPacket();
  LoRa.print("Temperature: ");
  LoRa.print(current_temp_c);
  String Temp = String(current_temp_c);
  LoRa.print("c");
  LoRa.print("Humidity: ");
  LoRa.print(current_humidity);
  String Humidity = String(current_humidity);
  LoRa.endPacket();
  display.clear();
  display.setTextAlignment(TEXT_ALIGN_LEFT);
  display.setFont(ArialMT_Plain_16);
  display.drawString(0, 23, "Temperature:");
  display.drawString(94, 23, Temp);
  display.drawString(0, 38, "Humidity:");
  display.drawString(70, 38, Humidity);
   display.display();
  delay(5000);
}
  else {
    Serial.println("Error on HTTP request");
  }
  https.end();
  count++;
}