
GPS stands for Global Positioning System and it is used to find out location, altitude, speed, date and time in UTC. In this project we are going to interface a GPS module with NodeMCU. A simple local web server is created using NodeMCU and the location details are updated in that server webpage. Specialty of this IoT based project is we can check the location in Goolge Maps by clicking on the link provided in the web page. You can also open this webpage and check the location from anywhere by activate port forwarding in your modem/router.
Components Required:
- NodeMCU ESP12
- GPS module (uBlox Neo 6M GPS)
GPS Module:
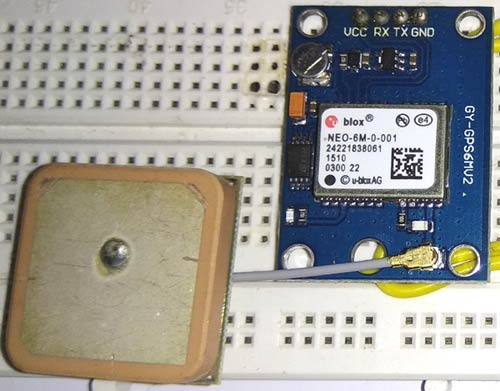
Ublox Neo 6M is a serial GPS module which provides location details through serial communication. It has four pins.
pin | Description |
Vcc | 2.7 – 5V power supply |
Gnd | Ground |
TXD | Transmit Data |
RXD | Receive Data |
Ublox neo 6M GPS module is TTL compatible and its specifications is given below.
| Capture time | Cool start : 27s , Hot start :1s |
| Communication protocol | NMEA |
| Serial communication | 9600bps , 8 data bits , 1 stop bit , no parity and no flow control |
| Operating current | 45mA |
Getting Location Data from GPS:
The Module will transmit data in multiple strings at 9600 Baud Rate. If we use an UART terminal with 9600 Baud rate, we will see the data received by GPS.
GPS module sends the Real time tracking position data in NMEA format (see the screenshot above). NMEA format consist several sentences, in which four important sentences are given below. More detail about the NMEA sentence and its data format can be found here.
- $GPGGA: Global Positioning System Fix Data
- $GPGSV: GPS satellites in view
- $GPGSA: GPS DOP and active satellites
- $GPRMC: Recommended minimum specific GPS/Transit data
Learn more about GPS data and NMEA strings here.
This is the data received by GPS when connected on 9600 baud rate.
$GPRMC,141848.00,A,2237.63306,N,08820.86316,E,0.553,,100418,,,A*73
$GPVTG,,T,,M,0.553,N,1.024,K,A*27
$GPGGA,141848.00,2237.63306,N,08820.86316,E,1,03,2.56,1.9,M,-54.2, M,,*74
$GPGSA,A,2,06,02,05,,,,,,,,,,2.75,2.56,1.00*02
$GPGSV,1,1,04,02,59,316,30,05,43,188,25,06,44,022,23,25,03,324,*76
$GPGLL,2237.63306,N,08820.86316,E,141848.00,A,A*65
When we use GPS module for tracking any location, we only need coordinates and we can find this in $GPGGA string. Only $GPGGA (Global Positioning System Fix Data) String is mostly used in programs and other strings are ignored.
$GPGGA,141848.00,2237.63306,N,08820.86316,E,1,03,2.56,1.9,M,-54.2,M,,*74
What is the meaning of that line?
Meaning of that line is:-
1. String always starts with a “$” sign
2. GPGGA stands for Global Positioning System Fix Data
3. “,” Comma indicates the separation between two values
4. 141848.00: GMT time as 14(hr):18(min):48(sec):00(ms)
5. 2237.63306,N: Latitude 22(degree) 37(minutes) 63306(sec) North
6. 08820.86316,E: Longitude 088(degree) 20(minutes) 86316(sec) East
7. 1 : Fix Quantity 0= invalid data, 1= valid data, 2=DGPS fix
8. 03 : Number of satellites currently viewed.
9. 1.0: HDOP
10. 2.56,M : Altitude (Height above sea level in meter)
11. 1.9,M : Geoids height
12. *74 : checksum
So we need No. 5 and No.6 to gather information about the module location or, where it is located. In this project we have used a GPS Library that provides some functions to extract the latitude and longitude so we don’t have to worry about that.
We have previously interface GPS with other microcontrollers:
· Raspberry Pi GPS Module Interfacing Tutorial
· Interfacing GPS Module with PIC Microcontroller
· Track A Vehicle on Google Maps using Arduino, ESP8266 & GPS
Interfacing GPS with ESP12E NodeMCU:
NodeMCU is ESP8266 based development board. It features ESP-12E as its processing core. It is a 32bit MCU. It has 14 GPIO pins, single channel 10 bit integrated ADC. It supports UART, I2C, SPI communication. It is 3.3V compatible, it cannot handle 5V. If you are new to NodeMCU then read our Getting Started with NodeMCU ESP-12.
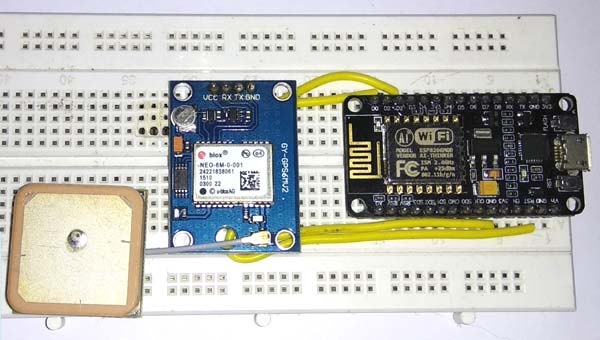
The connections between NodeMCU and GPS module is as shown below.
NodeMCU | GPS module |
3V3 | Vcc |
GND | GND |
D1 (GPIO5) | RX |
D2 (GPIO4) | TX |
Below is the circuit Diagram of connecting GPS with NodeMCU:

GPS module takes some time to capture location details once it is powered on. NodeMCU starts webserver and waits for a client to get connected to the webserver. Once client is connected to the webserver, NodeMCU sends location details to connected client. The location details are displayed in a simple webpage designed using HTML.
Steps:
- Connect the circuit as shown in the schematic.
- Upload the code after changing Wi-Fi credentials.
- Open serial monitor in Arduino IDE and note down IP address of the webserver.
- Open any Browser and enter the IP address of the webserver.
- It will display Location details, date, time and Google maps link.
Code explanation:
The complete source code for this project is given at the end of this article. The code is split into small meaningful chunks and explained below.
To interface GPS module with NodeMCU we need to include appropriate header files. The header files can be downloaded from the links given below.
Tiny GPS++ library : https://github.com/mikalhart/TinyGPSPlus/archive/v1.0.2.zip
#include <TinyGPS++.h>
#include <SoftwareSerial.h>
#include <ESP8266WiFi.h>
To create a webserver using NodeMCU, it needs to be connected to Wi-Fi Network. In this part of the code we are providing Wi-Fi credentials of the wireless network to which NodeMCU gets connected. Replace this with your Wi-Fi credentials.
const char* ssid = "shashi";
const char* password = "12345678”;
In this part of the code we are creating an object of the class TinyGPSPlus and defining the pins on which GPS module is connected. GPS module is connected to pins 4 and 5 (GPIO4 and GPIO5) of the NodeMCU. To support Serial communication on pin 4 and 5, we are using “SoftwareSerial” library to create virtual Serial port.
TinyGPSPlus  gps;              // The TinyGPS++ object
SoftwareSerial  ss(4, 5) ;   // The serial connection to the GPS device.
This line of the code indicates port number of webserver being created. For HTTP connection, default port number is 80.
WiFiServer server(80);
To create webserver using NodeMCU, the below mentioned piece of code is used. After creating the webserver, it prints the IP address of the webserver in Serial Monitor. Later this IP address is used to access the webserver within the local network.
  server.begin () ;
  Serial.println ("Server started") ;
  Serial.println (WiFi.localIP()) ;       // Print the IP address
Next we have to start reading the Serial data sent out from GPS module and if it is error free, we have to extract location details from it. To extract location details we are using TinyGPSPlus library. This part of the code does the above work.
while (ss.available() > 0)
    if ( gps.encode( ss.read() ))
If the received string is error free, first we have to check whether the location is valid or not. If the location is valid we have to extract latitude and longitude from it. Then it is converted to string format for displaying it in Webpage. To accomplish this task, we are using this piece of code.
if (gps.location.isValid())
      {
        lattitude = gps.location.lat();
        lat_str = String(lattitude , 6);
        longitude = gps.location.lng();
        lng_str = String(longitude , 6);
      }
We need to follow same steps to extract date and time.
if (gps.date.isValid())
      {
        date = gps.date.day();
        month = gps.date.month();
        year = gps.date.year();
      }
To extract Time, we need to follow same procedure, but GPS provides time is in UTC format. To convert UTC to IST we need to add an offset of + 5 hours and 30 minutes to UTC. This part of the code does the conversion from UTC to IST.
  minute = (minute + 30);
        if (minute > 59)
        {
          minute = minute - 60;
          hour = hour + 1;
        }
        hour = (hour + 5) ;
        if (hour > 23)
          hour = hour – 24;
This time is in 24 hour format. To convert 24 hour to 12 hour format, below mentioned code is used.
if (hour >= 12)
          pm = 1;
 else
          pm = 0;
hour = hour % 12;
In this part of the code we are checking if a client is connected to webserver. it waits till a client is connected.
  WiFiClient client = server.available();
  if (!client)
  {
    return;
  }
Once a client is connected, webserver need to send response to the client. The webpage is designed using HTML. The HTML code for webpage is given at the end of this article. The latitude, longitude, date and time values are updated once the data is received from GPS module. In this part of the code we are sending response to the client. Where ‘s’ is a string which contains HTML code for webpage and location details.
client.print(s);
HTML code for webpage:
<!DOCTYPE html>
<html>
<head>
<title>GPS Interfacing with NodeMCU</title>
<style>
a:link {
    background-color: YELLOW;
    text-decoration: none;
}
table, th, td {border: 1px solid black;}
</style>
</head>
<body>

<h1  style="font-size:300%;" ALIGN=CENTER> GPS Interfacing with NodeMCU</h1>
<p style="font-size:150%; text-align:center;"> <b>Location Details</b></p>
<table ALIGN=CENTER style="width:50%">
  <tr>
    <th>Latitude</th>
    <td ALIGN=CENTER >12.9000</td>
  </tr>

  <tr>
    <th>Longitude</th>
    <td ALIGN=CENTER >77.5900</td>
  </tr>

  <tr>
    <th>Date</th>
    <td ALIGN=CENTER >22 / 06 / 18</td>
  </tr>

  <tr>
    <th>Time</th>
    <td ALIGN=CENTER >07:12:12</td>
  </tr>

</table>

<p align=center><a style="color:RED;font-size:125%;" href="http://maps.google.com/maps?&z=15&mrt=yp&t=k&q=12.870790+77.658173" target="_top">Click here!</a> To check the location in Google maps.</p>

</body>
</html>
This is how the webpage looks after we open the IP of local webserver in web browser.
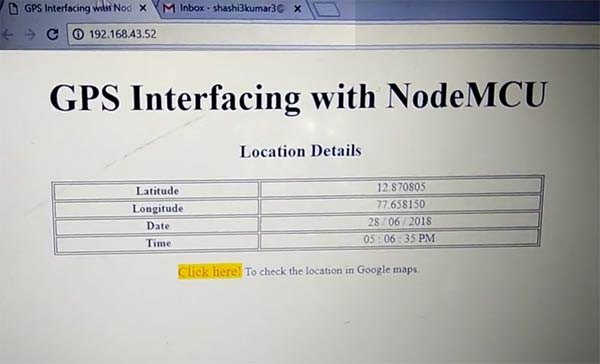
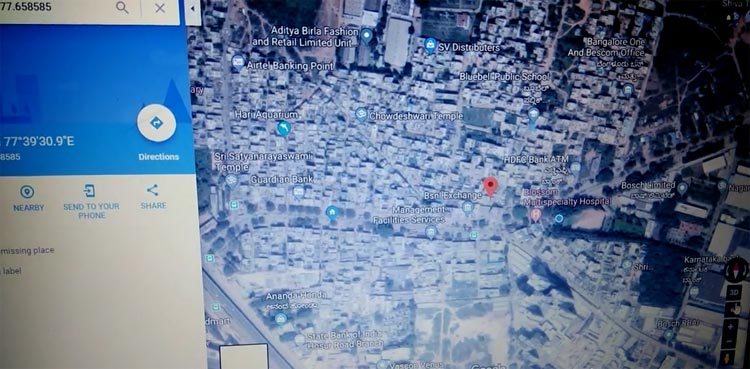
When you click on the link “Click here”, it will open the location in Google Maps like below:
If you are new to GPS module and facing problems in getting this module to work check out the Neo 6M GPs module not working troubleshooting guide article to check out the common problems with this module and how to solve them.
Complete Project Code
#include <TinyGPS++.h>
#include <SoftwareSerial.h>
#include <ESP8266WiFi.h>

TinyGPSPlus gps;  // The TinyGPS++ object
SoftwareSerial ss(4, 5); // The serial connection to the GPS device
const char* ssid = "shashi";
const char* password = "12345678";
float latitude , longitude;
int year , month , date, hour , minute , second;
String date_str , time_str , lat_str , lng_str;
int pm;

WiFiServer server(80);
void setup()
{
  Serial.begin(115200);
  ss.begin(9600);
  Serial.println();
  Serial.print("Connecting to ");
  Serial.println(ssid);
  WiFi.begin(ssid, password);
  while (WiFi.status() != WL_CONNECTED)
  {
    delay(500);
    Serial.print(".");
  }
  Serial.println("");
  Serial.println("WiFi connected");
  server.begin();
  Serial.println("Server started");
  // Print the IP address
  Serial.println(WiFi.localIP());
}
void loop()
{
  while (ss.available() > 0)
    if (gps.encode(ss.read()))
    {
      if (gps.location.isValid())
      {
        latitude = gps.location.lat();
        lat_str = String(latitude , 6);
        longitude = gps.location.lng();
        lng_str = String(longitude , 6);
      }
      if (gps.date.isValid())
      {
        date_str = "";
        date = gps.date.day();
        month = gps.date.month();
        year = gps.date.year();
        if (date < 10)
          date_str = '0';
        date_str += String(date);
        date_str += " / ";
        if (month < 10)
          date_str += '0';
        date_str += String(month);
        date_str += " / ";
        if (year < 10)
          date_str += '0';
        date_str += String(year);
      }
      if (gps.time.isValid())
      {
        time_str = "";
        hour = gps.time.hour();
        minute = gps.time.minute();
        second = gps.time.second();
        minute = (minute + 30);
        if (minute > 59)
        {
          minute = minute - 60;
          hour = hour + 1;
        }
        hour = (hour + 5) ;
        if (hour > 23)
          hour = hour - 24;

        if (hour >= 12)
          pm = 1;
        else
          pm = 0;
        hour = hour % 12;

        if (hour < 10)
          time_str = '0';
        time_str += String(hour);
        time_str += " : ";
        if (minute < 10)
          time_str += '0';
        time_str += String(minute);
        time_str += " : ";
        if (second < 10)
          time_str += '0';
        time_str += String(second);
        if (pm == 1)
          time_str += " PM ";
        else
          time_str += " AM ";
      }
    }
  // Check if a client has connected
  WiFiClient client = server.available();
  if (!client)
  {
    return;
  }
  // Prepare the response
  String s = "HTTP/1.1 200 OK\r\nContent-Type: text/html\r\n\r\n <!DOCTYPE html> <html> <head> <title>GPS Interfacing with NodeMCU</title> <style>";
  s += "a:link {background-color: YELLOW;text-decoration: none;}";
  s += "table, th, td {border: 1px solid black;} </style> </head> <body> <h1  style=";
  s += "font-size:300%;";
  s += " ALIGN=CENTER> GPS Interfacing with NodeMCU</h1>";
  s += "<p ALIGN=CENTER style=""font-size:150%;""";
  s += "> <b>Location Details</b></p> <table ALIGN=CENTER style=";
  s += "width:50%";
  s += "> <tr> <th>Latitude</th>";
  s += "<td ALIGN=CENTER >";
  s += lat_str;
  s += "</td> </tr> <tr> <th>Longitude</th> <td ALIGN=CENTER >";
  s += lng_str;
  s += "</td> </tr> <tr>  <th>Date</th> <td ALIGN=CENTER >";
  s += date_str;
  s += "</td></tr> <tr> <th>Time</th> <td ALIGN=CENTER >";
  s += time_str;
  s += "</td>  </tr> </table> ";


  if (gps.location.isValid())
  {
     s += "<p align=center><a style=""color:RED;font-size:125%;"" href=""http://maps.google.com/maps?&z=15&mrt=yp&t=k&q=";
    s += lat_str;
    s += "+";
    s += lng_str;
    s += """ target=""_top"">Click here!</a> To check the location in Google maps.</p>";
  }
  s += "</body> </html> \n";
  client.print(s);
  delay(100);
}
Comments
PLEASE HELP.This code is not working for my project. PLEASE HELP.
There is no output being shown on the serial monitor when i upload this project.There are no port/board issues.I have minimal knowledge of arduino.So I'm not sure what the problem is.I replaced wifi credentials and have followed the procedure as per instructions.
when i tried,the gps module prints the parsed data on serial monitor but the same data is not being sent to the webpage.

hello sir ! can you help to do it Access point mode ,when i gone outside i have no router to connect and get the log lat values is i tried a lot WiFi.mode(WIFI_AP);
WiFi.softAP(ssid, password);
Serial.println(""); ap has start but ip not print server not started please help me .