
Have you ever thought of getting your device’s location without using any GPS hardware? Sounds interesting!! Yes it is possible to get the location coordinates just using NodeMCU ESP board without any extra hardware. Here we will use ESP12E board to get live co-ordinates of our location. This becomes possible because of Google’s Geolocation API. So let’s see how this Geolocation API works and how we are able to get the location using this.
How Google Geolocation API works?
As we all know that Android OS for smartphones is powered by Google. Generally, most of the phones have GPS and Wi-Fi enabled all the time so Google not only tracks our location but it also tracks the nearby Wi-Fi networks. For example, if you are walking through a street with Wi-Fi and GPS enabled so your phone is constantly scanning the nearby Wi-Fi networks and what Google does, it saves the MAC addresses and the name of this Wi-Fi networks along with the location of our phone.

So based on the signal strengths received by phone, Google estimates the location of that particular Wi-Fi network and it saves that data into the database. Therefore, next time if anybody will pass through that same Wi-Fi networks and does not have GPS enabled in his phone he can still get the location of the phone based on the location of that particular Wi-Fi network.
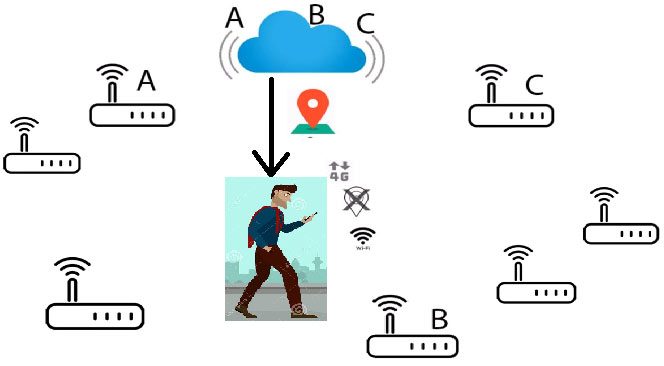
So more the number of Wi-Fi networks nearby more precise will be the location. This is how the Geolocation by Google works. For more information, you can check the Documentation of the Geolocation API.
Now, we will use this magic of Geolocation API in NodeMCU ESP12E board and try to get the location coordinates. Here we will use serial monitor of Arduino IDE to see the Co-ordinates. Alternatively you can interface an OLED display with the ESP12-e to display the data or if you are new to ESP board then start with Blinking LED with ESP12E.
Getting API key from Google Geolocation
To use Google’ Geolocation service, we need a Google account and API key. Follow below steps to get the API key.
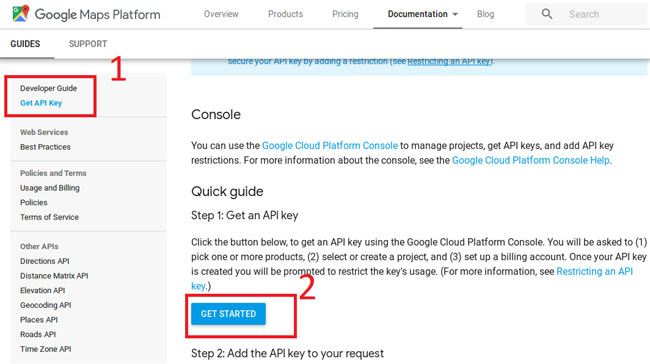
Step 1:- Go to Google developers page , login with your Google account and click on Get API key and then click on Get started.
Step 2:- By clicking on Get started, a New window will be open as shown below.
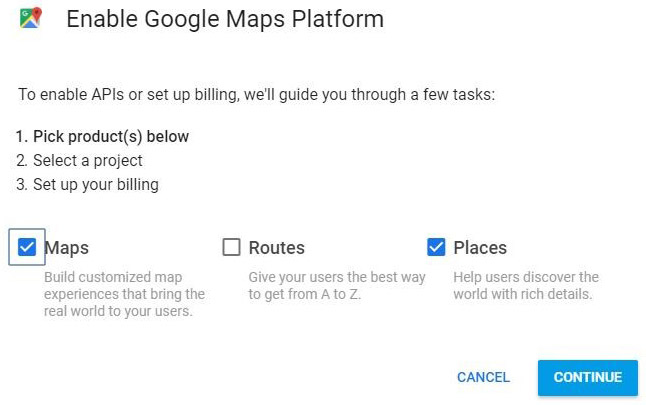
Click on Maps and Places for Pick Product option then click on continue.
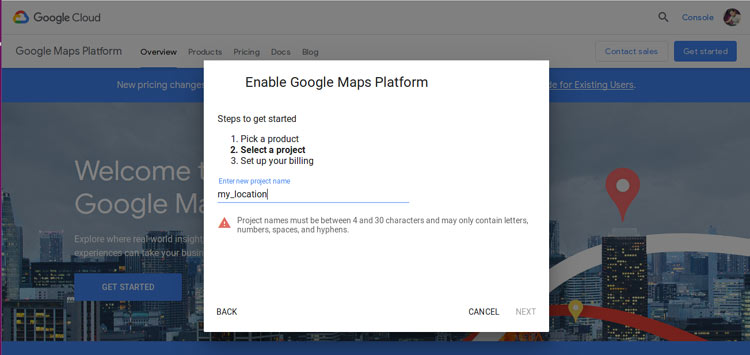
Step 3:- Give a name to your project then click on Next.
Step 4:- Next step is Set up billing. You have to save your bank card details. Although this service is free for an year, this is just to check that you are not a robot. After a year, it will not deduct amount from your account without your permission. So, just fill the details and go ahead and click on next.
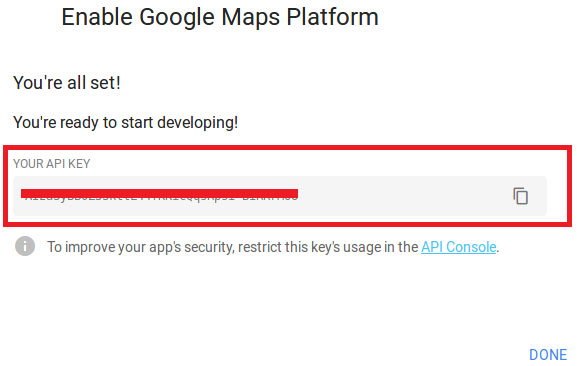
Step 5:- After that you will get your API key. Copy this key and save this key on a notepad. We need this key in our code.
Now, you are all set to proceed to coding part.
Programming NodeMCU for getting GPS data
Here We will use Arduino IDE to program ESP12. So, make sure you have downloaded ESP8266 board files. If there is no ESP8266 boards in the tool menu then follow the previous tutorials on NodeMCU.
Complete code with a demonstration Video is given at the end of the project.
For the coding part, we need three libraries ESP8266HTTPClient , ArduinoJson , ESP8266WiFi .
Then, we initialize variables for Wi-Fi name, Wi-Fi password, API key and initialize other variables used in the code.
char ssid[] = "********";         // your network SSID name
char pass[] = "********";          // your network password
String key = "your api key";
…
..

double latitude    = 0.0;
double longitude   = 0.0;
double accuracy    = 0.0;
In setup function, we set the Wi-Fi to station mode and disconnect from an AP if it was previously connected.
void setup()   {
  Serial.begin(9600);
  Serial.println("Start");
  WiFi.mode(WIFI_STA);
  WiFi.disconnect();
  delay(100);
  Serial.println("Setup done");
…
..
In loop function, we will scan all the nearby Wi-Fi networks and extract the MAC address and strength of these networks. Then, we make the json string from the extracted information and send it to the Google cloud and in return we get the co-ordinates of the location i.e. latitude, longitude and accuracy. Accuracy will depend on number of Wi-fi networks available nearby.
  int n = WiFi.scanNetworks();
  Serial.println("scan done");
  if (n == 0)
    Serial.println("no networks found");
  else
  {
   Serial.print(n);
    Serial.println(" networks found...");

    if (more_text) {
      Serial.println("\"wifiAccessPoints\": [");
      for (int i = 0; i < n; ++i)
      {
        Serial.println("{");
        Serial.print("\"macAddress\" : \"");
        Serial.print(WiFi.BSSIDstr(i));
        Serial.println("\",");
        Serial.print("\"signalStrength\": ");
.....
....
Upload the full code given at the end to the board and open the Serial monitor.
You will see the co-ordinates and accuracy of your location as shown below.

Now, open Google maps in your smartphone and enter the latitude and longitude separated by comma (,). You will see your location on the map as shown.
![]()
So we have seen how easy it is to get the current location of any devices just by using versatile ESP12 without needing any GPS module.
Complete Project Code
#include <ESP8266HTTPClient.h>

#include <ArduinoJson.h>

#include "ESP8266WiFi.h"
char ssid[] = "********";         // your network SSID name

char pass[] = "********";          // your network password

//Credentials for Google GeoLocation API...
const char* Host = "www.googleapis.com";

String thisPage = "/geolocation/v1/geolocate?key=";

String key = "your api key";
int status = WL_IDLE_STATUS;

String jsonString = "{\n";
double latitude    = 0.0;

double longitude   = 0.0;

double accuracy    = 0.0;

int more_text = 1;    // set to 1 for more debug output

void setup()   {

  Serial.begin(9600);

  Serial.println("Start");


 // Set WiFi to station mode and disconnect from an AP if it was previously connected

  WiFi.mode(WIFI_STA);

  WiFi.disconnect();

  delay(100);

  Serial.println("Setup done");


// We start by connecting to a WiFi network

  Serial.print("Connecting to ");

  Serial.println(ssid);

  WiFi.begin(ssid, pass);
  while (WiFi.status() != WL_CONNECTED) {

    delay(500);

    Serial.print(".");

  }

  Serial.println(".");

}

void loop() {
  char bssid[6];

  DynamicJsonBuffer jsonBuffer;

  Serial.println("scan start");


// WiFi.scanNetworks will return the number of networks found

  int n = WiFi.scanNetworks();

  Serial.println("scan done");

  if (n == 0)

    Serial.println("no networks found");

  else

  {

    Serial.print(n);

    Serial.println(" networks found...");
    if (more_text) {

      Serial.println("\"wifiAccessPoints\": [");

      for (int i = 0; i < n; ++i)

      {

        Serial.println("{");

        Serial.print("\"macAddress\" : \"");

        Serial.print(WiFi.BSSIDstr(i));

        Serial.println("\",");

        Serial.print("\"signalStrength\": ");

        Serial.println(WiFi.RSSI(i));

        if (i < n - 1)

        {

          Serial.println("},");

        }

        else

        {

          Serial.println("}");

        }

      }

      Serial.println("]");

      Serial.println("}");

    }

    Serial.println(" ");

  }
// now build the jsonString...

  jsonString = "{\n";

  jsonString += "\"homeMobileCountryCode\": 234,\n"; // this is a real UK MCC

  jsonString += "\"homeMobileNetworkCode\": 27,\n";  // and a real UK MNC

  jsonString += "\"radioType\": \"gsm\",\n";         // for gsm

  jsonString += "\"carrier\": \"Vodafone\",\n";      // associated with Vodafone

  jsonString += "\"wifiAccessPoints\": [\n";

  for (int j = 0; j < n; ++j)

  {

    jsonString += "{\n";

    jsonString += "\"macAddress\" : \"";

    jsonString += (WiFi.BSSIDstr(j));

    jsonString += "\",\n";

    jsonString += "\"signalStrength\": ";

    jsonString += WiFi.RSSI(j);

    jsonString += "\n";

    if (j < n - 1)

    {

      jsonString += "},\n";

    }

    else

    {

      jsonString += "}\n";

    }

  }

  jsonString += ("]\n");

  jsonString += ("}\n");
  //-------------------------------------------------------------------- Serial.println("");
  //Connect to the client and make the api call
  WiFiClientSecure client;

  Serial.print("Requesting URL: ");

  Serial.println("https://" + (String)Host + thisPage + key);

  Serial.println(" ");

  if (client.connect(Host, 443)) {

    Serial.println("Connected");

    client.println("POST " + thisPage + key + " HTTP/1.1");

    client.println("Host: " + (String)Host);

    client.println("Connection: close");

    client.println("Content-Type: application/json");

    client.println("User-Agent: Arduino/1.0");

    client.print("Content-Length: ");

    client.println(jsonString.length());

    client.println();

    client.print(jsonString);

    delay(500);

  }
  //Read and parse all the lines of the reply from server

  while (client.available()) {

    String line = client.readStringUntil('\r');

    if (more_text) {

      Serial.print(line);

    }

    JsonObject& root = jsonBuffer.parseObject(line);

    if (root.success()) {

      latitude    = root["location"]["lat"];

      longitude   = root["location"]["lng"];

      accuracy   = root["accuracy"];

    }

  }
  Serial.println("closing connection");

  Serial.println();

  client.stop();
  Serial.print("Latitude = ");

  Serial.println(latitude, 6);

  Serial.print("Longitude = ");

  Serial.println(longitude, 6);

  Serial.print("Accuracy = ");

  Serial.println(accuracy);

}
Comments
Requesting URL: https://www.googleapis.com/geolocation/v1/geolocate?key=
closing connection
Latitude = 0.000000
Longitude = 0.000000
Accuracy = 0.00
scan start
scan done
showing this only
'WiFiClientSecure' was not declared in this scope,
'client' was not declared in this scope
'DynamicJsonBuffer' was not declared in this scope

were does this can be used rather than GPS?