
MicroPython is a lightweight version of the Python programming language developed for programming microcontrollers, SOCs, and other embedded system devices. It was created to enable developers to leverage the “easy to learn and use” nature of python for embedded systems development. With Python now the major introductory language in most schools and with it being one of the most popular and widely used programming languages across the world, through micro-python, scores of Python users are able to circumvent the stressful steep learning curve associated with using C and C++ to program microcontrollers. They can immediately start using the knowledge they have acquired over the years to access the low-level hardware just as with the other languages. Micro-python is specifically a lean implementation of Python 3 and as such is compatible with the syntax of python 3.
While MicroPython is not yet on the same popularity level as C and C++ for embedded systems development, its popularity has been on the increase with more and more microcontrollers, IDEs and development boards supporting its use. For today’s tutorial, we will be looking at one of such boards for whom firmware can be developed using MicroPython.
For today’s tutorial, we will look into developing the code for the ESP32 using MicroPython.
We will start by taking a look at why MicroPython is good for ESP32 and work our way through setting up the ESP32 for MicroPython and uploading the blink sketch with MicroPython on the ESP32.
Why MicroPython? (MicroPython vs Arduino C)
One of the well proven, easiest ways of programming the ESP32 is by using the Arduino IDE which means the use of the Arduino version of C or C++. C and C++, for decades, have been the two most popular languages for embedded systems development, and the Arduino version of the language made it even simpler which accounts for its popularity amongst makers and hobbyist due to the ease with which codes can be developed. In addition to this, Arduino has one of the largest tech communities in the world with new libraries, software fixes, new board support etc. being released by the community daily. All these make it a formidable tool for programming embedded system boards. The only real limitation one could attach to the Arduino C is the fact that it only works within the Arduino IDE. With the IDE being limited and lacking some features which could really be useful when developing a large code base, the Arduino C is not the most efficient.

MicroPython, on the other hand, is relatively new. While its user's community is growing, with support for more platforms being released, its strength cannot be compared to that of the Arduino. On the upside, MicroPython is essentially a lean version of python which is one of the most popular programming languages in the world and as such, any problem which can’t be solved by the MicroPython community can take up insights from the general python community.
Asides the community support, MicroPython also has certain features which put it way above the class of the Arduino. One of such features is the REPL. REPL stands for Read-Evaluate-Print. This feature allows you to connect to a board and execute code quickly without the need to compile or upload the entire code. As such, you can test each part of your code as you develop them.
Irrespective of which of these two you choose for your project, be sure what serves you best. With that out of the way, let's jump into building the blink example using ESP32 with MicroPython.
Required Components
To build the blink example, we will need the following components;
- DOIT ESP32 DevKit v1 (1)
- An LED (1)
- 100 Ohm Resistor (1)
- Jumper wires
- Breadboard (1)
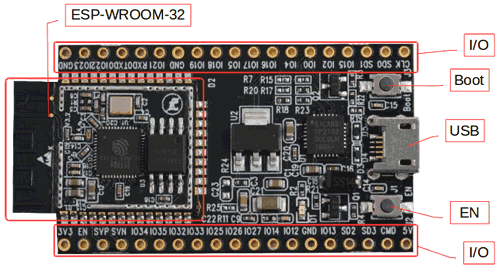
You can use any of the other ESP32 based boards in place of the DOIT ESP32 DevKit V1 and you can choose to work with the onboard LED, which means you only need the ESP32 board for this tutorial. Previously we blinked ESP32 LED by programming it using Arduino IDE.
Asides the hardware components, we will also require software like Thonny IDE
More on this software will be discussed later in this article.
Schematics
The schematics for using ESP32 with MicroPython for Blink an LED project is simple. You have seen it a countless number of times in blink projects. Connect the components as shown in the schematics below.

Later section contains a few installations and setup we need to do to be able to easily program the ESP32 using MicroPython.
Flash the ESP32 Board with the MicroPython Firmware
The first thing we need to do is to flash our ESP32 with the MicroPython firmware. This process is similar to how you flash an ESP-12e based boards with the NodeMCU firmware.
Step 1:
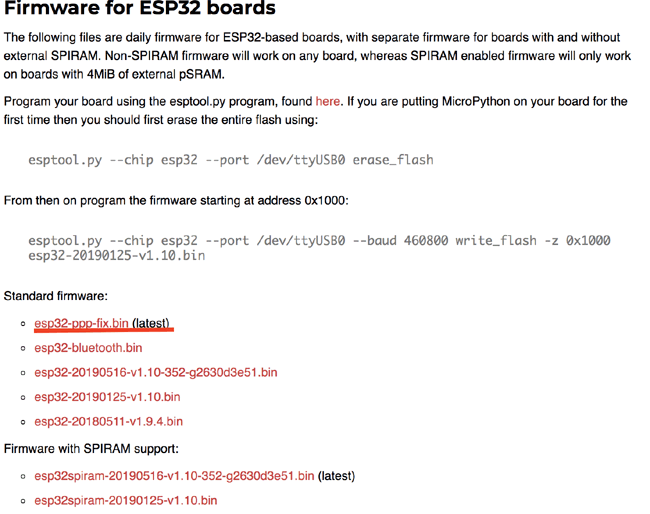
We start by downloading the bin file for the most recent MicroPython firmware from the MicroPython downloads page. You will have to choose between 3 main options depending on what works for you.
- Stable firmware builds
- Daily firmware builds
- Daily firmware builds with SPIRAM support
If you are just starting with MicroPython, the best bet is to go for the Stable firmware builds. If you are an advanced, experienced MicroPython ESP32 user who would like to follow development closely and help with testing new features, there are daily builds. If your board has SPIRAM support you can use either the standard firmware or the firmware with SPIRAM support, and in the latter case, you will have access to more RAM for Python objects.
Scroll all the way down to where you have the firmware for the ESP32 boards, and select the one you want depending on the kind of board you are using.
Step 2:
With the download done, Next step is to flash your board with the firmware. To do this, you will need to put your board in bootloader mode and then use a tool to copy the firmware from your PC to the board.
The exact procedure for putting your board in bootloader mode is highly dependent on the particular board and you will need to refer to its documentation for details. Fortunately, most boards have a USB connector, a USB-serial converter, and the DTR and RTS pins wired in a special way so deploying the firmware should be easy as all steps can be done automatically.
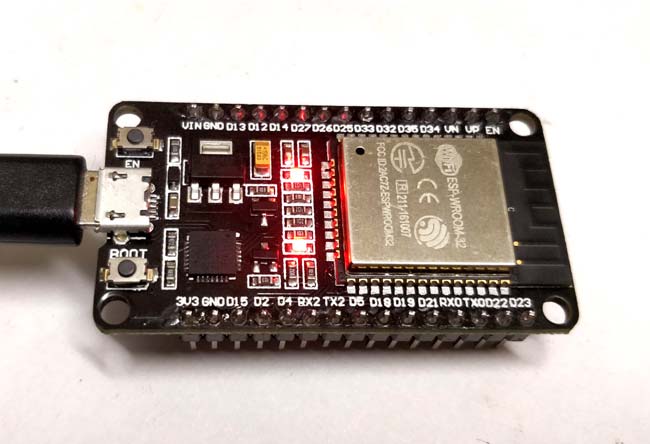
For the DOIT DevKit, you only need to press the boot button when you are about to flash the board.
To flash the ESP32 with the MicroPython firmware, we will be using the esptool.py as our copy tool.
The esptool.py requires either Python 2.7, Python 3.4 or a newer Python to be installed on your computer. We recommend using Python 3.7.X, which can be downloaded from Python’s website.
With Python 3 installed, you can go to the official esp repo and download the latest stable release of esptool.py or open a Terminal window to install it via pip.
To install via pip, open a terminal window and run:
pip install esptool
If the above doesn’t work, modify it to any of the commands below and try again.
pip3 install esptool
python -m pip install esptool
pip3 install esptool worked for me. With the installation done, your terminal should look like the image below.

You should now be able to launch the esptool by entering the command esptool.py in the terminal. Run:
esptool.py
If your installation went well, you should see a bunch of messages like in the image below.

Step 3:
For best results it is recommended to first erase the entire flash of your device before putting on new MicroPython firmware. To do this, hold down the boot/flash button on your ESP32 and run the command;
esptool.py --chip esp32 erase_flash
As soon as the process begins, you can remove your hand. The ESPtool will automatically identify the port on which your ESP32 is located.
You should now see a screen similar to this when complete.

If it gets stuck on the dots after the connecting, it means your board was not in boot/flash mode and you will need to try again.
Step 4:
With the erase complete, you can now flash the board with the new firmware by running the command;
esptool.py --chip esp32 --port <enter_the_serial_port_to_which_your_board_is_connected> write_flash -z 0x1000 <location_of_the_bin_file>
Fill the spots in the firmware with your serial port and the location of the bin file we downloaded earlier. To make things easier, you can change directory into the same folder as the bin file so you only have to enter the name of the file as the location. E.g.
esptool.py --chip esp8266 --port COM4 write_flash --flash_mode dio --flash_size detect 0x0 esp32-ppp-fix.bin
With this done, you should see remarks indicating that your board has been successfully flashed with the MicroPython Firmware and you should be able to program the board using any python IDE.
Install Thonny IDE to Program ESP32
With the firmware up, the next thing we need to do is to install a Python IDE.
IDEs provide an easy way to develop and manage code for your project. Quite a number of python IDEs with support for MicroPython exists including IDEs like Mu, thonny, UPyCraft, etc., and you can choose any of them for your project. For today’s tutorial, we will be using Thonny. Thonny is quite popular amongst makers and it scores an extra point for being one of the python development environment featured on the Raspberry Pi’s Raspbian Operating systems. I am assuming most people will be familiar with it because of this factor hence, its use for this tutorial. Download thorny from the official webpage here.

To program embedded system devices on thorny, the interpreter needs to be set to MicroPython. You can do this by going to Tools > Options > and select an interpreter. You should see a window similar to the one in the image below. Select MicroPython to be used for running the code and select the port to which your board is connected.

With this done, you are now ready to program your board using the IDE.
Program for ESP32 Blink LED with MicroPython
Blink is regarded as the hardware hello world, and the idea is basically to turn an LED “on” and “‘off” with a time delay in between, thus, it’s not complex enough for me to show you how powerful MicroPython is, but I believe its a good enough first MicroPython project.
While MicroPython does not come with the full python libraries or modules as they are commonly referred to in python, it comes with additional libraries that allow it interact with hardware on a low level to control GPIOs and interact with communication interfaces. One of those modules is the machine Module. The functions in the machine module allow direct and unrestricted access and control of hardware blocks like CPU, timer, buses, etc. on an embedded system. It is one module you will most certainly use in all your micropython projects.
To jump into the code, Create a new file, and save it as main.py. The main.py is loaded every time the board running MicroPython is powered on. Just like the loop function in an Arduino Sketch. Saving it with any other name is ok as the IDE will automatically rename it to main.py, when you instruct it to upload to a device.
We start by importing the modules to be used for the script, which in our case, are the Machine and time module.
from machine import Pin
from time import sleep
Pin helps us address specific GPIOs while sleep helps us introduce pauses like the delay() function in Arduino.
With that done, we set the pin status as output similar to what we do with the Arduino pinMode() function.
led = Pin(2, Pin.OUT)
Next, we write the while loop. The configuration of the while loop in MicroPython is similar to the void loop() function on Arduino. Here we turn “on” the LED for 0.5 seconds and turn it “off” for another 0.5 seconds.
while True:
  led.high()
  sleep(0.5)
  led.low()
  sleep(0.5)
That’s all. The complete code for the example is available below.
from machine import Pin
from time import sleep

led = Pin(2, Pin.OUT)

while True:
  led.high()
  sleep(0.5)
  led.low()
  sleep(0.5)
With the code complete. Upload it to your board by going to “device” on the title bar and selecting the “upload current script as main.py script” option.

You should see your board come up with the LED flashing intermittently.
MicroPython is arguably easier to work with compared to the Arduino C but it might take sometime before it attains its full potential as it's still yet to attain the level of support associated with C and C++ for embedded systems development. However, considering the recent trend of infusing machine learning, computer vision and other deep technologies with firmware development, MicroPython might just be the future of embedded system development.
Complete Project Code
from machine import Pin

from time import sleep
led = Pin(2, Pin.OUT)
while True:

  led.high()

  sleep(0.5)

  led.low()

  sleep(0.5)
