
By Rohan Barnwal
HomePod S3 is a Smart Desk Companion that combines everyday utilities into one compact offline-first device designed to sit permanently on your desk. The goal of this project was to answer a simple but important question:
If a small device stays on your desk all day, how can it actually make your daily life easier without distracting you?
Instead of building another trendy IoT gadget, we focused on solving small but real problems that people face daily-staying focused while studying or working, managing tasks, remembering medicines, and controlling basic room comfort - all without relying on cloud services or mobile apps.
HomePod S3 brings together:
- Touch-based control for lights and fan
- Offline voice commands for hands free use
- A local Web UI for remote control from phone or laptop
- Study timer (Pomodoro-style)
- To-do list
- Medicine reminders
- Temperature display
- Lock screen with slide to unlock
To make the device blend naturally into a desk setup, we also designed and 3D printed a custom outer enclosure with a gear shaped pen holder. This adds practical value as a small desk organizer while making the device look like a real everyday product instead of a prototype.
Features & Their Benefits
Touch Based Light & Fan Control
Benefit: Instant control without opening any mobile app. Reduces distractions and keeps your phone away while working or studying.
Offline Voice Commands (Hands Free Control)
Benefit: Control lights, fan, and screens even when your hands are busy or you're away from the desk - works without internet, ensuring privacy.
Local Web UI (Phone/Laptop Control)
Benefit: Lets you control everything from another device on the same Wi-Fi without installing any app or relying on cloud services.
Study Timer
Benefit: Helps maintain focus during study or work sessions and creates discipline without touching your smartphone.
To-Do List on Desk
Benefit Tasks remain visible throughout the day, unlike phone apps that distract you with notifications and social media.
Medicine Reminders (Audio + Visual Alerts)
Benefit Reduces missed doses for elderly users or anyone with daily medication routines.
Room Temperature Display
Benefit Gives quick awareness of room comfort during long work or study sessions.
Lock Screen with Slide-to-Unlock
Benefit Prevents accidental touches and makes the device feel like a finished consumer product rather than a prototype.
All features are designed to work offline-first ensuring low latency better privacy and zero dependency on cloud services.
Why We Chose ESP32-S3 Box3
We specifically chose the ESP32 S3 Box3 as the core of the HomePod S3 because it offers everything needed to build a polished, real world, smart device on a single platform:
- Built-in capacitive touch display
- Wi-Fi for local Web UI (no cloud required)
- Dual-core MCU for UI + web server + voice + Sensors
- Compact, desk friendly form factor
Using ESP32-S3 Box3 allowed us to focus more one user experience and real world usability instead of building basic infrastructure from scratch.
We would like to sincerely thank the entire team of CircuitDigest and Digi-Key for providing the hardware, articles and for organizing such hands on hackathon. Their articles resources helped us a lot throughout the development, and opportunity like this push students and makers to explore real-world embedded systems.
We truly appreciate their support and wish both CircuitDigest and Digi-Key the very best for future initiatives and hackathons.
Components Required
| Component Name | Quantity | Datasheet/Link |
| ESP32 S3 Box 3 | 1 | View Datasheet |
| DHT 11 Sensor | 1 | View Datasheet |
| DF2301Q Offline Voice Recognition Module | 1 | View Datasheet |
| Buzzer | 1 | View Datasheet |
| Jumper Wires | 1 | View Datasheet |
| 4 Channel Relay Module | 1 | View Datasheet |
| 3v Small Motor | 1 | View Datasheet |
Circuit Diagram

DF2301Q Voice Module → ESP32-S3 Box3
- RX to GPIO 44
- TX to GPIO 43
- GND to GND
- VCC to 3V
PRECAUTION: Ensure the DF2301Q module is switched from I2C to UART mode, otherwise voice commands will not works
DHT11 Sensor → ESP32-S3 Box3
- DATA to GPIO 42
- GND to GND
- VCC to 3V
4 Channel Relay Module → ESP32-S3 Box3
- IN1 to GPIO 10
- IN2 to GPIO 14
- IN3 to GPIO 13
- VCC to 3V
- GND to GND
Buzzer → ESP32-S3 Box3
- VCC to GPIO 41
- GND to GND
DC Motor → ESP32-S3 Box3
- VCC to GPIO 21
- GND to GND
Follow these steps to assemble HomePod S3 and wire all modules safely and correctly
Step1: Mount the ESP32 S3 Box3 into the Dock Board
Step 2: Connect the Relay Module to the following pins (Light Control)
- IN1 to GPIO 10
- IN2 to GPIO 14
- IN3 to GPIO 13
- VCC to 3v
- GND to GND
Step 3: Connect the DC Motor to the following pins (Fan Control via PWM)
- Motor positive terminal to GPIO 21
- Motor negative terminal to GND
Step 4: Connect the DF2301Q Offline Voice Module (UART Mode)
- TX to GPIO 44
- RX to GPIO 43
- GND to GND
- VCC to 3v
Step 5: Connect the DHT11 Temperature to the following pins
- Data to GPIO 42
- VCC to 3v
- GND to GND
Step 6: Connect the Buzzer (Alerts & Notifications)
- Buzzer positive terminal to GPIO 41
- Buzzer negative terminal to GND
Step 7: Train Wake Word and Voice Commands
The DF2301Q module supports training using voice commands only:
- Wake the module using the default wake word
- Say “Learning wake word” to train a custom wake command (optional)
- Follow the voice prompts to record your new wake word
- Say “Learning command word” to start training control commands
- (e.g., “Light one on”, “Fan speed three”, “Open timer”)
- Repeat each command as prompted (2–3 times)
- Say “Exit learning” to finish training
Perform training in a quiet environment for better recognition accuracy.
You can refer to the DF2301Q documentation for the full list of learning commands and IDs.
Operation & Usage
Navigation between Screens
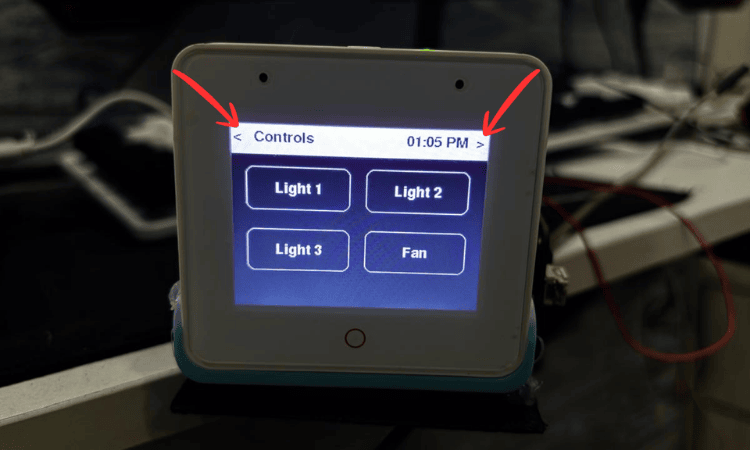
< and > buttons on the screen are used to navigate between
- Controller Screen
- Timer Screen
- To-Do List Screen
- Medicine List Screen
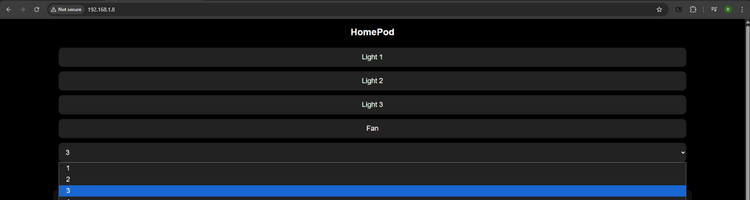
Controller Screen (Lights & Fan)
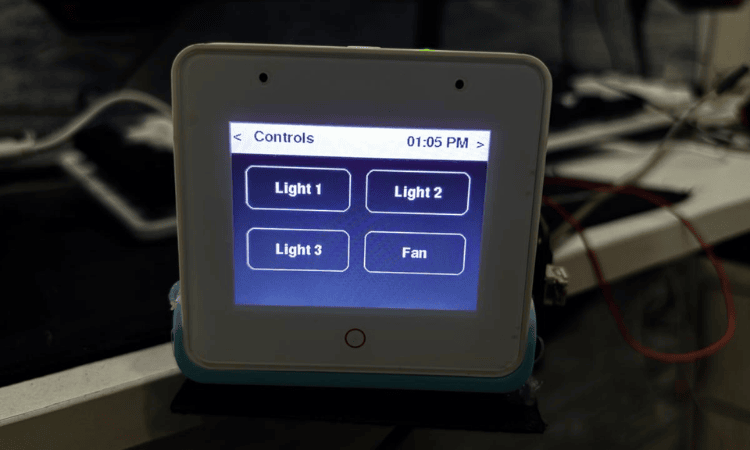
- Controls Light 1, Light 2, Light 3 ON/OFF
- Controls Fan ON/OFF
Fan Speed Pop-up:
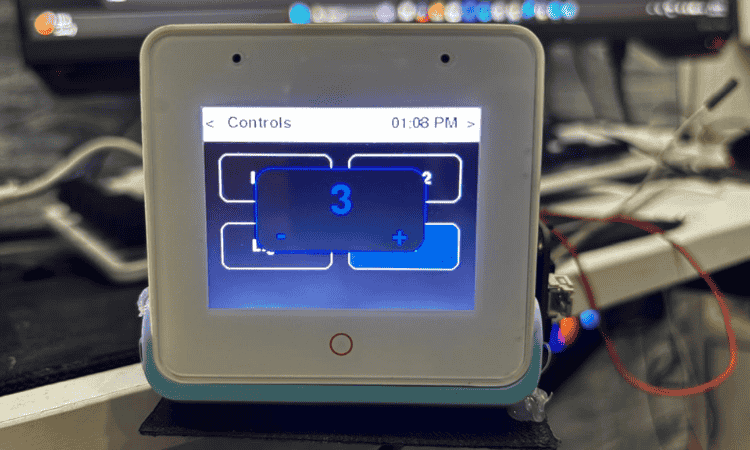
- Double-tap the Fan icon - a popup appears
- Use + and - to increase or decrease fan speed
Timer Screen
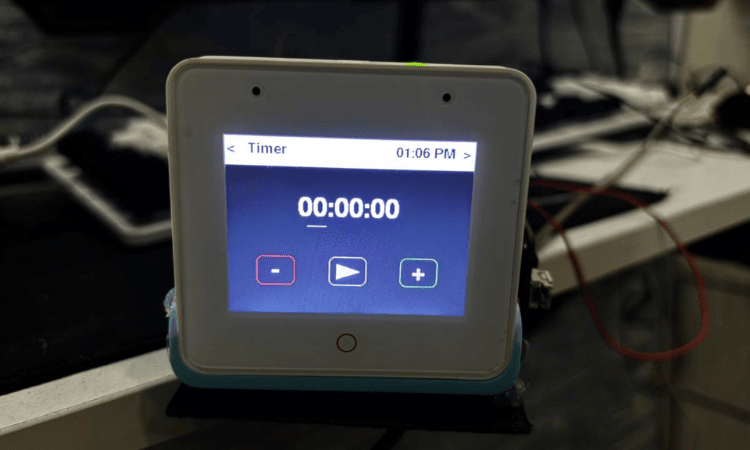
- Set time in HH:MM:SS format
- +/- adjusts hours, minutes, seconds
- Play/Pause to start and stop the timer
When timer ends:

- Buzzer sounds
- Big Timer DONE screen appears
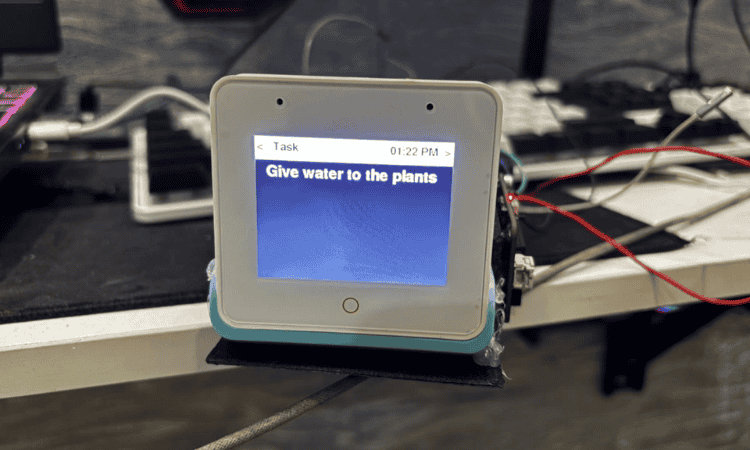
To-Do List Screen
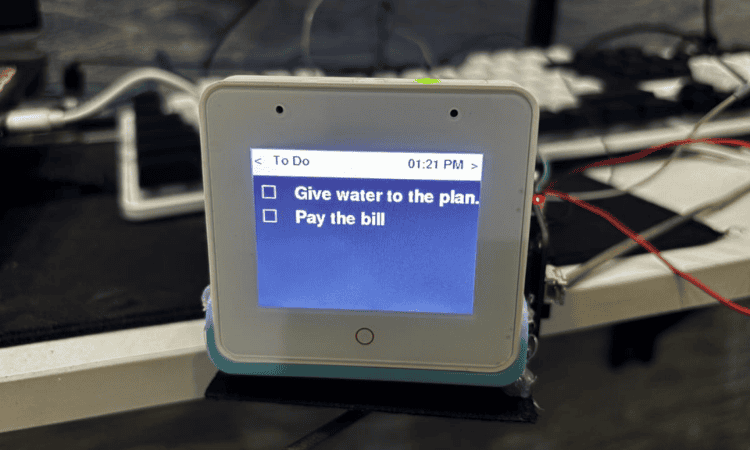
- Tasks added from Web UI appear here
- Tap any task to view full text
- Checkbox on the side deletes the task (task completed)
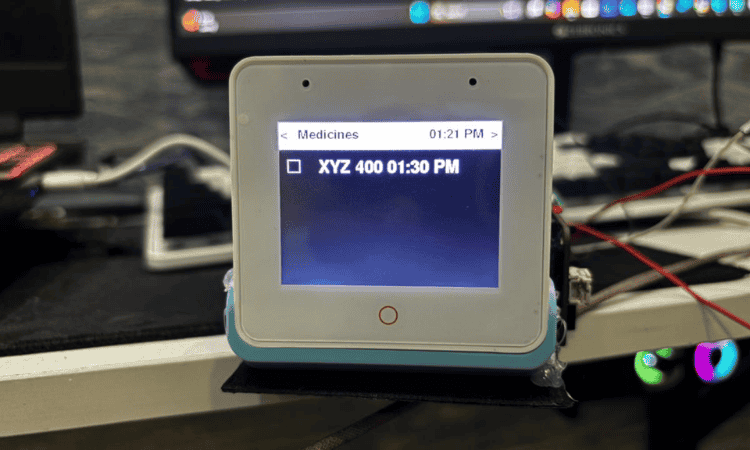
Medicine List Screen
- Medicines added from Web UI appear here
- Ticking the checkbox stops further reminders for that dose
Lock Screen
- Auto-lock after idle
- Shows time, temperature, slide to unlock
- Wake via touch or voice

Web UI (Local Web Dashboard)
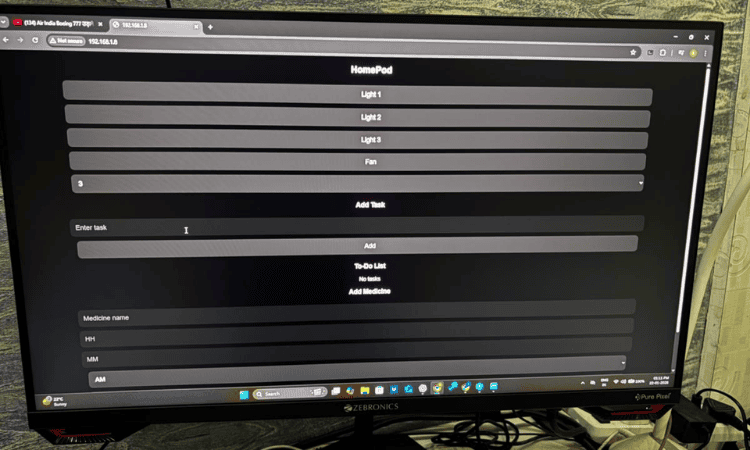
Light & Fan Controls
- Light 1, Light 2, Light 3 ON/OFF
- Fan ON/OFF
- Fan speed set via dropdown menu
Add Task Section
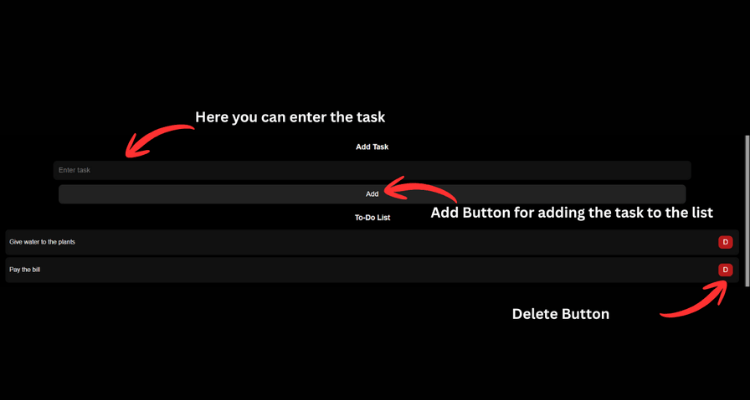
- Add tasks (max 5 tasks)
- D button deletes a task
- Changes sync instantly to device
Medicine List Section
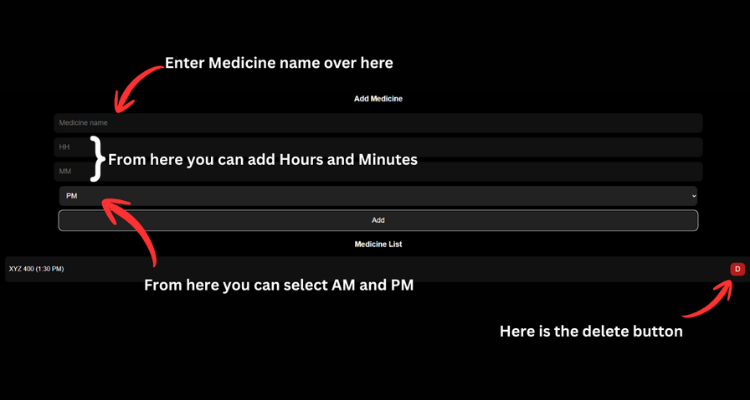
- Add medicine name + time + AM/PM
- Add button to save
- D button deletes medicine
- Real-time sync with device
Code Explanation
The firmware for HomePod S3 is written using the Arduino framework for ESP32 S3 Box3.
It integrates touch UI, offline voice control, web server, sensors, timers, and GPIO control into one application.
To keep everything responsive, the code is structured into clear modules:
Libraries & Board Setup
#include <WiFi.h>
#include <WebServer.h>
#include <time.h>
#include <DHT.h>
#include <LovyanGFX.hpp>
#include "DFRobot_DF2301Q.h"
These libraries enable:
Wi-Fi & WebServer: Local Web UI
NTP time sync: Lock screen clock + medicine reminders
DHT sensor: Room temperature display
LovyanGFX: Touch display UI
DF2301Q UART: Offline voice recognition
The ESP32-S3 Box3 display is auto-detected using:
#define LGFX_ESP32_S3_BOX_V3
#include <LGFX_AUTODETECT.hpp>
Pin Mapping & Hardware Control
All hardware connections are defined at the top for clarity:
Light (Relay Module):
#define GPIO_LIGHT1 10
#define GPIO_LIGHT2 14
#define GPIO_LIGHT3 13
Fan (PWM Motor Control):
#define FAN_PWM_PIN 21Buzzer:
#define BUZZER_PIN 41DHT 11 Temperature Sensor:
#define DHTPIN 42Voice Module (UART):
#define ASR_RX 44
#define ASR_TX 43
UI State Machine (Screen & Navigation)
The UI is implemented as a screen based state machine:
enum Screen { SCREEN_MAIN, SCREEN_TIMER, SCREEN_TASKS, SCREEN_TASK_DETAIL, SCREEN_MEDICINES };
Screen currentScreen = SCREEN_MAIN;
Each screen has its own draw function:
- drawMain(): Lights & Fan
- drawTimer(): Study timer
- drawTasks(): To do list
- drawTaskDetail(): Full task view
- drawMedicines(): Medicine reminders
- drawLockScreen(): Clock + Temperature + slide-to-unlock
Navigation is handled by touch on < and > arrows and also via voice commands
Touch Input Handling
Touch events are captured using:
if(lcd.getTouch(&x, &y)) { ... }Based on touch coordinates:
- Buttons toggle lights and fan
- Double-tap opens fan speed popup
- Timer values are adjusted
- Tasks are selected or deleted
- Lock screen slider unlocks the UI
This makes the interface feel like a real product instead of simple buttons.
Offline Voice Command Handling
The DF2301Q voice module sends a command ID when a voice command is recognized:
uint8_t cmd = asr.getCMDID();
if(cmd){
 handleVoiceCommand(cmd);
}
inside handleVoiceCommand(id):
Lights ON/OFF
Fan ON/OFF & speed change
Screen navigation (Timer, Tasks, Medicines)
Voice unlock when device is locked
Voice input is treated as user activity, so it also prevents auto lock.
Fan Speed Control using PWM
Fan speed is controlled using PWM:
ledcAttach(FAN_PWM_PIN, FAN_PWM_FREQ, FAN_PWM_RES);Speed levels are mapped to duty cycles:
case 1: duty = 51;   // 20%
case 2: duty = 102;  // 40%
case 3: duty = 153;  // 60%
case 4: duty = 204;  // 80%
case 5: duty = 255;  // 100%
This allows:
Touch control
Web UI control
Voice control
All using the same PWM logic.
Local Web UI (No Cloud)
The ESP32 hosts a local web server:
WebServer server(80);Endpoints like:
- /11, /12, //13 - Toggle lights
- /fan - Toggle fan
- /speed?val=3 - set fan speed
- /add, /deltask - manage tasks
- /addmed, /delmed - manage medicines
- /status - Live JSON state
The HTML page is embedded directly in firmware using R"rawliteral(...)", so no external hosting is needed.
Timer & Medicine Reminder Logic
Study Timer:
- Uses millis() for countdown
- Shows big TIMER DONE screen
- Plays buzzer alert
Medicine Reminder:
- NTP time sync
- Checks every few seconds
- Triggers popup + buzzer
- Auto closes popup
- Allows marking medicine as taken
This makes the device actually useful for daily routines.
Lock Screen & Auto Lock
If no user interaction for 10 seconds:
if(!isLocked && millis() - lastUserInteraction > 10000){
 isLocked = true;
}
Lock screen shows:
- Time (NTP)
- Room temperature (DHT11)
- Slide-to-unlock UI
The device can also be unlocked using voice commands.
Main Loop Architecture
The loop() function acts as a task scheduler:
- Handle web requests
- Read voice commands
- Update timer
- Check medicine time
- Read temperature
- Handle touch
- Auto-lock screen
- Refresh UI
Everything runs in a non-blocking manner using millis() keeping the UI smooth.
Conclusion
HomePod S3 started as a simple idea of building a desk controller but gradually evolved into a practical offline Smart desk Companion that combines productivity, comfort and daily routine management into one compact device. Instead of focusing on flashy features or cloud-based integrations, we prioritized real-world usability, low distraction, and privacy, making the device suitable for students, working professional and elderly users alike.
Through this project, we learned how to design and integrate multiple subsystems into a single embedded product — including touch-based UI design, offline voice recognition, local web servers, sensor integration, PWM motor control, real-time scheduling, and state management on the ESP32-S3 platform. Building a complete hardware + software product helped us move beyond individual modules and think in terms of user experience, reliability, and product-like behavior.
The use of the ESP32-S3 Box3 allowed us to rapidly prototype a polished interface and focus more on solving real user problems rather than building basic infrastructure from scratch. Designing and 3D-printing a custom enclosure with a gear-shaped pen holder further pushed the project towards a real-world, desk-friendly product rather than a typical development-board demo.
Overall, HomePod S3 demonstrates how thoughtful hardware design combined with local-first software can create meaningful, distraction-free smart devices for everyday use. This project has encouraged us to further explore building practical embedded systems and improving this device in the future with more personalization, smarter scheduling, and expanded integrations.
We are grateful to CircuitDigest and Digi-Key for providing the platform, hardware, and resources that made this project possible. Opportunities like this hackathon motivate makers to experiment, learn deeply, and build solutions that matter.


Excellent article on grounding and earthing solutions. Copper bonded rods play a vital role in ensuring electrical safety and long-term performance in industrial and commercial applications. If anyone is looking for reliable Copper Bonded Rods Manufacturers, SG Power offers high-quality earthing solutions designed to meet industry standards. Their products are known for durability, corrosion resistance, and excellent conductivity. Highly recommended for effective grounding systems.