
By Aditya Shekhar Das
Medication adherence is one of the most critical challenges in modern healthcare. Patients with chronic conditions often need to take multiple medicines at specific times every day. Missing doses, taking incorrect medicines, or double dosing can reduce treatment effectiveness and in severe cases lead to serious complications.
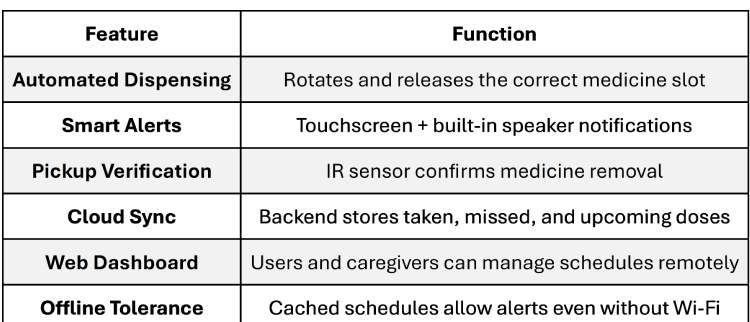
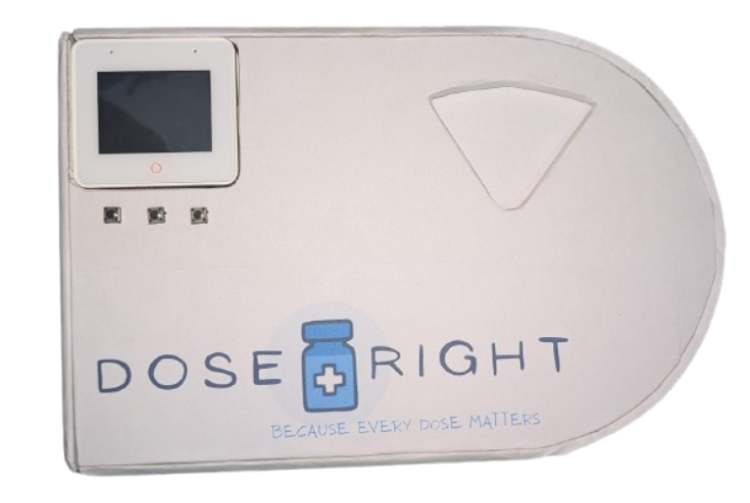
To address this issue, I developed DoseRight - Smart IoT-Based Automatic Medicine Manager, a cloud-connected medicine dispensing system that ensures medicines are taken accurately and on time. Unlike basic reminder systems, DoseRight does more than notify the user. It physically dispenses the correct medicine at the scheduled time, verifies pickup using a sensor, and synchronizes dose information with a backend server for tracking and monitoring.
What DoseRight Does
Why This Project Was Built
Many patients rely on:
- Manual pill organizers
- Phone reminders
- Memory-based routines
These methods do not confirm whether the medicine was actually taken.
DoseRight was built to:
- Reduce human error in medication intake
- Provide verified dose tracking
- Assist elderly or chronic patients
- Enable caregiver monitoring
- Create a scalable IoT-based healthcare support system
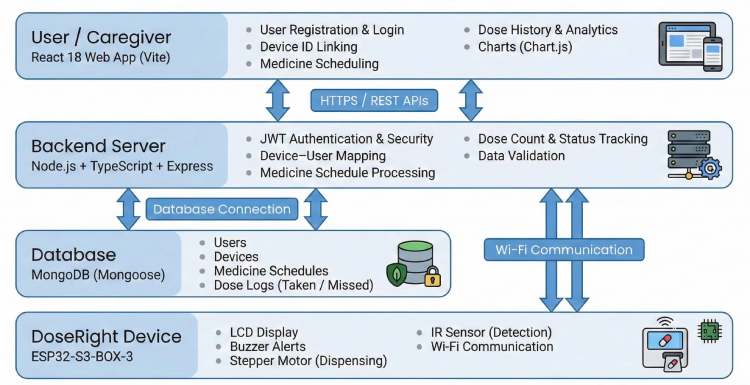
System Overview
DoseRight consists of:
- Hardware Unit - ESP32-S3 Box-3 controlled medicine dispenser
- Backend Server - Node.js + MongoDB Atlas
- Web Interface - Schedule management and dose monitoring
This three-layer architecture ensures modularity, scalability, and real-time synchronization between the physical device and the cloud.
Components Required
| Component Name | Quantity | Datasheet/Link |
| ESP32-S3-BOX-3 | 1 | View Datasheet |
| 28BYJ-48 Stepper Motor(858) | 1 | View Datasheet |
| ULN2003 Stepper Motor Driver(105990072) | 1 | View Datasheet |
| SG90 Servo Motor(SER0006) | 1 | View Datasheet |
| IR Sensor Module(ST0050) | 1 | View Datasheet |
| 5V Power Adapter(AQ03E-050A-R) | 1 | View Datasheet |
| Type-C(USB4125-GF-A) | 1 | View Datasheet |
| Push Buttons(B3F-6000) | 3 | View Datasheet |
| Switch(RA1113112R) | 1 | View Datasheet |
Circuit Diagram

The following tables shows the complete electrical connections of the DoseRight - Smart IoT-Based Automatic Medicine Manager as implemented in the firmware.
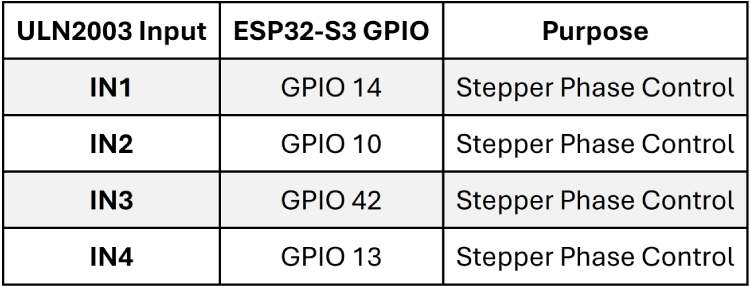
Stepper Motor (28BYJ-48 via ULN2003 Driver)
The stepper motor is controlled using four GPIO pins from the ESP32-S3.
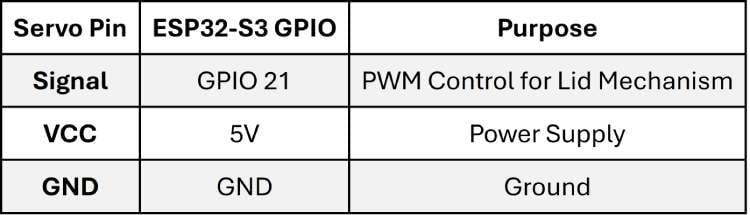
Servo Motor (Lid Control)
The SG90 servo motor is used to open and close the dispensing lid.
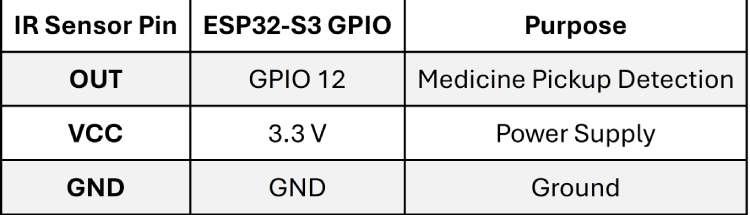
IR Sensor (Medicine Pickup Detection)
The IR sensor detects whether the medicine has been removed from the compartment.
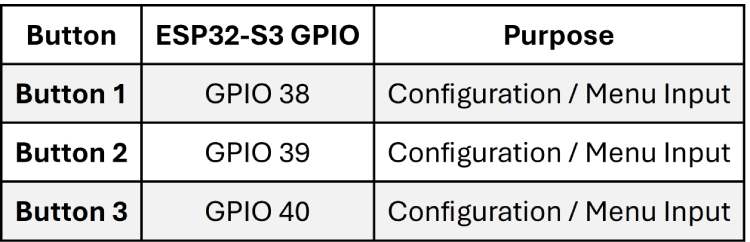
Configuration Push Buttons
Three hardware buttons are used for configuration and manual interaction.
Important Wiring Notes
- All grounds must share a common GND reference.
- The ULN2003 driver is required because the ESP32 GPIO pins cannot directly drive the stepper motor.
- Ensure stable 5V power (~2A) to prevent motor jitter or resets.
- Do not power motors directly from ESP32 GPIO pins.
Hardware Assembly
This section explains how to assemble the DoseRight smart medicine dispenser from scratch. Follow the steps in order to ensure a clean, stable, and reliable build.
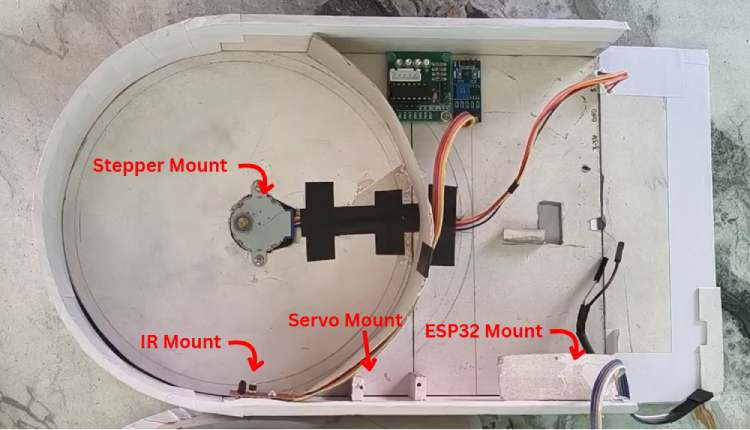
Step 1: Prepare the Enclosure & Medicine Compartments
- Use a custom enclosure (3D-printed or fabricated) with 5 fixed medicine compartments.
- Ensure each compartment aligns cleanly with the dispensing exit.
- Leave sufficient space below the compartment plate for the stepper motor shaft and wiring.
- Provide mounting positions for:
- Stepper motor
- Servo motor
- IR sensor
- ESP32-S3 Box-3
Step 2: Install the Stepper Motor (Compartment Rotation)
The 28BYJ-48 stepper motor is responsible for rotating the medicine compartments.
- Mount the stepper motor below the compartment plate.
- Align the motor shaft with the center of the rotating plate.
- Secure the motor using screws or a mounting bracket.
- Connect the stepper motor cable to the ULN2003 driver module.
NOTE - Ensure the rotation is smooth and does not jam between compartments.
Step 3: Install the Servo Motor (Lid Mechanism)
The SG90 servo motor controls the dispensing lid.
- Mount the servo motor near the dispensing lid.
- Attach the servo horn to the lid flap.
- Adjust the servo angle so:
- One position fully opens the lid
- Another position fully closes the lid
- Secure the servo firmly to prevent movement during operation.
Step 4: Place the IR Sensor (Pickup Detection)
The IR sensor verifies whether the medicine has been removed.
- Position the IR sensor at the medicine exit.
- Ensure the sensor detects pill removal clearly.
- Avoid placing the sensor too close to the lid to prevent false triggering.
- Fix the sensor using screws or adhesive.
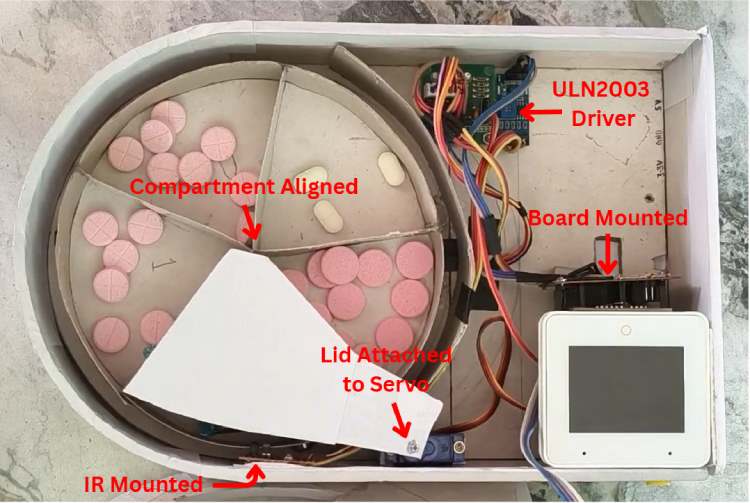
Step 5: Mount the ESP32-S3 Box-3
The ESP32-S3 Box-3 serves as the main controller and includes a built-in touchscreen and speaker.
- Secure the ESP32-S3 Box-3 inside the enclosure.
- Ensure:
- The touchscreen is visible from the front
- The speaker opening is not obstructed
- Mount the board firmly to avoid movement during interaction.
- Route all motor and sensor wires cleanly to the ESP32-S3 GPIO pins.
NOTE - Since the ESP32-S3 Box-3 includes a touchscreen and speaker, no external display or buzzer is required.
Step 6: Electrical Connections
Connect all components according to the circuit connection table:
- Stepper motor → ULN2003 → ESP32 GPIOs
- Servo motor → PWM GPIO (GPIO 21)
- IR sensor → GPIO 12
- Configuration buttons → GPIO 38, 39, 40
- All VCC lines → 5V
- All GND lines → Common Ground
NOTE - Ensure all grounds are common for stable operation.
Step 7: Power-Up & Initial Verification
Power the system using a 5V mobile charger (~2A).
Before closing the enclosure, verify:
- ESP32-S3 Box-3 boots successfully
- Touchscreen UI appears correctly
- Servo opens and closes the lid properly
- Stepper rotates compartments smoothly
- IR sensor detects pill removal
- Buttons respond correctly
Code Explanation
Technology Stack Overview

1. Firmware Implementation (ESP32-S3 Box-3)
The firmware controls the physical device, manages motor operations, verifies pill pickup, and synchronizes with the backend.
Task-Based Architecture
The firmware runs multiple concurrent FreeRTOS tasks:
- UI rendering using LVGL (~30 FPS)
- WiFi monitoring and auto-reconnect
- Backend heartbeat every 60 seconds
- Dose polling every 60 seconds
- Time synchronization (every 10 minutes)
- Button event handling
This ensures smooth UI interaction while maintaining real-time backend communication.
Slot-Based Compartment Control
Each medication is mapped to a specific slotIndex in the backend.
When a scheduled dose is received:
- The firmware reads the slot number.
- The stepper motor rotates to that slot.
- The servo opens the lid.
- The IR sensor verifies pill pickup.
- The dose is marked accordingly.
This ensures precise mechanical alignment between software schedule and physical compartments.
IR-Based Pickup Verification
The firmware does not immediately mark a dose as taken when the lid opens.
Instead:
- The IR sensor monitors pill removal.
- If pickup is detected → mark-taken API is called.
- If no pickup is detected → lid automatically closes.
- Dose remains pending or is later marked missed.
This prevents false-positive adherence logging and increases reliability.
Offline-Tolerant Operation
If WiFi disconnects:
- Network calls are skipped.
- UI displays connectivity status.
- Cached schedule data continues to trigger alerts.
- Sync resumes once connectivity is restored.
This makes the system robust in real-world environments.
Device Heartbeat & Monitoring
Every 60 seconds, the device sends a heartbeat containing:
- Battery level
- WiFi strength
- Firmware version
- Uptime
- Storage status
This allows backend-side device health monitoring and diagnostics.
2. Backend Implementation (Node.js + MongoDB)
The backend acts as the central intelligence of the system, handling authentication, medication plans, dose lifecycle management, and device integration.
Dose Lifecycle Management
Each scheduled dose follows a defined state machine:
- Pending - Scheduled but not confirmed
- Taken - Confirmed by device
- Skipped - User skipped dose
- Missed - Not confirmed within grace period
Backend logic includes:
- Automatic missed marking after a defined grace window
- Retry handling for pending confirmations
- Manual correction via dashboard
This ensures accurate adherence analytics.
Medication Plan & Slot Tracking
Each medication plan includes:
- slotIndex
- dosagePerIntake
- times
- daysOfWeek
- Stock trackig
This allows:
- Physical-to-digital mapping of compartments
- Dynamic schedule generation
- Scalable multi-slot device support
Secure API Architecture
The system uses two separate authentication models:
Dashboard API
- JWT-based authentication
- Used for patients, caretakers, doctors, admins
Hardware API
- Authorization: Bearer <DEVICE_SECRET>
- Device-specific authentication
- Separate from user login system
This separation improves security and scalability.
3. Frontend Dashboard (React + Vite)
The web application provides:
- Role-based dashboards:
- Patient
- Caretaker
- Doctor
- Admin
- Medication plan management
- Adherence tracking with charts
- Device linking and profile management
- Dose correction controls
React Query is used for efficient API caching and synchronization.
Advanced Engineering Features
The strength of DoseRight lies in several well-integrated design decisions:
- Slot-index-based compartment tracking
- Verified dose lifecycle management
- IR-based physical confirmation logic
- Grace period-based missed marking
- Heartbeat-based device telemetry
- Multi-role dashboard system
- Secure hardware-level authentication
- Offline-tolerant firmware design
- Modular full-stack architecture
These combined features make the system robust, scalable, and suitable for future real-world deployment.
Repository Structure
backend/ → Express API + MongoDB models
frontend/ → React dashboard
hardware/ → ESP32 firmware (ESP-IDF)
Full Documentation
For complete setup instructions, API references, environment configuration, and detailed implementation files, please refer to the GitHub repository
GitHub Repository


