Electrical appliances are all around us, starting from the indispensable charger of your smartphone to heavier appliances like room heaters, air conditioners, washing machines, and whatnot. Given the status quo of a looming global energy crisis, it is vital to have an understanding of the power consumed by these devices. While our monthly electricity bill gives us a vague idea of our cumulative electricity consumption, it provides little to no detail about the current being consumed by particular devices. To determine the exact and instantaneous consumption of power, we must have a way to detect the voltage and the current draw of our appliance. For the aforementioned purpose, we use energy monitoring devices which are widely available in the market, but they come with a heavy price tag and also with devoid you of the learning and fun experience of DIY. In this article, we will see how you can make a simple power consumption monitoring device using ESP32 and some commonly available sensors.
Table of Contents
- Components Required to Build a Smart Energy Meter Using ESP32
- How IoT Based Smart Energy Meter Using ESP32 Works
- └ ZMPT101B Voltage Sensor
- └ ACS712 20A Current Sensor
- IoT Based Smart Energy Meter Circuit Diagram
- Code for Power Consumption Monitoring Device
- └ Installing Required Libraries
- └ Initialization Commands
- └ Void Setup Code
- └ Void Loop Code
- └ User-Defined Functions
- Power Consumption Monitoring System Using IoT Project
- ESP32-based Energy Monitoring Device Working
- Smart Energy Meter Using IoT Project Summary and GitHub Repository
- Frequently Asked Questions
- Discover DIY Projects Similar to Monitoring Device using ESP32
Components Required to Build a Smart Energy Meter Using ESP32
ESP32 WROOM 32D Module
HI LINK 5V 3W SMPS
0.96” 128X64 I2C LED
ZMPT101B Voltage Sensor
ACS712 Current Sensor
220V AC 3 Pin Socket MALE
220V AC 3 Pin Socket FEMALE
3D-Printed Casing
How IoT Based Smart Energy Meter Using ESP32 Works
To begin with, our primary goal is to bring Voltage and current data to your ESP32, which will be our microcontroller in this project. The ESP32 will process this data from the sensors and send it to the OLED Display for the user to see the energy consumption. Moreover, to supply power to all these components, we will use a HI-Link 5V SMPS Module that converts the 220V AC into 5V DC. In this comprehensive guide, we will demonstrate how to build a smart energy meter using ESP32. This DIY Smart energy meter, using an IoT project, will help you track the real-time energy usage of your appliances with commonly available sensors and components. We have also done projects focused on developing an IoT-based smart Energy Meter, a Smart Electricity Meter with Energy Monitoring, ESP32 Power Meter to calculate input and output power.

Let us now discuss the sensors we will be using in this power consumption monitoring system using an IoT project.
ZMPT101B Voltage Sensor
The ZMPT101B is a Voltage transformer sensor that scales down the voltage linearly and provides an analog output to the user. It also provides an isolation voltage of up to 4000V and a safe operating voltage of 1000V.

Looking at the schematic, we can see that the output of the ZMPT Transformer is sent to a low-power dual Op-Amp IC LM358N, which amplifies the voltage peaks.
ACS712 20A Current Sensor
The ACS712 is a current sensing IC based on hall effect sensors. It has an integrated Hall effect IC that detects the change in the magnetic field when a current flows. This change in the magnetic field is converted into a proportional voltage and then given to the user as output data. The Schematic of the Sensor Module shows that the IC has pretty much all the components built right into it and needs only a very few passive components to work.

Out of the three variants that the IC is available in (5A, 20A, 30A), we choose the 20A version as it would meet almost all of our current measurement requirements, while still giving us enough resolution.
IoT Based Smart Energy Meter Circuit Diagram
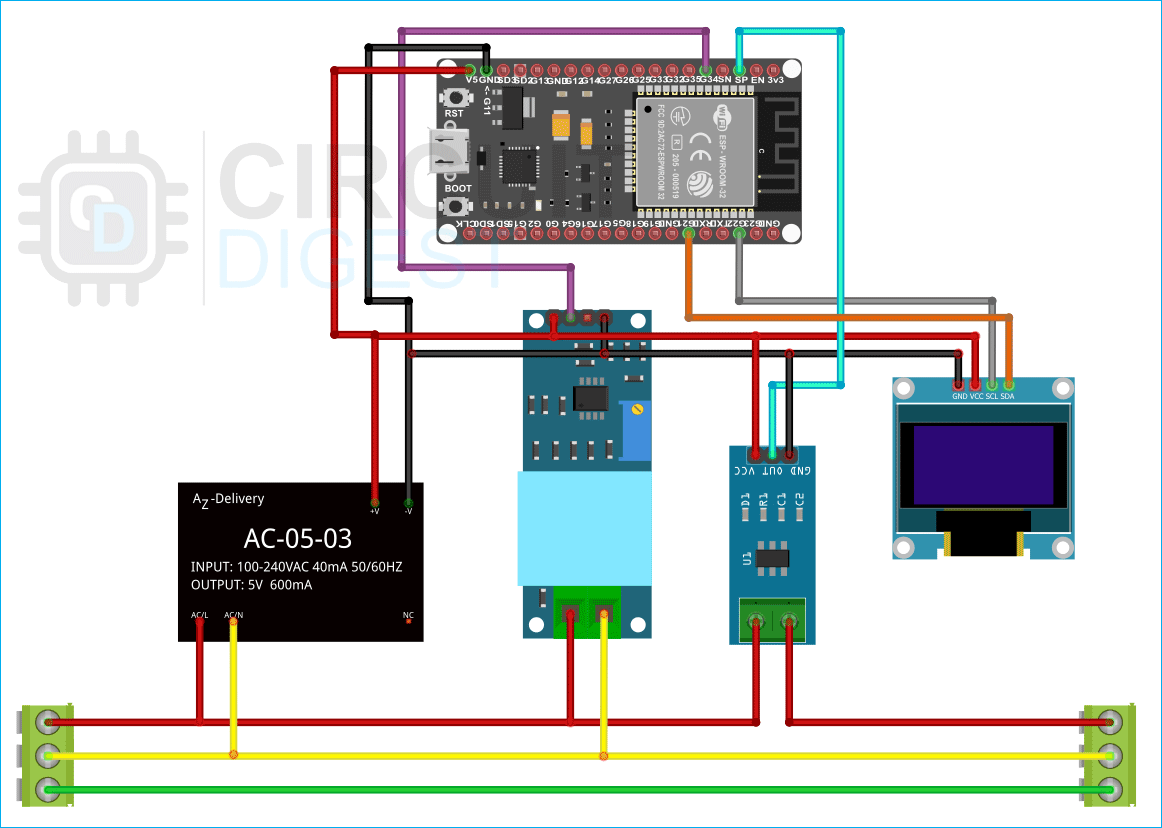
The IoT-based smart energy meter circuit diagram shows how the Hi-link SMPS and input terminal of the voltage sensor (ZMPT101B) are connected in parallel to the AC Live and AC Neutral, while the current sensor (ACS712) forms a series connection with the live AC Wire.
The OLED is connected via the I2C pins on the ESP32, and the Voltage and Current sensor are connected to Pin 34 and Pin 36(VP), respectively. These pins are capable of analog-to-digital conversion using the 12-bit ADC inside the ESP32.
All the components are powered by the 5V output of the Hi-Link module. (Vo+ and Vo- terminals)
Code for Power Consumption Monitoring Device
Installing Required Libraries
We start by installing the Adafruit GFX and the Adafruit SSD 1306 Library. Simply click on the library manager in the Tools menu in the Arduino IDE.

We search for Adafruit GFX and Adafruit SSD1306 and simply install them by clicking on the install button.

We now have to install the libraries for the ZMPT101B and the ACS712 current sensor modules, both of these libraries are similar in code, although the original libraries can be found here. We have slightly modified them to compensate for the change in the microcontroller and be compatible with the ESP32’s 12-bit 3.3V ADC.
The process of installing both libraries is the same. Simply go to the library's GitHub repository and click on the download zip button under the code button’s dropdown menu.

Once the zip file is downloaded, open the Arduino IDE and click on Sketch >> Include Library >> Add Zip Library.

Locate the downloaded zip file of the library and click open.

Arduino IDE will install your library. You can follow the same process for both libraries.
Once the libraries are installed, we can simply include them in our code from the beginning.
#include "ZMPT101B.h"
#include "ACS712.h"
#include <SPI.h>
#include <Wire.h>
#include <Adafruit_GFX.h>
#include <Adafruit_SSD1306.h>
Wire and SPI libraries are preinstalled in the IDE, and are required for the function of the I2C Bus for the OLED Display.
Initialization Commands
We now initialize objects of the current and the voltage sensor as
ZMPT101B voltageSensor(34);
ACS712 currentSensor(ACS712_20A, 36);
Along with this, we initialize our OLED with the following lines of code.
#define SCREEN_WIDTH 128 // OLED display width, in pixels
#define SCREEN_HEIGHT 64 // OLED display height, in pixels
#define OLED_RESET     -1 // Reset pin # (or -1 if sharing Arduino reset pin)
#define SCREEN_ADDRESS 0x3C ///< See datasheet for Address; 0x3D for 128x64, 0x3C for 128x32
Adafruit_SSD1306 display(SCREEN_WIDTH, SCREEN_HEIGHT, &Wire, OLED_RESET);
After these, we declare and initialize a few global variables that will be required in our code later.
float P=0;
float U=0;
float I=0;
long dt=0;
float CulmPwh=0;
float units=0;
long changeScreen=0;
float lastSample=0;
unsigned long lasttime=0;
long ScreenSelect = 0;
Void Setup Code
In the setup code, we set the zero point and the sensitivity of our sensors and start the display.
Note: While the sensitivity in the code will not change, you might have to change the zero point. To do that, simply uncomment the lines of code marked as “Calibration Commands” one at a time and ensure that no current or voltage is present on the module. The code will then display a zero point on the screen, and you can update the zero point in the code.
The calibration process has to be done separately for the Current and the Voltage Sensor.
void setup()
{
  Serial.begin(9600);
  delay(100);
  voltageSensor.setSensitivity(0.0025);
  voltageSensor.setZeroPoint(2621);
  currentSensor.setZeroPoint(2943);
  currentSensor.setSensitivity(0.15);
  if(!display.begin(SSD1306_SWITCHCAPVCC, SCREEN_ADDRESS)) {
    Serial.println(F("SSD1306 allocation failed"));
    for(;;); }
  // Clear the buffer
  display.clearDisplay();
  display.display();
  //Caliberation Commands Need To Be Run On First Upload.
  //CalibCurrent();
  //CalibVoltage();
}
Void Loop Code
In the loop code, we simply have to read the data from the sensors using the analog read command and send it to the custom display function after a regular interval of 500 milliseconds.
We also perform the calculations for the Instantaneous Power and the Energy Consumed.
Since there are a lot of variables that need to be displayed to the user (Voltage, Current, Instantaneous Power, Energy Consumed, Units Consumed), we implement a simple code of switching between 4 screens that display all the information.
void loop()
{
  // To measure voltage/current we need to know the frequency of voltage/current
  // By default 50Hz is used, but you can specify desired frequency
  // as first argument to getVoltageAC and getCurrentAC() method, if necessary
  U = voltageSensor.getVoltageAC();
    if(U<55)
      {
        U=0;
        CulmPwh=0;
       }
  I = currentSensor.getCurrentAC();
  dt = micros()- lastSample;
    if(I<0.15)
      {
        I=0;
        CulmPwh=0;
      }
  // To calculate the power we need voltage multiplied by current
  P = U * I;
  CulmPwh = CulmPwh + P*(dt/3600);///uWh
  units= CulmPwh/1000;
  if(millis()-changeScreen>5000)
    {
      ScreenSelect+=1;
      changeScreen=millis();
    }
  if(millis()-lasttime>500)
    {
      if((ScreenSelect%4)==0)
      { displayVoltCurrent(); }//Volts and Current
      else if( (ScreenSelect%4)==1)
      { displayInstPower();   }//Instantaenous Power
      else if( (ScreenSelect%4)==2)
      { displayEnergy();      } //Energy
      else if( (ScreenSelect%4)==3)
      { displayUnits();       } //Units
    }
  lastSample=micros();
}
User-Defined Functions
It can be seen in the code above that we have used functions like-
CalibCurrent();
CalibVoltage();
displayVoltCurrent();
displayInstPower();
displayEnergy();
displayUnits();
displayCenter(String,Position);
These are not predefined functions of the library, they are custom-written by us, and they are simply used to send data on the OLED Module and to keep the code clean. We can put them after the void loop() function.
void displayVoltCurrent()
{
  display.clearDisplay();
  display.setTextColor(WHITE);
  display.setTextSize(1);
  display.setCursor(0,0);
void displayVoltCurrent()
{
  display.clearDisplay();
  display.setTextColor(WHITE);
  display.setTextSize(3);
  displayCenter(String(U)+"V",3);
  display.setTextSize(3);
  displayCenter(String(I)+"A",33);
  display.display();
  lasttime=millis();
}
void displayInstPower()
{
  display.clearDisplay();
  display.setTextColor(WHITE);
  display.setTextSize(2);
  display.setCursor(0,0);
  displayCenter("Power",3);
  display.setTextSize(3);
     if(P>1000)
      {
        displayCenter(String(P/1000)+"kW",30);
      }
    else
      {
        displayCenter(String(P)+"W",30);
      }
  display.display();
  lasttime=millis();
}
void displayEnergy()
{
  display.clearDisplay();
  display.setTextColor(WHITE);
   if(CulmPwh>1000000000)
     {
        display.setTextSize(2);
        displayCenter("Energy kWh",3);
        display.setTextSize(3);
        displayCenter(String(CulmPwh/1000000000),30);
     }
   else if(CulmPwh<1000000000 && CulmPwh>1000000)
     {
        display.setTextSize(2);
        displayCenter("Energy Wh",3);
        display.setTextSize(3);
        displayCenter(String(CulmPwh/1000000),30);
     }
   else if(CulmPwh<1000000 && CulmPwh>1000)
     {
        display.setTextSize(2)
        displayCenter("Energy mWh",3);
        display.setTextSize(3);
        displayCenter(String(CulmPwh/1000),30);
     }
   else
     {
        display.setTextSize(2);
        displayCenter("Energy uWh",3);
        display.setTextSize(3);
        displayCenter(String(CulmPwh),30);
     }
  display.display();
  lasttime=millis();
 }
void displayUnits()
{
  display.clearDisplay();
  display.setTextColor(WHITE);
    if(units>1000000)
      {
        display.setTextSize(2);
        displayCenter("Units",3);
        display.setTextSize(3);
        displayCenter(String(units/1000000),30);
      }
    else if(units<1000000 && units>1000)
      {
        display.setTextSize(2);
        displayCenter("MilliUnits",3);
        display.setTextSize(3);
        displayCenter(String(units/1000),30);
      }
  else
      {
        display.setTextSize(2);
        displayCenter("MicroUnits",3);
        display.setTextSize(3);
        displayCenter(String(units),30);
      }
  display.display();
  lasttime=millis();
 }
void CalibCurrent()
{
  while(1)
  {
    currentSensor.calibrate();
    Serial.print("Zero Point Current :");
    Serial.println(currentSensor.getZeroPoint());
    display.clearDisplay();
    display.setTextColor(WHITE);
    display.setTextSize(1);
    display.setCursor(0,0);
    display.print("Current Zero Point :");
    display.setCursor(0,20);
    display.setTextSize(2);
    display.print(currentSensor.getZeroPoint());
    display.display();
    delay(500);
  }
}
void CalibVoltage()
{
  while(1)
  {
    voltageSensor.calibrate();
    Serial.print("Zero Point Voltage :");
    Serial.println(voltageSensor.getZeroPoint());
    display.clearDisplay();
    display.setTextColor(WHITE);
    display.setTextSize(1);
    display.setCursor(0,0);
    display.print("Voltage Zero Point :");
    display.setCursor(0,20);
    display.setTextSize(2);
    display.print(voltageSensor.getZeroPoint());
    display.display();
    delay(500);
  }
}
void displayCenter(String text, int line)
{
  int16_t x1;
  int16_t y1;
  uint16_t width;
  uint16_t height;
  display.getTextBounds(text, 0, 0, &x1, &y1, &width, &height);
  // display on horizontal center
  display.setCursor((SCREEN_WIDTH - width) / 2, line);
  display.println(text); // text to display
  display.display();
}
Power Consumption Monitoring System Using IoT Project
Once the code is uploaded to the ESP32, you can start with the build of the project by 3D printing an enclosure for the system. We have attached the STL Files for the same. The enclosure is made in two parts and can be joined after the assembly.
Refer to the following process to place all the components for an elegant, snug fit. It is also recommended that proper insulation is done using heat shrink and insulation tape to prevent any shorts.
This is what the project would look like:

ESP32-based Energy Monitoring Device Working
After the project is complete, you can fit it inside any AC Socket and connect an appliance and measure the Voltage, Current as well as power being consumed by the device.
Smart Energy Meter Using IoT Project Summary and GitHub Repository
This IoT-based DIY smart energy meter project demonstrates how the ESP32 can be used practically to create intelligent power consumption monitoring solutions. All the materials you need to construct your energy monitoring system are available in our GitHub repository, including circuit schematics, source code, and assembly instructions.
Frequently Asked Questions
⇥ What is an ESP32-based smart energy meter?
An ESP32 smart energy meter is a do-it-yourself Internet of Things gadget that tracks the power usage of electrical appliances in real time. It measures electrical parameters like voltage, current, power, and energy consumption using an ESP32 microcontroller, voltage sensors (ZMPT101B), and current sensors (ACS712).
⇥ Is it possible to use this ESP32 energy monitoring device with voltage standards other than 110V and 220V?
It is possible to adapt this ESP32-based power consumption monitoring device to both 110V and 220V systems. With an input range of 80V to 380V AC, the ZMPT101B voltage sensor is appropriate for a number of international standards.
⇥ Which Arduino libraries are needed for this project involving IoT energy monitoring?
A custom ZMPT101B library for voltage sensing, the ACS712 library for current measurement, and the Adafruit GFX and Adafruit SSD1306 for OLED display control are all necessary for the smart energy meter using IoT project. For I2C communication, you'll also need Wire.h and SPI.h, which come pre-installed with the Arduino IDE.
Discover DIY Projects Similar to Monitoring Device using ESP32
Explore interactive do-it-yourself projects that use ESP32 and include wireless communication and real-time data tracking, much like the Monitoring Device. Examine ESP32-based solutions for Internet of Things, health monitoring, and home automation.
Water Level and Water Quantity Monitoring System using ESP32 using ESP32
This project aims to solve the problem by proper management of the water and by preventing water wastage due to tank overflow. Saving Water is our Responsibility. So, Automate Your Responsibility.
IoT based Garden X Soil Monitoring Device using ESP32, DHT11 and MQ135
To implement this project we are using an ESP32 as the main controller along with sensors that will tell us the environmental conditions, and they are DHT11 for temperature and humidity, capacitive soil moisture sensor, LDR for light intensity, MQ135 for air quality index monitoring.
IoT Based Air Quality Index Monitoring System – Monitor PM2.5, PM10, and CO using ESP32
So in this project, we are going to build an ESP32 Air Quality Monitoring System using Nova PM SDS011 sensor, MQ-7 sensor, and DHT11 sensor. We will also be using an OLED Display module to display Air Quality Values.
Complete Project Code
#include "ZMPT101B.h"
#include "ACS712.h"

#include <SPI.h>
#include <Wire.h>
#include <Adafruit_GFX.h>
#include <Adafruit_SSD1306.h>

#define SCREEN_WIDTH 128 // OLED display width, in pixels
#define SCREEN_HEIGHT 64 // OLED display height, in pixels

#define OLED_RESET     -1 // Reset pin # (or -1 if sharing Arduino reset pin)
#define SCREEN_ADDRESS 0x3C ///< See datasheet for Address; 0x3D for 128x64, 0x3C for 128x32
Adafruit_SSD1306 display(SCREEN_WIDTH, SCREEN_HEIGHT, &Wire, OLED_RESET);


ZMPT101B voltageSensor(34);
ACS712 currentSensor(ACS712_20A, 36);

float P=0;
float U=0;
float I=0;
long dt=0;
float CulmPwh=0;
float units=0;
long changeScreen=0;
float lastSample=0;

unsigned long lasttime=0;
long ScreenSelect = 0;


void setup()
{
  Serial.begin(9600);

  delay(100);
  voltageSensor.setSensitivity(0.0025);
  voltageSensor.setZeroPoint(2621);

  currentSensor.setZeroPoint(2943);
  currentSensor.setSensitivity(0.15);

  if(!display.begin(SSD1306_SWITCHCAPVCC, SCREEN_ADDRESS)) {
    Serial.println(F("SSD1306 allocation failed"));
    for(;;); }

  // Clear the buffer
  display.clearDisplay();
  display.display();

  //Caliberation Commands Need To Be Run On First Upload.
  //CalibCurrent();
  //CalibVoltage();

}


void loop()
{
  // To measure voltage/current we need to know the frequency of voltage/current
  // By default 50Hz is used, but you can specify desired frequency
  // as first argument to getVoltageAC and getCurrentAC() method, if necessary

  U = voltageSensor.getVoltageAC();
    if(U<55)
      {
        U=0;
        CulmPwh=0;
       }

  I = currentSensor.getCurrentAC();
  dt = micros()- lastSample;

    if(I<0.15)
      {
        I=0;
        CulmPwh=0;
      }

  // To calculate the power we need voltage multiplied by current
  P = U * I;

  CulmPwh = CulmPwh + P*(dt/3600);///uWh
  units= CulmPwh/1000;

  if(millis()-changeScreen>5000)
    {
      ScreenSelect+=1;
      changeScreen=millis();
    }

  if(millis()-lasttime>500)
    {
      if((ScreenSelect%4)==0)
      { displayVoltCurrent(); }//Volts and Current

      else if( (ScreenSelect%4)==1)
      { displayInstPower();   }//Instantaenous Power

      else if( (ScreenSelect%4)==2)
      { displayEnergy();      } //Energy

      else if( (ScreenSelect%4)==3)
      { displayUnits();       } //Units
    }
  lastSample=micros();
}

void displayVoltCurrent()
{
  display.clearDisplay();
  display.setTextColor(WHITE);

  display.setTextSize(3);
  displayCenter(String(U)+"V",3);

  display.setTextSize(3);
  displayCenter(String(I)+"A",33);
  display.display();
  lasttime=millis();

}

void displayInstPower()
{
  display.clearDisplay();
  display.setTextColor(WHITE);
  display.setTextSize(2);
  display.setCursor(0,0);
  displayCenter("Power",3);
  display.setTextSize(3);

     if(P>1000)
      {
        displayCenter(String(P/1000)+"kW",30);
      }
    else
      {
        displayCenter(String(P)+"W",30);
      }

  display.display();
  lasttime=millis();
}

void displayEnergy()
{
  display.clearDisplay();
  display.setTextColor(WHITE);

   if(CulmPwh>1000000000)
     {
        display.setTextSize(2);
        displayCenter("Energy kWh",3);
        display.setTextSize(3);
        displayCenter(String(CulmPwh/1000000000),30);
     }
   else if(CulmPwh<1000000000 && CulmPwh>1000000)
     {
        display.setTextSize(2);
        displayCenter("Energy Wh",3);
        display.setTextSize(3);
        displayCenter(String(CulmPwh/1000000),30);
     }
   else if(CulmPwh<1000000 && CulmPwh>1000)
     {
        display.setTextSize(2);
        displayCenter("Energy mWh",3);
        display.setTextSize(3);
        displayCenter(String(CulmPwh/1000),30);
     }
   else
     {
        display.setTextSize(2);
        displayCenter("Energy uWh",3);
        display.setTextSize(3);
        displayCenter(String(CulmPwh),30);
     }
  display.display();
  lasttime=millis();
 }

void displayUnits()
{
  display.clearDisplay();
  display.setTextColor(WHITE);

    if(units>1000000)
      {
        display.setTextSize(2);
        displayCenter("Units",3);
        display.setTextSize(3);
        displayCenter(String(units/1000000),30);
      }
    else if(units<1000000 && units>1000)
      {
        display.setTextSize(2);
        displayCenter("MilliUnits",3);
        display.setTextSize(3);
        displayCenter(String(units/1000),30);
      }
  else
      {
        display.setTextSize(2);
        displayCenter("MicroUnits",3);
        display.setTextSize(3);
        displayCenter(String(units),30);
      }
  display.display();
  lasttime=millis();
 }

void CalibCurrent()
{
  while(1)
  {
    currentSensor.calibrate();
    Serial.print("Zero Point Current :");
    Serial.println(currentSensor.getZeroPoint());
    display.clearDisplay();
    display.setTextColor(WHITE);
    display.setTextSize(1);
    display.setCursor(0,0);
    display.print("Current Zero Point :");
    display.setCursor(0,20);
    display.setTextSize(2);
    display.print(currentSensor.getZeroPoint());
    display.display();
    delay(500);
  }

}

void CalibVoltage()
{
  while(1)
  {
    voltageSensor.calibrate();
    Serial.print("Zero Point Voltage :");
    Serial.println(voltageSensor.getZeroPoint());
    display.clearDisplay();
    display.setTextColor(WHITE);
    display.setTextSize(1);
    display.setCursor(0,0);
    display.print("Voltage Zero Point :");
    display.setCursor(0,20);
    display.setTextSize(2);
    display.print(voltageSensor.getZeroPoint());
    display.display();
    delay(500);
  }

}

void displayCenter(String text, int line)
{
  int16_t x1;
  int16_t y1;
  uint16_t width;
  uint16_t height;

  display.getTextBounds(text, 0, 0, &x1, &y1, &width, &height);
  // display on horizontal center
  display.setCursor((SCREEN_WIDTH - width) / 2, line);
  display.println(text); // text to display
  display.display();
}
Comments
Hi thanks. These threshold values are noise filtering to prevent false readings. Below 55V is typically sensor noise voltage rather than actual AC supply, and below 0.15A eliminates ACS712 offset drift when no load is present. Without these thresholds, you'd get continuous power readings even with nothing connected due to sensor imperfections.
Hi, may i know which acs712 library you used?


Hi, Very interesting project. I would like to know why you ignore values for Voltage smaler than 55 and for current smaller than 0.15. in your code:
U = voltageSensor.getVoltageAC();
if(U<55)
{
U=0;
CulmPwh=0;
}
I = currentSensor.getCurrentAC();
dt = micros()- lastSample;
if(I<0.15)
{
I=0;
CulmPwh=0;
}