 Function in Code")
The multitasking has led the computers to a revolution where one or more programs can run simultaneously which increases efficiency, flexibility, adaptability and productivity. In embedded systems, microcontrollers can also handle Multitasking and performs two or more tasks simultaneously without halting the current instructions.
Here in this tutorial we will learn How Arduino performs Multitasking with Arduino millis function. Generally a delay() function is used in Arduino for a periodic task like LED Blinking but this delay() function halt the program for some definitive time and don’t allow other operations to perform. So this article explains how we can avoid use of delay() function and replace it with millis() to perform more than one tasks simultaneously and make the Arduino a Multitasking controller. Before going into detail let’s start with understating Multitasking.
What is Multitasking?
Multitasking simply means executing more than one task or program simultaneously at the same time. Almost all operating systems feature multitasking. This kind of operating systems are known as MOS (multitasking operating system). The MOS can be mobile or desktop PC Operating System. The good example of multitasking in computers are when users run the email application, internet browser, media player, games, at the same time and if users don’t want use the application it runs in the background if not closed. The end user use all these applications at the same time but OS takes this concept a bit different. Let’s discuss how OS manages multitasking.
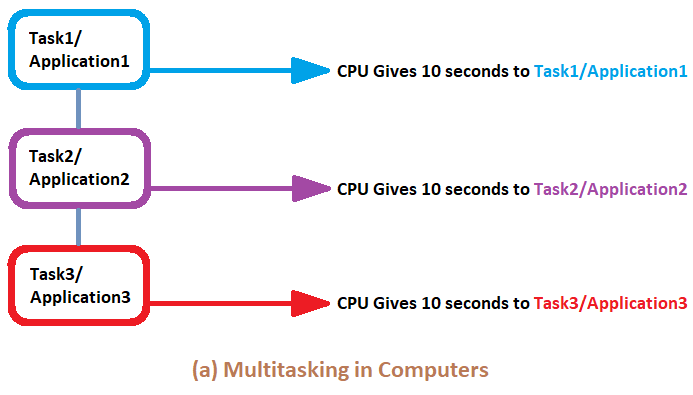
As seen in the picture, the CPU divides the time in the three equal parts and assign each part to each task/application. This is how the multitasking is done in most of the systems. The concept will be almost same for the Arduino Multitasking, except the time distribution will be a bit different. Since the Arduino runs in low frequency and RAM compare to Laptop/Mobile/PC so the time given to each task will also be different. Arduino also has a delay() function which is used widely. But before starting let's discuss that why we should not use delay() function in any project.
Why to skip delay() in Arduino?
If the reference documentation of Arduino is considered then there is two type of delay functions, the first one is delay() and second is delayMicroseconds(). Both functions are identical in terms of generating delay. The only difference is that, in delay() function, the parameter integer passed is in milliseconds i.e if we write delay(1000) then the delay will be of 1000 milliseconds i.e. 1 second. Similarly in delayMicroseconds() function, the parameter passed is in microseconds i.e. if we write delayMicroseconds(1000), then the delay will be of 1000 microseconds i.e. 1 milliseconds.
Here comes the point, both functions pause the program for the amount of time passed in delay function. So if we are giving a delay of 1 second then the processor cannot go to next instruction until 1 second passed. Similarly if the delay is 10 seconds then program will stop for 10 seconds and processor will not allow to go for the next instructions until the 10 seconds passed. This hampers the performance of the microcontroller in terms of speed and executing the instructions.
The best example to explain the drawback of delay function is using two push buttons. Consider we want to toggle two LEDs using two push buttons. So if one push button is pushed then the corresponding LED should glow for 2 seconds, similarly if second is pushed then LED should glow for 4 seconds. But when we use delay(), if the user is pressing the first button then the program will stop for 2 seconds and if the user presses the second button before 2 seconds delay, then the microcontroller won’t accept the input as the program is in halt stage.
The official documentation of Arduino clearly mentions this in its Notes and Warnings of delay() function description. You can go through and check this out to make it more clear.
Why to use millis() ?
To overcome the problem caused by using delay, a developer should use millis() function which is easy to use once you become habitual and it will use 100% CPU performance without generating any delay in executing the instructions. millis() is a function that just returns the amount of milliseconds that have elapsed since the Arduino board began running the current program without freezing the program. This time number will overflow (i.e go back to zero), after approximately 50 days.
Just like Arduino have delayMicroseconds(), it also has the micro version of millis() as micros(). The difference between micros and millis is that, the micros() will overflow after approximately 70 minutes, compared to millis() which is 50 days. So depending upon the application you can use millis() or micros().
Using millis() instead of delay():
To use the millis() for timing and delay, you need to record and store the time at which the action took place to start the time and then check at intervals whether the defined time has passed. So as stated, store the current time in a variable.
unsigned long currentMillis = millis();
We need two more variables to find out if the required time has passed. We have stored the current time in currentMillis variable but we also need to know that when did the timing period start and how long is the period. So the Interval and previousMillis is declared. The interval will tell us the time delay and previosMillis will store the last time the event has occurred.
unsigned long previousMillis;
unsigned long period = 1000;
To understand this, let's take an example of a simple blinking LED. The period = 1000 will tell us that the LED will blink for 1 second or 1000ms.
const int ledPin =  4; // the LED pin number connected
int ledState = LOW;             // used to set the LED state
unsigned long previousMillis = 0;  //will store last time LED was blinked
const long period = 1000;         // period at which to blink in ms

void setup() {
  pinMode(ledPin, OUTPUT); // set ledpin as output
}

void loop() {
 unsigned long currentMillis = millis(); // store the current time
  if (currentMillis - previousMillis >= period) { // check if 1000ms passed
   previousMillis = currentMillis;   // save the last time you blinked the LED
   if (ledState == LOW) { // if the LED is off turn it on and vice-versa
     ledState = HIGH;
   } else {
ledState = LOW;
}
   digitalWrite(ledPin, ledState);//set LED with ledState to blink again
 }
}
Here, the statement <if (currentMillis - previousMillis >= period)> checks if the 1000ms has passed. If 1000ms has passed, then the LED blink and again comes to same state. And this goes on. That's it, we have learnt to use millis instead of delay. This way it won’t halt the program for particular interval.
Interrupts in Arduino works same as in other microcontrollers. The Arduino UNO board has two separate pins for attaching interrupts on GPIO pin 2 and 3. We have covered it in detail in Arduino Interrupts Tutorial, where you can learn more about Interrupts and how to use them.
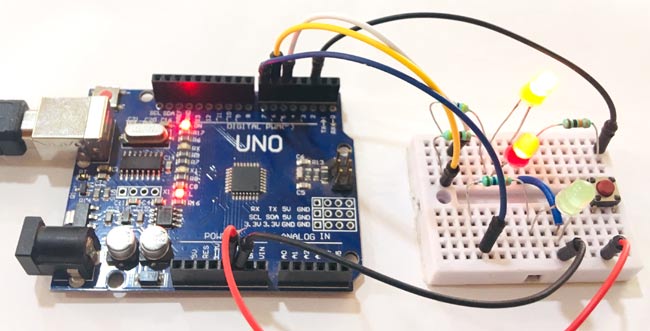
Here we will show Arduino Multitasking by handling two tasks at the same time. The tasks will include blinking of two LEDs in different time delay along with a push button which will be used to control the ON/OFF state of LED. So three tasks will be performed simultaneously.
Components Required
- Arduino UNO
- Three LEDs(Any Color)
- Resistances (470, 10k)
- Jumpers
- Breadboard
Circuit Diagram
The circuit diagram for demonstrating the use of Arduino Millis() fuction is very easy and doesn't have much components to attach as shown below.

Programming Arduino UNO for Multitasking
The programming starts with declaring pin numbers where LEDs and Push Button are connected.
int led1 =  6;
int led2 =  7;
int toggleLed = 5;
int pushButton = 2;
Next we write a variable to store the status of LEDs for future use.
int ledState1 = LOW;
int ledState2 = LOW;
Just as explained above in the blink example, the variables for period and previousmillis is declared to compare and generate delay for LEDs. The first LED blinks at after every 1 second and another LED blinks at after 200ms.
unsigned long previousMillis1 = 0;
const long period1 = 1000;
unsigned long previousMillis2 = 0;
const long period2 = 200;
Another millis function will be used to generate the debounce delay to avoid the multiple presses of push button. There will be similar approach as above.
int debouncePeriod = 20;
int debounceMillis = 0;
The three variables will be used to store the status of push button as interrupt, toggle LED and push button state.
bool buttonPushed = false;
int ledChange = LOW;
int lastState = HIGH;
Define the action of pin that which pin will work as INPUT or OUTPUT.
  pinMode(led1, OUTPUT);
  pinMode(led2, OUTPUT);
  pinMode(toggleLed, OUTPUT);
  pinMode(pushButton, INPUT);
Now define the interrupt pin by attaching interrupt with definition of ISR and interrupt Mode. Note that it is recommended to use digitalPinToInterrupt(pin_number) when declaring attachInterrupt() function to translate the actual digital pin to the specific interrupt number.
attachInterrupt(digitalPinToInterrupt(pushButton), pushButton_ISR, CHANGE);
The interrupt subroutine is written and it will only change the buttonPushed flag. Note that, interrupt subroutine should be as short as possible, so try to write it and minimize the extra instructions.
void pushButton_ISR()
{
  buttonPushed = true;
}
Loop starts with storing the millis value in a currentMillis variable which will store the value of time elapsed every time the loop iterates.
unsigned long currentMillis = millis();
There is in total three functions in multitasking, blink one LED at 1 second, Blink second LED at 200ms and If push button is pressed then switch OFF/ON LED. So we will write three parts to do this task.
The first is toggles LED state after every 1 second by comparing the millis elapsed.
 if (currentMillis - previousMillis1 >= period1) {
    previousMillis1 = currentMillis;
    if (ledState1 == LOW) {
      ledState1 = HIGH;
    } else {
      ledState1 = LOW;
    }
    digitalWrite(led1, ledState1);
  }
Similarly the secondly it toggles the LED after every 200ms by comparing the elapsed millis. The explanation is already explained earlier in this article.
  if (currentMillis - previousMillis2 >= period2) {
    previousMillis2 = currentMillis;
    if (ledState2 == LOW) {
      ledState2 = HIGH;
    } else {
      ledState2 = LOW;
    }
    digitalWrite(led2, ledState2);
  }
Lastly, the buttonPushed flag is monitored and after generating a debounce delay of 20ms it just toggles the state of LED corresponds to push button attached as interrupt.
  if (buttonPushed = true)    // check if ISR is called
  {
    if ((currentMillis - debounceMillis) > debouncePeriod && buttonPushed)  // generate 20ms debounce delay to avoid multiple presses
    {
      debounceMillis = currentMillis;      // save the last debounce delay time
      if (digitalRead(pushButton) == LOW && lastState == HIGH)     // change the led after push button is pressed
      {
        ledChange = ! ledChange;
        digitalWrite(toggleLed, ledChange);
        lastState = LOW;
      }
      else if (digitalRead(pushButton) == HIGH && lastState == LOW)
      {
        lastState = HIGH;
      }
     buttonPushed = false;
    }
  }
This finishes the Arduino millis() Tutorial. Note that in order to get habitual with millis(), just practice to implement this logic in some other applications. You can also expand it to use motors, servo motors, sensor and other peripherals. In case of any doubt then please write to our forum or comment below.
Complete code and Video for demonstrating the use of millis function in Arduino is provided below.
Complete Project Code
/* Multitasking using Arduino millis() function

    Author : CircuitDigest (circuitdigest.com)

*/
int led1 =  6;      // led1 connected at pin 6

int led2 =  7;       // led1 connected at pin 7

int toggleLed = 5;    // push button controlled led connected at pin 5

int pushButton = 2;    // push butoon connected at pin 2 which is also interrupt pin
int ledState1 = LOW;  // to determine the states of led1 and led2

int ledState2 = LOW;
unsigned long previousMillis1 = 0;  //store last time LED1 was blinked

const long period1 = 1000;         // period at which led1 blinks in ms
unsigned long previousMillis2 = 0;  //store last time LED2 was blinked

const long period2 = 200;             // period at which led1 blinks in ms
int debouncePeriod = 20;            // debounce delay of 20ms

int debounceMillis = 0;            // similar to previousMillis
bool buttonPushed = false;     // interrupt routine button status

int ledChange = LOW;      // to track the led status last

int lastState = HIGH;    // to track last button state

void setup() {

  pinMode(led1, OUTPUT);               // define pins as input or output

  pinMode(led2, OUTPUT);

  pinMode(toggleLed, OUTPUT);

  pinMode(pushButton, INPUT);

  attachInterrupt(digitalPinToInterrupt(pushButton), pushButton_ISR, CHANGE);  // use interrupt pin2

}
void pushButton_ISR()

{

  buttonPushed = true;   // ISR should be as short as possible

}
void loop() {

  unsigned long currentMillis = millis(); // store the current time
  if (currentMillis - previousMillis1 >= period1) {    // check if 1000ms passed

    previousMillis1 = currentMillis;   // save the last time you blinked the LED

    if (ledState1 == LOW) {  // if the LED is off turn it on and vice-versa

      ledState1 = HIGH;   //change led state for next iteration

    } else {

      ledState1 = LOW;

    }

    digitalWrite(led1, ledState1);    //set LED with ledState to blink again

  }
  if (currentMillis - previousMillis2 >= period2) { // check if 1000ms passed

    previousMillis2 = currentMillis;   // save the last time you blinked the LED

    if (ledState2 == LOW) { // if the LED is off turn it on and vice-versa

      ledState2 = HIGH;

    } else {

      ledState2 = LOW;

    }

    digitalWrite(led2, ledState2);//set LED with ledState to blink again

  }
  if (buttonPushed = true)    // check if ISR is called

  {

    if ((currentMillis - debounceMillis) > debouncePeriod && buttonPushed)  // generate 20ms debounce delay to avoid multiple presses

    {

      debounceMillis = currentMillis;      // save the last debounce delay time

      if (digitalRead(pushButton) == LOW && lastState == HIGH)     // change the led after push button is pressed

      {

        ledChange = ! ledChange;

        digitalWrite(toggleLed, ledChange);

        lastState = LOW;

      }

      else if (digitalRead(pushButton) == HIGH && lastState == LOW)

      {

        lastState = HIGH;

      }

      buttonPushed = false;

    }

  }

}

Why not replace '
 if (ledState1 == LOW) {
      ledState1 = HIGH;
    } else {
      ledState1 = LOW;
    }'
with ' ledState1 = !ledState1; ' ?