
As the name suggests, color sorting is simply to sort the things according to their color. It can be easily done by seeing it but when there are too many things to be sorted and it is a repetitive task then automatic color sorting machines are very useful. These machines have color sensor to sense the color of any objects and after detecting the color servo motor grab the thing and put it into respective box. They can be used in different application areas where color identification, color distinction and color sorting is important. Some of the application areas include Agriculture Industry (Grain Sorting on the basis of color), Food Industry, Diamond and Mining Industry, Recycling etc. The applications are not limited to this and can be further applied to different industries.
Most popular sensor for detecting the colors is TCS3200 color sensor. We previously used TCS3200 sensor with Arduino to get the RGB component (Red, Green, Blue) of any color and also interfaced it with Raspberry Pi for detecting the color of any object.
Here in this tutorial we will make a color sorting machine using a color sensor TCS3200, some servo motors and Arduino board. This tutorial will include the sorting of colored balls and keeping them in the relevant color box. The box will be in the fixed position and the servo motor will be used to move the sorter hand to keep the ball in the relevant box.
We also made a Tomato Sorting Machine using Raspberry Pi, you can check out the demonstration video giveen below.
Components Required
- Arduino UNO
- TCS3200 Color Sensor
- Servo Motors
- Jumpers
- Breadboard
How to make the chassis for Color Sorting Robotic Arm
For making the complete setup including chassis, arm, roller, pad, we have used the white Sunboard of 2mm thickness. It is easily available in the stationary stores. We have used paper cutter to cut the Sunboard Sheet and FlexKwik or FeviKwik for joining the different parts.
Below are some steps build the Color sorting Arm:
1) Take the Sunboard Sheet.

2) Cut the sunboard sheet into pieces after measuring all sides with scale and marker as shown in the figure.

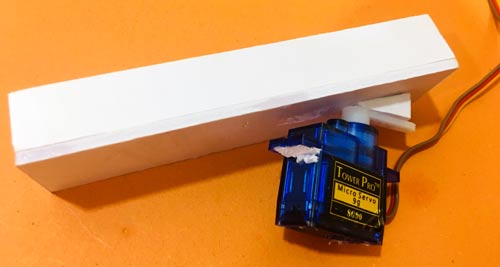
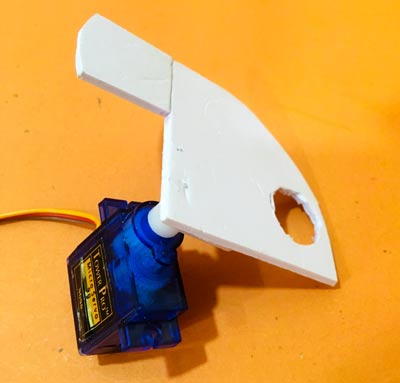
3) Now hold the two pieces of sunboard together and pour a drop of FeviKwik on it to stick the pieces together. Keep joining the pieces by following the figure.
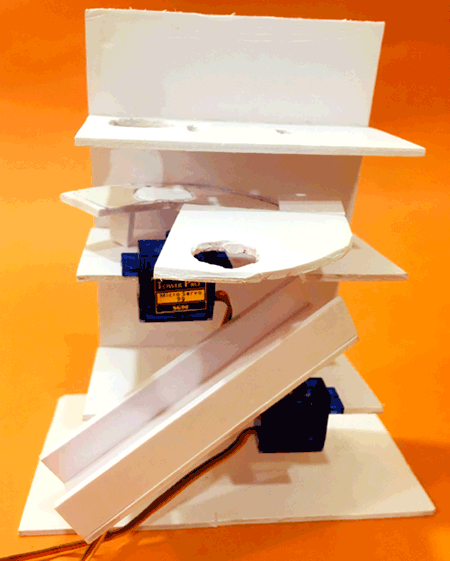
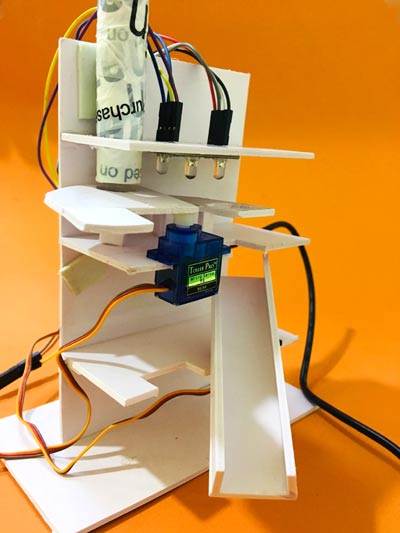
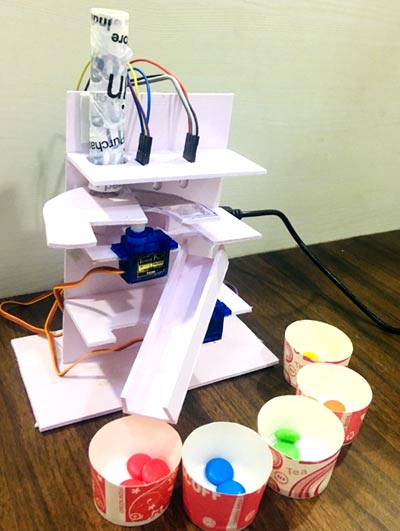
4) After joining all the pieces together, this color sorting machine will look something like this:
TCS3200 Color Sensor

TCS3200 is a color sensor which can detect any number of colors with right programming. TCS3200 contains RGB (Red Green Blue) arrays. As shown in figure on microscopic level one can see the square boxes inside the eye on sensor. These square boxes are arrays of RGB matrix. Each of these boxes contain three sensors, One is for sensing RED light intensity, One is for sensing GREEN light intensity and the last in for sensing BLUE light intensity.
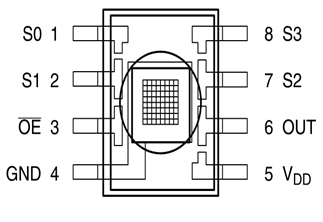
Each of sensor arrays in these three arrays are selected separately depending on the requirement. Hence it is known as programmable sensor. The module can be featured to sense the particular color and to leave the others. It contains filters for that selection purpose. There is a forth mode called ‘no filter mode’ in which the sensor detects white light.
Arduino Color Sorter Circuit Diagram
The circuit diagram for this Arduino Color Sorter is pretty easy to make and doesn’t require much connections. The schematic is given below.

This is the circuitry behind the setup of color sorting machine:

Programming Arduino Uno for sorting colourful balls
Programing Arduino UNO is a pretty simple and requires a simple logic to simplify the steps involved in color sorting. Complete program with a demonstration Video is given at the end.
Since the servo motor is used, so the servo library is essential part of the program. Here we are using two servo motors. The first servo will move the colored balls from initial position to TCS3200 detector position and then move to the sorting position where the ball will be dropped. After moving to sorting position, the second servo will drop the ball using its arm to the desired color bucket. See the complete working in the Video given at the end.
The first step will be all library inclusion and define the servo variables.
#include <Servo.h>
Servo pickServo;
Servo dropServo;
The TCS3200 color sensor can work without library as there is only need of reading frequency from sensor pin to decide the color. So just define the pin numbers of TCS3200.
#define S0 4
#define S1 5
#define S2 7
#define S3 6
#define sensorOut 8
int frequency = 0;
int color=0;
Make the select pins as output as this will make the color photodiode high or low and take the Out pin of TCS3200 as input. The OUT pin will provide frequency. Select the scaling of frequency as 20% initially.
  pinMode(S0, OUTPUT);
  pinMode(S1, OUTPUT);
  pinMode(S2, OUTPUT);
  pinMode(S3, OUTPUT);
  pinMode(sensorOut, INPUT);
  digitalWrite(S0, LOW);
  digitalWrite(S1, HIGH);
The servo motors are connected at Pin 9 and 10 of Arduino. The pickup servo which will pickup the color balls is connected at Pin 9 and the drop servo which will drop the color balls according to the color is connected at Pin10.
  pickServo.attach(9);
  dropServo.attach(10);
Initially the pick servo motor is set in the initially position which in this case is 115 degrees. It may differ and can be customized accordingly. The motor moves after some delay to the detector region and waits for the detection.
  pickServo.write(115);
  delay(600);
  for(int i = 115; i > 65; i--) {
    pickServo.write(i);
    delay(2);
  }
  delay(500);
The TCS 3200 reads the color and gives the frequency from the Out Pin.
  color = detectColor();
  delay(1000);
Depending Upon the color detected, the drop servo motor moves with particular angle and drops the color ball to its respective box.
  switch (color) {
    case 1:
    dropServo.write(50);
    break;
    case 2:
    dropServo.write(80);
    break;
    case 3:
    dropServo.write(110);
    break;
    case 4:
    dropServo.write(140);
    break;
    case 5:
    dropServo.write(170);
    break;
    case 0:
    break;
  }
  delay(500);
The servo motor returns to the initial position for the next ball to pick.
  for(int i = 65; i > 29; i--) {
    pickServo.write(i);
    delay(2);
  }
  delay(300);
  for(int i = 29; i < 115; i++) {
    pickServo.write(i);
    delay(2);
  }
The function detectColor() is used to measure frequency and compares the color frequency to make the conclusion of color. The result is printed on the serial monitor. Then it returns the color value for cases to move the drop servo motor angle.
int detectColor() {
Writing to S2 and S3 (LOW,LOW) activates the red photodiodes to take the readings for red color density.
  digitalWrite(S2, LOW);
  digitalWrite(S3, LOW);
  frequency = pulseIn(sensorOut, LOW);
  int R = frequency;
  Serial.print("Red = ");
  Serial.print(frequency);//printing RED color frequency
  Serial.print("   ");
  delay(50);
Writing to S2 and S3 (LOW,HIGH) activates the blue photodiodes to take the readings for blue color density.
  digitalWrite(S2, LOW);
  digitalWrite(S3, HIGH);
  frequency = pulseIn(sensorOut, LOW);
  int B = frequency;
  Serial.print("Blue = ");
  Serial.print(frequency);
  Serial.println("   ");
Writing to S2 and S3 (HIGH,HIGH) activates the green photodiodes to take the readings for green color density.
  digitalWrite(S2, HIGH);
  digitalWrite(S3, HIGH);

  // Reading the output frequency
  frequency = pulseIn(sensorOut, LOW);
  int G = frequency;
  Serial.print("Green = ");
  Serial.print(frequency);
  Serial.print("   ");
  delay(50);
Then the values are compared to make the color decision. The readings are different for different experimental setup as the detection distance varies for everyone when making the setup.
  if(R<22 & R>20 & G<29 & G>27){
    color = 1; // Red
    Serial.print("Detected Color is = ");
    Serial.println("RED");
  }
  if(G<25 & G>22 & B<22 &B>19){
    color = 2; // Orange
      Serial.println("Orange  ");
  }
  if(R<21 & R>20 & G<28 & G>25){
    color = 3; // Green
      Serial.print("Detected Color is = ");
    Serial.println("GREEN");
  }
  if(R<38 & R>24 & G<44 & G>30){
    color = 4; // Yellow
       Serial.print("Detected Color is = ");
    Serial.println("YELLOW");
  }
  if (G<29 & G>27 & B<22 &B>19){
    color = 5; // Blue
     Serial.print("Detected Color is = ");
    Serial.println("BLUE");
  }
  return color;
}
This finishes the color sorting machine using TCS3200 and Arduino UNO. You can also program it to detect more colors if needed. If you have any doubt or have any suggestion then write to our forum or comment below. Also check the video given below.
Complete Project Code
#include <Servo.h>

Servo pickServo;

Servo dropServo;
#define S0 4

#define S1 5

#define S2 7

#define S3 6

#define sensorOut 8

int frequency = 0;

int color=0;
int detectColor() {

  // activating red photodiodes to read

  digitalWrite(S2, LOW);

  digitalWrite(S3, LOW);

  frequency = pulseIn(sensorOut, LOW);

  int R = frequency;

  Serial.print("Red = ");

  Serial.print(frequency);//printing RED color frequency

  Serial.print("   ");

  delay(50);
   // activating blue photodiodes to read

  digitalWrite(S2, LOW);

  digitalWrite(S3, HIGH);

  frequency = pulseIn(sensorOut, LOW);

  int B = frequency;

  Serial.print("Blue = ");

  Serial.print(frequency);

  Serial.println("   ");


  // activating green photodiodes to read

  digitalWrite(S2, HIGH);

  digitalWrite(S3, HIGH);

  // Reading the output frequency

  frequency = pulseIn(sensorOut, LOW);

  int G = frequency;

  Serial.print("Green = ");

  Serial.print(frequency);

  Serial.print("   ");

  delay(50);
  delay(50);
//Readings are different for different setup

//change the readings according your project and readings detected

  if(R<22 & R>20 & G<29 & G>27){

    color = 1; // Red

    Serial.print("Detected Color is = ");

    Serial.println("RED");

  }

  if(G<25 & G>22 & B<22 &B>19){

    color = 2; // Orange

      Serial.println("Orange  ");

  }

  if(R<21 & R>20 & G<28 & G>25){

    color = 3; // Green

      Serial.print("Detected Color is = ");

    Serial.println("GREEN");

  }

  if(R<38 & R>24 & G<44 & G>30){

    color = 4; // Yellow

       Serial.print("Detected Color is = ");

    Serial.println("YELLOW");

  }

  if (G<29 & G>27 & B<22 &B>19){

    color = 5; // Blue

     Serial.print("Detected Color is = ");

    Serial.println("BLUE");

  }

  return color;

}
void setup() {

  pinMode(S0, OUTPUT);

  pinMode(S1, OUTPUT);

  pinMode(S2, OUTPUT);

  pinMode(S3, OUTPUT);

  pinMode(sensorOut, INPUT);
  //frequency-scaling to 20% selected

  digitalWrite(S0, LOW);

  digitalWrite(S1, HIGH);
  pickServo.attach(9);

  dropServo.attach(10);
  Serial.begin(9600);

}
void loop() {

  //initial position of servo motor

  pickServo.write(115);

  delay(600);


  for(int i = 115; i > 65; i--) {

    pickServo.write(i);

    delay(2);

  }

  delay(500);

  //read color values by calling function. save the values for conclusion in variable

  color = detectColor();

  delay(1000);
  switch (color) {

    case 1:

    dropServo.write(50);


    break;
    case 2:

    dropServo.write(80);

    break;
    case 3:

    dropServo.write(110);

    break;
    case 4:

    dropServo.write(140);

    break;
    case 5:

    dropServo.write(170);

    break;


    case 0:

    break;

  }

  delay(500);


  for(int i = 65; i > 29; i--) {

    pickServo.write(i);

    delay(2);

  }

  delay(300);


  for(int i = 29; i < 115; i++) {

    pickServo.write(i);

    delay(2);

  }

  color=0;

}
