
In this tutorial, we are going to use OpenCV and Deep Learning models to accurately identify the gender and age of a person from a real-time video stream. The deep learning age and gender detector model that we are going to use today was implemented and trained by Levi and Hassner in their 2015 publication. Age and Gender detection is a two-step process:
Step 1: Detect faces in the input video stream
Step2: Extract the face Region of Interest (ROI), and apply the age and gender detector algorithm to predict the age and gender of the person.
The predicted gender will be ‘Male’ or ‘Female’, and the predicted age can be one of the following ranges- (0 – 2), (4 – 6), (8 – 12), (15 – 20), (25 – 32), (38 – 43), (48 – 53), (60 – 100). We previously used Raspberry Pi for some complex image processing projects like facial landmark detection and Face recognition application. Learn by building real applications through these curated AI projects and tutorials for students and engineers.
Components Required for Age & Gender Classification
- Raspberry Pi
- Pi Camera Module
Here, we only need RPi 4 and Pi camera module with OpenCV installed on it. OpenCV is used here for digital image processing. The most common applications of Digital Image Processing are object detection, Face Recognition, and people counter.
Installing OpenCV
Before installing the OpenCV and other dependencies, the Raspberry Pi needs to be fully updated. Use the below commands to update the Raspberry Pi to its latest version:
sudo apt-get update
Then use the following commands to install the required dependencies for installing OpenCV on your Raspberry Pi.
sudo apt-get install libhdf5-dev -y
sudo apt-get install libhdf5-serial-dev –y
sudo apt-get install libatlas-base-dev –y
sudo apt-get install libjasper-dev -y
sudo apt-get install libqtgui4 –y
sudo apt-get install libqt4-test –y
After that, use the command given below to install the OpenCV on your Raspberry Pi.
pip3 install opencv-contrib-python==4.1.0.25
Programming Raspberry Pi for Age & Gender Classification
Complete Age and Gender detection using the Raspberry Pi project directory can be downloaded from here. Here we are explaining the important sections of the code for a better explanation.
Start the code by importing OpenCV and math packages.
import cv2
import math
Next is the highlightFace() function that is used to get the coordinates of the face. In the first three lines, we get the shallow copy of the frame and then we detect the height and width of the frame. In the next line, construct a blob from it and pass the blob through the network to obtain the face detections. Then in the next lines, loop over the detections and extract the face coordinates. Then use these coordinates to create a rectangle around the face.
def highlightFace(net, frame, conf_threshold=0.7):
    frameOpencvDnn=frame.copy()
    frameHeight=frameOpencvDnn.shape[0]
    frameWidth=frameOpencvDnn.shape[1]
    blob=cv2.dnn.blobFromImage(frameOpencvDnn, 1.0, (300, 300), [104, 117, 123], True, False)
    net.setInput(blob)
    detections=net.forward()
    faceBoxes=[]
    for i in range(detections.shape[2]):
        confidence=detections[0,0,i,2]
        if confidence>conf_threshold:
            x1=int(detections[0,0,i,3]*frameWidth)
            y1=int(detections[0,0,i,4]*frameHeight)
            x2=int(detections[0,0,i,5]*frameWidth)
            y2=int(detections[0,0,i,6]*frameHeight)
            faceBoxes.append([x1,y1,x2,y2])
            cv2.rectangle(frameOpencvDnn, (x1,y1), (x2,y2), (0,255,0), int(round(frameHeight/150)), 8)
    return frameOpencvDnn,faceBoxes
In the next lines, define the path of the face detection, age detection, and gender detection models.
faceProto="face_detector/opencv_face_detector.pbtxt"
faceModel="face_detector/opencv_face_detector_uint8.pb"
ageProto="age_detector/age_deploy.prototxt"
ageModel="age_detector/age_net.caffemodel"
genderProto="gender_detector/gender_deploy.prototxt"
genderModel="gender_detector/gender_net.caffemodel"
Define the list of age buckets and gender that our age detector will predict.
MODEL_MEAN_VALUES=(78.4263377603, 87.7689143744, 114.895847746)
ageList=['(0-2)', '(4-6)', '(8-12)', '(15-20)', '(25-32)', '(38-43)', '(48-53)', '(60-100)']
genderList=['Male','Female']
Load the face detection, age detection, and gender detection models from disk using the path defined earlier.
faceNet=cv2.dnn.readNet(faceModel,faceProto)
ageNet=cv2.dnn.readNet(ageModel,ageProto)
genderNet=cv2.dnn.readNet(genderModel,genderProto)
Now, initialize the video stream and allow the camera sensor to warm up.
video=cv2.VideoCapture(0)
Inside the loop, get the frames from video streaming and then call the highlightFace() function with the faceNet and frame parameters. And what these returns will be stored in resultimg and faceboxes variables
hasFrame,frame=video.read()
resultImg,faceBoxes=highlightFace(faceNet,frame)
After getting the face boxes, we create a 4-dimensional blob from the image. In doing this, we scale it, resize it, and pass in the mean values.
blob=cv2.dnn.blobFromImage(face, 1.0, (227,227), MODEL_MEAN_VALUES, swapRB=False)
Now, pass the blob through the gender detection model and get the confidence of the two-class (Male & Female). Whichever is higher, that is the gender of the person in the picture.
genderNet.setInput(blob)
genderPreds=genderNet.forward()
gender=genderList[genderPreds[0].argmax()]
Then we follow the same procedure for age detection.
ageNet.setInput(blob)
agePreds=ageNet.forward()
age=ageList[agePreds[0].argmax()]
Now, after getting the Age and Gender results, add the gender and age to the resulting image using cv2.putText() function and display it with imshow().
text = "{}:{}".format(gender, age)
cv2.putText(resultImg, text,(faceBox[0], faceBox[1]-10), cv2.FONT_HERSHEY_SIMPLEX, 0.8, (0,255,255), 2, cv2.LINE_AA)
cv2.imshow("Detecting age and gender", resultImg)
Testing the Age & Gender Classification
Before launching the python script, connect the Raspberry Pi Camera module with Pi as shown below:
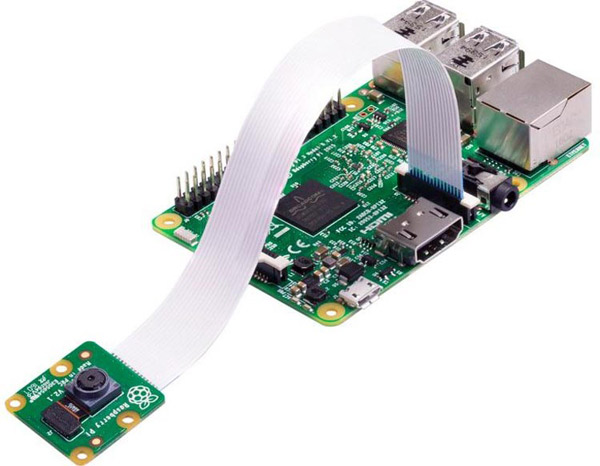
Now, check whether the Pi camera is working or not. After reviewing the camera, launch the python script, and you will find a window popping up with your video feed in it. Once the Pi detects the Age and Gender, it will print it on the video feed.

This is how you can detect age and gender using OpenCV and Python. Check out the below video for a full working demonstration. If you have any questions, use our forum to post your questions.
Complete Project Code
import cv2
import math
def highlightFace(net, frame, conf_threshold=0.7):
    frameOpencvDnn=frame.copy()
    frameHeight=frameOpencvDnn.shape[0]
    frameWidth=frameOpencvDnn.shape[1]
    blob=cv2.dnn.blobFromImage(frameOpencvDnn, 1.0, (300, 300), [104, 117, 123], True, False)
    net.setInput(blob)
    detections=net.forward()
    faceBoxes=[]
    for i in range(detections.shape[2]):
        confidence=detections[0,0,i,2]
        if confidence>conf_threshold:
            x1=int(detections[0,0,i,3]*frameWidth)
            y1=int(detections[0,0,i,4]*frameHeight)
            x2=int(detections[0,0,i,5]*frameWidth)
            y2=int(detections[0,0,i,6]*frameHeight)
            faceBoxes.append([x1,y1,x2,y2])
            cv2.rectangle(frameOpencvDnn, (x1,y1), (x2,y2), (0,255,0), int(round(frameHeight/150)), 8)
    return frameOpencvDnn,faceBoxes
faceProto="face_detector/opencv_face_detector.pbtxt"
faceModel="face_detector/opencv_face_detector_uint8.pb"
ageProto="age_detector/age_deploy.prototxt"
ageModel="age_detector/age_net.caffemodel"
genderProto="gender_detector/gender_deploy.prototxt"
genderModel="gender_detector/gender_net.caffemodel"
MODEL_MEAN_VALUES=(78.4263377603, 87.7689143744, 114.895847746)
ageList=['(0-2)', '(4-6)', '(8-12)', '(15-20)', '(25-32)', '(38-43)', '(48-53)', '(60-100)']
genderList=['Male','Female']
faceNet=cv2.dnn.readNet(faceModel,faceProto)
ageNet=cv2.dnn.readNet(ageModel,ageProto)
genderNet=cv2.dnn.readNet(genderModel,genderProto)
video=cv2.VideoCapture(0)
padding=20
while True:
    hasFrame,frame=video.read()
    resultImg,faceBoxes=highlightFace(faceNet,frame)
    for faceBox in faceBoxes:
        face=frame[max(0,faceBox[1]-padding):
                   min(faceBox[3]+padding,frame.shape[0]-1),max(0,faceBox[0]-padding)
                   :min(faceBox[2]+padding, frame.shape[1]-1)]
        blob=cv2.dnn.blobFromImage(face, 1.0, (227,227), MODEL_MEAN_VALUES, swapRB=False)
        genderNet.setInput(blob)
        genderPreds=genderNet.forward()
        gender=genderList[genderPreds[0].argmax()]
#        print(f'Gender: {gender}')
        ageNet.setInput(blob)
        agePreds=ageNet.forward()
        age=ageList[agePreds[0].argmax()]
 #       print(f'Age: {age[1:-1]} years')
        text = "{}:{}".format(gender, age)
        cv2.putText(resultImg, text,(faceBox[0], faceBox[1]-10), cv2.FONT_HERSHEY_SIMPLEX, 0.8, (0,255,255), 2, cv2.LINE_AA)
        cv2.imshow("Detecting age and gender", resultImg)
    key = cv2.waitKey(1) & 0xFF
    # if the `q` key was pressed, break from the loop
    if key == ord("q"):
        break
# do a bit of cleanup
cv2.destroyAllWindows()
vs.stop()

Hi, I was wondering if anyone might help me. I would love to use this code however i've only managed to install OpenCV 4.5.5 on my pi 4 32bit. When I run the above code its throwing an error
line 30, in <module>
faceNet=cv2.dnn.readNet(faceModel,faceProto)
cv2.error: OpenCV(4.5.5) /home/opencv/modules/dnn/src/caffe/caffe_io.cpp:1138: error: (-2:Unspecified error) FAILED: fs.is_open(). Can't open "face_detector/opencv_face_detector_uint8.pb" in function 'ReadProtoFromBinaryFile'
I will explore coding something from scratch using the functions in openCV but time is of the essence, so if I can get this code working in 4.5.5 that'd be amazing. Any insight welcome