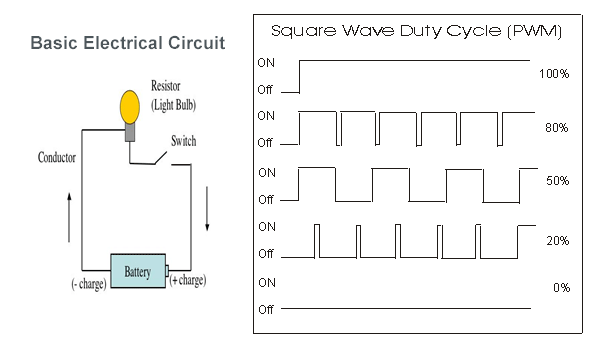
The LED DIMMER is primarily a 555 IC based PWM (Pulse Width Modulation) circuit developed to get variable voltage over constant voltage. The method of PWM is explained below. Before we get start building a 1 Watt LED Dimmer circuit, first consider a simple circuit as shown in figure below.

Now if the switch in the figure is closed continuously over a period of time then the bulb will continuously ON during that time. If the switch is closed for 8ms and opened for 2ms over a cycle of 10ms, then the bulb will be ON only in the 8ms time. Now the average terminal over across the over a period of 10ms = Turn ON time/ (Turn ON time + Turn OFF time), this is called duty cycle and is of 80% (8/ (8+2)), so the average output voltage will be 80% of the battery voltage.
In the second case, the switch is closed for 5ms and opened for 5ms over a period of 10ms, so the average terminal voltage at the output will be 50% of the battery voltage. Say if the battery voltage is 5V and the duty cycle is 50% and so the average terminal voltage will be 2.5V.
In the third case the duty cycle is 20% and the average terminal voltage is 20% of the battery voltage.
Now how this technique is used in this LED Dimmer? It is explained in the subsequent section of this tutorial.
Circuit Components
+5v power supply
1WATT LED, 555IC
1K and 100R resistors
TIP122
100K preset or pot
IN4148 or IN4047- two pieces,
10nF or 22nF capacitor
MAKE SURE TO HEAT SINK BOTH THE LED AND THE TRANSISTOR.
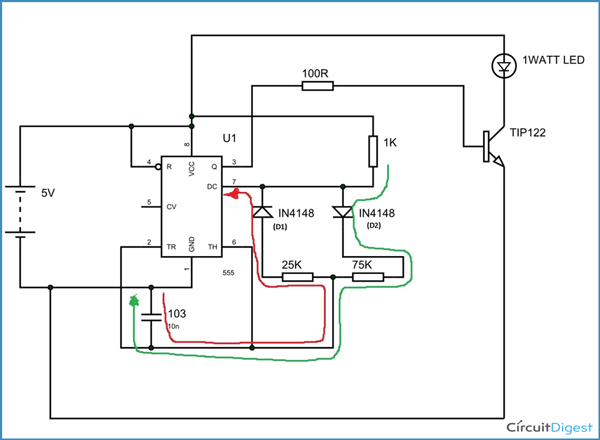
Circuit Diagram
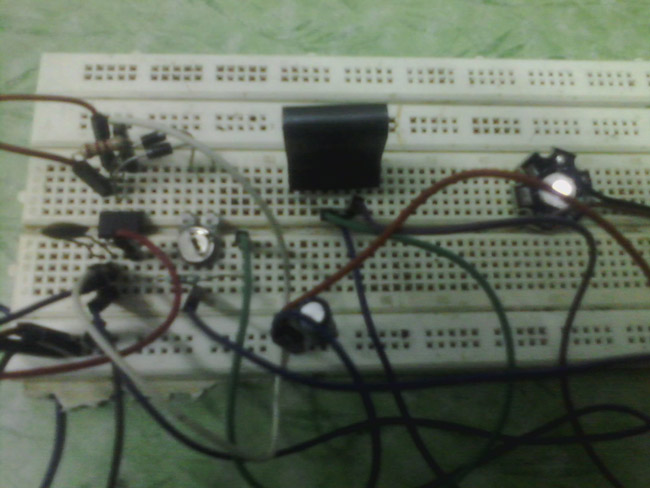
The circuit is connected in breadboard as per the circuit diagram shown above. However one must pay attention during connecting the LED terminals and the transistor ones. If the LED does seen to flicker at any stage replace the capacitor with a lower capacitance one.
Here one can replace the 1 WATT LED with 15 smaller ones on choice.
Working
The whole PWM generation takes place due to difference in charging and discharging times of the capacitor in the circuit. Now to understand this, consider the pot is adjusted and the resistance is divided as 25K on one side and 75K on the other as shown in the figure. Now the charging of capacitor (green line) can takes place only through the resistance part of 75K because of diode D2. During the charging time of capacitor, 555 TIMER IC outputs high. Once the capacitor charges to a potential, it discharges.
Now the discharge of capacitor (red line) must take place through 25K resistance part because of D1, at this time the 555 TIMER outputs LOW. So now consider the case one can say while charging of capacitor the current flows through 75K part taking much more time than to discharge, as discharge current should flow through only 25K. Therefore it can be concluded the capacitor charging time is 4 times the discharge implying the 555 TIMER turn ON time is 4 times the turn OFF time. So the duty ratio of the timer output signal is 4/5 = 80%.
So each time when we change the potentiometer is varied we get different on and off times giving PWM output.
Now this PWM signal is fed in to transistor base, for driving the high current load. Now based on the last case, the LED will be ON for 8ms and OFF for 2ms, now the effect is the human eye can catch a maximum of 50Hz and after the human eye cannot catch the frame and so it seems continuous so because the LED will be ON only for 8ms the LED glow looks dim over original intensity for the human eye. Thus the objective of the project is achieved.
Comments
Can this ckt be modified for driving 10 watt LED?
Can this ckt be modified for driving 10 watt LED? Please suggest changes.


hi, what to do to use 555 for 10W or 20W LED? will this circuit work,
need some modification or is not suitable for this?