
In this project, we are going to build a Smart Farming System using IoT. The objective of this project is to offer assistance to farmers in getting Live Data (Temperature, Humidity, Soil Moisture, Soil Temperature) for efficient environment monitoring which will enable them to increase their overall yield and quality of products. This smart agriculture using IoT system powered by NodeMCU consists of a DHT11 sensor, Moisture sensor, DS18B20 Sensor Probe, LDR, Water Pump, and 12V led strip. When the IoT-based agriculture monitoring system starts, it checks the Soil moisture, temperature, humidity, and soil temperature. It then sends this data to the IoT cloud for live monitoring. If the soil moisture goes below a certain level, it automatically starts the water pump. We previously build Automatic Plant Irrigation System which sends alerts on mobile but doesn’t monitor other parameters. Apart from this, Rain alarm and soil moisture detector circuit can also be helpful in building Smart Agriculture Monitoring System.
We also build low cost Advanced IoT based Soil Moisture Monitoring Device, you can check out the demonstration video given below.
Components Required for Smart Agriculture System
Hardware
- NodeMCU ESP8266
- Soil Moisture Sensor
- DHT11 Sensor
- DS18B20 Waterproof Temperature Sensor Probe
- LDR
- Submersible Mini Water Pump
- 12V LED Strip
- 7805 Voltage Regulator
- 2×TIP122 Transistor
- Resistor (4.7K, 10K)
- Capacitor (0.1µF, 10 µF)
Online Services
- Adafruit IO
Smart Agriculture System Circuit Diagram
The complete schematic for the Smart Agriculture System is given below:

This circuit isn’t that hard. Here we have used 4 sensors i.e. DHT11, DS18B20 sensor probe, LDR and Soil Moisture Sensor, one 12V LED Strip, 12V water pump, 7805 voltage regulator, and two TP122 transistors to control Led strip and water pump. 7805 is used to get the regulated 5V from the 12V adapter, DHT11 sensor is used to get the temperature and humidity readings. The DS18B20 sensor probe is used to get the soil temperature and a soil moisture sensor is used to read the Soil moisture so that the water pump can be turned on/off automatically.
Adafruit IO Setup
Adafruit IO is an open data platform that allows you to aggregate, visualize, and analyze live data on the cloud. Using Adafruit IO, you can upload, display, and monitor your data over the internet, and make your project IoT-enabled. You can control motors, read sensor data, and make cool IoT applications over the internet using Adafruit IO.
To use Adafruit IO, first, you have to create an account on Adafruit IO. To do this, go to Adafruit IO website and click on ‘Get started for Free’ on the top right of the screen.

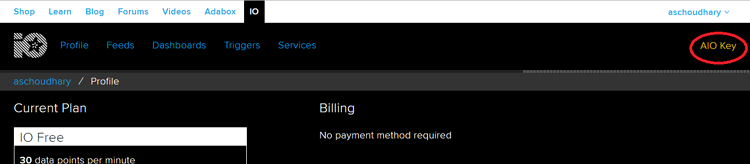
After finishing the account creation process, log in to your account and click on ‘View AIO Key’ on the top right corner to get your account username and AIO key.
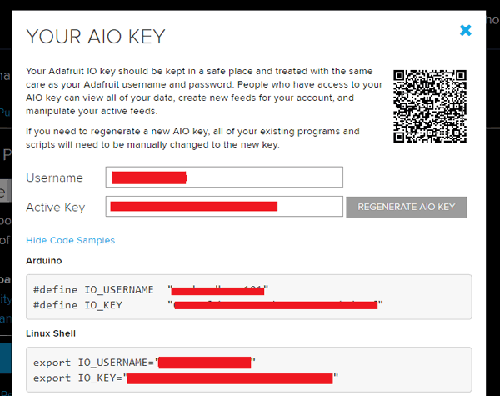
When you click on ‘AIO Key,’ a window will pop up with your Adafruit IO AIO Key and username. Copy this key and username. You'll need it later in your code.
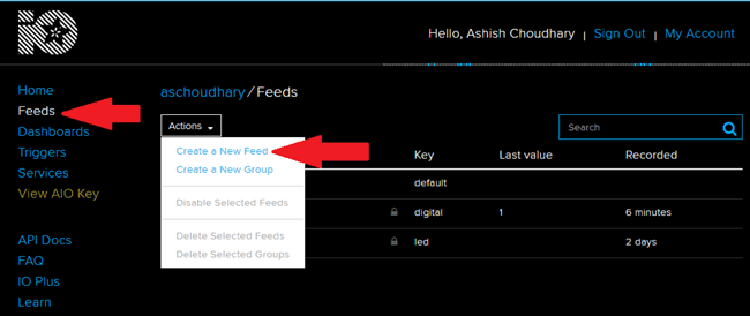
Now, after this, you need to create a feed. To create a feed, click on ‘Feed.’ Then click on ‘Actions,’ you will see some options, from them, click on ‘Create a New Feed.’
After this, a new window will open where you need to input the Name and Description of your feed. Writing description is optional.

Click on ‘Create,’; after this, you will be redirected to your newly created feed.
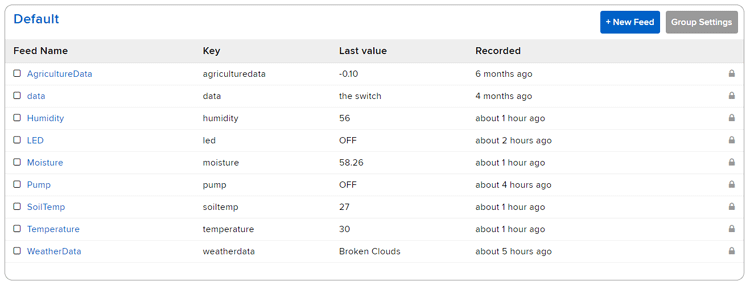
For this project, we created a total of eight feeds for Water pump, LED Strip, moisture data, Temperature, Humidity, Weather data, and Soil Temperature. Follow the same procedure as above to create the rest of the feeds.
After creating feeds, now we will create an Adafruit IO dashboard to show all of these feeds on a single page. For that, first create a dashboard and then add all these feeds in that dashboard.
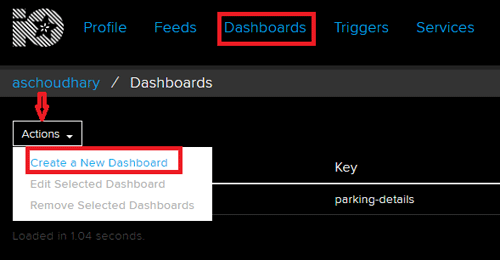
To create a dashboard, click on the Dashboard option and then click on the ‘Action,’ and after this, click on ‘Create a New Dashboard.’
In the next window, enter the name for your dashboard and click on ‘Create.’
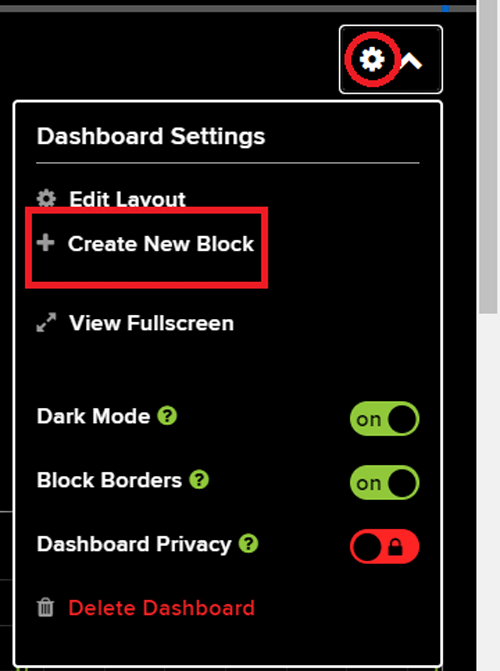
As our dashboard is created, now we will add our Blocks to dashboard. To add a Block, click on the ‘Gear’ in the top right corner and then click on ‘Create New Block’.
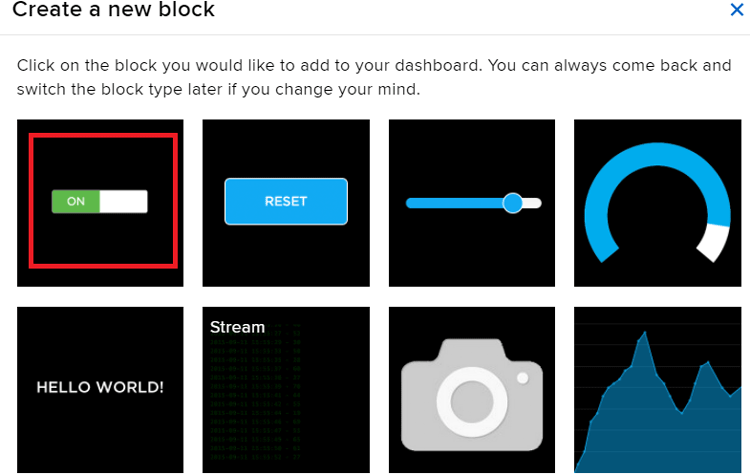
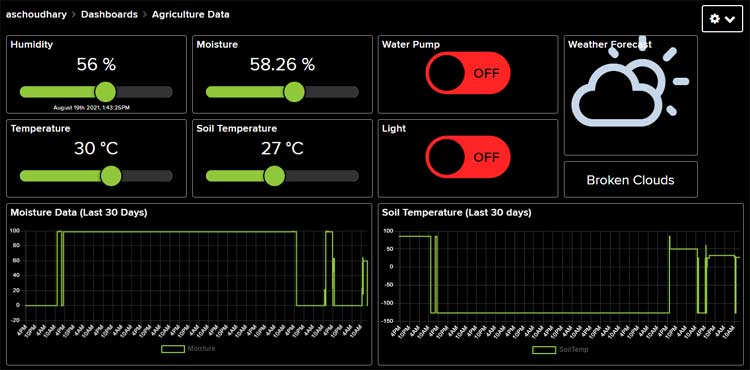
First, we will add two toggle buttons blocks to turn ON/OFF LED Strip and Water Pump manually, then four sliders to display Temperature, Humidity, Soil Temperature, and Moisture Value and in last, two Graph blocks to display last 30 day Moisture and Soil Temperature Data. To add a button on the dashboard, click on the Toggle block.
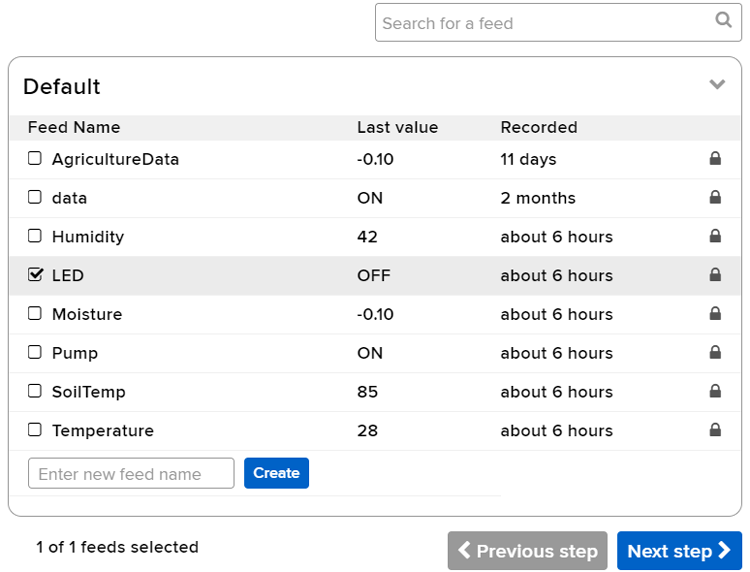
In the next window, it will ask you to choose the feed, so click on LED feed.
After this, follow the same procedure to add rest of the blocks. After adding all the blocks, my dashboard looks like this:

You can edit your dashboard by clicking on the settings buttons.
Getting the OpenWeatherMap API
As mentioned earlier, we are also going to display weather forecast on Adafruit IO dashboard and for that, we will use OpenWeatherMap API to request the day’s weather forecast for chosen location. OpenWeatherMap provides highly recognizable weather products that make working with the weather data a way easier. This data can be accessed via fast, reliable APIs that follow industry standards and compatible with different kinds of enterprise systems. OpenWeatherMap offers both paid and free plans and here in this project, we are going to use its free plan to get the weather forecast data.
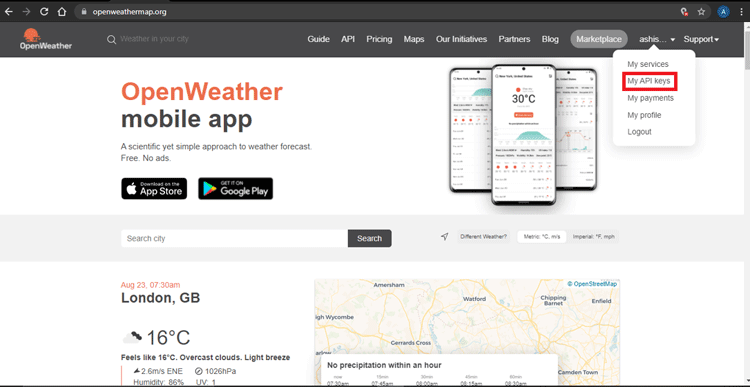
Now to obtain the API key, it’s necessary to sign up on their platform, so first create an account and once your account is created, you’ll be redirected to dashboard as shown below. From there click on your Name and then click on ‘My API Keys’ and you will be presented with a unique API key to pull information from the site.
Now we are going to use a 5 day / 3 hour forecast data API. This API includes weather forecast data with 3-hour gap and forecast data is available in JSON or XML format. To get the weather data for your chosen location, enter the below URL with the sections in curly brackets replaced with the city and your unique API key:
api.openweathermap.org/data/2.5/forecast?q={city name}&appid={API key}
For example, our API URL would be:
api.openweathermap.org/data/2.5/forecast?q=Jaipur&appid=e8b22b36da932dce8f31ec9be9cb68a3
Paste this URL into your browser’s search bar and it should give you a bunch of information that corresponds to your local weather forecast information.

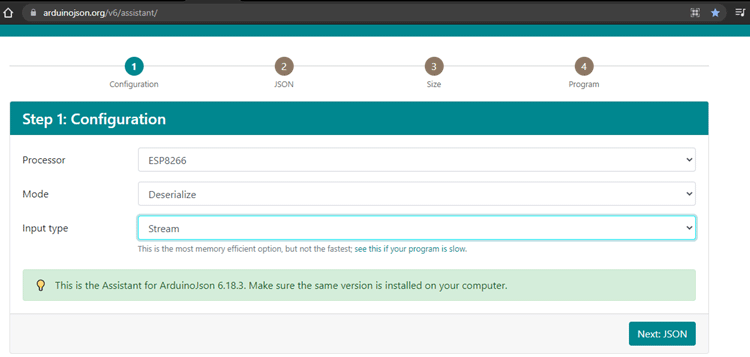
Now that we have the JSON data, the next step will be generating the code by which we can read the JSON data and phrase it according to our needs. For that, go to the ArduinoJson Assistant and in first step select the processor type, Mode, and Input Type.
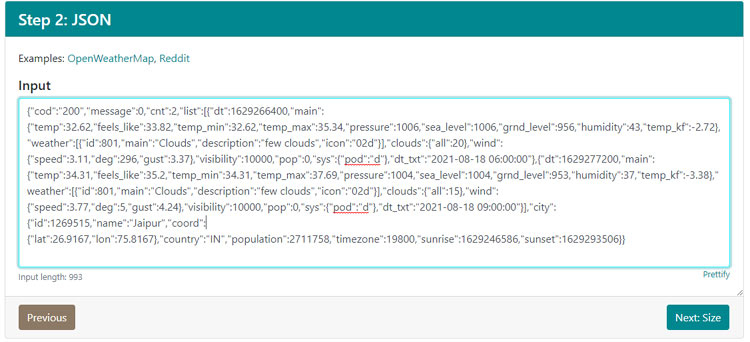
Then in the next section, paste the JSON data.
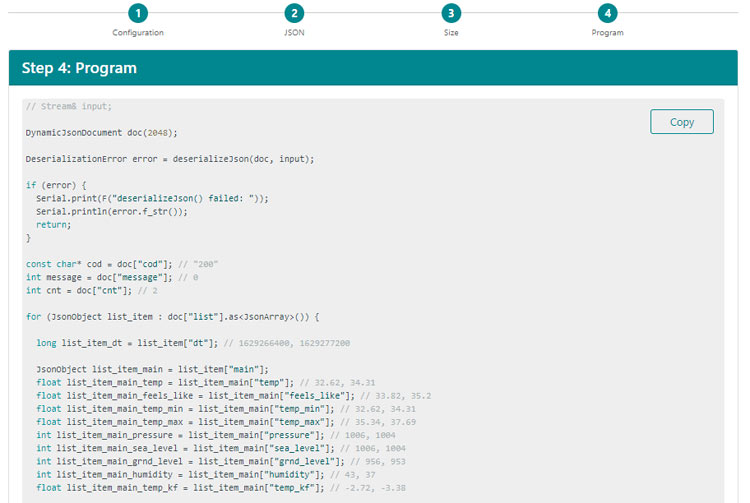
Then in last step, you will get the code to read the weather forecast data. We will not use the complete code that is generated by the Assistant.
Programming NodeMCU for Smart Agriculture System
The complete code for IoT based Agriculture Monitoring System is given at the end of the document. Here we are explaining some important parts of the code. The code uses the DallasTemperature, OneWire, Adafruit_MQTT, ArduinoJson, and DHT.h libraries. The Adafruit_MQTT.h and DHT11.h can be downloaded from the given links, rest of the library can be directly downloaded from Arduino IDE library manager.
After installing the libraries to Arduino IDE, start the code by including the required libraries files.
#include <ESP8266WiFi.h>
#include <DallasTemperature.h>
#include <OneWire.h>
#include "DHT.h"
#include "Adafruit_MQTT.h"
#include "Adafruit_MQTT_Client.h"
#include <ArduinoJson.h>
Then enter the Wi-Fi and Adafruit IO credentials that you copied from the Adafruit IO server. These will include the MQTT server, Port No, User Name, and AIO Key.
const char *ssid =  "Wi-Fi Name";
const char *pass =  "Wi-Fi password";
#define MQTT_SERV "io.adafruit.com"
#define MQTT_PORT 1883
#define MQTT_NAME "Adafruit IO Username"
#define MQTT_PASS "AIO Key"
Then set up the Adafruit IO feeds for storing the sensor data and controlling LED and water pump. In my case, I have defined four feeds to store different sensor data namely: Soil Temperature, Temperature, Humidity and Moisture, one feed for displaying Weather data and two feeds to control LED Strip & Water Pump.
Adafruit_MQTT_Client mqtt(&client, MQTT_SERV, MQTT_PORT, MQTT_NAME, MQTT_PASS);
Adafruit_MQTT_Publish Moisture = Adafruit_MQTT_Publish(&mqtt,MQTT_NAME "/f/Moisture");
Adafruit_MQTT_Publish Temperature = Adafruit_MQTT_Publish(&mqtt,MQTT_NAME "/f/Temperature");
Adafruit_MQTT_Publish Humidity = Adafruit_MQTT_Publish(&mqtt,MQTT_NAME "/f/Humidity");
Adafruit_MQTT_Publish SoilTemp = Adafruit_MQTT_Publish(&mqtt,MQTT_NAME "/f/SoilTemp");
Adafruit_MQTT_Subscribe LED = Adafruit_MQTT_Subscribe(&mqtt, MQTT_NAME "/f/LED");
 Adafruit_MQTT_Subscribe Pump = Adafruit_MQTT_Subscribe(&mqtt, MQTT_NAME "/f/Pump");
Now inside the setup() function, initialize the Serial Monitor at a baud rate of 9600 for debugging purposes. Also Initialize the DHT sensor, and DS18B20 sensor with the begin() function.
void setup()
{
  Serial.begin(9600);
  delay(10);
  dht.begin();
  sensors.begin();
………………..
}
Now comes the void loop(). This is where all the tasks are performed. So, in this loop, first we will get the weather forecast data from OpenWeatherMap API, then we will read the sensors data and in last step, we will publish all this data on Adafruit IO dashboard.
Reading the Weather Forecast:
To read the weather forecast data from OpenWeatherMap API, we will use the code snippets that we generated using ArduinoJson Assistant. Here in void loop, we will only call the API after a particular time interval so that we don’t exceed our daily limit.
if (millis() - lastConnectionTime > postInterval) {
    // note the time that the connection was made:
    lastConnectionTime = millis();
    makehttpRequest();
  }
Reading the Sensor Data:
Now after getting the weather data, next we will read all the sensor data. Here we are using the DHT11, DS18B20, LDR and Soil Moisture Sensor. LDR and soil moisture sensor data will be used to automate LED strip and water pump. So first we will read the LDR status and if the LDR reading is less than 200, then LED will be turned on automatically. Similarly, if the soil moisture percentage is less than 35, then water pump will be turned on.
int ldrStatus = analogRead(ldrPin);
    if (ldrStatus <= 200) {
       digitalWrite(ledPin, HIGH);
    }
    else {
      digitalWrite(ledPin, LOW);     }
  moisturePercentage = ( 100.00 - ( (analogRead(moisturePin) / 1023.00) * 100.00 ) );
if (moisturePercentage < 35) {
  digitalWrite(motorPin, HIGH);
}
temperature = dht.readTemperature();
 humidity = dht.readHumidity();
sensors.requestTemperatures();
soiltemp = sensors.getTempCByIndex(0);
Publishing the Data on Adafruit IO:
Now as we have collected all the data, it's time to publish this data on Adafruit IO dashboard, so that we can monitor it from anywhere. Here we will publish the different sensor data to their respective feeds.
 if (currentTime - previousTime >= Interval) {
    if (! Moisture.publish(moisturePercentage))
    if (! Temperature.publish(temperature))
    if (! Humidity.publish(humidity))
    if (! SoilTemp.publish(soiltemp))
    if (! WeatherData.publish(icon))
}

3D Printed Casing for Smart Farming System
As this project will be used in farming applications, I decided to 3D print an enclosure. I measured the dimensions of the setup using vernier to design a casing. Once it was done, my design looked something like this:
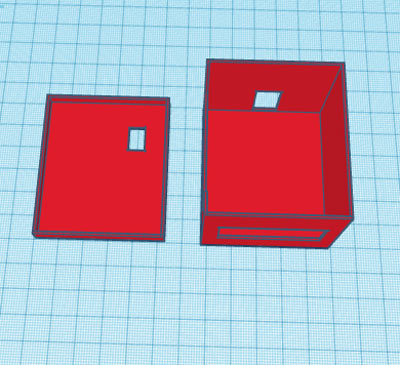
After I was satisfied with the design, I exported it as an STL file, sliced it based on printer settings, and finally printed it. The STL file is also available for download from Thingiverse and you can print your own casing using it.
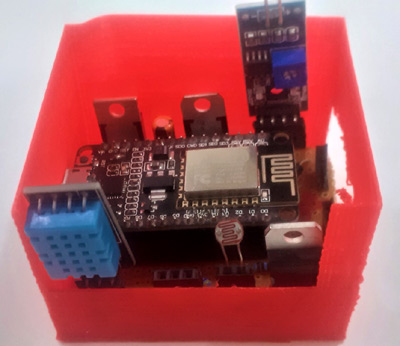
After the print was done, I proceeded with assembling the project set-up in a permanent enclosure for future use. Once the complete connection was done, I assembled the circuit into my casing and everything was nicely fit as you can see below:
Testing the Smart Farming System
To test this project, I sprouted some seeds in a plastic tray as shown in the below image:
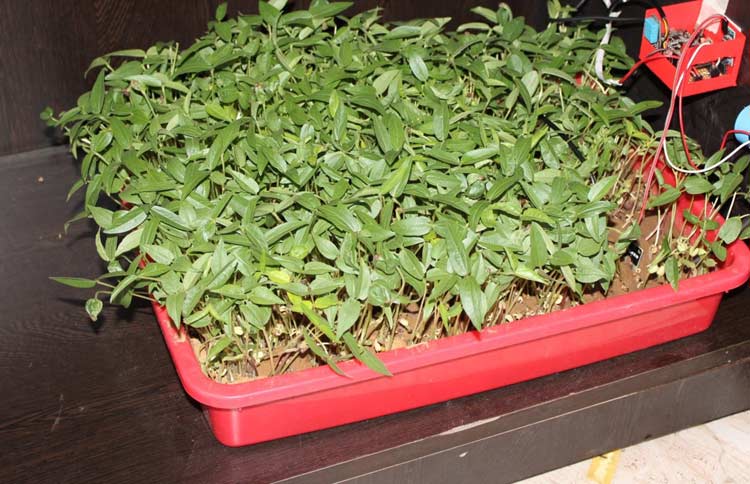
I mounted the hardware box beside the tray, connected a water pump to a water bottle, and connected the power supply. With this done, it starts monitoring the different parameters like soil moisture, soil temperature, etc. All these reading will be published on Adafruit IO dashboard.

So, this is how you can setup a IoT based smart Agriculture System. Apart from these parameters, you can also measure some other parameters like PH, etc. Hope you enjoyed the project and learned something useful, if you have any questions, please leave them in the comment section below or use our forum to start a discussion on this.
Complete Project Code
#include <ESP8266WiFi.h>

#include <DallasTemperature.h>

#include <OneWire.h>

#include "DHT.h"

#include "Adafruit_MQTT.h"

#include "Adafruit_MQTT_Client.h"

#include <ArduinoJson.h>

const char *ssid =  "Galaxy-M20";     // Enter your WiFi Name

const char *pass =  "ac312124"; // Enter your WiFi Password

WiFiClient client;

#define MQTT_SERV "io.adafruit.com"

#define MQTT_PORT 1883

#define MQTT_NAME "aschoudhary" // Your Adafruit IO Username

#define MQTT_PASS "1ac95cb8580b4271bbb6d9f75d0668f1" // Adafruit IO AIO key

const char server[] = "api.openweathermap.org";

String nameOfCity = "Jaipur,IN";

String apiKey = "e8b22b36da932dce8f31ec9be9cb68a3";

String text;

const char* icon="";

int jsonend = 0;

boolean startJson = false;

int status = WL_IDLE_STATUS;

#define JSON_BUFF_DIMENSION 2500

unsigned long lastConnectionTime = 10 * 60 * 1000;     // last time you connected to the server, in milliseconds

const unsigned long postInterval = 10 * 60 * 1000;  // posting interval of 10 minutes  (10L * 1000L; 10 seconds delay for testing)

const int ldrPin = D1;

const int ledPin = D0;

const int moisturePin = A0;  // moisteure sensor pin

const int motorPin = D8;

float moisturePercentage;              //moisture reading

int temperature, humidity, soiltemp;

#define ONE_WIRE_BUS 4   //D2 pin of nodemcu

#define DHTTYPE DHT11   // DHT 11

#define dht_dpin D4

DHT dht(dht_dpin, DHTTYPE);

OneWire oneWire(ONE_WIRE_BUS);

DallasTemperature sensors(&oneWire);

const unsigned long Interval = 50000;

unsigned long previousTime = 0;

//Set up the feed you're publishing to

Adafruit_MQTT_Client mqtt(&client, MQTT_SERV, MQTT_PORT, MQTT_NAME, MQTT_PASS);

Adafruit_MQTT_Publish Moisture = Adafruit_MQTT_Publish(&mqtt,MQTT_NAME "/f/Moisture");  // Moisture is the feed name where you will publish your data

Adafruit_MQTT_Publish Temperature = Adafruit_MQTT_Publish(&mqtt,MQTT_NAME "/f/Temperature");

Adafruit_MQTT_Publish Humidity = Adafruit_MQTT_Publish(&mqtt,MQTT_NAME "/f/Humidity");

Adafruit_MQTT_Publish SoilTemp = Adafruit_MQTT_Publish(&mqtt,MQTT_NAME "/f/SoilTemp");

Adafruit_MQTT_Publish WeatherData = Adafruit_MQTT_Publish(&mqtt,MQTT_NAME "/f/WeatherData");

//Set up the feed you're subscribing to

 Adafruit_MQTT_Subscribe LED = Adafruit_MQTT_Subscribe(&mqtt, MQTT_NAME "/f/LED");

 Adafruit_MQTT_Subscribe Pump = Adafruit_MQTT_Subscribe(&mqtt, MQTT_NAME "/f/Pump");

void setup()

{

  Serial.begin(9600);

  delay(10);

  dht.begin();

  sensors.begin();

  mqtt.subscribe(&LED);

  mqtt.subscribe(&Pump);

  pinMode(motorPin, OUTPUT);

  pinMode(ledPin, OUTPUT);

  pinMode(ldrPin, INPUT);

  digitalWrite(motorPin, LOW); // keep motor off initally

  digitalWrite(ledPin, HIGH);

  text.reserve(JSON_BUFF_DIMENSION);

  Serial.println("Connecting to ");

  Serial.println(ssid);

  WiFi.begin(ssid, pass);

  while (WiFi.status() != WL_CONNECTED)

  {

    delay(500);

    Serial.print(".");              // print ... till not connected

  }

  Serial.println("");

  Serial.println("WiFi connected");

}

void loop()

{

 unsigned long currentTime = millis();

 MQTT_connect();

 if (millis() - lastConnectionTime > postInterval) {

    // note the time that the connection was made:

    lastConnectionTime = millis();

    makehttpRequest();

  }

//}

 int ldrStatus = analogRead(ldrPin);

    if (ldrStatus <= 200) {

       digitalWrite(ledPin, HIGH);

       Serial.print("Its DARK, Turn on the LED : ");

       Serial.println(ldrStatus);

    }

    else {

      digitalWrite(ledPin, LOW);

      Serial.print("Its BRIGHT, Turn off the LED : ");

      Serial.println(ldrStatus);

     }

  moisturePercentage = ( 100.00 - ( (analogRead(moisturePin) / 1023.00) * 100.00 ) );

  Serial.print("Soil Moisture is  = ");

  Serial.print(moisturePercentage);

  Serial.println("%");

if (moisturePercentage < 35) {

  digitalWrite(motorPin, HIGH);         // tun on motor

}

if (moisturePercentage > 38) {

  digitalWrite(motorPin, LOW);          // turn off mottor

}

 temperature = dht.readTemperature();

 humidity = dht.readHumidity();

 //Serial.print("Temperature: ");

 //Serial.print(temperature);

 //Serial.println();

 //Serial.print("Humidity: ");

 //Serial.print(humidity);

 //Serial.println();

 sensors.requestTemperatures();

 soiltemp = sensors.getTempCByIndex(0);

// Serial.println("Soil Temperature: ");

// Serial.println(soiltemp);

if (currentTime - previousTime >= Interval) {

    if (! Moisture.publish(moisturePercentage)) //This condition is used to publish the Variable (moisturePercentage) on adafruit IO. Change thevariable according to yours.

         {

            }

    if (! Temperature.publish(temperature))

         {

           }

    if (! Humidity.publish(humidity))

         {

         //delay(30000);

          }

    if (! SoilTemp.publish(soiltemp))

       {

          }

    if (! WeatherData.publish(icon))

       {

         }

          previousTime = currentTime;

}

Adafruit_MQTT_Subscribe * subscription;

while ((subscription = mqtt.readSubscription(5000))) //Dont use this one until you are conrolling something or getting data from Adafruit IO.

     {

    if (subscription == &LED)

     {

      //Print the new value to the serial monitor

      Serial.println((char*) LED.lastread);

        if (!strcmp((char*) LED.lastread, "OFF"))

       {

         digitalWrite(ledPin, LOW);

        }

        if (!strcmp((char*) LED.lastread, "ON"))

          {

         digitalWrite(ledPin, HIGH);

         }

     }

    if (subscription == &Pump)

      {

      //Print the new value to the serial monitor

      Serial.println((char*) Pump.lastread);


      if (!strcmp((char*) Pump.lastread, "OFF"))

       {

        digitalWrite(motorPin, HIGH);

       }

     if (!strcmp((char*) Pump.lastread, "ON"))

       {

        digitalWrite(motorPin, LOW);

       }

     }

    }

  delay(9000);

 // client.publish(WeatherData, icon)

}

void MQTT_connect()

{

  int8_t ret;

  // Stop if already connected.

  if (mqtt.connected())

  {

    return;

  }

  uint8_t retries = 3;

  while ((ret = mqtt.connect()) != 0) // connect will return 0 for connected

  {

       mqtt.disconnect();

       delay(5000);  // wait 5 seconds

       retries--;

       if (retries == 0)

       {

         // basically die and wait for WDT to reset me

         while (1);

       }

  }

}

void makehttpRequest() {

  // close any connection before send a new request to allow client make connection to server

  client.stop();

  // if there's a successful connection:

  if (client.connect(server, 80)) {

    client.println("GET /data/2.5/forecast?q=" + nameOfCity + "&APPID=" + apiKey + "&mode=json&units=metric&cnt=2 HTTP/1.1");

    client.println("Host: api.openweathermap.org");

    client.println("User-Agent: ArduinoWiFi/1.1");

    client.println("Connection: close");

    client.println();

    unsigned long timeout = millis();

    while (client.available() == 0) {

      if (millis() - timeout > 5000) {

        Serial.println(">>> Client Timeout !");

        client.stop();

        return;

      }

    }

    char c = 0;

    while (client.available()) {

      c = client.read();

      // since json contains equal number of open and close curly brackets, this means we can determine when a json is completely received  by counting

      // the open and close occurences,

      //Serial.print(c);

      if (c == '{') {

        startJson = true;         // set startJson true to indicate json message has started

        jsonend++;

      }

      if (c == '}') {

        jsonend--;

      }

      if (startJson == true) {

        text += c;

      }

      // if jsonend = 0 then we have have received equal number of curly braces

      if (jsonend == 0 && startJson == true) {

        parseJson(text.c_str());  // parse c string text in parseJson function

        text = "";                // clear text string for the next time

        startJson = false;        // set startJson to false to indicate that a new message has not yet started

      }

    }

  }

  else {

    // if no connction was made:

    Serial.println("connection failed");

    return;

  }

}

//to parse json data recieved from OWM

void parseJson(const char * jsonString) {

  //StaticJsonBuffer<4000> jsonBuffer;

  const size_t bufferSize = 2*JSON_ARRAY_SIZE(1) + JSON_ARRAY_SIZE(2) + 4*JSON_OBJECT_SIZE(1) + 3*JSON_OBJECT_SIZE(2) + 3*JSON_OBJECT_SIZE(4) + JSON_OBJECT_SIZE(5) + 2*JSON_OBJECT_SIZE(7) + 2*JSON_OBJECT_SIZE(8) + 720;

  DynamicJsonBuffer jsonBuffer(bufferSize);

//  DynamicJsonDocument(bufferSize);

  // FIND FIELDS IN JSON TREE

  JsonObject& root = jsonBuffer.parseObject(jsonString);

  if (!root.success()) {

    Serial.println("parseObject() failed");

    return;

  }

  JsonArray& list = root["list"];

  JsonObject& nowT = list[0];

  JsonObject& later = list[1];

  JsonObject& tommorow = list[2];

//  String conditions = list.weather.main;

  // including temperature and humidity for those who may wish to hack it in

  String city = root["city"]["name"];

  String weatherNow = nowT["weather"][0]["description"];

  String weatherLater = later["weather"][0]["description"];

  String list12 = later["weather"][0]["list"];

  Serial.println(list12);

  Serial.println(weatherLater);

  if(weatherLater == "few clouds"){

    icon = "Few Clouds";

    Serial.print(icon);

  }

  else if(weatherLater == "rain"){

    icon = "Rain";

    Serial.print(icon);

  }

  else if(weatherLater == "broken clouds"){

    icon = "Broken Clouds";

    Serial.print(icon);

  }

  else {

    icon = "Sunny";

    }

}
Comments
Awesome description about this project. I love the way you describe this.
Hello,
I am residing in Melbourne, Australia. While I am entering the link to obtain the weather data it's saying invalid, I think that link is permitted only to cities in India. Now how to grab the info? if possible, could you give me the link that suits Australia.
doubt 2. you said you are using Dallas temperature what does that mean? as you are grabbing info about Jaipur and using Dallas. I am confused here.
could you please clarify these two doubts?
thanks

can i get this project ppts n synopsis sir....