

Proximity sensors can be described as one of a kind switches that detect a nearby object with the help of light, electromagnetic field, or sound. Typically, these types of devices are designed to detect nearby subjects, and often it's the practical application that most of these sensors are going to be used in. But there are circumstances where the subject is far away from the sensor or the subject is blocked by an obstruction, in these types of situations, we can use BLE (Bluetooth Low Energy) devices to detect and sense the proximity of the object. The ESP32 development board has built-in BLE, which we have used in many other projects. If you are completely new to BLE, then check out the ESP32 BLE client and ESP32 BLE Server projects that we have built earlier. We have also built a Bluetooth iBeacon using ESP32 previously.
In this article, I am going to show you how to make a simple BLE presence detector with the help of an ESP32, and Arduino, and in the end, we will test these devices using BLE on my smartphone and a smartwatch.
What is Bluetooth Low Energy (BLE)?

BLE stands for Bluetooth Low Energy, and it came to our everyday lives in 2011, because at that time of the year every major manufacturer started embedding BLE technology on their devices. BLE is a low power wireless communication technology that was developed for battery power applications which can be used to communicate among devices over a short distance. Some of the devices you use every day have Bluetooth built into it like your smartphone, your smartwatch, wireless earbuds, wireless speakers, smart home devices, and more embedded Bluetooth to communicate or to get location data.
BLE is a relatively new technology, and the BLE protocol was developed by Bluetooth Special Interest Group (SIG) with a primary objective of making low power devices a reality. Though the name of the newly made protocol stayed the same, the newly developed BLE protocol was not backward compatible which means our Bluetooth Classic devices cannot talk to the BLE devices, despite the downside of this technology, it enabled developers to produce very low power energy-efficient devices that can last for months even years on a small coin cell battery.
How does BLE Communication Work?
BLE uses a hierarchical data structure to send and receive information. A BLE device acting as a server will advertise services and characteristics that can be detected by a client and once the information exchange is successful, BLE devices can communicate with each other simultaneously. In technical terms, this information stack all together is known as an attribute of a BLE device. And it's defined and implemented using the GATT (Generic Attributes) profile. In these Profiles, we have Service, Characteristics, and values in a hierarchical order. Services contain characteristics and the characteristic contains the value, by reading the characteristic, we can read the values and values changes over time.
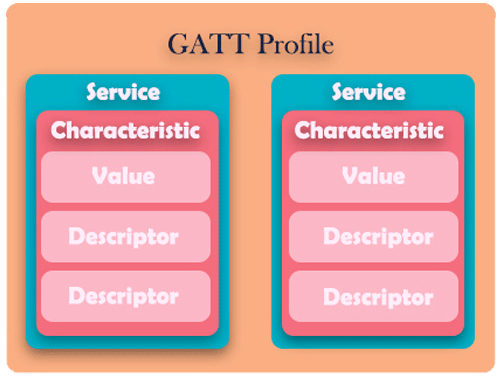
Characteristics can be processed to include read or write information. Devices containing read components can publish information and devices which contain write characteristics can receive data from a client.
The GATT profile under which the services and characteristics are defined is known as a Universally Unique Identifier (UUID). There are some standard services and characteristics defined and reserved by the SIG corporation if we read the UUID of a BLE device, we can instantly tell what kind of device it is. More on this topic later.
BLE data is transmitted and received in very small packages, a BLE packet is of only 31 bytes in total when a TCP packet is of 60 bytes or more. Finally, one important thing to remember is that a BLE packet needs to be structured properly which can then be serialized and deserialized consistently in both the server and the client end.
How the BLE Proximity Sensor Works?
As I said earlier, proximity sensors can detect objects with the help of light, electromagnetic waves, or sound. Previously we have made some projects based on PIR sensors, and IR sensors, you can check those out if you want to learn more about the topic.

BLE servers regularly broadcast advertisement signals so the clients can search for it and connect to it. This advertisement signal contains a unique BLE MAC (Media Access Control) address, which is very similar to a MAC address used in Wi-Fi because our ESP32 module has Bluetooth built-in, we could easily detect this broadcasted signal and compare it to a lookup table, to detect the presence of a known device. Once the device is verified, we can turn on a light locally or we can use Adafruit IO to trigger a notification on our android application. We have also made projects with Adafruit IO previously, you can check those out if you want to implement Adafruit IO.
Requirements for this Project?
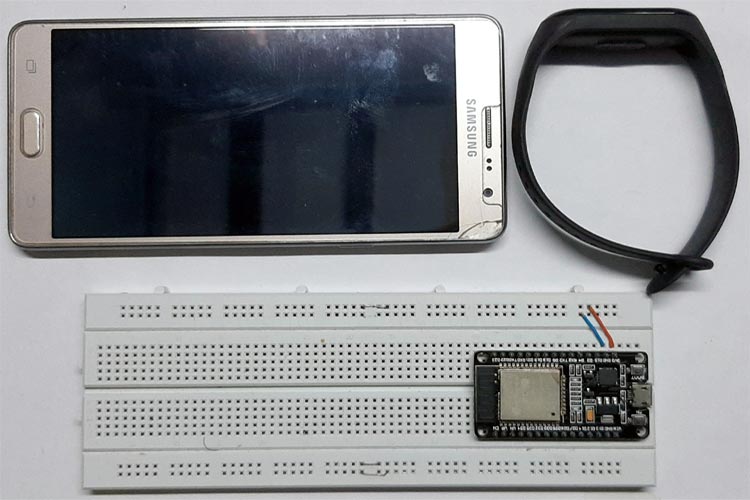
As you can see in the above image, there is not much requirement for this project, an esp32 dev board, and a BLE enabled device, here I am using my MI Band, that's it.
Arduino Code for ESP32 BLE Proximity Sensor
For the demonstration, we will program our ESP32 controller to sense a known BLE beacon and we will light up the onboard LED once the known device is close to proximity. The complete program to do this can be found at the bottom of this page. The explanation of the code is as follows.
We begin our program by adding the required header files and declaring the variables.
As we are using the BLEScan class, we need to include the header file for BLEScan along with other BLE headers.
#include <BLEDevice.h>
#include <BLEUtils.h>
#include <BLEScan.h>
#include <BLEAdvertisedDevice.h>
Next, we will declare some variables, first is the array in which we store our known BLE MAC addresses. Next, we will declare the threshold value, breaking which the desired action will be triggered. Next, we will define a Boolean which will be set to true if a known device in our array matched the scanned device list. Next, we declare another variable to clear already scanned BLE devices, if we don't do this, there will be memory issues. Next, we take a pointer to BLEScan class.
String knownBLEAddresses[] = {"aa:bc:cc:dd:ee:ee", "54:2c:7b:87:71:a2"};
int RSSI_THRESHOLD = -55;
bool device_found;
int scanTime = 5; //In seconds
BLEScan* pBLEScan;
We have to define a call-back function, first, this call-back function will be called once every few seconds to check if any new BLE devices are available or not. Once we are in the call-back function, we will set a flag and break the loop if we have found a BLE device. At last, we will print the BLE device information.
class MyAdvertisedDeviceCallbacks: public BLEAdvertisedDeviceCallbacks {
    void onResult(BLEAdvertisedDevice advertisedDevice) {
      for (int i = 0; i < (sizeof(knownBLEAddresses) / sizeof(knownBLEAddresses[0])); i++)
      {
        //Uncomment to Enable Debug Information
        //Serial.println("*************Start**************");
        //Serial.println(sizeof(knownBLEAddresses));
        //Serial.println(sizeof(knownBLEAddresses[0]));
        //Serial.println(sizeof(knownBLEAddresses)/sizeof(knownBLEAddresses[0]));
        //Serial.println(advertisedDevice.getAddress().toString().c_str());
        //Serial.println(knownBLEAddresses[i].c_str());
        //Serial.println("*************End**************");
        if (strcmp(advertisedDevice.getAddress().toString().c_str(), knownBLEAddresses[i].c_str()) == 0)
                        {
          device_found = true;
                          break;
                        }
        else
          device_found = false;
      }
      Serial.printf("Advertised Device: %s \n", advertisedDevice.toString().c_str());
    }
};
Next is the setup section where we declare the LED pin as an output. Also, we initialize the BLEDevice with the BLEDevice::init method, after that, we get a scanned object from our BLEDevice, we store the address to the previously declared pBLEScan pointer.
Next, we set the call-back function, this call-back function will be called once in a few seconds to check if there are any new devices are available or not, next I am using the SetActiveScan method to set it inactive mode because if we enable this, the BLE device will give us very accurate results. Finally, we set up the setInterval and setWindow method to complete the setup.
  Serial.begin(115200); //Enable UART on ESP32
  Serial.println("Scanning..."); // Print Scanning
  pinMode(LED_BUILTIN, OUTPUT); //
  BLEDevice::init("");
  pBLEScan = BLEDevice::getScan(); //create new scan
  pBLEScan->setAdvertisedDeviceCallbacks(new MyAdvertisedDeviceCallbacks()); //Init Callback Function
  pBLEScan->setActiveScan(true); //active scan uses more power, but get results faster
  pBLEScan->setInterval(100); // set Scan interval
  pBLEScan->setWindow(99);  // less or equal setInterval value
In the loop section, we start the BLE device by using the start method. The scanTime parameter defines how much time the BLE device should take to scan for new devices.
BLEScanResults foundDevices = pBLEScan->start(scanTime, false);
And once the scan is done, we are putting it to a variable, named foundDevices.
Once the scan is complete, we can get how many devices the scanner has found by using the found devices.getCount() method and we conveniently put it in a for loop get every device one by one to get the RSSI values, after that, we compare if that device was matched to a device in the list or not, we do that by using a simple if statement. If we get a known device, we make the onboard LED on as an indication that we have found a known device in our list. Else we turn the led off.
for (int i = 0; i < foundDevices.getCount(); i++)
  {
    BLEAdvertisedDevice device = foundDevices.getDevice(i);
    int rssi = device.getRSSI();
    Serial.print("RSSI: ");
    Serial.println(rssi);
    if (rssi > RSSI_THRESHOLD && device_found == true)
      digitalWrite(LED_BUILTIN, HIGH);
    else
      digitalWrite(LED_BUILTIN, LOW);
  }
Finally, we clear the heap by calling the-
clearResults() methode
pBLEScan->clearResults();   // delete results fromBLEScan buffer to release memory
Once the code is uploaded, you can trigger anything if a known device comes near your ESP32 device. Complete working can also be found at the bottom of this page.
Hope you enjoyed the tutorial and found it useful. Feel free to use the code, upgrade it, and share it back. Any questions or comments are welcomed in the comment section below. You can also use our forums if you have any technical queries to be answered.
Complete Project Code
#include <BLEDevice.h>
#include <BLEUtils.h>
#include <BLEScan.h>
#include <BLEAdvertisedDevice.h>
String knownBLEAddresses[] = {"6E:bc:55:18:cf:7b", "53:3c:cb:56:36:02", "40:99:4b:75:7d:2f", "5c:5b:68:6f:34:96"};
int RSSI_THRESHOLD = -55;
bool device_found;
int scanTime = 5; //In seconds
BLEScan* pBLEScan;
class MyAdvertisedDeviceCallbacks: public BLEAdvertisedDeviceCallbacks {
    void onResult(BLEAdvertisedDevice advertisedDevice) {
      for (int i = 0; i < (sizeof(knownBLEAddresses) / sizeof(knownBLEAddresses[0])); i++)
      {
        //Uncomment to Enable Debug Information
        //Serial.println("*************Start**************");
        //Serial.println(sizeof(knownBLEAddresses));
        //Serial.println(sizeof(knownBLEAddresses[0]));
        //Serial.println(sizeof(knownBLEAddresses)/sizeof(knownBLEAddresses[0]));
        //Serial.println(advertisedDevice.getAddress().toString().c_str());
        //Serial.println(knownBLEAddresses[i].c_str());
        //Serial.println("*************End**************");
        if (strcmp(advertisedDevice.getAddress().toString().c_str(), knownBLEAddresses[i].c_str()) == 0)
                        {
          device_found = true;
                          break;
                        }
        else
          device_found = false;
      }
      Serial.printf("Advertised Device: %s \n", advertisedDevice.toString().c_str());
    }
};
void setup() {
  Serial.begin(115200); //Enable UART on ESP32
  Serial.println("Scanning..."); // Print Scanning
  pinMode(LED_BUILTIN, OUTPUT); //make BUILTIN_LED pin as output
  BLEDevice::init("");
  pBLEScan = BLEDevice::getScan(); //create new scan
  pBLEScan->setAdvertisedDeviceCallbacks(new MyAdvertisedDeviceCallbacks()); //Init Callback Function
  pBLEScan->setActiveScan(true); //active scan uses more power, but get results faster
  pBLEScan->setInterval(100); // set Scan interval
  pBLEScan->setWindow(99);  // less or equal setInterval value
}
void loop() {
  // put your main code here, to run repeatedly:
  BLEScanResults foundDevices = pBLEScan->start(scanTime, false);
  for (int i = 0; i < foundDevices.getCount(); i++)
  {
    BLEAdvertisedDevice device = foundDevices.getDevice(i);
    int rssi = device.getRSSI();
    Serial.print("RSSI: ");
    Serial.println(rssi);
    if (rssi > RSSI_THRESHOLD && device_found == true)
      digitalWrite(LED_BUILTIN, HIGH);
    else
      digitalWrite(LED_BUILTIN, LOW);
  }
  pBLEScan->clearResults();   // delete results fromBLEScan buffer to release memory
}Comments
in article: https://circuitdigest.com/microcontroller-projects/ble-based-proximity-…
I got the code compiled and running, and 5 ESP32 BLE cirecuits also running from iBeacon, EddyStone TLM beacon , and others including BLE scanners in the hopes it pick one or moe of them and give RSSI of them but no RSSI it will display the devices...
It runs and shows debug printed lines fine, but never enters the for(){} loop;
So i am not seeing RSSI or blue LED
BLEScanResults foundDevices = pBLEScan->start(scanTime, false);
// GETS TO HERE but not do the for loop? wondering whaT does it want?
for (int i = 0; i < foundDevices.getCount(); i++)
{
BLEAdvertisedDevice device = foundDevices.getDevice(i);
int rssi = device.getRSSI();
Serial.print("RSSI: ");
Serial.println(rssi);
if (rssi > RSSI_THRESHOLD && device_found == true)
digitalWrite(LED_BUILTIN, HIGH);
else
digitalWrite(LED_BUILTIN, LOW);
}
pBLEScan->clearResults(); // delete results fromBLEScan buffer to release memory
}
thank you,
louie
version 1.0.5 and 1.0.6 has a bug with foundDevices.getCount(); ESP32 version 1.0.4
ESP32 Version 1.0.5 and 1.0.6 has a bug with foundDevices.getCount() version ESP32 1.0.4 WORKED OK.

With WiFi pls code