
ESP32 is really a powerful IoT device with built-in support for Bluetooth and WiFi. The ESP32 is an advanced version of its predecessor, the ESP8266, with extra features like RAM, ROM, GPIO Pins, etc. The ESP32 module supports both classic Bluetooth and Bluetooth Low Energy (BLE). The Classic Bluetooth can be used to transfer songs or files, and the BLE option can be used for battery-optimised applications like Bluetooth beacons, fitness bands, proximity advertisements, etc. It is also possible to use ESP32 as a serial Bluetooth module, like the HC-05 or HC-06 modules, for simple microcontroller projects.
As we know, the BLE can operate in two different modes - Server mode and Client mode. Both modes have been discussed in our previous ESP32 Tutorials:
- ESP32 BLE Server - GATT Service for Battery Level Indication
- ESP32 BLE Client – Connecting to a Fitness Band to Trigger a Bulb
In this tutorial, we will build a BLE iBeacon using ESP32, where ESP32 will act as a server, and a smartphone will act as a client. I assume that you are already familiar with how to use the ESP32 board with Arduino IDE; if not, fall back on the getting started with ESP32 tutorial.
You can also know more about Beacon/iBeacon Technology by going through our previous Bluetooth iBeacon projects using Raspberry Pi and HM-10 BLE iBeacon.
The ESP32 based Bluetooth iBeacon setup is one of the most flexible IoT solutions for use cases that use proximity. In this ultimate guide, we will cover everything from simple ESP32 Bluetooth server setups to advanced ESP32 iBeacon scanner projects, so you can create any type of professional iBeacon project with the least amount of hardware.
Table of Contents
What is the ESP32 Bluetooth iBeacon Technology?
An ESP32 BLE iBeacon is a Bluetooth transmitter that uses low energy to broadcast identification information to devices that are in proximity. Because a BLE iBeacon is not a traditional Bluetooth pairing of devices. Bluetooth iBeacon ESP32 implementations are useful for:
» Proximity marketing and location-based services
» Navigation systems inside buildings
» Asset tracking and managing inventory
» Smarter home automation trippers
» Fitness tracking and health monitoring applications.
ESP32 vs Traditional iBeacon Hardware
| Feature | ESP32 iBeacon | Traditional Hardware |
| Cost | $3-8 | $15-50 |
| Programming | Arduino IDE | Limited/Proprietary |
| Power Management | Deep sleep modes | Basic sleep |
| Customization | Full control | Limited options |
| Additional Features | WiFi, GPIO, sensors | Beacon only |
Components Required
Hardware Requirements for ESP32 Bluetooth iBeacon
- ESP32 Development Board
- Micro USB Cable
Software Requirements and Setup
- Arduino IDE
- Android App: nRF Connect for Mobile (By Nordic Semiconductor)
There are many BLE scanner apps, one of which we have used in our previous project on How to Use HM-10 BLE Module with Arduino. This BLE scanner app provides a good Graphical Interface (GUI) but lacks additional information, so in this project, we are using the NRF Connect for Mobile app.
Step-by-Step ESP32 Based Bluetooth iBeacon Setup
⇒ 1. Install ESP32 Board Package
Download the nRF Connect app from the Google Play Store and open it.
![]()
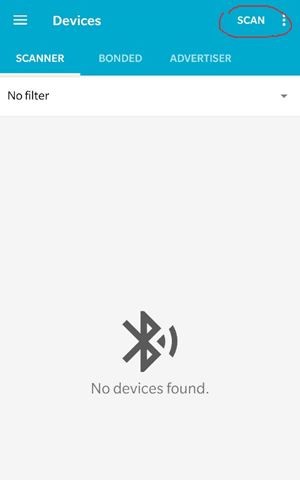
⇒ 2. The screen looks like this. The Useful options for this project will be ‘Scan’, ‘Scanner’ and ‘Info’ when devices get found.
The ‘Scan’ option will be used to see all the available iBeacons. To start searching for the iBeacon ,either pull down the screen or go to the ‘Scan’ option on the top right corner of the Screen. This will start searching for the available iBeacons.
⇒ 3. After searching the iBeacon, you will be able to see the RSSI, UUID, Major and Minor of the iBeacon. The RSSI will change if you take the mobile or the iBeacon away from each other. Here in this screen, the RSSI is (-37). Other than this, there are some details such as Dummy Company Name, Device Type, Length of the Bytes, and the Local Name of ESP32. Here it is, “ESP32 as iBeacon”. You can change the local name in the sketch.
![]()
⇒ 4. After taking away the smartphone from the iBeacon, the RSSI value changes from -37 to -58. These values will keep changing if you move one of the devices.
![]()
The RSSI signal acceptable values are as follows:
| Signal Strength | TL;DR | Required for | |
|---|---|---|---|
| -30 dBm | Amazing | Max achievable signal strength. The client can only be a few feet from the AP to achieve this. Not typical or desirable in the real world. | N/A |
| -67 dBm | Very Good | Minimum signal strength for applications that require very reliable, timely delivery of data packets. | VoIP/VoWiFi, streaming video |
| -70 dBm | Okay | Minimum signal strength for reliable packet delivery. | Email, web |
| -80 dBm | Not Good | Minimum signal strength for basic connectivity. Packet delivery may be unreliable. | N/A |
| -90 dBm | Unusable | Approaching or drowning in the noise floor. Any functionality is highly unlikely. | N/A |
Programming ESP32 to work as a BLE iBeacon
There is a sample program of ESP32 BLE iBeacon available when you install the ESP32 Board in Arduino IDE. But we have slightly edited this sketch in this tutorial; the completely edited version of the sample program is given at the end of this tutorial.
To open the Sample Program of ESP32 BLE_iBeacon, just follow the steps below.
- Open Arduino IDE and Select “ESP32 Dev Module”. (If you don’t find this board, then please check if you have installed the ESP32 Board Package)
- Go to File > Examples > ESP32 BLE Arduino > BLE_iBeacon
- Open “BLE_iBeacon” Sketch.
Now, there is a slight modification in the code which is done in this tutorial. The ESP32 Name will also be updated in this sketch. So start with the inclusion of necessary Libraries which will be used in creating the BLE Server and iBeacon.
#include "sys/time.h"
This is a time library to get the current system time. This contains functions such as tv_sec, gettimeofday(), etc. For more information, you can visit the official UNIX release of ‘sys/time.h’.
Then the ESP32 BLE libraries are included, which contain many functions used to make the ESP32 in different configurations, such as BLE Client or BLE Server.
#include "BLEDevice.h"
#include "BLEUtils.h"
#include "BLEServer.h"
The iBeacon library is included, which sets the ESP32 as an iBeacon. Along with this, the deep sleep library is included for ESP32. The library will be used to send the ESP32 into deep sleep mode for a defined period of time.
#include "BLEBeacon.h"
#include "esp_sleep.h"
Define the sleep duration for ESP32. Here, the ESP32 will be in deep sleep for a duration of 10 seconds, and it will advertise and then again go to deep sleep for 10 seconds.
#define GPIO_DEEP_SLEEP_DURATION 10
Here, the RTC_DATA_ATTR is defined. Note that if you define a global variable with the RTC_DATA_ATTR attribute, the variable will be placed into the RTC_SLOW_MEM memory. So the structure declared as RTC_DATA_ATTR and copying the dynamic memory to this structure before a deep sleep helps recover this into dynamic memory after waking up. In simple words, we are saving the time in static memory from dynamic memory to recover it again after a deep sleep. Here, the two variables are defined. The ‘last’ is used to get the last time when the ESP32 went to deep sleep, and bootcount is used to count the number of resets.
RTC_DATA_ATTR static time_t last;
RTC_DATA_ATTR static uint32_t bootcount;
Then define the BLE Advertising Type. The definition is done as follows.
BLEAdvertising *pAdvertising;
The timeval is defined as a structure to access the current time.
struct timeval now;
Also, the UUID is defined. The UUIDs can be generated from this link.
#define BEACON_UUID "87b99b2c-9XXd-11e9-bXX2-526XXXX64f64"
Now create a function which will contain iBeacon attributes such as UUID, Major, Minor, Etc. In this function, create an instance for BLE as iBeacon, and set a fake manufacturer ID, UUID, major and minor for ESP32 as iBeacon.
void setBeacon() {
BLEBeacon oBeacon = BLEBeacon();
oBeacon.setManufacturerId(0x4C00);
oBeacon.setProximityUUID(BLEUUID(BEACON_UUID));
  oBeacon.setMajor((bootcount & 0xFFFF0000) >> 16);
  oBeacon.setMinor(bootcount & 0xFFFF);
Set the flag to 0x04 so that it will output BrEdrNotSupported in the scanner.
oAdvertisementData.setFlags(0x04);
Set advertising data for publishing.
std::string strServiceData = "";
Add the strings one after another to advertise.
  strServiceData += (char)26;     // Len
  strServiceData += (char)0xFF;   // Type
  strServiceData += oBeacon.getData();
  oAdvertisementData.addData(strServiceData);
Start the advertising by publishing data.
  pAdvertising->setAdvertisementData(oAdvertisementData);
  pAdvertising->setScanResponseData(oScanResponseData);
Begin the serial monitor at a 115200 baud rate and get the time. Also, increment the bootcount to store the number of Resets.
  Serial.begin(115200);
  gettimeofday(&now, NULL);
  Serial.printf("start ESP32 %d\n", bootcount++);
Store the current time in the static memory.
last = now.tv_sec;
Create a BLE device and name it as you want. Here, the ESP32 is named as “ESP2 as iBeacon”. Note that the names can be long, but this version of code has started to support long names.
BLEDevice::init("ESP32 as iBeacon");
Create a BLE server to advertise and start advertising.
BLEServer *pServer = BLEDevice::createServer();
 pAdvertising = BLEDevice::getAdvertising();
 BLEDevice::startAdvertising();
Then set the ESP32 in iBeacon mode.
setBeacon();
Start advertising, then stop advertising and go to deep sleep for 10 seconds.
pAdvertising->start();
 pAdvertising->stop();
esp_deep_sleep(1000000LL * GPIO_DEEP_SLEEP_DURATION);
Finally, plug the ESP32 Development Board into your Laptop using a Micro USB cable and upload the code into the ESP32 using Arduino IDE. Then open the nRF Connect Android App on your smartphone and start scanning. You will find ESP32 as an iBeacon broadcast as shown in the picture below:
![]()
Technical Summary and GitHub Repository
A Technical Summary condenses the project details into an easy-to-read format, highlighting how it works. Meanwhile, the GitHub Repository contains source files, documentation, and example codes for developers.


Alternative Testing Applications
| App Name | Platform | Features | Best For |
| Beacon Scanner | Android/iOS | Simple interface | Beginners |
| iBeacon Detector | iOS | Apple-optimized | iOS development |
| Bluetooth Scanner | Android | Multiple protocols | Advanced users |
FAQ: ESP32 Bluetooth iBeacon
⇥ 1. Why do you use a MOSFET in a circuit for an automatic water dispenser?
A MOSFET is used as an electronic switch for a 12V solenoid valve. A typical Arduino or microcontroller will provide 5V - not enough to operate a solenoid. The IRF540N MOSFET allows for an Arduino to control the activation of a high-current (12V) solenoid while being controlled from a low-voltage (5V) signal.
⇥ 2. How to set the range of detection in the Arduino water dispenser?
Adjust the threshold variable in the code. Default is 10cm. Update "int threshold = 10;" with your desired value (recommended 2-15cm). Range short reduces false triggering, range long enhances the detection area.
⇥ 3. What kind of power supply do I need for an automatic water dispenser?
Use a 12V DC power adapter rated for at least 1.5A to plug into the DC jack of the Arduino. This provides 12V to the solenoid valve from the VIN pin and automatically gives 5V for the Arduino and the sensor to use.
⇥ 4. How do I stop the water dispenser from overflowing?
The code has to include a timer-based cut-off using the millis() function. That can only be used in one of two ways: you can add a time limit for dispensing water (say, after 5 seconds), or you can add another, second sensor higher up to sense when the glass is full.
⇥ 5. Can I use a different solenoid valve specification that was not specifically recommended for the dispenser?
Yes. Just make sure that the voltage is compatible. If you are using a 24V solenoid, use a 24V adapter, but also check the MOSFET voltage ratings. In the case of 5V solenoids, use the 5V pin to connect directly to the solenoid, and you will not need to use the VIN pin. This will minimise power requirements and be easier to apply.
⇥ 6. What should I do if the sensor is not detecting any object?
You might want to start with the wiring: trigger pin - pin 9 on the Arduino; echo pin - pin 8; VCC goes to the +5V power connector, and GND should go to a ground. Also, check your orientation; make sure nothing is blocking the face of the sensor. You can also check to see if the sensor is getting or detecting data with the serial monitor output as well.
⇥ 7. Is the automatic water dispenser safe for drinking water?
Use a potable water-rated food-grade solenoid valve and make sure it is isolated from any of the electrical components. Clean the water lines and valves regularly in order to keep your setup clean and functioning.
⇥ 8. Do the sensors work with the iBeacon features in the ESP32?
Yes! You can use the GPIO pins on the ESP32 to connect multiple sensors (temperature, motion, light, etc.), and you may also advertise sensor data with iBeacon advertisements, essentially making smart devices that are aware of their environment for IoT development.
This is how ESP32 can be used as a BLE Beacon to advertise UUID, Major and Minor. If you want to know more about iBeacon, then follow our previous tutorial on HM10 as an iBeacon. Also, if you have any doubts, then comment below or ask questions in the forums.
Complete Code with a working video is given below.
Practical Applications of ESP32
We’ve built a variety of ESP32 projects, explore them through the links below.

ESP32 Timers & Timer Interrupts
Timer interrupts are crucial in the use of ESP32 timer interrupt programming projects for accurate timing control. If you want something to occur on schedule, ESP32 timer interrupts give you the accuracy required.

Interrupts are used to handle events that do not happen during the normal execution of a program, but when a specific trigger occurs. For example, if we write a program to blink an LED, the microcontroller will execute each command one by one.

ESP32 Smart Home Automation using Alexa and Google Assistant
This project will guide you through creating a smart home control system that can be controlled using both Google Assistant and Alexa, using an ESP32 and Sinric Pro.
Complete Project Code
#include "sys/time.h"
#include "BLEDevice.h"
#include "BLEUtils.h"
#include "BLEServer.h"
#include "BLEBeacon.h"
#include "esp_sleep.h"

#define GPIO_DEEP_SLEEP_DURATION     10  // sleep x seconds and then wake up
RTC_DATA_ATTR static time_t last;        // remember last boot in RTC Memory
RTC_DATA_ATTR static uint32_t bootcount; // remember number of boots in RTC Memory
// See the following for generating UUIDs:
// https://www.uuidgenerator.net/
BLEAdvertising *pAdvertising;   // BLE Advertisement type
struct timeval now;
#define BEACON_UUID "87b99b2c-90fd-11e9-bc42-526af7764f64" // UUID 1 128-Bit (may use linux tool uuidgen or random numbers via https://www.uuidgenerator.net/)
void setBeacon() {
  BLEBeacon oBeacon = BLEBeacon();
  oBeacon.setManufacturerId(0x4C00); // fake Apple 0x004C LSB (ENDIAN_CHANGE_U16!)
  oBeacon.setProximityUUID(BLEUUID(BEACON_UUID));
  oBeacon.setMajor((bootcount & 0xFFFF0000) >> 16);
  oBeacon.setMinor(bootcount & 0xFFFF);
  BLEAdvertisementData oAdvertisementData = BLEAdvertisementData();
  BLEAdvertisementData oScanResponseData = BLEAdvertisementData();
  oAdvertisementData.setFlags(0x04); // BR_EDR_NOT_SUPPORTED 0x04
  std::string strServiceData = "";
  strServiceData += (char)26;     // Len
  strServiceData += (char)0xFF;   // Type
  strServiceData += oBeacon.getData();
  oAdvertisementData.addData(strServiceData);
  pAdvertising->setAdvertisementData(oAdvertisementData);
  pAdvertising->setScanResponseData(oScanResponseData);
}
void setup() {
  Serial.begin(115200);
  gettimeofday(&now, NULL);
  Serial.printf("start ESP32 %d\n", bootcount++);
  Serial.printf("deep sleep (%lds since last reset, %lds since last boot)\n", now.tv_sec, now.tv_sec - last);
  last = now.tv_sec;
  // Create the BLE Device
  BLEDevice::init("ESP32 as iBeacon");
  // Create the BLE Server
  BLEServer *pServer = BLEDevice::createServer(); // <-- no longer required to instantiate BLEServer, less flash and ram usage
  pAdvertising = BLEDevice::getAdvertising();
  BLEDevice::startAdvertising();
  setBeacon();
  // Start advertising
  pAdvertising->start();
  Serial.println("Advertizing started...");
  delay(100);
  pAdvertising->stop();
  Serial.printf("enter deep sleep\n");
  esp_deep_sleep(1000000LL * GPIO_DEEP_SLEEP_DURATION);
  Serial.printf("in deep sleep\n");
}
void loop() {
}

hi Im Muhammad Taqwa from Malaysia, i am asking for your opinion about utiliziing the iBeacon functionality.so here are the questions:
1. Can we make/ modify the arduino program code for the IBeacon to provide alarm trigger function,when it reaches certain distance required?
2. Can we connect the smartphone bluetooth to the esp 32 IBeacon? as i have tried to connect to my smartphone,it always say "connection failed" but the IBeacon information were displayed accordingly
really hope that you can help me on these questions,as i am doing this for my final year project,thanks alot in advance :D