
Manually sorting items is one of the most exhausting and time-consuming tasks. Manual sorting, whether of fruits or veggies or anything else, takes a lot of manpower and time. So, in this tutorial, we have tried to build a tomato sorting machine that could distinguish between red and green tomatoes. This Raspberry Pi-based Tomato Sorting system uses TensorFlow modules that are trained using Edge Impulse to detect the tomatoes and sort them according to the color. To know more about Raspberry Pi, you should check out our previously build raspberry pi projects.
Edge Impulse Studio is a machine learning platform that enables developers to generate Machine Learning trained models in the cloud and deploy them on microcontrollers (e.g., Arduino and STM32), or single-board computers like Raspberry Pi. Previously we used Edge Impulse with Arduino 33 BLE sense to build a Cough Detection system. We have also trained some custom models using Tensorflow for Face Mask Detection and Object Detection using Tensorflow.
Components Required for Sorting Machine
Hardware
- Raspberry Pi
- Pi Camera Module
- 2× Servo Motors
Software
- Edge Impulse Studio
Getting Started with Edge Impulse
To train a machine learning model with Edge Impulse Raspberry Pi, create an Edge Impulse account, verify your account and then start a new project.

Installing Edge Impulse on Raspberry Pi
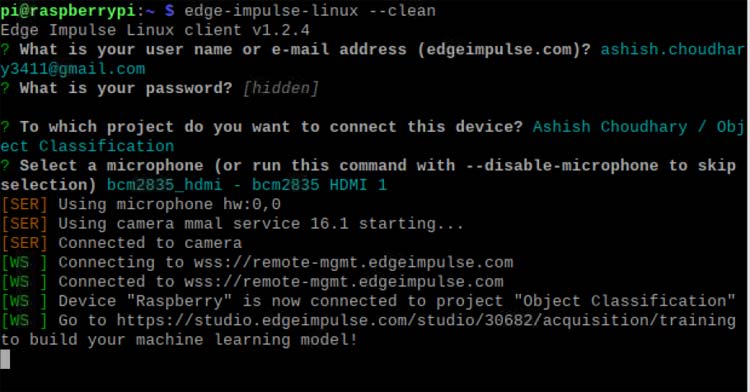
Now to use Edge Impulse on Raspberry Pi, you first have to install Edge Impulse and its dependencies on Raspberry Pi. Use the below commands to install Edge Impulse on Raspberry:
curl -sL https://deb.nodesource.com/setup_12.x | sudo bash -
sudo apt install -y gcc g++ make build-essential nodejs sox gstreamer1.0-tools gstreamer1.0-plugins-good gstreamer1.0-plugins-base gstreamer1.0-plugins-base-apps
sudo npm install edge-impulse-linux -g --unsafe-perm
Now use the below command to run Edge Impulse:
edge-impulse-linux
You will be asked to log in to your Edge Impulse account. You’ll then be asked to choose a project, and finally to select a microphone and camera to connect to the project.
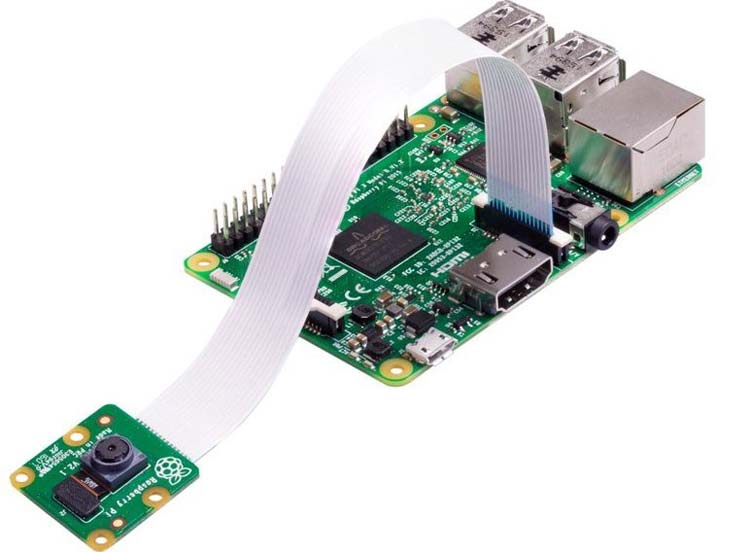
Now as Edge Impulse is running on Raspberry Pi, we have to connect Pi camera Model with Pi for image collection. Connect the Pi camera as shown in the below image:
Creating the Dataset
As mentioned earlier we are using Edge Impulse Studio to train our image classification model. For that, we have to collect a dataset that has the samples of objects which we would like to classify using a Pi camera. Since the goal is to classify Red Tomato and Green Tomato, you'll need to collect some sample images of Red Tomato and Green Tomato so that it can distinguish between the two.
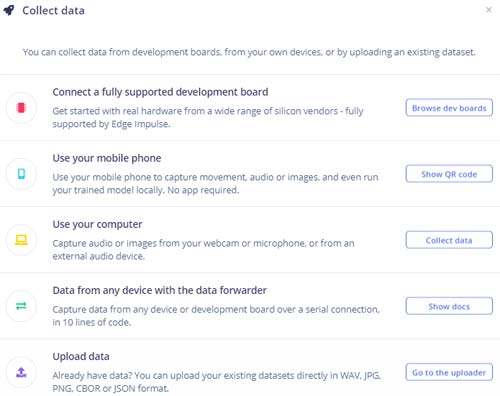
You can collect the samples by using a mobile phone, Raspberry Pi board, or you can import a dataset into edge impulse account. The easiest way to load the samples into Edge Impulse is using your mobile phone. For that, you have to connect your mobile with Edge Impulse.
To connect your Mobile phone, click on ‘Devices’ and then click on ‘Connect a New Device’.

Now in the next window click on ‘Use your Mobile Phone’, and a QR code will appear. Scan the QR code with your Mobile Phone using Google Lens or other QR code scanner apps. This will connect your phone with Edge Impulse studio.
With your phone connected with Edge Impulse Studio, you can now load your samples. To load the samples, click on ‘Data acquisition’. Now on the Data acquisition page enter the label name and select ‘Camera’ as the sensor. Click on ‘Start sampling’.
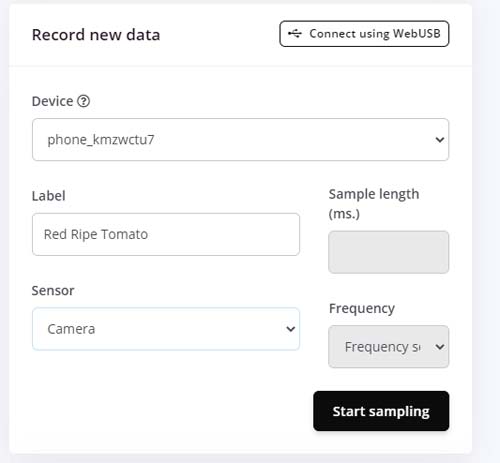
This will take and save the tomato image to the Edge Impulse cloud. Take 50 to 60 images from different angles. After uploading the samples now set the label to ‘Green Tomato’ and collect another 50 to 60 images. Apart from samples of green and red tomato, also collect some samples for Uncertain situations in case nothing is in the frame.
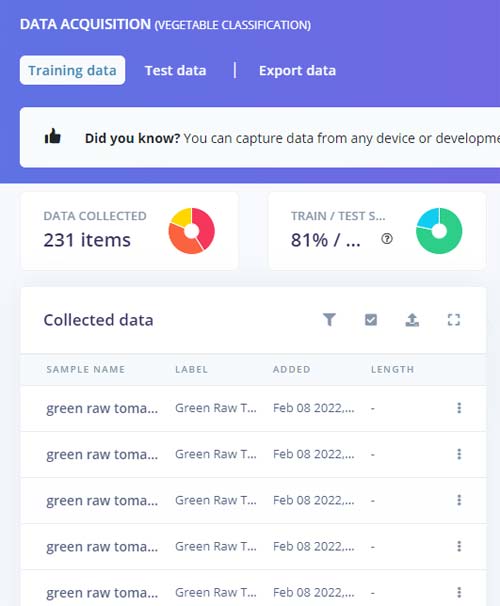
These samples are for Training the module, in the next steps, we will collect the Test Data. Test data should be at least 20% of training data.
Training the Model
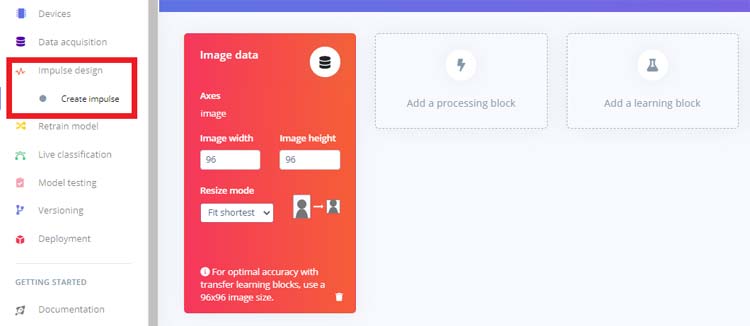
As our dataset is ready, now we will create an impulse for our data. For that go to the ‘Create impulse’ page.
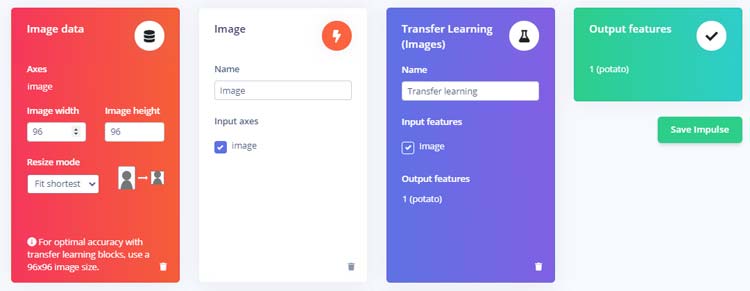
Now on the ‘Create impulse’ page, click on ‘Add a processing block’ and then click on the “Add” button next to the “Image” block to add a processing block that will normalize the image data and reduce color depth. After that, click on the “Transfer Learning (images)” block to grab a pre-trained model intended for image classification, on which we will perform transfer learning to tune it for our tomato recognition task. Then click on ‘Save Impulse’.
Next, go to the “Images” sub-item under the “Impulse design” menu item, and then click on the ‘Generate Features’ tab, and then hit the green “Generate features” button.

After that, click on the “Transfer learning” sub-item under the “Impulse design” menu item, and hit the “Start training” button at the bottom of the page. Here we used the default MobileNetV2. You can use different training models if you want.
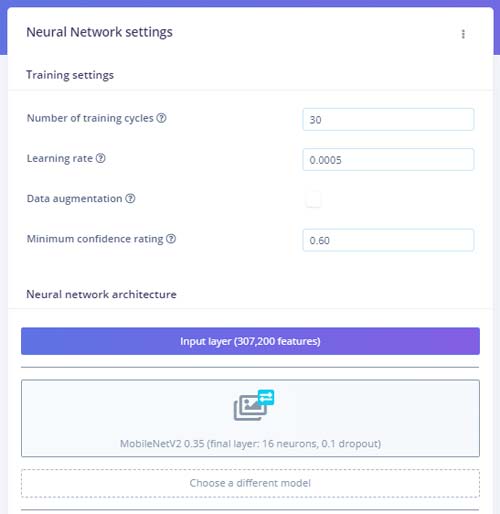
Training the model will take some time. After training the model it will show the training performance. For me, the accuracy was 75% and the loss was 0.58. We can now test our trained model. For that click on the “Live classification” tab in the left-hand menu, and then you can use Raspberry Pi camera to take Sample images.

Deploying the Trained Model on Raspberry Pi
Once the training process is complete, we can deploy the trained Edge impulse image classification model to Raspberry Pi. There are two ways to do that, one is using the edge impulse linux runner command. This will automatically compile the trained model with full hardware acceleration, download the model to Raspberry Pi, and then start classifying without writing any code and another way is downloading the model file and then using python SDK example for image classification.
The first method is very simple, go to the Terminal window and enter the below command:
edge-impulse-linux-runner
If the edge-impulse-linux command is already running, then hit Control-C to stop it and then enter the above command. And if you have already assigned a project and want to clear it to start a fresh project then use the below command:
edge-impulse-runner --clean
This will connect Raspberry Pi to the Edge Impulse cloud and download the recently trained model, and start up a video stream. The results will be shown in the Terminal window.

You can also open up the video stream on the browser using the Raspberry Pi IP address. But as our aim is to build a Red and Green tomato sorting machine, we have to use the second method that is using the python SDK example. Download the model file via:
edge-impulse-linux-runner --download modelfile.eim
Now clone this repository to get the python examples for object classification, voice recognition, etc.:
git clone https://github.com/edgeimpulse/linux-sdk-python
Here we are going to classify red and green tomatoes, so we will use the classify.py example from the examples folder of this repository. Run this code using the below command:
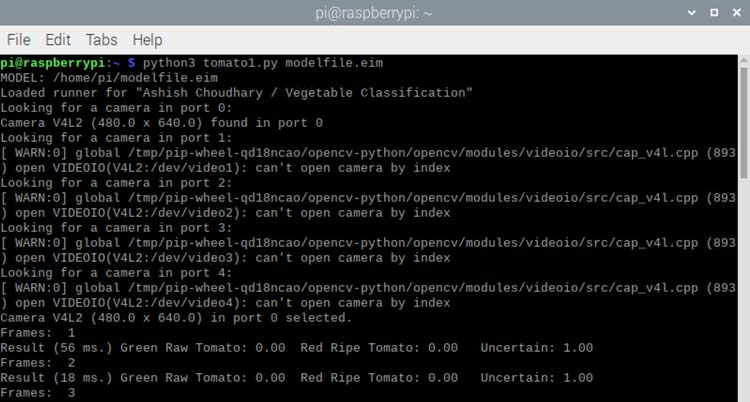
python3 classify.py modelfile.eim
where modefile.eim is the trained model file name. Make sure that this file is in the same folder as the code.
Once you run the code it will print the probabilities of the objects detected as shown in the below image:
Now we will have to make some tweaks in the code so that we can move the servos according to the detections. Prediction’s label and score are stored in labels and score variables, so we will store these score values inside an array and then assign these three values to three different values so that we can easily compare them and move the servos accordingly. Complete code with all the changes is also given at the end of the document.
 for label in labels:
          score = res['result']['classification'][label]
          print('%s: %.2f\t' % (label, score), end='')
          data.append(score)
          print('', flush=True)
          Green = round(data[0],2)
          Red = round(data[1],2)
          Uncertain = round(data[2],2)
          if (Green >=0.45 and framee_count%10 ==0):
                        while(Green >=0.35):
                            pwm1.ChangeDutyCycle(12.0)
                            time.sleep(0.500)
                            pwm1.ChangeDutyCycle(2.0) #close
                            time.sleep(0.250)
                            pwm.ChangeDutyCycle(7.0)
                            time.sleep(0.450)
                            pwm.ChangeDutyCycle(2.0)
                            Green=0.01
                    if (Red >=0.50 and framee_count%10 ==0):
                        while(Red >=0.50):
                            pwm1.ChangeDutyCycle(7.0)
                            time.sleep(0.500)
                            pwm1.ChangeDutyCycle(2.0)
                            time.sleep(0.250)
                            pwm.ChangeDutyCycle(7.0)
                            time.sleep(0.450)
                            pwm.ChangeDutyCycle(2.0)
                            Red=0.01
Raspberry Pi Sorting Machine Circuit Diagram
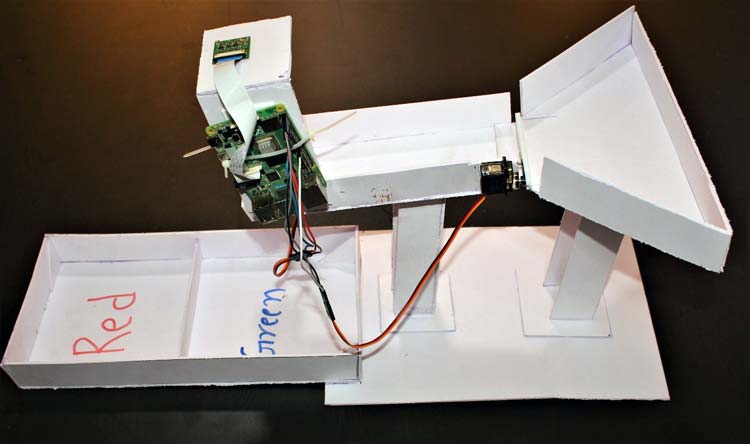
To move the tomatoes, we have connected two servo motors to Raspberry Pi. One servo is used to move the tomatoes one by one and the second servo is used to drop the tomatoes to their respective boxes.

As shown in the circuit diagram first servo is connected to GPIO 25 and the second servo is connected to GPIO 17 of Raspberry Pi. Both the servos are powered by 5V and GND pins of Raspberry Pi.
Building the Sorting Machine Setup
Now as the training and coding part is done, let's move to the next part which is making the complete setup for sorting tomatoes. We have used the white Sunboard of 2mm thickness with two servo motors. The first servo motor is used to move the tomatoes one by one and the second servo is used to drop the tomatoes into boxes according to the color. After joining all the pieces together, this sorting machine will look something like this:
Now to test the setup put some tomatoes in the tray, one tomato below the camera and launch the code on Raspberry Pi.

Complete working of this project is shown in the video given below. Apart from classifying the tomatoes based on color, we can also classify them according to their state that whether a tomato is rotten or not. If you have any questions, please put them in the comment section or you use our forum to start a discussion on it.
Complete Project Code
#!/usr/bin/env python
import cv2
import os
import sys, getopt
import signal
import time
from edge_impulse_linux.image import ImageImpulseRunner
import RPi.GPIO as GPIO
runner = None
show_camera = False
framee_count=0
servo_pin = 25
servo1 = 17
GPIO.setmode(GPIO.BCM)
GPIO.setup(servo_pin,GPIO.OUT)
GPIO.setup(servo1, GPIO.OUT)
# setup PWM process
pwm = GPIO.PWM(servo_pin,50) # 50 Hz (20 ms PWM period)
pwm1 = GPIO.PWM(servo1,50)
pwm.start(7) # start PWM by rotating to 90 degrees
pwm1.start(7)
pwm1.ChangeDutyCycle(2.0)
pwm.ChangeDutyCycle(2.0) #close
def now():
    return round(time.time() * 1000)
def get_webcams():
    port_ids = []
    for port in range(5):
        print("Looking for a camera in port %s:" %port)
        camera = cv2.VideoCapture(port)
        if camera.isOpened():
            ret = camera.read()
            if ret:
                backendName =camera.getBackendName()
                w = camera.get(3)
                h = camera.get(4)
                print("Camera %s (%s x %s) found in port %s " %(backendName,h,w, port))
                port_ids.append(port)
            camera.release()
    return port_ids
def sigint_handler(sig, frame):
    print('Interrupted')
    if (runner):
        runner.stop()
    sys.exit(0)
signal.signal(signal.SIGINT, sigint_handler)
def help():
    print('python classify.py <path_to_model.eim> <Camera port ID, only required when more than 1 camera is present>')
def main(argv):
    framee_count=0
    try:
        opts, args = getopt.getopt(argv, "h", ["--help"])
    except getopt.GetoptError:
        help()
        sys.exit(2)
    for opt, arg in opts:
        if opt in ('-h', '--help'):
            help()
            sys.exit()
    if len(args) == 0:
        help()
        sys.exit(2)
    model = args[0]
    dir_path = os.path.dirname(os.path.realpath(__file__))
    modelfile = os.path.join(dir_path, model)
    print('MODEL: ' + modelfile)
    with ImageImpulseRunner(modelfile) as runner:
        try:
            model_info = runner.init()
            print('Loaded runner for "' + model_info['project']['owner'] + ' / ' + model_info['project']['name'] + '"')
            labels = model_info['model_parameters']['labels']
            if len(args)>= 2:
                videoCaptureDeviceId = int(args[1])
            else:
                port_ids = get_webcams()
                if len(port_ids) == 0:
                    raise Exception('Cannot find any webcams')
                if len(args)<= 1 and len(port_ids)> 1:
                    raise Exception("Multiple cameras found. Add the camera port ID as a second argument to use to this script")
                videoCaptureDeviceId = int(port_ids[0])
            camera = cv2.VideoCapture(videoCaptureDeviceId)
            ret = camera.read()[0]
            if ret:
                backendName = camera.getBackendName()
                w = camera.get(3)
                h = camera.get(4)
                print("Camera %s (%s x %s) in port %s selected." %(backendName,h,w, videoCaptureDeviceId))
                camera.release()
            else:
                raise Exception("Couldn't initialize selected camera.")
            next_frame = 0 # limit to ~10 fps here
            for res, img in runner.classifier(videoCaptureDeviceId):
                if (next_frame > now()):
                    time.sleep((next_frame - now()) / 1000)
                # print('classification runner response', res)
                data = []
                framee_count  = framee_count +1
                print("Frames: ", framee_count)
                if "classification" in res["result"].keys():
                    print('Result (%d ms.) ' % (res['timing']['dsp'] + res['timing']['classification']), end='')
                    for label in labels:
                        score = res['result']['classification'][label]
                    #    print(score)
                        print('%s: %.2f\t' % (label, score), end='')
                        data.append(score)
                    print('', flush=True)
                    Green = round(data[0],2)
                    Red = round(data[1],2)
                    Uncertain = round(data[2],2)
                    print(Green, Red, Uncertain)
                    if (Green >=0.25 and framee_count%10 ==0):
                        while(Green >=0.25):
                            pwm1.ChangeDutyCycle(12.0)
                            print("Green Tomato Detected")
                            time.sleep(0.500)
                            pwm1.ChangeDutyCycle(2.0) #close
                            time.sleep(0.250)
                            pwm.ChangeDutyCycle(7.0)
                            time.sleep(0.450)
                            pwm.ChangeDutyCycle(2.0)
                            Green=0.01
#                            time.sleep(2)
                    if (Red >=0.50 and framee_count%10 ==0):
                        while(Red >=0.50):
                            pwm1.ChangeDutyCycle(7.0)
                            print("Red Tomato Detected")
                            time.sleep(0.500)
                            pwm1.ChangeDutyCycle(2.0)
                            time.sleep(0.250)
                            pwm.ChangeDutyCycle(7.0)
                            time.sleep(0.450)
                            pwm.ChangeDutyCycle(2.0)
                            Red=0.01
 #                           time.sleep(2)
                    else:
                        time.sleep(0.01)
                   # print('%s: %.2f\t' % (Green,Red,Uncertain), end ='')
                    if (show_camera):
                        cv2.imshow('edgeimpulse', img)
                        if cv2.waitKey(1) == ord('q'):
                            break
                elif "bounding_boxes" in res["result"].keys():
                    print('Found %d bounding boxes (%d ms.)' % (len(res["result"]["bounding_boxes"]), res['timing']['dsp'] + res['timing']['classification']))
                    for bb in res["result"]["bounding_boxes"]:
                        print('\t%s (%.2f): x=%d y=%d w=%d h=%d' % (bb['label'], bb['value'], bb['x'], bb['y'], bb['width'], bb['height']))
                next_frame = now() + 100
        finally:
            if (runner):
                runner.stop()
# framee_count=0
if __name__ == "__main__":
    main(sys.argv[1:])
cap.release()
cv2.destroyAllWindows()Comments
when i run the code in…
when i run the code in Raspberry pi its shows an Error ,The error is "Couldn't initialize selected camera." Below i give the entire thing, which is shown in terminal.Can you Help me to proceed further.
"'""
python3 Source_code.py modelfile.eim
MODEL: /home/mathusudhan/Final_Pro_Source/modelfile.eim
Loaded runner for "Mathu Sudhan Baskaran / MS_Main_Pro_ML"
Looking for a camera in port 0:
Camera V4L2 (480.0 x 640.0) found in port 0
Looking for a camera in port 1:
[ WARN:0] global /tmp/pip-wheel-a8gfdc_n/opencv-python_13563f08137a4b20bc4dfee05bcbf854/opencv/modules/videoio/src/cap_v4l.cpp (893) open VIDEOIO(V4L2:/dev/video1): can't open camera by index
Looking for a camera in port 2:
[ WARN:0] global /tmp/pip-wheel-a8gfdc_n/opencv-python_13563f08137a4b20bc4dfee05bcbf854/opencv/modules/videoio/src/cap_v4l.cpp (893) open VIDEOIO(V4L2:/dev/video2): can't open camera by index
Looking for a camera in port 3:
[ WARN:0] global /tmp/pip-wheel-a8gfdc_n/opencv-python_13563f08137a4b20bc4dfee05bcbf854/opencv/modules/videoio/src/cap_v4l.cpp (893) open VIDEOIO(V4L2:/dev/video3): can't open camera by index
Looking for a camera in port 4:
[ WARN:0] global /tmp/pip-wheel-a8gfdc_n/opencv-python_13563f08137a4b20bc4dfee05bcbf854/opencv/modules/videoio/src/cap_v4l.cpp (893) open VIDEOIO(V4L2:/dev/video4): can't open camera by index
Traceback (most recent call last):
File "/home/mathusudhan/Final_Pro_Source/Source_code.py", line 152, in <module>
main(sys.argv[1:])
File "/home/mathusudhan/Final_Pro_Source/Source_code.py", line 90, in main
raise Exception("Couldn't initialize selected camera.")
Exception: Couldn't initialize selected camera.
"""

Hi, I have a project to control a lamp using continuous audio (alarm) using edge impulse in raspberry pi4. could you please suggest what should I do?