
Most connected IoT devices today are connected to the internet using a Wi-Fi connection. Although a Wi-Fi connection enables remote access to the internet, it has its own limitations. For instance, in most industrial applications for a stationary device, Ethernet is usually chosen over Wi-Fi connection simply because it’s more reliable and secure. Also, since Ethernet is a wired connection, it provides better speed and has lower latency. We have already worked on many IoT projects, most of which were built around ESP8266, ESP32, or Raspberry Pi. As we know, these devices have an in-built Wi-Fi modem that allows you to connect to the internet. But if you are working with a humble Arduino UNO or Nano board and you want to connect your Arduino to the internet, then you have two popular options. One option is to use an ESP8266 with Arduino and the second option is to connect an Ethernet module with Arduino.
In this project, we are going to use the latter option to control an LED over the Internet by interfacing Arduino with W5100 Ethernet Module. The Ethernet module is used to establish communication between the computer and Arduino in a LAN or Wired Network. This article is written assuming that the reader has an understanding of basic computer networking which includes having knowledge of connecting computers to hub/router with RJ45 cables, IP and MAC addresses, etc.
W5100 Ethernet Module
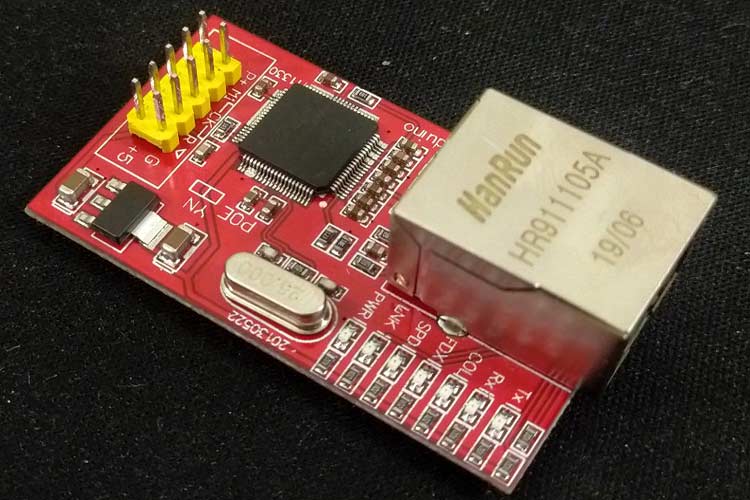
We are using the W5100 Ethernet module. It is a single-chip, full-featured, internet-enabled module to establish an internet connection. In simple terms, this module enables the Arduino board to connect to the internet. By using this module, we can complete the internet linking without the support of an Operating System. It also supports Hardwired TCP/IP Protocols like TCP, PPPoE, Ethernet, UDP, ICMP, IPv4, etc. It supports full-duplex and half-duplex modes of operation. It supports ADSL connections and up to four simultaneous socket connections.
The Ethernet module also uses the Arduino Ethernet library to write sketches that connect to the internet using this module. It fits all versions of Arduino like UNO, NANO, mega 1280, mega 2560, and others. The working and functionality of the W5100 Ethernet module are very similar to that of an Arduino Ethernet shield, meaning you can do everything you want with an Arduino Ethernet shield. As an advantage, it comes at half the price of a shield.

Circuit Diagram to Connect Arduino W5100 Ethernet Module

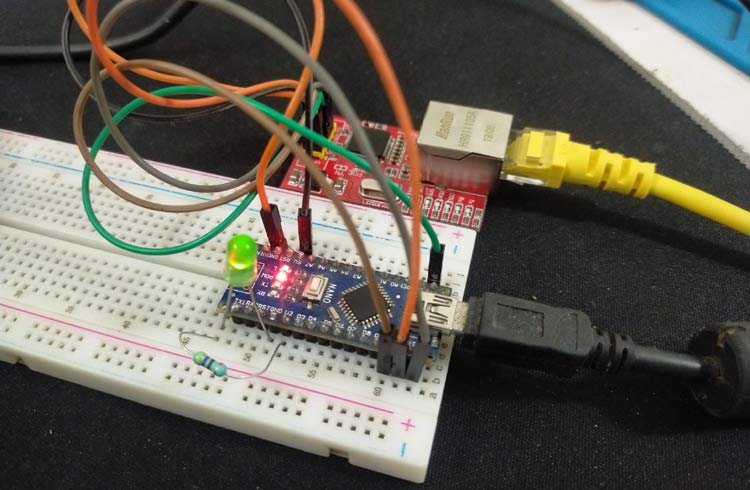
The Circuit consists of Arduino Nano and Ethernet Module W5100 (This project would be possible with Ethernet Arduino Shield and Arduino UNO as well). The connection between Arduino and Ethernet modules are made as shown in the circuit diagram.
- Connect pin 5V and GND pins of Arduino Nano to +5 and G pin of Ethernet Module respectively (These connections supply power to the Ethernet Module).
- Connect pin 9, 10, 11,12, and 13 of Arduino to R, SS, MO, MI, CK of the Ethernet module respectively (These make the communication between Arduino and Ethernet over SPI).
Arduino Code to get data from W5100 Ethernet Module
SPI header file is included to use the protocols to communicate to the Ethernet module.
#include <SPI.h>
The Ethernet header file has the library to run webclient/webserver over Ethernet.
#include <Ethernet.h>
Physical Mac address is set to the Ethernet module.
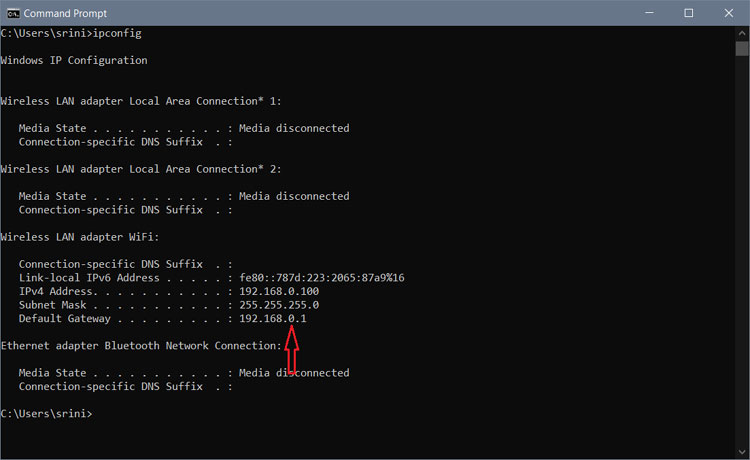
byte mac[] = { 0xDE, 0xAD, 0xBE, 0xEF, 0xFE, 0xED };The number 192.168.0.12 is the IP address. Where “0” depends on the host (default gateway) of the network you are connected to, check that by doing ipconfig on the command prompt.
byte ip[] = { 192, 168, 0, 12 };
byte gateway[] = { 192, 168, 0, 12 };
byte subnet[] = { 255, 255, 255, 0 };
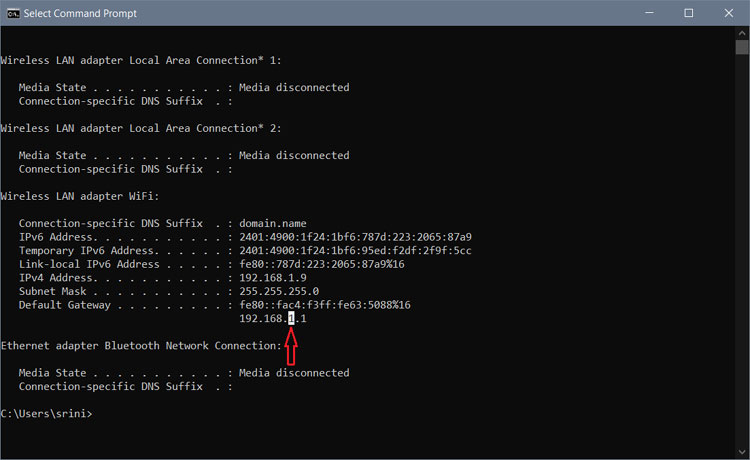
Just for reference, this default gateway of a different network is shown below.
This creates a local server at port 80 which can be later accessed by the clients.
EthernetServer server(80);
This reads the response from the client when the user accesses the webserver.
String readString;
The setup function initializes the LED pin to output and initializes the Ethernet module with the given parameters (Mac address, IP address, gateway, subnet mask), and finally, the server is started by the function “server.begin()”
int ledPin = 2;
void setup(){
                        pinMode(ledPin, OUTPUT);
                        Ethernet.begin(mac, ip, gateway, subnet);
            server.begin();
}
In the loop function, we create a client connection and check if someone is trying to access the assigned IP address over a browser.
void loop(){
    EthernetClient client = server.available();
              if (client) {
                   while (client.connected()) {
                       if (client.available()) {
If connected, continue checking if the client is sending some message back to the server
char c = client.read();
Then read char by char HTTP response and store characters to user-defined readString variable.
                if (readString.length() < 100) {
                    readString += c;
                }
if HTTP request has ended– 0x0D is Carriage Return \n ASCII
if (c == 0x0D) {Once we receive an OK response, we start displaying the webpage, and below is the HTML code.
                                 client.println("HTTP/1.1 200 OK");
         client.println("Content-Type: text/html");
                                 client.println();
                    client.println("<HTML>");
                    client.println("<HEAD>");
                    client.println("<TITLE> ARDUINO ETHERNET</TITLE>");
                    client.println("</HEAD>");
                    client.println("<BODY>");
                    client.println("<hr>");
                    client.println("<H1 style=\"color:green;text-align:center\">ARDUINO ETHERNET LED CONTROL</H1>");
                    client.println("<hr>");
                    client.println("<br>");
When the user clicks the TURN ON LED hyperlink, he/she would be redirected to URL \?LEDON which further turns on the LED.
client.println("<H2 style=\"text-align:center\"><a href=\"/?LEDON\"\">Turn On LED</a><br></H2>");Similar to the above code, this redirects the user to the “TURN OFF LED” URL.
client.println("<H2 style=\"text-align:center\"><a href=\"/?LEDOFF\"\">Turn Off LED</a><br></H2>");Remaining part of the HTML Code-
                    client.println("<br>");
                    client.println("</BODY>");
                    client.println("</HTML>");
                    delay(10);
                    client.stop();
Control Arduino pin to turn on and turn off the LED depending on the URL the users are redirected to.
                    if(readString.indexOf("?LEDON") > -1)
                    {
                        digitalWrite(ledPin, HIGH);
                    }
                    else{
                        if(readString.indexOf("?LEDOFF") > -1)
                        {
                            digitalWrite(ledPin, LOW);
                        }
                    }
clearing string for next read
                    readString="";
                }
            }
        }
    }
}
Connecting Arduino to PC or Router Ethernet Port
To connect the two (PC and Arduino) together, we need a suitable cable (CAT-6 crossover cable) if the PC's Ethernet port doesn't have auto-direction sensing. In case your PC supports auto-direct sensing, just connect a regular cable that comes with the router.
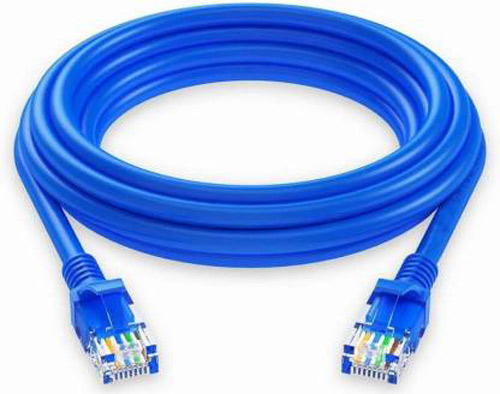
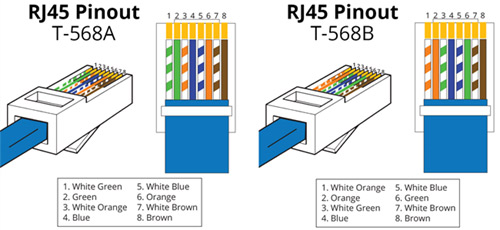
In this special cable TX+/TX- and RX+/RX- are swapped over.
In any case, if you don’t have an Ethernet port in your PC or you don’t want to buy a special cable you can follow our method to connect the Ethernet module to a router LAN network port.

Blinking LED over Internet using Ethernet module on Arduino
After making the above connections, connect to the router using your PC or mobile phone. Then open any web browser and go to this URL “https://192.168.0.12” (In your case, enter your Ethernet IP address that you have set in the code). Now, you can control the LED via the web page. When the user clicks on the “Turn On LED” on the webpage, the LED turns ON in the circuit. When “Turn OFF LED” is clicked, the LED is turned OFF in the circuit. This command is executed using the wired connection of the Ethernet module. The web server page is as shown in the figure below.

Hope you enjoyed the project and learned how to use the W5100 Ethernet module with Arduino to send and receive data over the internet. You can also check out the detailed working in the video below. If you have any questions, leave them in the comment section below or use our Electronics forum.
Complete Project Code
#include <SPI.h> //protocol to communicate to the ethernet module
#include <Ethernet.h> //library to run webclient / web server over ethernet
byte mac[] = { 0xDE, 0xAD, 0xBE, 0xEF, 0xFE, 0xED }; //physical mac address set to the ethernet module
/*the number 0 in the IP address depends on the host of the network you are connected to, check that by doing ipconfig on command prompt*/
byte ip[] = { 192, 168, 0, 12 }; // IP address in LAN – need to change according to your Network address
byte gateway[] = { 192, 168, 0, 12 }; // internet access via router
byte subnet[] = { 255, 255, 255, 0 }; //subnet mask
EthernetServer server(80); //port where the server can be accessed
String readString; // to read the response form the user / client
int ledPin = 2; // Led is connected to pin 2
void setup(){
    pinMode(ledPin, OUTPUT); //pin selected to control
    //start Ethernet
    Ethernet.begin(mac, ip, gateway, subnet); //initialize ethernet
    server.begin(); //start the server
}
void loop(){
    // Create a client connection
    EthernetClient client = server.available();
    //check if someone is tried access the assigned IP address over a browser
    if (client) {
      //if connected, continue checking if client is sending some message back to the server
        while (client.connected()) {
            if (client.available()) {
                char c = client.read();
                //read char by char HTTP request
                if (readString.length() < 100) {
                    //store characters to string
                    readString += c;
                }
                //if HTTP request has ended– 0x0D is Carriage Return \n ASCII
                if (c == 0x0D) {
                  //display the webpage
                    client.println("HTTP/1.1 200 OK"); //send new page
                    client.println("Content-Type: text/html");
                    client.println();
                    client.println("<HTML>");
                    client.println("<HEAD>");
                    client.println("<TITLE> ARDUINO ETHERNET</TITLE>");
                    client.println("</HEAD>");
                    client.println("<BODY>");
                    client.println("<hr>");
                    client.println("<H1 style=\"color:green;text-align:center\">ARDUINO ETHERNET LED CONTROL</H1>");
                    client.println("<hr>");
                    client.println("<br>");
                    //creating a link to redirect the user to turn on the light
                    client.println("<H2 style=\"text-align:center\"><a href=\"/?LEDON\"\">Turn On LED</a><br></H2>");
                    //creating a link to redirect the user to turn off the light
                    client.println("<H2 style=\"text-align:center\"><a href=\"/?LEDOFF\"\">Turn Off LED</a><br></H2>");
                    client.println("<br>");
                    client.println("</BODY>");
                    client.println("</HTML>");
                    delay(10);
                    //stopping client
                    client.stop();
                    // control arduino pin with URL
                    if(readString.indexOf("?LEDON") > -1) //checks for LEDON
                    {
                        digitalWrite(ledPin, HIGH); // set pin high
                    }
                    else{
                        if(readString.indexOf("?LEDOFF") > -1) //checks for LEDOFF
                        {
                            digitalWrite(ledPin, LOW); // set pin low
                        }
                    }
                    //clearing string for next read
                    readString="";
                }
            }
        }
    }
}
Comments
Am I correct in thinking that any of the digital pins could be used to connect to 'R' on the module, not just D9 on the nano? I do understand the others need to be connected as shown.

Please Sir/Madam,
Can I get the component of Arduino connecting to internet by using ethernet cable to buy in this mouth? PLEASE