

Bluetooth modules like HC-05 and HC-06 are easy to set-up and quick to use with Arduino IDE, but they have their own limitation like high power consumption and they operate on the old Bluetooth V2.0. Also, recently I got myself a new ESP32 DEV kit, these modules has a punch of features like in-built Wi-Fi and Bluetooth, ample ADC and DAC pins, Audio Support, SD Card Support, Deep Sleep Mode etc. it almost has everything to build IoT projects.
And just as any hobbyist would love it, the ESP32 is now officially supported by the Arduino IDE. Earlier we have to do a huge workaround with Neil Kolbans Library, but now thanks to this guy’s hard work programming ESP32 with Arduino IDE has become a cake walk. Hence, I launched my Arduino IDE and went thorough few example BLE programs, through which I understood nothing. After a long time of surfing and youtubing I realized that there are lot more thing to understand if you have to work with Bluetooth Low Energy (BLE) using ESP32. I decided to cover the BLE in separate articles, so here we will use the Classic Serial Bluetooth of ESP32 to toggle an LED using Smart Phone. If you are interested in checking out how to use the BLE features check this article on ESP32 BLE Server and ESP32 BLE Client
Getting started with ESP32 Bluetooth
The first program that I wanted to try was a simple program using which I can turn On or Off an LED from a mobile phone Bluetooth Terminal application, just like the good old HC-05 days. But it turns out that, Bluetooth Low Energy (BLE) is not indented for that. I also discovered that there are two types of Bluetooth in the ESP32 module, one is the Classic Bluetooth and the other is BLE Bluetooth Low Energy. Okay, but why?.... why do we have two types of Bluetooth and what should I use for my project?
Understanding Bluetooth Low Energy (BLE) and ESP32 Classic Bluetooth
The Bluetooth Low Energy, as the name indicates consumes less power than classic Bluetooth. It is achieved by sending data as needed with pre-defined periodic updates. But unlike classic Bluetooth it is not used to transfer Files or Music. Have you ever wondered how your phone automatically identifies that the Bluetooth device you just paired is an audio device or a laptop or phone, you might have also seen that the battery level in wireless audio player or fitness band is automatically shown in the status bar of your mobile; all these are possible with the characteristics of BLE devices. A BLE device works with Bluetooth V4.0 and can operate with low power as a server or as a client which makes BLE an ideal choice for beacons, smart watches, fitness bands etc.

Classic Bluetooth on the other hand is just the simple plain old Bluetooth that we use to transfer files and other data. Almost all BLE devices have Classic Bluetooth functionality associated with it. The Bluetooth used in modules like HC-05 is a version of the classic Bluetooth called Bluetooth SSP (Serial Port Protocol), meaning the Bluetooth follows the standard serial protocol which makes it easier to send and receive data without much overhead. At the end of this tutorial we will learn how to use Serial Bluetooth functionality in ESP32.
Here in this article we will use the Serial Bluetooth function on ESP32 to pair it with a Smartphone and use any existing Bluetooth Terminal app from Play store to send commands to the ESP32 and toggle the on board LED accordingly.
In later articles we will cover ESP32 BLE as server as well as client. BLE server is generally used to send BLE data to other Bluetooth Devices and BLE client is used to scan other BLE devices thus act as beacon.
Preparing Arduino IDE for ESP32
Do note Arduino IDE by default does not support ESP32 board; you have to download and install them using the board manager. If this is your first program with ESP32 then follow this getting started tutorial to add the ESP32 board to your Arduino and upload a test sketch.

Further, you can do more projects with ESP32, without using any Microcontroller with it.
Serial Bluetooth Program for ESP32
The complete program to toggle an LED using ESP32 Bluetooth is given at the end of this page. Under this heading, lets break the code in to small snippets and try to understand them. If you have already used other Bluetooth modules like HC-05 then you would find this ESP32 Bluetooth Classic example program being very similar.
The idea of the program is to initialise a Serial Bluetooth connection using ESP32 and listen for data from paired devices. If the incoming data is ‘1’ then we turn on the LED and if it is ‘0’ we should turn off the LED. We begin our program by adding the header file BluetoothSerial which makes the ESP32 Bluetooth to work as Bluetoth SSP.
#include "BluetoothSerial.h" //Header File for Serial Bluetooth, will be added by default into Arduino
There are a lot of things going on behind this library, but we chose not to get deep into it to keep things simple. The next thing we need is an object for our Bluetooth related operations. Here I have named mine as ESP_BT, but you can choose any name.
BluetoothSerial ESP_BT; //Object for Bluetooth
Next, inside the void setup() function. We begin the Serial communication with baud rate 9600 and initialize the Bluetooth signal with a name. Here I have named it as “ESP32_LED_Control”, this will be name that will be found by our phone when trying to pair. Finally I have declared the in-built LED pin as output pin since we are going to toggle it based on Bluetooth signal.
void setup() {
Serial.begin(9600); //Start Serial monitor in 9600
ESP_BT.begin("ESP32_LED_Control"); //Name of your Bluetooth Signal
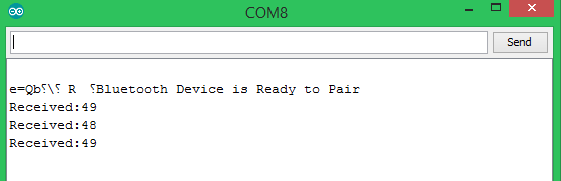
Serial.println("Bluetooth Device is Ready to Pair");
pinMode (LED_BUILTIN, OUTPUT);//Specify that LED pin is output
}
Inside the infinite void loop function, we check if there is any data coming in from the Bluetooth module, if yes then the data is read and stored in the variable incoming. We also print this value on the Serial monitor just to cross check what is being received by the Arduino.
  if (ESP_BT.available()) //Check if we receive anything from Bluetooth
  {
    incoming = ESP_BT.read(); //Read what we recevive
    Serial.print("Received:"); Serial.println(incoming);
Now, whatever data is received is stored in the variable incoming, so we can directly compare this variable with expected value and perform the required action. But the value sent from Bluetooth will be in char form and Arduino will read the Decimal value of the char that is being sent from the phone. In our case for char ‘0’ the decimal value will be 48 and for char ‘1’ the decimal value will be 49. You can refer the ASCII chart to understand what will be the decimal value for every character.
Here we have compared the incoming variable with 48 and 49 to check for 0 and 1 respectively. If it is a 1 then we turn off the LED and also print an acknowledgment message back to Bluetooth saying that LED was turned off and vice versa for 0.
    if (incoming == 49)
        {
        digitalWrite(LED_BUILTIN, HIGH);
        ESP_BT.println("LED turned ON");
        }

    if (incoming == 48)
        {
        digitalWrite(LED_BUILTIN, LOW);
        ESP_BT.println("LED turned OFF");
        }
Testing Serial Bluetooth with ESP32
Connect your ESP to your Arduino IDE and select the correct board and port as discussed in getting started tutorial. Since it is a 3rd party board manager it might take a bit longer for the code to get compiled and uploaded. Once uploaded launch the Serial monitors (just for debugging) and open the Bluetooth setting on your phone. You should find a Bluetooth device named ESP32_LED_Control pair with.
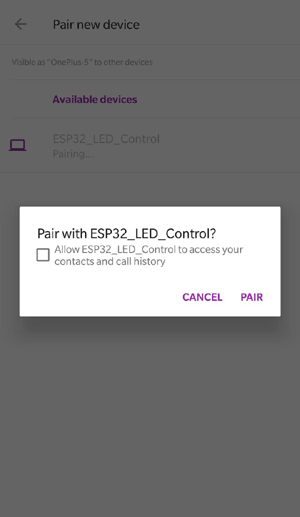
Now you can open any Bluetooth terminal app on your smartphone, I am using the one named “Bluetooth Terminal” which was downloaded from Google App store. Connect the Bluetooth application to the device that we just paired and type 1 and press send.

The ESP32 module should receive it and turn on the LED as per our program and also give you an acknowledgment message saying the LED is turned ON like the screenshot shown above. You can also check the Serial monitor which will show the data that is being received by the ESP32 Bluetooth in decimal format that is your Arduino will read 48 for 0 and 49 for 1 as explained earlier. The snapshot of my terminal window is shown below.
Similarly, you should also be able to turn off the LED by sending 0 from the mobile application. The complete working is shown in the video below. Hope you understood the tutorial and learned something useful. If you have any doubts feel free to leave them in the comment section below or use our forums for other technical help.
Complete Project Code
/*Program to control LED (ON/OFF) from ESP32 using Serial Bluetooth

 * Thanks to Neil Kolbans for his efoorts in adding the support to Arduino IDE

 * Turotial on: www.circuitdigest.com

 */
#include "BluetoothSerial.h" //Header File for Serial Bluetooth, will be added by default into Arduino

BluetoothSerial ESP_BT; //Object for Bluetooth
int incoming;

int LED_BUILTIN = 2;
void setup() {

  Serial.begin(9600); //Start Serial monitor in 9600

  ESP_BT.begin("ESP32_LED_Control"); //Name of your Bluetooth Signal

  Serial.println("Bluetooth Device is Ready to Pair");
  pinMode (LED_BUILTIN, OUTPUT);//Specify that LED pin is output

}
void loop() {


  if (ESP_BT.available()) //Check if we receive anything from Bluetooth

  {

    incoming = ESP_BT.read(); //Read what we recevive

    Serial.print("Received:"); Serial.println(incoming);
    if (incoming == 49)

        {

        digitalWrite(LED_BUILTIN, HIGH);

        ESP_BT.println("LED turned ON");

        }


    if (incoming == 48)

        {

        digitalWrite(LED_BUILTIN, LOW);

        ESP_BT.println("LED turned OFF");

        }

  }

  delay(20);

}
Comments
We are glad that this
We are glad that this tutorial was helpful for you!

Hello,Aswinth Raj
DO you provide how to dim led using esp32 via blutoothif know please share...thank you