

WhatsApp is one of the most popular cross-platform messaging tools that is used by a vast majority of people. Even though its recent privacy policy update came as an unpleasant surprise for many people, the user base WhatsApp still holds good and nearly 2 billion people use WhatsApp today. This huge user base has attracted many medium and large-scale businesses to use WhatsApp to interact with their customers. While WhatsApp itself provides a business version called “Whatstapp Business”, the features in it are simply not enough when you want to automate a lot of stuff using it. For example, Telegram provides bot feature which can be used to automate a lot of stuff, we have also previously used Telegram bot with Raspberry Pi and have built some simple project like controlling Pi GPIO pins from telegram to turn on or off few LEDs. You can check those projects if you are interested.
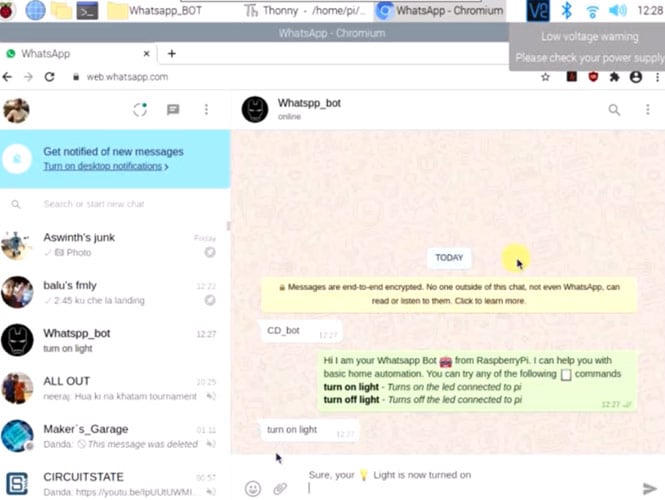
In this tutorial we will be building a Raspberry pi WhatsApp Bot, using Python pyautogui package. We will be launching WhatsApp web on our Pi and reading messages from our chat and responding back to those chats with appropriate answers. For demonstration purposes, I have programmed the Pi to control an LED using chat. But you can be creative and exchange any type of messages between your Pi and the people who chat with your Pi. So, let's get started.
Using WhatsApp on Raspberry Pi
If you are just installing WhatsApp on Raspberry Pi, you can check out the linked tutorial where we have used the Yowsup library. But this method has many limitations and the Yowsup package also suffers from many bugs. So in this tutorial, we will be exploring other options to do that.
Why not use the official WhatsApp Business API for Automation?
It is true that WhatsApp has its own API for business purposes using which you can automate WhatsApp messages using python. You might have also come across various businesses like OYO, MakeMyTrip, etc. using this feature to communicate with its customer. But for a maker or small-scale project, getting permission to access the API is painstakingly expensive.
To get around this, we can put together a small hack using which we can access contents on WhatsApp web to read and respond to message for free. In this tutorial, we are going to do exactly that and for this project, you just need a Raspberry Pi and an Internet connection.
Selenium vs pyautogui to Automate WhatsApp on Raspberry Pi
Now that we have decided to follow the less professional and low-cost way to automate WhatsApp, we have to decide between selenium and Pyautogui.
For those who are new, Selenium is a browser automation tool that is mainly intended to test web applications. But it can also be used to automate anything you need over the web, like sending a tweet, posting on Facebook, etc. basically, anything that you can do on a browser can be automated through selenium. We might also post another project with Raspberry Pi and selenium, so let me know in the comment section if you have any idea for that.
The other alternatives to selenium for WhatsApp browser automation are pyautoGUI and OpenCV. This package basically helps us to read what is on screen and navigate across the screen to perform any desired action. So most things that you can do with a keyboard and mouse on your raspberry pi can be done using pyautogui and paperclip package on python. We will look into the details on how to do it later.
In this tutorial, we have used pyautogui over selenium as I found it hard to use selenium on Pi because of its webdriver. There is clearly no advantageous choice of one over the other. You can look into both the options and check which suits you best. This tutorial will only cover pyautogui WhatsApp automation.
Python Packages to Automate WhatsApp messages on Raspberry Pi
Before we begin, we should install all the required packages for our program. As mentioned earlier, this uses OpenCV, so make sure you have already installed OpenCV on your Pi. If not you can either install OpenCV using Cmake on Pi or use pip install. I would recommend pip install since it is faster and easier.
Simply follow the below commands to easily install OpenCV for Python 3 on Raspberry Pi
pip3 install opencv-python
sudo apt-get install libcblas-dev
sudo apt-get install libhdf5-dev
sudo apt-get install libhdf5-serial-dev
sudo apt-get install libatlas-base-dev
sudo apt-get install libqt4-test
sudo apt-get install libqtgui4
sudo apt-get install libjasper-dev
Next, we have to install Pyperclip and pyautogui to automate our WhatsApp messages. Pyautogui is used to read elements on the screen and to create mouse and keyboard events, while pyperclip is used to copy and paste information between the screen and the python program.
pip3 install pyperclip
pip3 install pyautogui
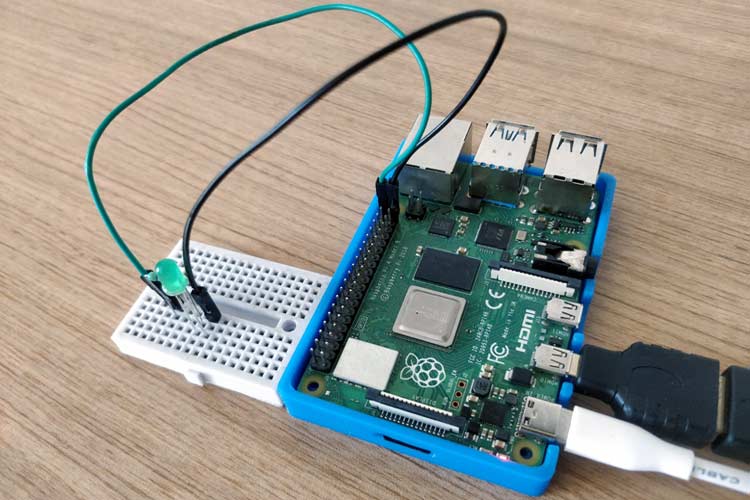
Hardware set-up to control LED lights from WhatsApp using Raspberry Pi
On the hardware side, there is nothing much other than an LED connected to GPIO pin 40 of the Raspberry Pi. When the user sends a WhatsApp message like “turn on the light” our raspberry pi will turn on this light and similarly it will turn off when we send “turn of light”

If you are an absolute beginner with a hardware interface on Raspberry Pi, check out this basic tutorial on interfacing and controlling LED with Raspberry Pi. If not, just follow the circuit diagram above, make the circuit, and proceed further. My hardware looks like this when the connections are made.

Python Program to Send and Receive WhatsApp Messages on Raspberry Pi
The complete Python code for this tutorial can be downloaded from the link below.
Inside the folder, you will find the main Python code along with five other images. These images help us in identifying different parts on the WhatsApp page. Always make sure to execute your Python file in the same directory as these images are present. Also, if you are adding new images for your program make sure they are in .JPG format, Raspberry Pi will have problems with other formats.
Now, let's take a closer look at our code to get a better understanding.
Importing all required packages:
Let's start the project by importing all the required packages. Most of these have been explained and installed already in the previous step. The new packages are the time and webbrowser packages. The time package is used to create a delay and the webbrowser package is used to open a web browser and launch WhatsApp automatically.
import pyautogui as pygu #To move mouse cursor and make click and keyboard strokes
from time import sleep #for delay
import pyperclip #to copy and past data
import webbrowser #to open webbrowser
import RPi.GPIO as IO # calling header file for GPIO’s of PI
import time  # calling for time to provide delays in program
Set GPIO pins and open WhatsApp Browser:
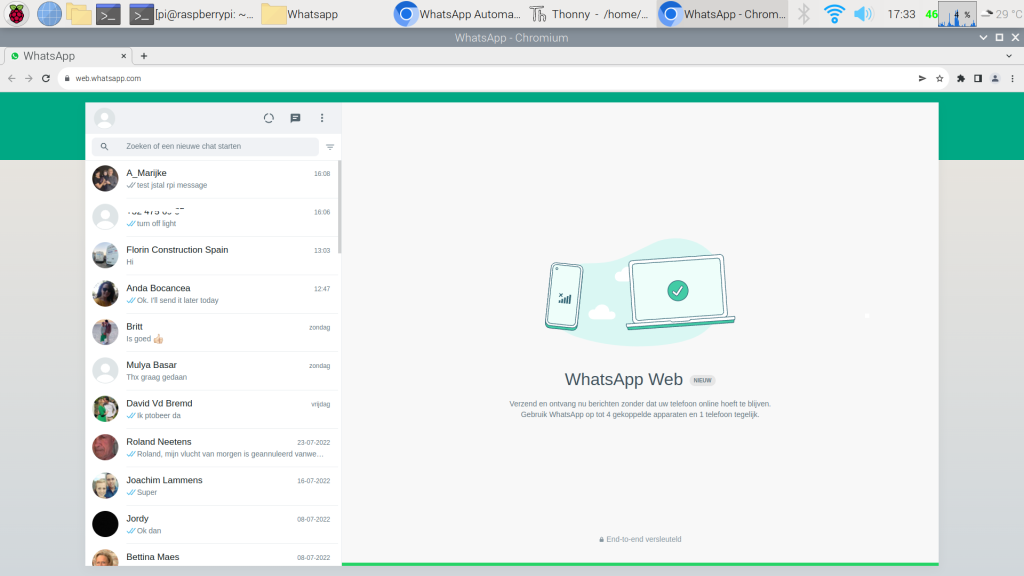
The GPIO pin 40 is used to control the LED here, so we have set it as output and we have launched a web browser, which is Chromium by default on Pi. Then we have opened web.whatsapp.com to being our WhatsApp automation. Make sure you have already scanned your QR code and have checked “always login” if this is your first time
IO.setmode (IO.BOARD) # programming the GPIO by BOARD pin numbers, GPIO21 is called as PIN40
IO.setup(40,IO.OUT) # initialize digital pin40 as an output.
#Open the default webbrowser and open web.whatsapp
webbrowser.open_new('https://web.whatsapp.com/')
Prepare Message Templates which has to be sent to the user as Response:
Next, we have prepared three messages which we will send to our users as a response to the chat. You can create as many as you need. All WhatsApp formatting features like *bold* for bold and :smiley for smiley will also work here as you can see below.
default_message = [
    "Hi I am your Whatsapp Bot :robot \n from RaspberryPi. I can help you with basic home automation. You can try any of the following :notes \n commands",
    "*turn on light* - _Turns on the led connected to pi_",
    "*turn off light* - _Turns off the led connected to pi_"]
turn_on_light = [
    "Sure, your :bulb \n Light is now turned on"
]
turn_off_light = [
    "Okay, Your LED is not turned off"
]
Check if WhatsApp has opened successfully on web browser:
The below method is used to check if the WhatsApp chat page is opened successfully on a web browser. It uses the whatsapp_header.jpg (can be found in the code file above) image to check if it is the right screen. We will proceed to the program only if the page has opened successfully.
Basically, we are searching for the image “whatsapp_header.jpg” on our screen. If we find that image, we can confirm that this particular page has opened.
#Wait for whatsapp page to
def open_whatsapp():
    # check if whatsapp opened successfully
    find_whatsapp_header = None
    while find_whatsapp_header is None:
        find_whatsapp_header = pygu.locateOnScreen("Whatsapp_header.JPG", confidence=.8)
        use_here_button_pos = pygu.locateOnScreen("use_here_button.JPG", confidence=.8)
        if (use_here_button_pos):
            print("Whatsapp is being used somewhere else, clicking on use here")
            sleep(2)
            pygu.moveTo(use_here_button_pos[0], use_here_button_pos[1], duration=0.5)
            pygu.click()
        print(".")
        sleep(2)
    return 1
Check if a new chat is available:
Similarly, in this method, we will search for the “green_circle.jpg” image. If that image is found, we will navigate to the circle and click on it. If the user is chatting for the first time, we might want to click on the ok button before proceeding, otherwise, we can just continue.
This method will return 1 if a new chat is available and will return 0 if not. It will also open the chat and get it ready for reading or sending a message.
#checks for new message and opens it
def new_chat_available():
    # Check for new messages
    green_circle_pos = pygu.locateOnScreen("green_circle.JPG", confidence=.8)
    if (green_circle_pos):
        sleep(2)
        pygu.moveTo(green_circle_pos[0], green_circle_pos[1], duration=0.5)
        pygu.click()
        sleep(1)
        ok_button_pos = pygu.locateOnScreen("ok_button.JPG", confidence=.8)
        if (ok_button_pos):
            pygu.moveTo(ok_button_pos[0], ok_button_pos[1], duration=0.5)
            pygu.click()
        return 1
    else:
        sleep(1)
        return 0
Read the last message sent by the user:
This method reads the last message by searching for “smily_paperclip.jpg” image on the screen. Then from there, it moves to the text box using the py.mpveTo(). Note that the values 50 and 35 used in this method are hard-coded to work for Raspberry Pi. You might want to tweak or change it as needed.
Then we can read the last message by triple-clicking on the white box. This will select the complete message, we can then copy the message using ctrl+C and then later use pyperclip to get this value. As you can see, this function returns the copied information using pyperclip.paste().
def read_last_message():
    smily_paperclip_pos = pygu.locateOnScreen("smily_paperclip.JPG", confidence=.6)
    pygu.moveTo(smily_paperclip_pos[0], smily_paperclip_pos[1])
    pygu.moveTo(smily_paperclip_pos[0] + 50, smily_paperclip_pos[1] - 35, duration=0.5)
    sleep(1)
    pygu.tripleClick()
    pygu.hotkey('ctrl', 'c')
    sleep(0.1)
    return (pyperclip.paste())
Get a proper response for the last received message:
The next method is used to find an appropriate replay for the last message the user has sent. This method takes in the last read message as input and compares it with a set of pre-defined answers which we are expecting from the customer. In our case, we are expecting “CD_bot” or “turn on light” or “turn off light” if the user has sent any one of the above messages, we will respond with the pre-defined text. We will also toggle the GPIO pin of the LED as per the command received.
def get_response(incoming_message):
    if "CD_bot" in incoming_message:
        return default_message
    if "turn on light" in incoming_message:
        IO.output(40,1) # turn the LED on
        return turn_on_light
    if "turn off light" in incoming_message:
        IO.output(40,0) # turn the LED off
        return turn_off_light
    else:
        return ""
Sending a WhatsApp Message as Response Automatically:
Now, we have already read the last message from a chat and have prepared the message to be sent back. All that is left is the sent that response as a chat replay. To do that, we have the below method called send_message(). This function takes in the response as a parameter and types it on the chat windows using typewrite method in pyautogui. Then we have used shift+enter to go to the new line and then finally press enter to send the message.
def send_message(message_content):
for content in message_content:
pygu.typewrite(content, interval=.02)
pygu.hotkey('shift', 'enter')
pygu.hotkey('enter') #Enter key to send the message
Check if a new message is available from the current chat:
We can look for the green_circle image only if the chat is not opened yet. If the currently opened chat user sends a new message, we will need to detect it by checking the color of the pixel under the cursor. Since WhatsApp received messages always have white color as a background color. We can simply look for the color under the cursor, if it is white, we will proceed with reading the message as discussed earlier.
def new_message_available():
    current_mouse_pos = pygu.position()
    pointer_color = pygu.pixel(current_mouse_pos[0], current_mouse_pos[1])
    if (pointer_color == (255, 255, 255)):
        return 1
    else:
        return 0
Open WhatsApp, read the last message, and send a response message:
Now that we have prepared a different method for each action, all we have to do is, use them appropriately inside a while loop so that our python script will keep looking for new messages and reply to them accordingly.
if (open_whatsapp()): #if whatsapp page is opened successfully
    print("##Whatsapp page ready for automation##")
while(1):
    if (new_chat_available() or new_message_available()):
        print("New chat or message is available")
        incoming_message = read_last_message() #read the last message that we received
        message_content = get_response(incoming_message) #decide what to respond to that message
        send_message(message_content) #send the message to person
That is it, now you can control any devices or get information like the temperature and humidity of your room on your WhatsApp like chatting to your friend. The best part is you can easily share this with anyone who has WhatsApp installed, all they have to do to access your bot is to call your bot name like “CD_bot”. You can also add this to a WhatsApp group so that anyone in the group can access this bot.
Check out the below video for a full working demonstration, if you have any questions, use our forums to post your questions. Also, let me know what you will be building with the help of the tutorial, if it sounds very interesting, we might also build one for our next tutorial.
Complete Project Code
import pyautogui as pygu #To move mouse cursor and make click and keyboard strokes
from time import sleep #for delay
import pyperclip #to copy and past data
import webbrowser #to open webbrowser
import os #to close webbrowser
import RPi.GPIO as IO            # calling header file for GPIO’s of PI
import time                              # calling for time to provide delays in program

IO.setmode (IO.BOARD)       # programming the GPIO by BOARD pin numbers, GPIO21 is called as PIN40
IO.setup(40,IO.OUT)             # initialize digital pin40 as an output.

#Open the default webbrowser and open web.whastapp
webbrowser.open_new('https://web.whatsapp.com/')

default_message = [
    "Hi I am your Whatsapp Bot :robot \n from RaspberryPi. I can help you with basic home automation. You can try any of the following :notes \n commands",
    "*turn on light* - _Turns on the led connected to pi_",
    "*turn off light* - _Turns off the led connected to pi_"]

turn_on_light = [
    "Sure, your :bulb \n Light is now turned on"
]

turn_off_light = [
    "Okay, Your LED is not turned off"
]

#Wait for whatsapp page to
def open_whatsapp():
    # check if whatsapp opened successfully
    find_whatsapp_header = None
    while find_whatsapp_header is None:
        find_whatsapp_header = pygu.locateOnScreen("Whatsapp_header.JPG", confidence=.8)
        use_here_button_pos = pygu.locateOnScreen("use_here_button.JPG", confidence=.8)
        if (use_here_button_pos):
            print("Whatsapp is being used somewhere else, clicking on use here")
            sleep(2)
            pygu.moveTo(use_here_button_pos[0], use_here_button_pos[1], duration=0.5)
            pygu.click()
        print(".")
        sleep(2)
    return 1

#checks for new message and opens it
def new_chat_available():
    # Check for new messages
    green_circle_pos = pygu.locateOnScreen("green_circle.JPG", confidence=.8)
    if (green_circle_pos):
        sleep(2)
        pygu.moveTo(green_circle_pos[0], green_circle_pos[1], duration=0.5)
        pygu.click()
        sleep(1)
        ok_button_pos = pygu.locateOnScreen("ok_button.JPG", confidence=.8)
        if (ok_button_pos):
            pygu.moveTo(ok_button_pos[0], ok_button_pos[1], duration=0.5)
            pygu.click()

        return 1
    else:
        sleep(1)
        return 0

def read_last_message():
    smily_paperclip_pos = pygu.locateOnScreen("smily_paperclip.JPG", confidence=.6)
    pygu.moveTo(smily_paperclip_pos[0], smily_paperclip_pos[1])
    pygu.moveTo(smily_paperclip_pos[0] + 50, smily_paperclip_pos[1] - 35, duration=0.5)
    sleep(1)
    pygu.tripleClick()
    pygu.hotkey('ctrl', 'c')
    sleep(0.1)
    return (pyperclip.paste())

def get_response(incoming_message):
    if "CD_bot" in incoming_message:
        return default_message
    if "turn on light" in incoming_message:
        IO.output(40,1)                      # turn the LED on
        return turn_on_light
    if "turn off light" in incoming_message:
        IO.output(40,0)                      # turn the LED off
        return turn_off_light
    else:
        return ""


def send_message(message_content):
    for content in message_content:
        pygu.typewrite(content, interval=.02)
        pygu.hotkey('shift', 'enter')
    sleep(1)
    pygu.hotkey('enter') #Enter key to send the message

def new_message_available():
    current_mouse_pos = pygu.position()
    pointer_color = pygu.pixel(current_mouse_pos[0], current_mouse_pos[1])
    if (pointer_color == (255, 255, 255)):
        return 1
    else:
        return 0

if (open_whatsapp()): #if whatsapp page is opened successfully
    print("##Whatsapp page ready for automation##")

while(1):

    if (new_chat_available() or new_message_available()):
        print("New chat or message is available")
        incoming_message = read_last_message() #read the last message that we received

        message_content = get_response(incoming_message) #decide what to respond to that message
        send_message(message_content) #send the message to person
Comments
cuentame te sirvio? Baruch
Exelente proyecto me funciono a la perfeccion, desde Bogota Colombia, felicitaciones al desarrollador
tengo unos comentarios.
1.el letrero de wasap sale mejor si se desonecta el teclado de la raspberry
2. no eh logrado ejecutar el scrip desde ssh me saca un error keyerror:DISPLAY
AL PARECER EL PROBLEMA ES CON PYAUTOGI
si sabes como ejecurarlo por SSH te agradezco mucho
Hi, Followed this tutorial but I don't see the "Whatsapp_Bot" user to communicate with. How do I get that?
Next issue: in the shell I see following error message, but I don't know how to fix that error?
##Whatsapp page ready for automation##
New chat or message is available
Traceback (most recent call last):
File "/home/pi/Whatsapp/Walter_Whatsap_bot.py", line 111, in <module>
incoming_message = read_last_message() #read the last message that we received
File "/home/pi/Whatsapp/Walter_Whatsap_bot.py", line 66, in read_last_message
pygu.moveTo(smily_paperclip_pos[0], smily_paperclip_pos[1])
TypeError: 'NoneType' object is not subscriptable
got this error:
File "/home/pi/Whatsapp/Walter_Whatsap_bot.py", line 66, in read_last_message
pygu.moveTo(smily_paperclip_pos[0], smily_paperclip_pos[1])
TypeError: 'NoneType' object is not subscriptable
how to solve?

Hello Aswinth Raj,
Your project looks highly attractive. It is fine documented and may be extended in virtually endless ways.
I try to reproduce it on my 5.10.52 Raspberry Pi OS with Python 3.7.3.
During initial execution of Walter_Whatsap_bot.py code I got next error:
RuntimeError: module compiled against API version 0xe but this version of numpy is 0xd.
I had installed opencv-contrib-python package using "pip3" and I may guess that its version is not matching numpy.
What is your suggestion for mending this problem? Should I remove the installed OpenCV package, download ist source and recompile it?
With appreciation
Baruch