

In this tutorial we are going to interface a seven segment display to ARDUINO UNO. The display counts from 0-9 and resets itself to zero. Before going further, let us first discuss about seven segment displays. You can also check this detailed tutorial on interfacing arduino with seven segment display.
A seven segment display got its name from the very fact that it got seven illuminating segments. Each of these segments has a LED (Light Emitting Diode), hence the lighting. The LEDs are so fabricated that lighting of each LED is contained to its own segment. The important thing to notice here that the LEDs in any seven segment display are arranged in common anode mode (common positive) or common cathode mode (common negative).
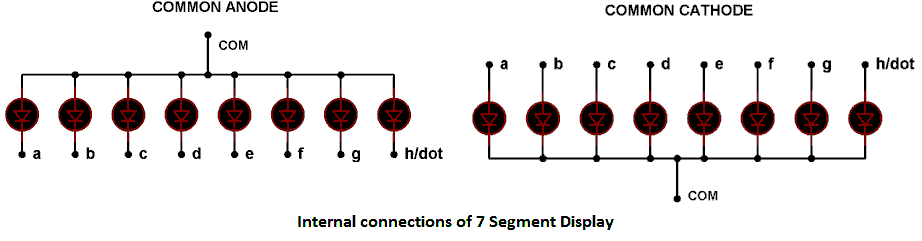
The circuit connection of LEDs in common cathode and common anode is shown in above figure. Here one can observe that, in CC the negative terminals of every LED is connected together and brought out as GND. In CA the positive of every LED is connected together and brought out as VCC. These CC and CA come in very handy while multiplexing several cells together.
Components Required
Hardware: ARDUINO UNO , power supply (5v), HDSP5503 seven segment display (two pieces) (any common cathode will do ), 47uF capacitor (connected across power supply).
Software: arduino IDE (Arduino nightly)
Circuit Diagram and Working Explanation

The connections which are done for 7 segment display are given below:
PIN1 or E to PIN 6 of ARDUINO UNO
PIN2 or D to PIN 5
PIN4 or C to PIN 4
PIN5 or H or DP to PIN 9 ///not needed as we are not using decimal point
PIN6 or B to PIN 3
PIN7 or A to PIN 2
PIN9 or F to PIN 7
PIN10 or G to PIN 8
PIN3 or PIN8 or CC to ground through 100Ω resistor.
Now to understand the working, consider a seven segment display is connected to a port, so say we have connected “A segment of display to PIN0”, “B segment of display to PIN1”, “A segment of display to PIN3”, “A segment of display to PIN4”, “A segment of display to PIN5”, “A segment of display to PIN6”. And is common ground type as shown in figure.
Here the common ground has to be connected to ground for the display to work. One can check each segment of display by using multimeter in diode mode. Each segment should not be power with a voltage greater than 4v, if did the display will be damaged permanently. For avoiding this a common resistor can be provider at common terminal, as shown in circuit diagram.
Now, if we want to display a “0” in this display as shown in below figure.
We need to turn the LEDs of segments “A, B, C, D, E F”, so we need to power PIN0, PIN1, PIN2, PIN3, PIN4 and PIN5. So every time we need a “0”, we need to power all the pins mentioned.
Now, if we want “1” on display
We need to power segments “B, C”, for segment B, C to turn ON we need to power PIN1, PIN2. With both the pins high we get “1” on display. So as seen above we are going to power pins corresponding to the digit that to be shown on display.
Here we are going to write a program turning each segment ON and OFF for a count 0-9. The working of 0-9 counter is best explained step by step in C code given below:
Complete Project Code
#define segA 2//connecting segment A to PIN2
#define segB 3// connecting segment B to PIN3
#define segC 4// connecting segment C to PIN4
#define segD 5// connecting segment D to PIN5
#define segE 6// connecting segment E to PIN6
#define segF 7// connecting segment F to PIN7
#define segG 8// connecting segment G to PIN8

                int COUNT=0;//count integer for 0-9 increment
void setup()
{
                  for (int i=2;i<9;i++)
                  {
                                    pinMode(i, OUTPUT);// taking all pins from 2-8 as output
                  }
}

void loop()
{
switch (COUNT)
                {

                case 0://when count value is zero show”0” on disp
                digitalWrite(segA, HIGH);
                digitalWrite(segB, HIGH);
                digitalWrite(segC, HIGH);
                digitalWrite(segD, HIGH);
                digitalWrite(segE, HIGH);
                digitalWrite(segF, HIGH);
                digitalWrite(segG, LOW);
                break;

                case 1:// when count value is 1 show”1” on disp
                digitalWrite(segA, LOW);
                digitalWrite(segB, HIGH);
                digitalWrite(segC, HIGH);
                digitalWrite(segD, LOW);
                digitalWrite(segE, LOW);
                digitalWrite(segF, LOW);
                digitalWrite(segG, LOW);
                break;

                case 2:// when count value is 2 show”2” on disp
                digitalWrite(segA, HIGH);
                digitalWrite(segB, HIGH);
                digitalWrite(segC, LOW);
                digitalWrite(segD, HIGH);
                digitalWrite(segE, HIGH);
                digitalWrite(segF, LOW);
                digitalWrite(segG, HIGH);
                break;

                case 3:// when count value is 3 show”3” on disp
                digitalWrite(segA, HIGH);
                digitalWrite(segB, HIGH);
                digitalWrite(segC, HIGH);
                digitalWrite(segD, HIGH);
                digitalWrite(segE, LOW);
                digitalWrite(segF, LOW);
                digitalWrite(segG, HIGH);
                break;

                case 4:// when count value is 4 show”4” on disp
                digitalWrite(segA, LOW);
                digitalWrite(segB, HIGH);
                digitalWrite(segC, HIGH);
                digitalWrite(segD, LOW);
                digitalWrite(segE, LOW);
                digitalWrite(segF, HIGH);
                digitalWrite(segG, HIGH);
                break;

                case 5:// when count value is 5 show”5” on disp
                digitalWrite(segA, HIGH);
                digitalWrite(segB, LOW);
                digitalWrite(segC, HIGH);
                digitalWrite(segD, HIGH);
                digitalWrite(segE, LOW);
                digitalWrite(segF, HIGH);
                digitalWrite(segG, HIGH);
                break;

                case 6:// when count value is 6 show”6” on disp
                digitalWrite(segA, HIGH);
                digitalWrite(segB, LOW);
                digitalWrite(segC, HIGH);
                digitalWrite(segD, HIGH);
                digitalWrite(segE, HIGH);
                digitalWrite(segF, HIGH);
                digitalWrite(segG, HIGH);
                break;

                case 7:// when count value is 7 show”7” on disp
                digitalWrite(segA, HIGH);
                digitalWrite(segB, HIGH);
                digitalWrite(segC, HIGH);
                digitalWrite(segD, LOW);
                digitalWrite(segE, LOW);
                digitalWrite(segF, LOW);
                digitalWrite(segG, LOW);
                break;

                case 8:// when count value is 8 show”8” on disp
                digitalWrite(segA, HIGH);
                digitalWrite(segB, HIGH);
                digitalWrite(segC, HIGH);
                digitalWrite(segD, HIGH);
                digitalWrite(segE, HIGH);
                digitalWrite(segF, HIGH);
                digitalWrite(segG, HIGH);
                break;

                case 9:// when count value is 9 show”9” on disp
                digitalWrite(segA, HIGH);
                digitalWrite(segB, HIGH);
                digitalWrite(segC, HIGH);
                digitalWrite(segD, HIGH);
                digitalWrite(segE, LOW);
                digitalWrite(segF, HIGH);
                digitalWrite(segG, HIGH);
                break;

                break;
                }
                if (COUNT<10)
                {
                                COUNT++;
                                delay(1000);///increment count integer for every second
                }
                if (COUNT==10)
                {
                                COUNT=0;// if count integer value is equal to 10, reset it to zero.
                                delay(1000);
                }
}
Comments
Hello,
This is a good example for the study of seven segment interface with Arduino. But I like to mention about the current limiting resistor used in the common pin. It is not a correct way to use it. You have to use individual resistors in all the segment pins to get an even current in all segments irrespective of the number of segments ON.
number patterns are not coming properly
PLzzz help me my display dint shws any thing
bro make sure your display are okay or not once chek every led are glowing individualy i will tell u how , took 1k resisister and joint 9 volt battery to positive probe to resister and negetive probebto connect with led diplay common ptobe meams GND then resister second probe conmect indiual all led's then u sure all led are good condition then , and also make sure your display is common cathod or anothde ,your display must common cathode , then connect proper way as show in circuit diagram.then fill code to arduino and ur project is complete.
Please the seven segment display I have is three in one.. How do I write the code to make it count from 0-999
bro its simple, connect all display in parrellel mode every pine of led arebu understand wht i say if yes give reply
seven segment programmed but not working please help me
please help us. it is not working asap
i was meke this circuit board using arduino and using 55 timmer also 4026 ic
555 timer ic

hi,
if any model is used is it okay for 7 segment display in this arduino project