
While using the BLE HM-10 module, you must encounter some really frustrating problems like you cannot send or receive AT commands, or you cannot pair HM-10 with Smart Phone. If you encounter these problems, then your BLE HM-10 module is surely a Cloned HM-10 Module. Yes, you heard it right, the Cloned HM-10 module. However after flashing it with genuine firmware it acts like a genuine BLE HM10 module and can be used as original Bluetooth module. Here we have interfaced HM10 BLE module with Arduino Uno to control an LED.
What is a Cloned HM-10 Module?
Cloned HM-10 modules are similar to the Genuine HM-10 module. But to save the extra cost while manufacturing, the manufacturers removed the external oscillator and leaves the space for the External Oscillator. The manufacture used the internal oscialltor of HM-10 module for saving the cost. Also, the firmware is different than the genuine HM-10 module.
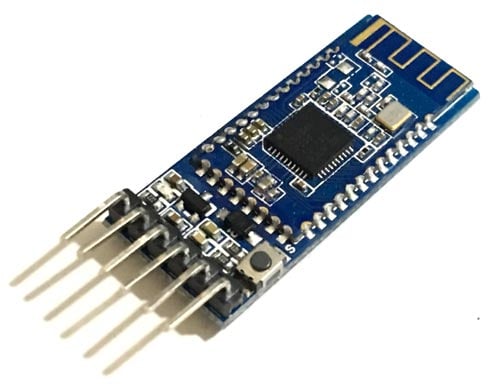
BLE HM-10 module is a Bluetooth Low Energy (BLE) module built on Texas Instrument’s CC2540 or CC2541. Chinese manufacturer Jinan Huamao Technology is developer of the board and the firmware. The Manufacturer has stated on the official documentation that there are several clones available in the market.
How to distinguish between Genuine and Clone HM10 BLE Modules
There are two types of BLE HM-10 modules available, the genuine and Chinese cloned. To identify the difference the between the genuine and Chinese Cloned HM-10 module, there are some points to do that.
1. The first point is by looking at the HM-10 module. If the Crystal Oscillator of 32KHz is available on the HM-10 board then it is Genuine one else it is the Chinese Cloned HM10.

2. The second way to find is by connecting the HM10 with any Serial Module and sending AT commands. If the HM-10 doesn’t reply to AT commands, then it is a Cloned HM-10 module.
How to change or Flash the firmware of Clone HM-10 BLE Module
In order to change the firmware, we really need a good hand on soldering. Once you change the firmware of the HM10 module. You will be able to access all its functions. There are two methods to flash the cloned HM10 module:
1. The first method includes the SmartRF Flash Programmer from Texas Instruments.
2. And the second method includes the Arduino as programmer for HM-10.
In this tutorial, we will use the second method of flashing the HM-10 module i.e. Arduino as Programmer for HM-10. So lets start the steps in Flashing the HM-10 module using Arduino UNO as Programmer. As said earlier, the soldering will be required to connect HM-10 with Arduino. We need to solder the wires to the DEBUG_CLOCK, DEBUG_DATA, RESET_N pins of HM-10. Then complete procedure is explained in next sections.
Components Required
Hardware
- Arduino (UNO, Pro Mini)
- USB to TTL converter for connect Arduino to the PC (in case of arduino pro mini or similar)
- CC2541 board: HM-10, CC41
- Some Jumper Wires
- Soldering Iron (To solder the wire to HM-10 Board)
Software:
- Arduino IDE
- CCLoader Arduino Sketch
- CCloader Windows Program
- HM-10 Firmware (Extract the Zip file)
HM-10 Pin Out


Circuit Diagram
Firstly, solder the small jumper wires with HM-10 Board pins then proceed with the circuit connections with Arduino to flash the firmware inside HM10 BLE Module.


Steps to Update Firmware in HM10 Bluetooth Module using Arduino Uno
1. Firstly, download and Upload the CCloader Sketch on Arduino Uno Using the Arduino IDE. This zip file contains all the files (.bin file, CCloaderArduino.ino, CCLoader.exe) related to flash the firmware.
- Open the sketch with Arduino IDE
- Setup the baud rate, Board, COM Port, Programmer etc.
- Compile and Upload the sketch to the UNO Board.
2. Now wire the HM-10/CC2541 Board to the Arduino according to below table after soldering the wires on HM-10 board:
|
Pin Name |
CC2541 Pins |
Arduino UNO Pins |
|
DEBUG_CLOCK |
Pin 7 |
Pin 5 |
|
DEBUG_DATA |
Pin 8 |
Pin 6 |
|
RESET_N |
Pin 11 |
Pin 4 |
|
GND |
Pin 13 |
GND |
|
3.3 V |
Pin 12 |
|

3. Now the circuit connection is ready, the next steps is burning the HM-10 Firmware using the Windows CCloader.exe. Keep all the files in same folder i.e. CCloader.exe, CC2541hm10v540.bin ( in my case, I have saved it in Users > Desktop > HM10). The CC2541hm10v540.bin file need to be extracted as it will be downloaded in Zip format.
4. Now, open the command prompt and navigate to the folder where “CCloader.exe” is located. In my case it is C:\Users\Abhiemanyu Pandit\Desktop\HM10

5. Write and execute the command in format like :
CCLoader.exe <COM Port> <Firmware.bin> 0
Note: Replace the COM Port with your COM Port number (e.g 2,3,4,5). Don’t write COM5 or COM4 just write the Number of Port. Also replace the Firmware.bin file excluding <> signs with your’s file name. Note that if you are using Arduino Uno then use ‘0’ and if you are using other Arduino e.g. Micro then change 0 to 1
In my case the command looks like:
C:\Users\Abhiemanyu Pandit\Desktop\HM10>CCloader.exe 4 CC2541hm10v540.bin 0
You can also change the Firmware Name and CCloader name. if you change the name from CCloader.exe -> CCloader123.exe and CC2541hm10v540.bin -> CC2541.bin with COM Port 5 then the command will look like below:
C:\Users\Abhiemanyu Pandit\Desktop\HM10>CCloader123.exe 5 CC2541.bin 0
You must put the Firmware.bin file in the same folder where CCloader is located.
6. After executing the above command the firmware will start uploading, just wait for it to finish. When it is finished the Command prompt will look like below.


Now its all done and new firmware is successfully installed and the CC2541 is now have the genuine HM-10 Firmware.
7. Now if you want to upgrade or degrade the firmware then you need not follow these same steps again. Just Connect the HM-10 Module with a USB to TTL converter with Rx, Tx, Vcc, GND and do the Normal steps to upgrade firmware.
This finishes the complete tutorial on the Changing and flashing of the HM-10 Module with Genuine Firmware. Note that, after flashing the firmware the Onboard LED of HM-10 stops glowing, it doesn’t mean that your HM-10 is not working. The firmware doesn’t have LED code or may be the PIN number would be different. If you have any doubt or suggestion then comment below or write to our forums.
Comments
Hi Anxjos,
Since the author has not responded for almost a year now, do let me know if you found a solution to this problem.
Cheers,
Jay
Hi, I have a question.
Is there a HM-0 Firmware version for the cc2540? (Not for the cc2541!).
I have a pair of HM-10 China clone with cc2541chip imprinted on them , which the CCDebugger identifies as CC2540. I can flash the firmware version CC2541hm10v540.hex on it, but without any function. That's why I'm looking for a firmware specifically for the CC2540. Does anyone know a source?
Hello friend, update the module as the steps shown but the module not response for command
Thanks for the guide! I used these steps to flash an AT-09 clone and a HM-10 clone using an arduino Mega. At first I thought it didnt work, but the firmware changed the command structure! In Arduino Serial monitor, change ending to "no line ending" and use commands with ? at end. ex. AT? or AT-NAME?
I wanted to let people know that I managed to brick my HM-10 clone because I tried flashing a genuine .bin file from HMSoft using this method.
For some reason, I wasn't aware that after flashing the module with the .bin file mentioned in this guide you're able to flash the module with the genuine firmware using the genuine flashing method BUT you need to get the module in "upgrade mode" using the "AT+SBLUP" command.
But I also managed to unbrick the module using another flashing method because other methods didn't work.
I used an alternative flashing method using an Arduino with CCLib to upload this guide's .bin file. After that the module responded again, and I was also able to flash a genuine firmware using the genuine flashing method.
Hi all,
this info maybe important to some people:
On my HM-10 clone board´s pin 11 is not the CC2541 RESET pin!
I had to manually solder some wire to pin 20 of the CC2541

The Flashing was sucessful though. I Flashed 2 of my modules and neither recognize any at command. I have changed some baud rates and switched to stop sending new line andcarriage returns chars but I still cant get it to work. Any suggestions?