

Raspberry Pi is a Palm Size computer that comes in very handy when prototyping stuff that requires high computational power. It is being extensively used for IOT hardware development and robotics application and much more memory hunger applications. In most of the projects involving the Pi it would be extremely useful if the Pi had a display through which we can monitor the vitals of our project.
The pi itself has a HDMI output which can be directly connected to a Monitor, but in projects where space is a constrain we need smaller displays. So in this tutorial we will learn how we can interface the popular 3.5 inch Touch Screen TFT LCD screen from waveshare with Raspberry pi. At the end of this tutorial you will have a fully functional LCD display with touch screen on top of your Pi ready to be used for your future projects.
The technical specification of the 3.5” TFT LCD screen is shown below.
| LCD Type | TFT |
| Size | 3.5 |
| Resolution | 320*480 Pixels |
| Interface | SPI |
| Display Controller | XPT2046 |
| Touch Type | Resistive |
| Backlight | LED |
| Aspect Ratio | 8:5 |
| Colours | 65536 |
| Supports | Camera, Mouse and Keyboard |
Materials Required
- Raspberry Pi
- 3.5” TFT LCD
- Internet connection
Pre-Requisites
It is assumed that your Raspberry Pi is already flashed with an operating system and is able to connect to the internet. If not, follow the Getting started with Raspberry Pi tutorial before proceeding.
It is also assumed that you have access to the terminal window of your raspberry pi. In this tutorial we will be using Putty in SSH mode to connect to the Raspberry Pi. You can use any method but you should somehow be able to have access to your Pi’s terminal window.
Connecting your Raspberry Pi with TFT LCD screen
Connecting your 3.5” TFT LCD screen with Raspberry pi is a cake walk. The LCD has a strip of female header pins which will fit snug into the male header pins. You just have to align the pins and press the LCD on top of the Pi to make the connection. Once fixed properly you Pi and LCD will look something like this below. Note that I have used a casing for my Pi so ignore the white box.
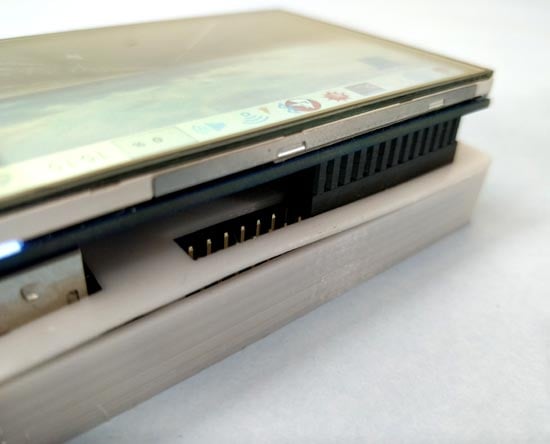
For people who are curious to know what these pins are! It is used to establish a SPI communication between the Raspberry Pi and LCD and also to power the LCD from the 5V and 3.3V pin of the raspberry Pi. Apart from that it also has some pins dedicated for the touch screen to work. Totally there are 26 pins, the symbol and description of the pins are shown below
|
Pin No: |
Symbol |
Description |
|
1, 17 |
3.3V |
3.3V power input |
|
2,4 |
5V |
5V power input |
|
3,5,7,8,10,12,13,15,16 |
NC |
No connection – used for support |
|
6,9,14,20,25 |
GND |
Ground |
|
11 |
TP_IRQ |
Active low interrupt pin for touch screen |
|
18 |
LCD_RS |
Register select pin of Display controller |
|
19 |
LCD_SI |
SPI data input for the LCD display |
|
21 |
TP_SO |
SPI data output from the LCD display |
|
22 |
RST |
Reset |
|
23 |
LCD_SCK |
Clock sync pin of SPI communication |
|
24 |
LCD_CS |
Chip select pin of SPI LCD |
|
26 |
TP_CS |
Chip select pin of SPI Touch screen |
Preparing your Raspberry Pi for 3.5” LCD Display Screen
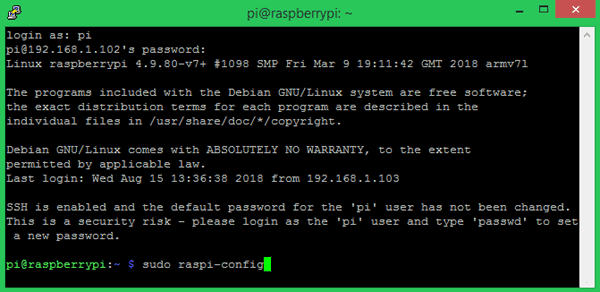
Now, after connecting the LCD to PI, power the PI and you will see a blank white screen on the LCD. This is because there are no drivers installed on our PI to use the connected LCD. So let us open the terminal window of Pi and start making the necessary changes. Again, I am using putty to connect to my Pi you can use your convenient method.
Step 1: Get into the configuration window using the following command. To get the below window
sudo raspi-config
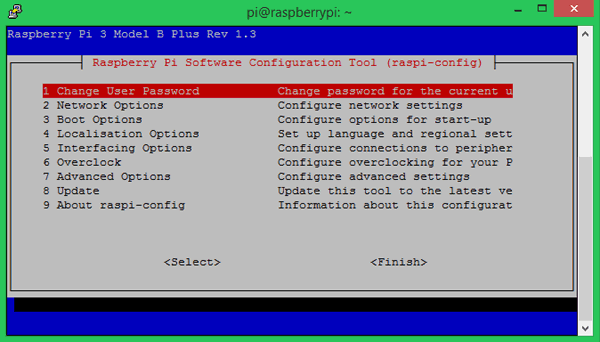
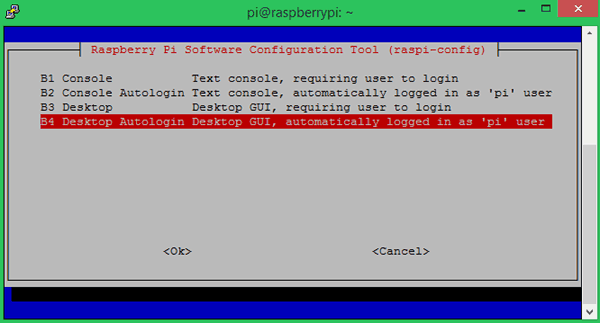
Step 2: Navigate to Boot Options -> Desktop/CLI and select option B4 Desktop Autologin Desktop GUI, automatically logged in as ‘pi’ user as highlighted in below image. This will make the PI to login automatically from next boot without the user entering the password.
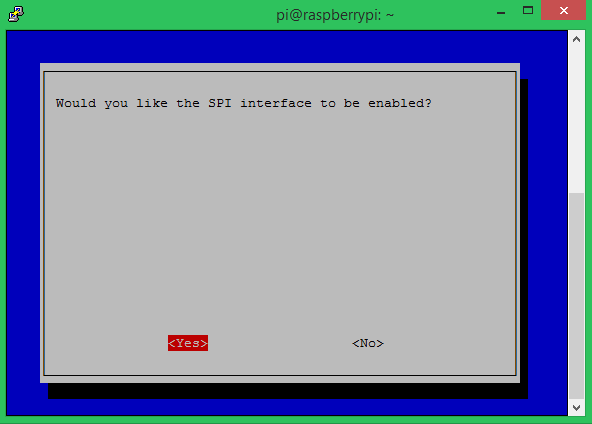
Step 3: Now again navigate to interfacing options and enable SPI as show in the image below. We have to enable the SPI interface because as we discussed the LCD and PI communicates through SPI protocol
Step 4: Click on this waveshare driver link to download the driver as a ZIP file. Then move the ZIP file to you PI OS. I used Filezilla to do this, but you can also use a pen drive and simple copy paste work. Mine was placed in the path /home/pi.
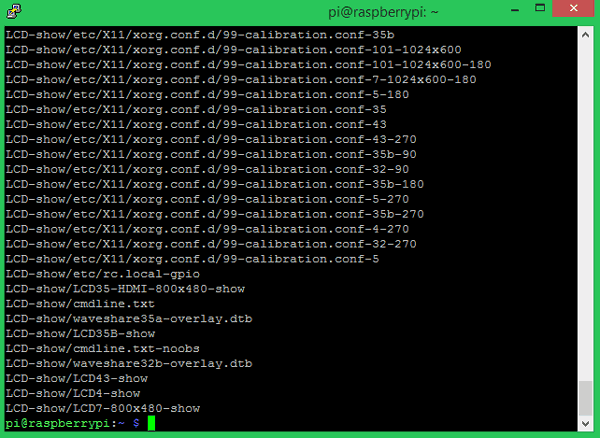
Step 5: After the zip file is placed in position continue with your terminal window. To install the driver use the following command.
tar xvf LCD-show-*.tar.gz
Note: Make sure your PI is connected to internet during this step
Step 6: Finally after installing the driver we can enable the display by using the below command
cd LCD-show/

Step 7: Now use the below command to restart your Pi. This will automatically end the terminal window. When the PI restarts you should notice the LCD display also showing the boot information and finally the desktop will appear as shown below.
sudo reboot

You can also watch the video below to check how the LCD is connected and how it responds to touch. I am pretty much satisfied with its default accuracy so I am not going to do any calibration. But if you are interested you can view the official wiki page from waveshare where they discuss how to calibrate and enable camera view on the LCD screen.
Hope you understood the tutorial and were successful in interfacing your LCD with PI and got it working. If otherwise state your problem in the comment section below or use the forums for more technical quires.
Comments
He seems to have to have omitted the most important commands of all:
chmod +x LCD35-show
./LCD35-show
The RPI will reboot itself after these two commands, and then the screen should start to work. Mine did, anyway!
See https://www.waveshare.com/wiki/3.5inch_RPi_LCD_(A) (which he links to above) for the full instructions.
@Don Stewart: Follow the instructions here: https://www.waveshare.com/wiki/3.5inch_RPi_LCD_(A)

The final command shown in the above tutorial which you say enables the LCD screen actually just changes to the 'LCD-show' directory, it does not enable the LCD screen.
I've tried running a few of the commands within the LCD-show directory but I just get error messages which say they're not commands.
What do I have to type to enable the LCD before rebooting.
And if it works how do I then switch back to the HDMI output when I want to stop using the LCD?
Please advise,
Don Stewart.