
Have you ever thought about a speaker which can be controlled by your voice!!! Yes, Amazon Echo is the one of the most popular voice controlled Speaker, but in competition with it Google Home is also getting popular. Voice assistants becoming more popular as we are heading towards an era of AI based systems. You have heard about Google Assistant, Apple Siri and Amazon Alexa. These all are Voice based AI systems, what makes these different from each other is their ecosystems, and this is where Google Assistant standout the most. Google, Apple and Amazon, all these companies already launched their smart speakers. Google smart speakers are also available in the market. We already covered Raspberry Pi based Amazon Echo, this time we will turn Raspberry Pi into a Google Home Speaker.
Google provides the API for using its voice service, which is open source and available on Github. Using Google voice service, we can play music, get information about weather, book tickets and many more. All you have to do is Ask. In this tutorial, let’s see how to build a voice controlled smart speaker using Google assistant and Raspberry Pi.
Hardware Requirements
- Raspberry Pi 3 [Recommended] or Raspberry Pi 2 Model B [Supported] and SD card(8GB or more)
- External Speaker with 3.5mm AUX cable
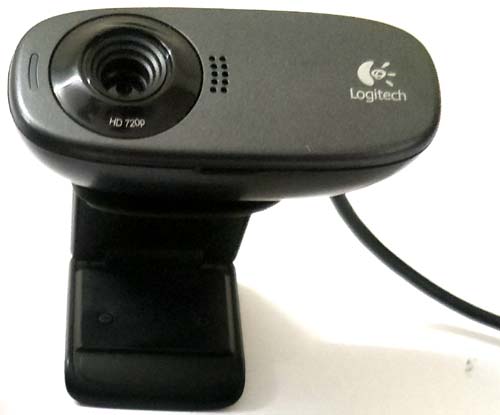
- Any Webcam or USB 2.0 Microphone
We also assume that your Raspberry pi is already set up with an Raspbian OS and is connected to the internet. With these in place let’s proceed with the tutorial. If you are new to Raspberry Pi then go through Getting started with Raspberry pi first.
Note: Webcam has inbuilt microphone so, we will use this in place of USB 2.0 microphone.
You also need a keyboard, mouse and a monitor to connect the raspberry pi using HDMI cable.
Checking Webcam Mic with Raspberry Pi:
1. Open Raspberry Pi terminal and type arecord -l command. This will display the hardware devices which are connected to Raspberry Pi as shown below:
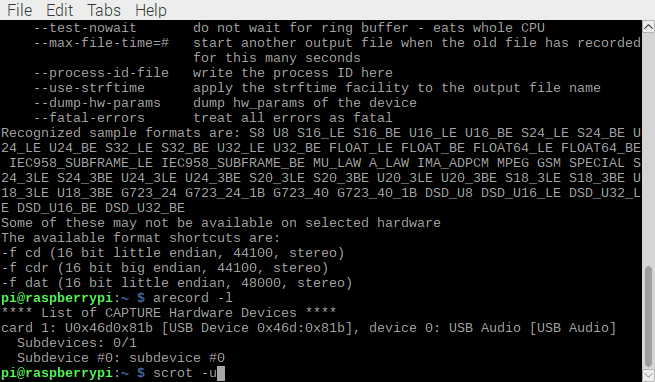
Card 1 is your webcam’s mic that we are going to use. If it is not displayed, your webcam may be defective.
2. Now, check if mic is working by running the record audio command as :
arecord /home/pi/Desktop/test.wav -D sysdefault:CARD=1
3. To play the recorded audio type this command :
omxplayer -p -o local /home/pi/Desktop/test.wav
If you have connected Raspberry Pi with monitor using HDMI cable then by default audio output is through your monitor’s speaker (if there is inbuilt speaker in it). So, to change it to 3.5mm you have to type the following command:
sudo raspi-config and go to Advance option.
Select Audio from the list -> select Force 3.5mm -> select Ok and Restart you Raspberry Pi.
Now, you should hear the sound from 3.5mm jack.
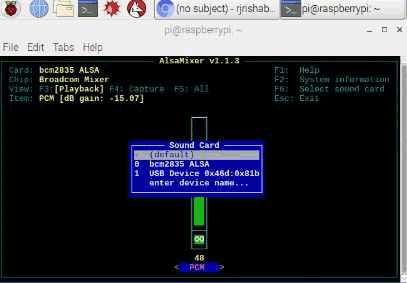
NOTE: If you want to increase or decrease the input voice loudness for microphone the type alsamixer in the terminal. Select sound card from the terminal by pressing F6.
Press F4 to change the Mic dB gain and set it as you want.
If you have USB 2.0 microphone then steps followed are same to check the microphone. Here we have used Webcam for USB microcphone.
Setting up the Google API for Raspberry Pi Google Assistant
1. First, we have to register and set up a project on the Google Console Actions dashboard .
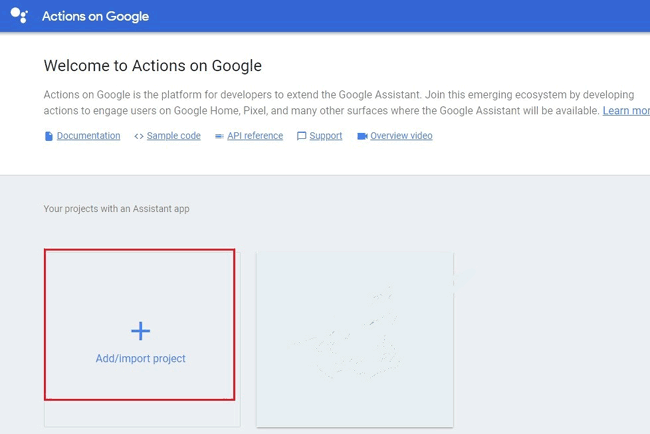
2. After logging in to your Google account, you will see following window.
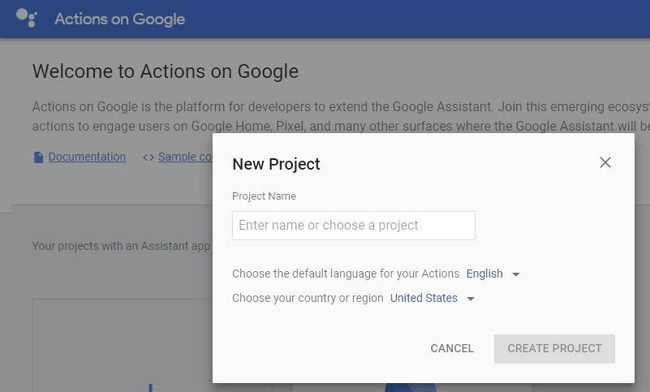
Click on Add/Import Project.
3. On next screen, you have to enter the Project Name and click on Create Project.
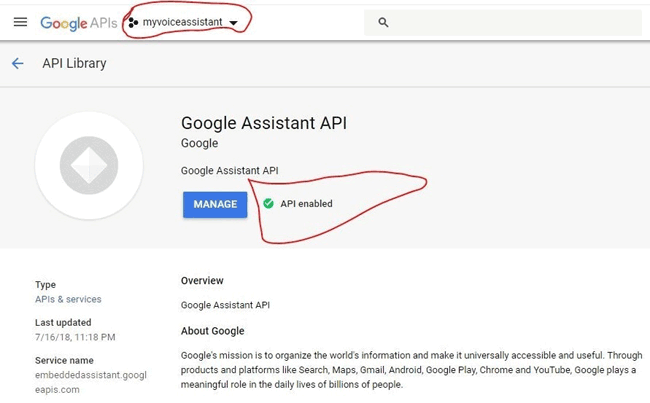
4. Now, go to the Google developers console in the new tab and search for Google Assistant API. Before you go ahead and press the Enable button make sure that you have your project selected. Then click on Enable.
5. Now, open the previous tab of Google console and scroll down to the bottom of the screen.
You will find an option Device Registration, click on it.

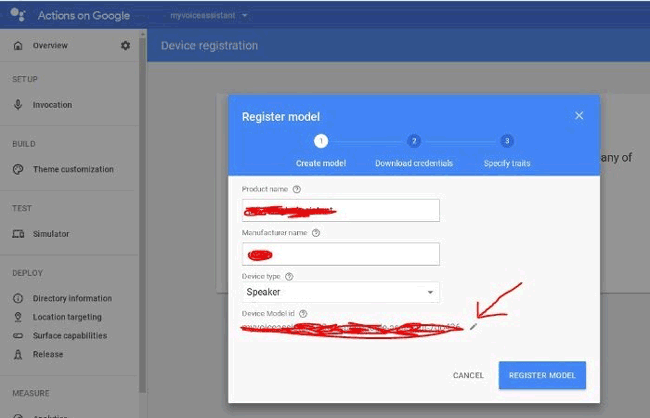
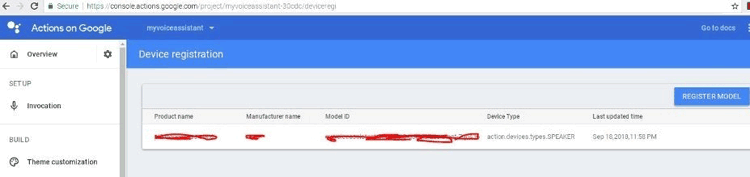
6. On the next screen, Click on Register Model. After this, you need to set a Product Name, Manufacturer name and set a Device Type. These names can be anything as you want.
Write down the Device Model Id, as we will need this later in the process.
Now, click on Register Model.
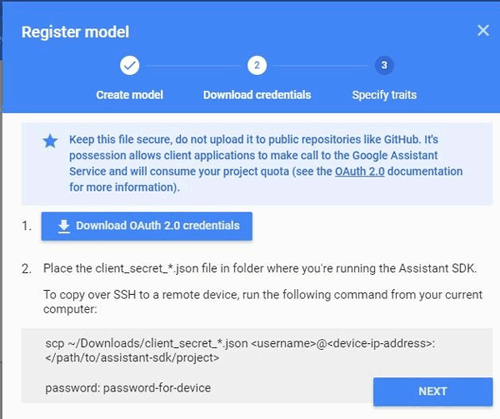
7. Next screen will be for Download Credentials. To get this credentials file click the Download OAuth 2.0 credentials. This file is very important so, keep it somewhere safe.
Now, click on Next.
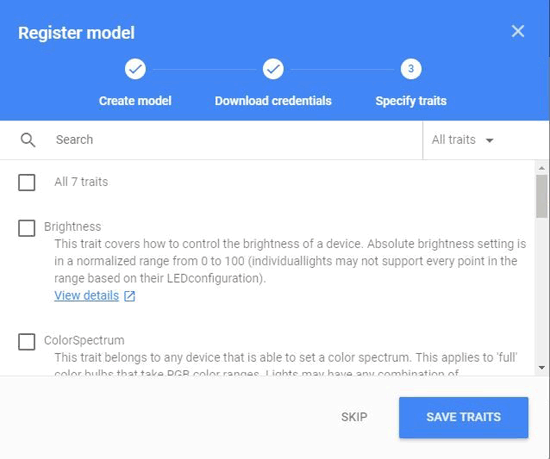
8. You can select any traits that you need, but in our case we don’t need any of these so we just clicked the Skip button as shown below.
9. Once everything is done, you will have following screen.
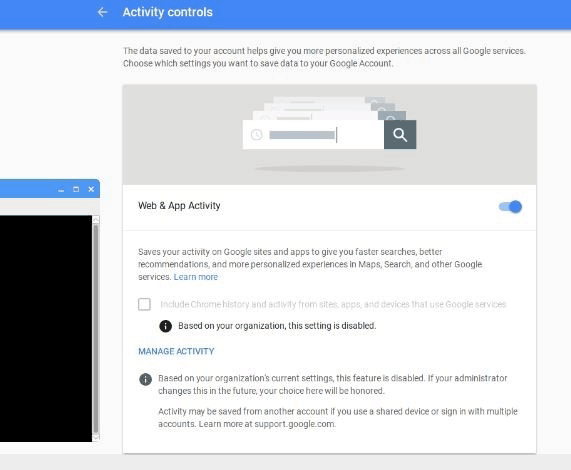
10. Now, go to Activity Controls page. Here you have to activate the following activity controls to ensure that the Google Assistant API work fine.
Web & App Activity, Location History, Device Information, Voice & Audio Activity
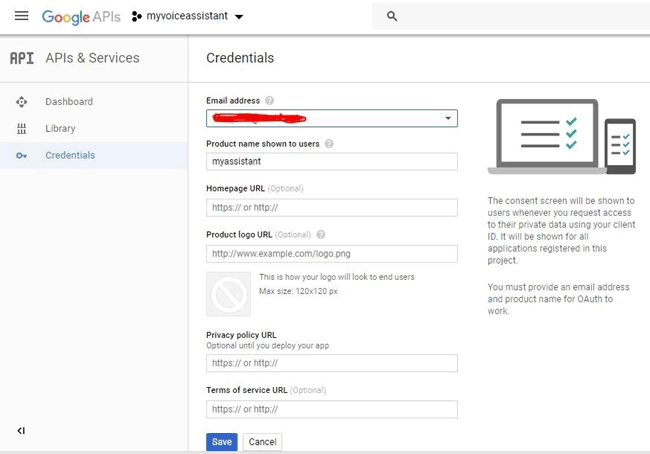
11. Again, go to Google developers console . Click on Credentials on the left side of dashboard. Click on OAuth consent screen.
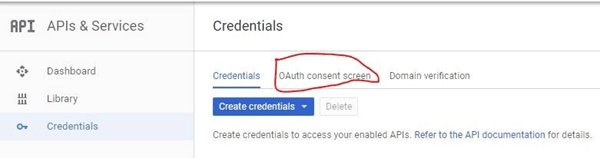
12. Fill your Gmail id and any name to the Product name and Save it.
Now, we have done with the Google API setup.
Setting up Google Assistant for Raspberry Pi Google Home
Please note from this part onwards you will be required to complete the tutorial on the Raspbian desktop directly and not over SSH, this is since you will have to use the built-in web browser.
1. First, update the Raspberry Pi’s package list by using the following command
sudo apt-get update
2. Now, we will create a file where we can store the credentials we downloaded earlier. For this, run the following two commands
mkdir ~/googleassistantnano ~/googleassistant/credentials.json
3. In this file, you have to copy the contents of the credentials file that we downloaded. Open the .json file in your favourite text editor and press ctrl + A then ctrl + C to copy the contents.
After copying the content, save the file by pressing Ctrl + X then Y and then finally press Enter .
4. After saving the credentials file, we will start installing some of the dependencies required to run the Google assistant.
Run the following command to install Python3 and the Python 3 Virtual Environment to our RPi.
sudo apt-get install python3-dev python3-venv
5. Now enable python3 as our virtual environment using following command
python3 -m venv env
6. Install the latest versions of pip and the setuptools. Run following command to get the update
env/bin/python -m pip install --upgrade pip setuptools --upgrade
7. To get into the python environment, we have to run this command
source env/bin/activate
8. Now we will install the Google Assistant Library, run the following commands one by one to get the updated library
python -m pip install --upgrade google-assistant-librarypython -m pip install --upgrade google-assistant-sdk[samples]
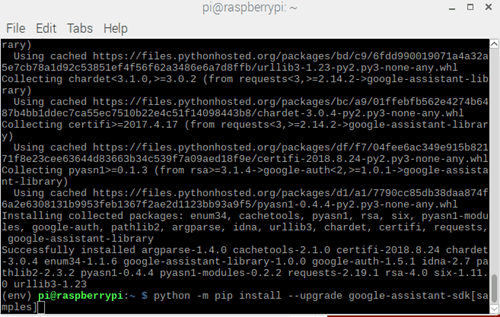
Now, we have finished installing all the required dependencies and libraries.

Authorizing Raspberry Pi for the Google Assistant
1. We will first install the Google authorization tool to our Raspberry pi by executing the following command
python -m pip install --upgrade google-auth-oauthlib[tool]
2. Now, we need to run the Google Authentication library. Execute this command to run the library.
google-oauthlib-tool --client-secrets ~/googleassistant/credentials.json \
--scope https://www.googleapis.com/auth/assistant-sdk-prototype \
--scope https://www.googleapis.com/auth/gcm \
--save –headless
This command will generate an URL, copy this URL and paste it in your web browser.
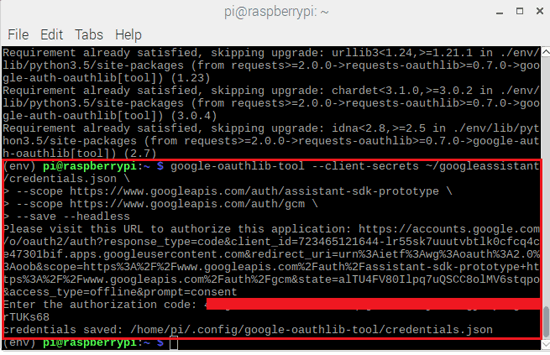
3. In the browser, login to your Google account, if you have multiple accounts only select the one you set up your API key with.
After login, you will see a long authentication code. Copy this code and paste it into your terminal window and press enter. If the authentication is verified you should see the following line appear on command line as shown in above image:
credentials saved: /home/pi/.config/google-oauthlib-tool/credentials.json
4. Our authentication credentials are verified now, but Google still want to verify through a pop display. But our pop up is blocked by the CORS(Cross-origin resource sharing) so, first disable this thing using below command.
To use this command make sure your chromium browser is closed and now open new terminal window and type the command. This command will launch the chromium browser with the CORS security disabled, don’t browse the internet with this disabled.
chromium-browser --disable-web-security --user-data-dir "/home/pi/
After the opening of browser, go to the previous terminal window in which you have setup the Google assistant sample.
5. Now run the following command to first time launch of Google assistant. In this command replace <projectid> with the id of your project.
If you forgot the Project ID, go to Actions Console on Google, click the project you created, then click the gear icon in the top left-hand corner then Project Settings.
Also, replace <deviceid> with the device ID that you obtained earlier in the tutorial.
googlesamples-assistant-pushtotalk --project-id <projectid> --device-model-id <deviceid> --display
This command will launch a new tab in the Chromium browser.
6. Now press Enter in the terminal window to trigger it and ask any question.
When you asked the first question, below screen may appear in the browser. Click on Continue -> I understand -> Allow.
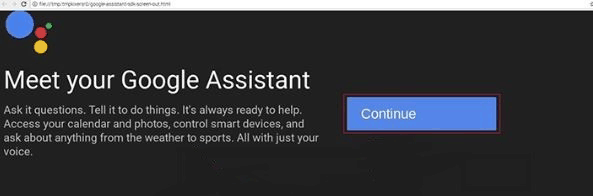
If this Continue screen not appears, no problem.
7. Now, we can use push to talk Google Assistant sample and get a output response.
When you press the Enter in the terminal and speak an action you should hear a verbal response and another tab will also opened displaying the action you just called.
You can disable the opening of tab by removing the –display argument from the command. We needed this to get the authorization screen.
Using Google Assistant on Raspberry Pi
We have authorized our Raspberry Pi. Whenever you want to launch Google assistant, just get in the environment and follow the below steps.
1. Run the following command on get in the environment
source env/bin/activate
You will be seeing (env) appear at the front of each line.
2. To start up the push to talk sample, run the following command
googlesamples-assistant-pushtotalk
3. In addition to the push to talk feature, you can also trigger the Google assistant by saying Ok Google. For this you have to enter an invalid device id for it to work. Incorrect device id can be anything like aaaa , abcd.
Now, run the following command.
googlesamples-assistant-hotword --device-model-id <deviceid>
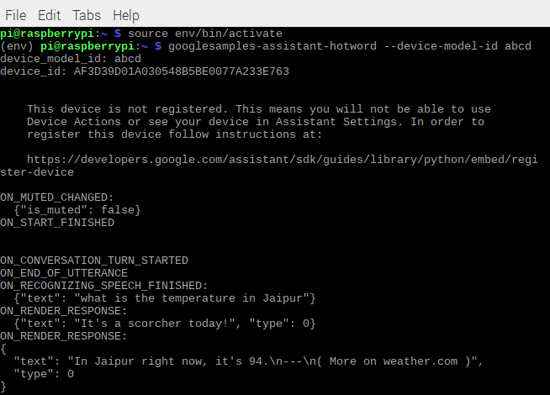
Now, you can ask anything with the very own Google assistant just say Ok Google.
So this is how we can install Google Assistant on Raspberry Pi and can turn it into a Google Home by connecting a Speaker and microphone to it.
Comments

can anyone help me solve this
can anyone help me solve this error
I'm stuck in step 2 , testing
I'm stuck in step 2 , testing the microphone. arecord -l shows that I have a web cam connected, with audio. The test doesn't record anything. What's wrong? How to correct it?
