
It’s been almost two years since amazon released the Amazon ECHO voice controlled speaker and the popularity of the speaker has continued to soar for reasons which are probably not far from the astounding performance of the Alexa voice service and the fact that the platform was opened up to developers which has led to the development of Alexa compatible devices by top electronics manufacturers and the birth of several Alexa/amazon echo based tech start-ups. For this reason, in today’s Article, I will be showing you how to build your own DIY version of the Amazon echo and setting up the Alexa voice service on the raspberry pi.
Be you an engineer or a maker, this will be an opportunity to familiarize yourself with the underlying principles that defines how the amazon echo works which will come in very handy should you decide to build a device based on the Amazon Echo or the Alexa voice service.
Required components:
The following are required to build this Raspberry pi amazon echo project:
- Raspberry pi 3 or 2
- WiFi Dongle (If raspberry pi 2 is to be used)
- Microphone
- Line-in Speaker (with 3.5mm jack)
- 5V, 2A USB Power supply
- Ethernet cable
Optional Requirements
- Monitor
- Mouse and Keyboard
- HDMI CABLE
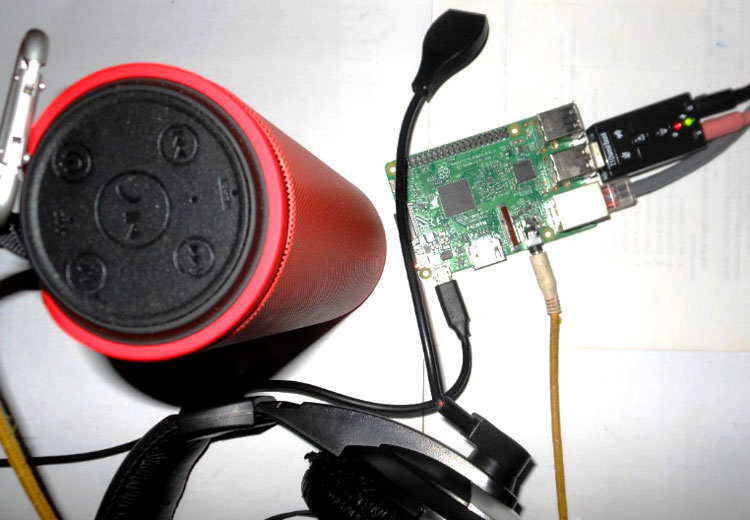
Since it was taking too long for the USB microphone I planned to use for this project to arrive, I decided to use a headset connected to the USB microphone and earphone connector for my PlayStation 3. If you are unable to get the USB microphone like me, you can use any other device with a microphone output like most USB webcams.
This tutorial will be based on the Raspbian stretch OS, so to proceed as usual I will assume you are familiar with setting up the Raspberry Pi with the Raspbian stretch OS, and you know how to SSH into the raspberry pi using a terminal software like putty. If you have issues with any of this, there are tons of Raspberry Pi Tutorials on this website that can help.
Due to the nature of this tutorial, it is important to be able to use a visual display like a monitor or view the raspberry pi desktop using VNC. The reason for this is to make copying of IDs from the Amazon website to the terminal.
This tutorial will be in steps to make it easier to follow and replicate.
Step 1: Ready the Pi
Before starting any Raspberry Pi project after installing the OS, I like running an update on the pi to ensure everything on it is up to date.
To do that, run:
sudo apt-get update
sudo apt-get upgrade
Step 2: Configure the Sound system of the Pi
At this stage, I will advice to connect a monitor or connect to the desktop of your Raspberry Pi using VNC to make things easier.
With the Pi desktop up and running, connect the microphone over USB and the speaker to the 3.5mm audio jack on the Raspberry Pi. We need to reconfigure the raspberry pi to send sound output over the 3.5mm jack. To do this, right click on the sound (speaker) button on the raspberry pi’s desktop taskbar and select analog as shown in the image below.
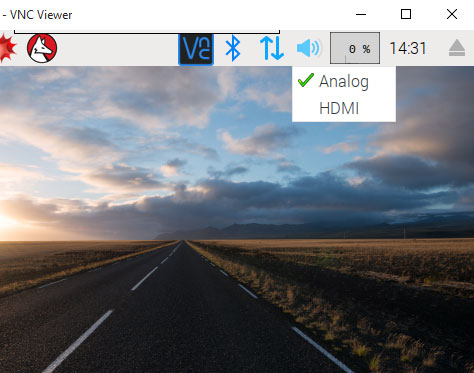
This will allow the Raspberry Pi to send sound out via the 3.5mm jack instead of sending over HDMI.
Next, we need to configure the Raspberry Pi to use the connected USB microphone as default. To do this we need to edit the configuration of the advanced linux sound architecture of the raspberry pi.
We do this using:
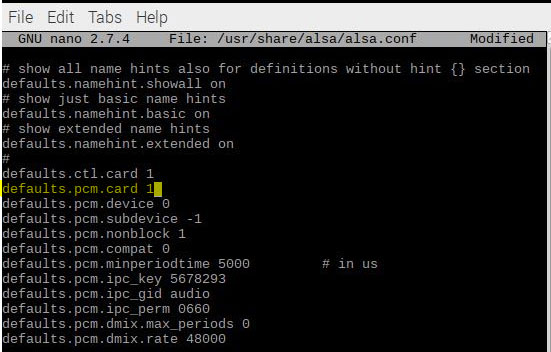
sudo nano /usr/share/alsa/alsa.conf
The editor opens up, scroll to the line for the PCM card and change it from 0 to 1 as shown in the image below
Save the configuration and exit using ctrl+x
Step 3:- Set up Your Amazon Developer Account
The next step is for us to create an amazon developer account so as to obtain the developer IDs, certificates and security profile needed for us to be able to connect to the amazon Alexa voice service.
Start by going to the amazon’s developer’s website and creating an account, you can follow this link, click on sign in it will lead you the page to create your developer account.
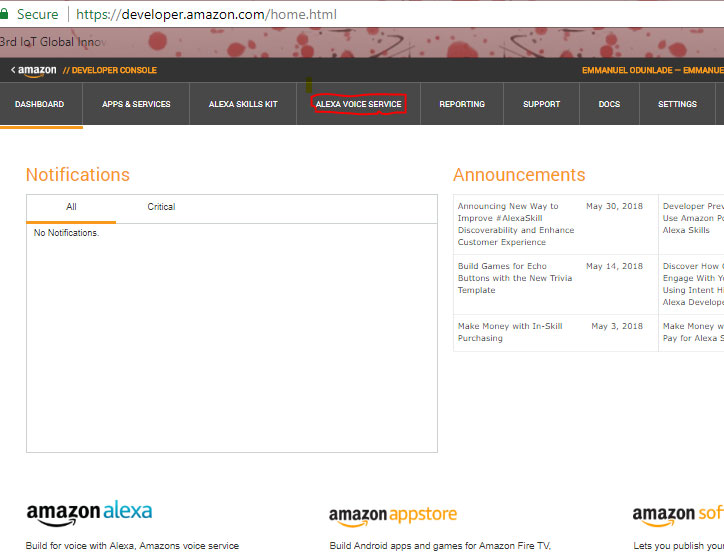
Once that’s done, follow this link to the home page for the developers. I had some issues navigating the amazon website, so I’d advise you follow this links.
At the home page, click on the Alexa voice service highlighted below.
On the next page, click on the Create Product button, highlighted in the image below;
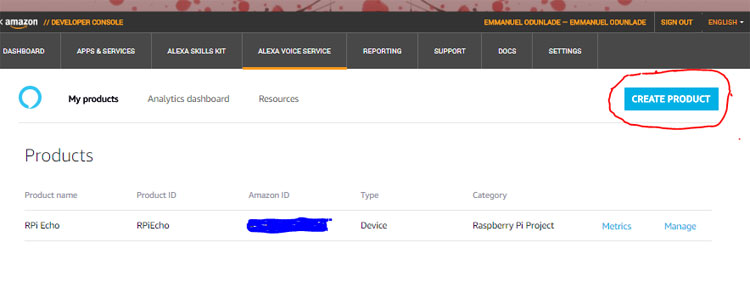
Fill the product form as explained below.
Product Name:- RPi Echo (this name is a personal preference, you can use whatever name you desire)
Product ID: RPiEcho (you can use whatever name you want as product ID).
Product Type: Select Alexa enabled device
Companion App: select No
Product category:  select Other
Product description: whatever comes to mind
How users will interact: select hands free
Image Upload: upload any descriptive image or skip.
Commercial distribution: select No
For children: select No

After filling the form, click on the next button at the end of the page. On the next page, you will be asked to select a security profile, choose the Create New Profile option.
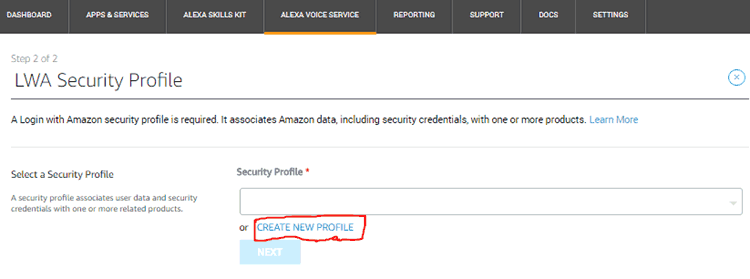
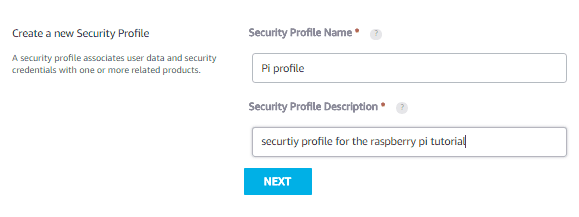
Enter a profile name and a suitable description and hit the next button.
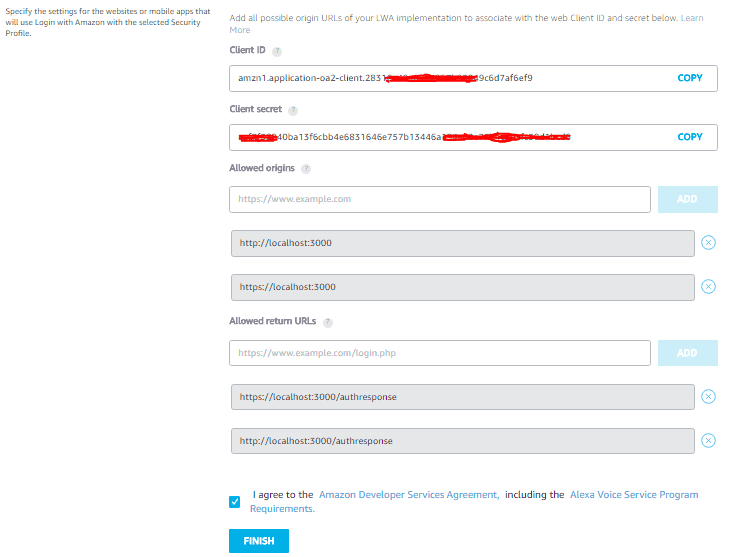
Once the next button is clicked, the security profile ID, the client ID and the client secret will be generated. Keep these details safe as we will use them later.
Before you click on the finish button, we need to add paths for the Allowed origin and Allowed return URL.
To the Allowed origin, add the following links:
To the allowed return url, add the following links:
With these links added, click on the finish button, as shown below.
With the Amazon developer account created and all the required IDs acquired, we then proceed to install the Alexa voice service on the raspberry pi.
Step 4: Install and Configure the Alexa Voice Service on the Raspberry Pi
To install the Alexa voice service on the raspberry pi, we clone the alexa git hub repo by running:
git clone https://github.com/alexa/alexa-avs-sample-app.git
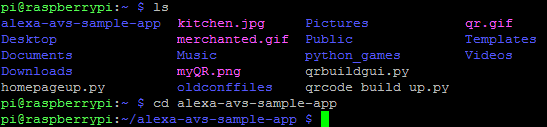
With the repo cloned, change into its directory by running;
cd alexa-avs-sample-app.git
We need to configure the Alexa voice service before running the installation. To do this, we edit the automated_install.sh file;
sudo nano automated_install.h
Fill in the required product ID, client ID and Client secret information as shown in the image below.
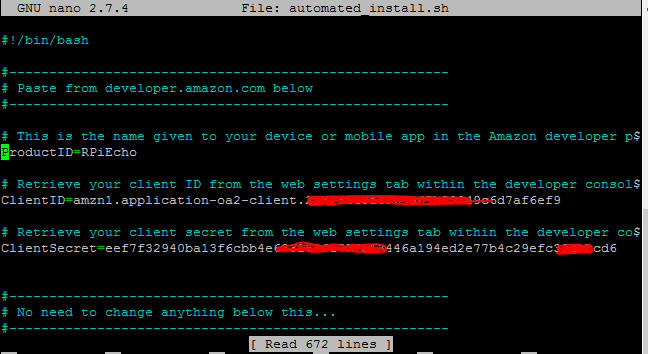
Use ctrl+x to save and exit the editor.
Next, we need to make the automated_install script an executable file so as to install it on the raspberry pi. To do this run;
Sudo chmod+x automated_install.h
After which we run the installation using;
./automated_install.h
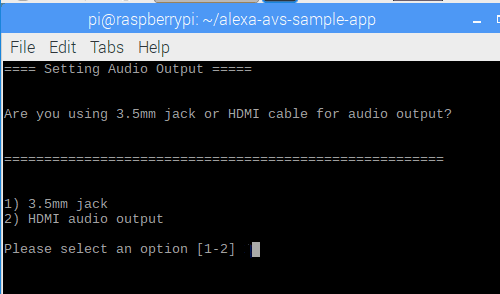
This will install the Alexa voice service on the pi. During the installation, some questions will arise that you will have to provide answers to.
You will also be asked to select the audio output amongst the questions, ensure to select the 3.5mm audio jack.
This might take a while but after it, you will have the Alexa voice service installed.
Step 5: Get the companion app and start AVS Client:
Before starting the AVS, we need to get the companion app up and running. The companion app serves as some sort of gateway to allow interaction between our client and the AVS server.
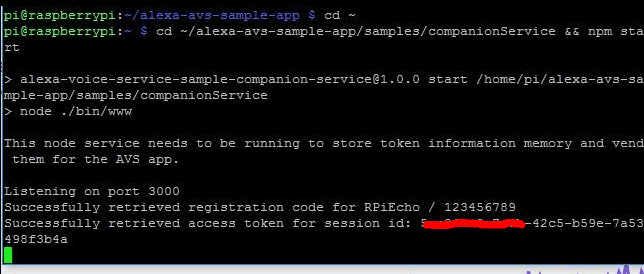
To start the companion, we need to change into the avs sample app directory and run the accompanying companion service. This can be done by running:
cd ~/alexa-avs-sample-app/samples/companionService && npm start
With the companion service running, we need to start the AVS client, to do this, we open a new terminal without closing the one on which the companion service is running.
On the new terminal, invoke the AVS client by running;
cd ~/alexa-avs-sample-app/samples/javaclient && mvn exec:exec
Immediately you run the command, you should see a pop up (shown below) that asks you to authenticate the device copy the link and paste in a web browser or click the yes button.
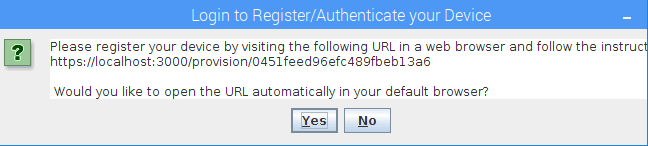
Once yes has been clicked, do not click the ok button on the next dialog box that will pop up until you have completed the authentication on the web page.
The web browser might raise a flag and declare the link insecure, but advance. The link will lead you to the amazon developer account login page, once you sign in, you will be redirected to a page(shown below) that confirms authentication.
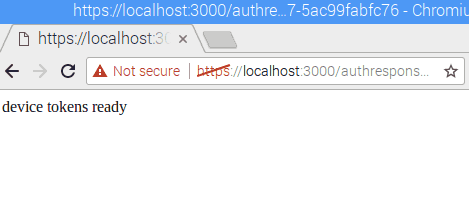
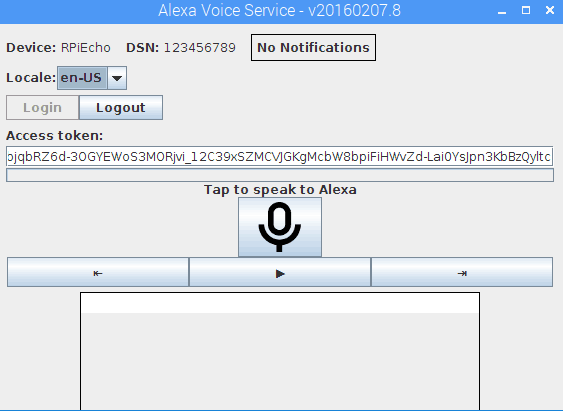
You can now click the okay on the dialog box I mentioned earlier. With this, Alexa is ready for use, all the buttons on the client dialog box will now be enabled so you can click to issue commands to Alexa and get a response.
Step 6: Activate Alexa wake word:
The last thing we will be covering in this tutorial is activating the sensory Alexa wake word agent, you will agree with me that having to click a button all the time to communicate with Alexa is sort of not cool. While different wake agent exists, for this project, we will be using the Sensory Alexa wake word agent. The wake agent will run in the background, waiting for us to mention the wake word “alexa”, once it hears the wake word, it instructs our Alexa client to start listening for commands.
To install the wake word agent, with the client terminal still up, run the command below on a new terminal:
cd ~/alexa-avs-sample-app/samples/wakeWordAgent/src && ./wakeWordAgent -e sensory
if everything is as it should be, you should get a response like the one below.
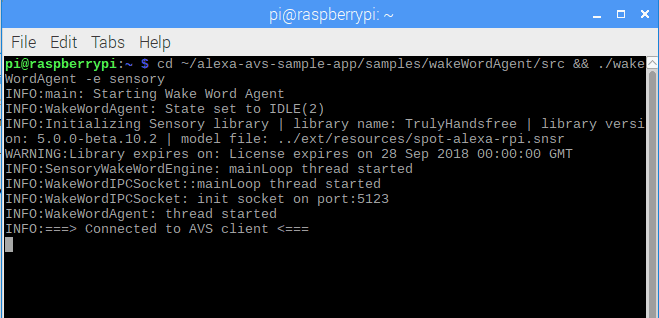
With this you should be able to get Alexa to listen to you by saying the alexa wake word.
That’s it for this tutorial guys, there are several other things you can load up on your DIY raspberry pi amazon echo, I will try to cover most of them in next few tutorials if time permits. Take the project for a spin and let me know how it goes.
Also, check our other similar Raspberry Pi projects:
Comments
It is "sudo chmod+X automated
It is "sudo chmod+X automated_install.sh"
Problem installing
Hello,
I have tried installing this on a pi 3 running stretch. When I run this command,
cd ~/alexa-avs-sample-app/samples/javaclient && mvn exec:exec
I get a bunch of errors. I am installing on a clean o.s. And it stops. i did go step by step,
But still havent figured out the problem. Any help would be apprecitated.
Here are the errors
[INFO] --- exec-maven-plugin:1.2.1:exec (default-cli) @ sample-java-client ---
--disable-quic --enable-tcp-fast-open --disable-gpu-compositing --ppapi-flash-path=/usr/lib/chromium-browser/libpepflashplayer.so --ppapi-flash-args=enable_stagevideo_auto=0 --ppapi-flash-version=
Fontconfig warning: "/etc/fonts/fonts.conf", line 160: blank doesn't take any effect anymore. please remove it from your fonts.conf
[1673:1673:0721/030306.382714:ERROR:gpu_process_transport_factory.cc(1029)] Lost UI shared context.
[1673:1808:0721/030306.649003:ERROR:object_proxy.cc(626)] Failed to call method: org.freedesktop.Notifications.GetCapabilities: object_path= /org/freedesktop/Notifications: org.freedesktop.DBus.Error.ServiceUnknown: The name org.freedesktop.Notifications was not provided by any .service files
[1673:1714:0721/030309.020877:ERROR:cert_verify_proc_nss.cc(944)] CERT_PKIXVerifyCert for localhost failed err=-8179
ATTENTION: default value of option force_s3tc_enable overridden by environment.
[1813:1813:0721/030309.398214:ERROR:sandbox_linux.cc(375)] InitializeSandbox() called with multiple threads in process gpu-process.
[1673:2057:0721/030312.193922:ERROR:object_proxy.cc(626)] Failed to call method: org.freedesktop.DBus.Properties.Get: object_path= /org/freedesktop/UPower: org.freedesktop.DBus.Error.ServiceUnknown: The name org.freedesktop.UPower was not provided by any .service files
[1673:2057:0721/030312.194976:ERROR:object_proxy.cc(626)] Failed to call method: org.freedesktop.UPower.GetDisplayDevice: object_path= /org/freedesktop/UPower: org.freedesktop.DBus.Error.ServiceUnknown: The name org.freedesktop.UPower was not provided by any .service files
[1673:2057:0721/030312.196310:ERROR:object_proxy.cc(626)] Failed to call method: org.freedesktop.UPower.EnumerateDevices: object_path= /org/freedesktop/UPower: org.freedesktop.DBus.Error.ServiceUnknown: The name org.freedesktop.UPower was not provided by any .service files
Thank you...
Problem with sensor
Hi,
I finally got it working..Except for the wake word. I even copy and pasted your command. Do you have any suggestions? I have followed directions, But am unable to get wake word working. The error i am getting is: Error happened in main loop of sensory wake word snsrRun(): task: Input channel audio-pcm: Alsa error: no such file or directory
INFO: sensorywakewordengine: mainloop thread ended
Any help would be appreciated.
Thank you..
How you solved exec:exec?
Hey Rob U,
could you please explain how you solved the first issue with Lost UI shared context?
Thanks!
I am stuck at this point:
everything before this command went well (i guess),
when i enter this command in a terminal:
cd ~/alexa-avs-sample-app/samples/companionService && npm start
i get a reply:
bash : npm: command not found
what do i do?
everything before this
-
everything before this command went well (i guess),
when i enter this command in a terminal:
cd ~/alexa-avs-sample-app/samples/companionService && npm starti get a reply:
listening on port 3000and didnt show me anything
what do i do?
-
Repository not Found
Steps were going good until
git clone https://github.com/alexa/alexa-avs-sample-app.git
I get a fatal error for repositor not found...Thoughts??
Use this command instead
Use this command instead
git clone https://github.com/Howchoo/alexa-avs-sample-app.git
Can I get some published
Can I get some published papers on this project??

Sudo chmod+x automated_install.h
this command is not working
can you fix this?