
If you are looking for a beginners guide on “How to start with 8051 Microcontroller”, here in this article I will show you how to work with 8051 microcontroller practically. I am not going into detail of “What is 8051 microcontroller”, or “How to write a c-program” etc., but the scope of this article is to tell about the hardware and software which are needed to work with microcontroller and how to use them.
But before going into detail we can briefly summarize about 8051 microcontroller. It is a 40 Pin device, and has 4 ports, each port consists 8 pin, Means 4X8=32 pins. These pins are used to input/output operation, some Pins have dual functions like timer, interrupts etc. Among these 32 pins, two pins are for power supply and ground (pin 40 and 20), two pins to connect crystal oscillator (pin 18, 19), 3 pins to connect external memory (pin 29, 30, 31) and one pin for Reset function (Pin 9).
It has two types of memory RAM and Flash memory (EEPROM), they have different sizes according to microcontroller like RAM is 256 Bytes and Flash is 8K for AT89S52. After going through this article, you can go ahead with “LED Interfacing with 8051 Microcontroller”, to get a good idea about 8051 microcontroller.
IDE for Programming
I am assuming that you are aware about the basic electronics components, wires, breadboard, battery etc, so I am directly heading to 8051 Microcontroller.
Now first we need a C program to run microcontroller, so that we can program it and it will work according to program. So we need an IDE (Integrated development environment) to write and compile the program, there are many editor available but unarguably the best IDE is “keil uVision IDE”. In Keil uvision you can write, compile, debug and run a program. There are the steps to use Keil uvision:
- Download latest keil uvision4 and install the program.
- Go to Project and select ‘New uVision Project’, give it a name and save it. You will find ‘Target 1’ and ‘Source Group 1’ folder structure in the left side.
- Right click on Target 1, select “Options for Target Target 1”, click on Output tab and check the checkbox ‘Create HEX file’ then click OK.

- Click on File menu and click on ‘New’, write c program and save it with .c extension like ‘led_blinking.c’ (usually in same folder in which we create uVision project)
- Right click on ‘Source Group 1’ select ‘Add files to Group Source Group 1’ and select your c program file and click ‘Add’ then click ‘Close’.

- Now go to Project menu and click on ‘Rebuild all target Files’ or click on button as shown in above figure. In output window, you can check for any Error and Warning. It also create HEX file in same folder as c program file. We need this HEX file to program 8051 chip, explained in next section.
So at the end of this section, we have the HEX file of c program which we want to run through 8051 microcontroller.
Burning the 8051 Microcontroller
This is also called “Programming the microcontroller” or “transferring program to microcontroller”. Here we should note that microcontroller doesn’t understand the c-program or high-level language, that’s why we need a HEX file. HEX file is in machine level language, which microcontroller understands. For this purpose we have checked the “Create HEX file” in step 3 above to generate the HEX file. Now we have HEX file and 8051 chip, but how to transfer it? For that purpose we need a hardware which is called ‘Burner’ or ‘Programmer’.
There are many types of Burner hardware available in the market, and we can also build it, you can find many tutorials on the Internet on “Building the 8051 burner”. But if you are a beginner, I recommend you to buy instead of building. They are available in the market at reasonable price ($5 to $10). ISP (In System Programming) is the simple and best way to program the microcontroller. In ISP programmer, you do not need to take out the microcontroller from breadboard each time to program it.
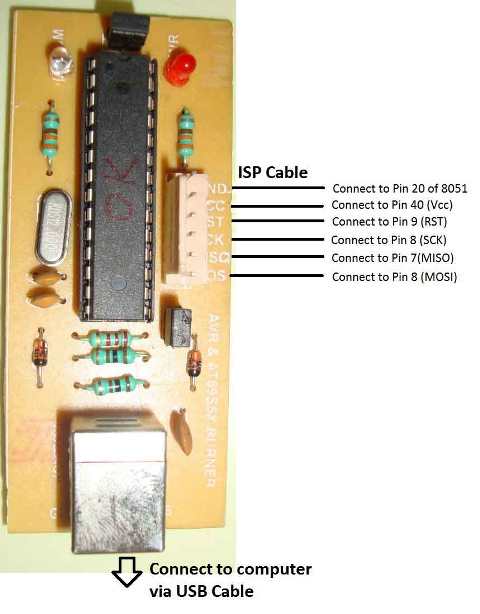
It’s very easy to connect with 8051 microcontroller, simply connect MOSI (data input) line to MOSI of 8051, MISO (data output) line to MISO and so on, like in below diagram. It can be connected through ISP cable. And connect USB cable to computer.
So after all the connections, how we will transfer the code to microcontroller? For that we need Burner software which will burn the Flash memory of 8051 chip. There are many softwares available like Flash magic, ProgISP etc. I recommend ProgISP, Below is the snap shot of ProgISP software. Here are Steps to burn:
- Download ProgISP and install drivers, run the .exe file.
- Check the checkboxes according to diagram.
- Select your chip from ‘Select Chip’ dropdown,
- Click on File menu, select Load Flash, select your HEX file click Open,
- And finally click on Auto button in ProgISP. It will burn you program into chip.

Remember PROGISP icon should be active, if it is inactive or grey, means drivers haven’t been installed properly or there is some problem.
You may find some problem to install the driver in Windows 7, vista and 8, you can find solution here. Or you can use some other software to burn 8051 Microcontroller.
What's next?
Once you get started with 8051 microcontroller, start working on some 8051 microcontroller projects. Here are few experiments for beginners:
- LED Interfacing with 8051 microcontroller
Comments
Programmer error
When i try to programme using USBasp programmer and PROGISP,
It shows error saying :"CHIP ENABLE Programme ERROR". What should I do?
Please tell me.
Thank You in Advance.
Select the Chip which you are
Select the Chip which you are using, and follow the tutorial carefully. Try removing the Reset pin once.
I did select the right chip i
I did select the right chip i.e 89s51. I followed tutorial completely and followed all instructions. In PROGISP, in its zip folder, I found a pdf. In that (it was in chinese or some other language) I found a circuit connecting isp to 89s51. Altough I tried it, It FAILS!!. Please suggest the method you tried.
Thank You .
if you want i can send you screen shot of my pc.
Which burner are you using,
Which burner are you using, make sure your burner is compatible for the 8051 series you are using. Also have you tried to burn after removing Reset Pin?
generating hex file
how much clock i need to select in keil when i am generating hex file by default it is 33.0mhz do i need to keep as it is or what i need to put
IT depends on what crystal
IT depends on what crystal you are using in your hardware

Muy buenas tengo unas preguntas, ¿el microcontrolador 8051se puede programar con un arduino uno, como puedo hacerlo?