

Adding sounds or music to our project will always make it looks cool and sounds much more attractive. Especially if you are using an Arduino and you have lots of pins free, you can easily add sound effects to your project by just investing in an extra SD card module and a normal speaker. In this article I will show you how easy it is to Play music/add sound effects using your Arduino Board. Thanks to the Arduino community who have developed some libraries to build this in a fast and easy way. We have also used IC LM386 here for amplification and noise cancelation purpose.
In this project, we will play the .wav music files stores in an SD card. We will program the Arduino to read these .wav files and play the audio on a speak through an LM386 Audio amplifier. Now, since this code could only read .wav files, technically this project cannot be called as an Arduino Mp3 Player, but hey you will still be able to hear songs with it. If you are looking for simple alternatives like an Arduio music player without SD card, you should check out the Arduino melody player which we have built earlier.
Hardware Required:
- Arduino UNO
- SD Card Reader module
- SD card
- LM386 Audio Amplifier
- 10uf Capacitor (2 Nos)
- 100uf Capacitor (2 Nos)
- 1K,10K Resistor
- Push buttons (2 Nos)
- Breadboard
- Connecting Wires
Getting ready with your WAV audio files:
For playing sounds from SD Card using Arduino, we need audio files in .wav format because Arduino Board can play an audio file in a specific format that is wav format. To make an arduino mp3 player, there are a lot of mp3 shields are available which you can use with arduino. Or else to play mp3 files in arduino, there are websites which you can be used to convert any audio file on your computer into that specific WAV file.
So to convert any audio file into wav format, follow the below steps:
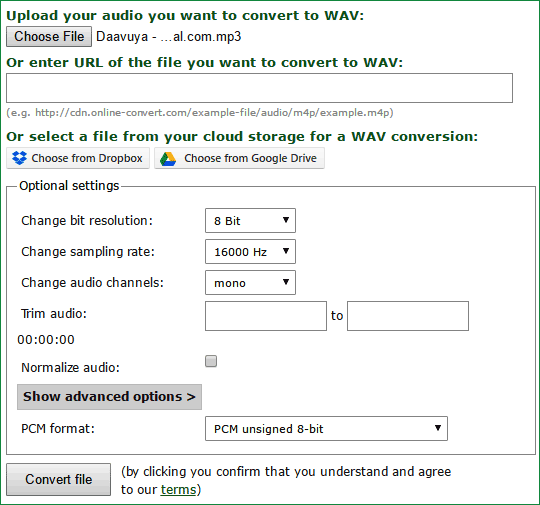
Step 1: Click on “Online Wav Converter” to enter into the website.
Step 2: Arduino can play a wav file in the following format. You can toy around with the settings later, but these settings were experiment to be the best in quality.
|
Bit Resolution |
8 Bit |
|
Sampling Rate |
16000 Hz |
|
Audio Channel |
Mono |
|
PCM format |
PCM unsigned 8-bit |
Step 3: In the website click on “choose file” and select the file you want to convert. Then feed in the above settings. Once done it should look something like this in the below image
Step 4: Now, click on “Convert File” and your Audio file will be converter to .Wav file format. It will also be downloaded once the conversion is done.
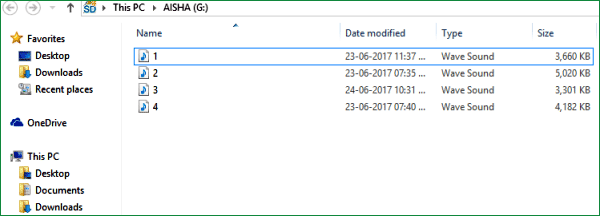
Step 5: Finally format your SD card and save your .wav audio file into it. Make sure you format it before you add this file. Also remember the name of your audio file. Similarly you can select any of your four audios and save them with names 1, 2, 3 and 4(Names should not be changed). I have converted four songs and have saved them as 1.wav, 2.wav, 3.wav and 4.wav like shown below.
Circuit and Hardware:
Circuit Diagram for this Arduino Audio File Player is simple. The complete circuit diagram is shown in the Image below.

As we know our audio files are saved into the SD card, hence we interface a SD card reader module with our Arduino. The Arduino and SD card communicate using the SPI communication protocol. Hence the Module is interfaced with the SPI pins of the Arduino as shown above in the diagram. It is further listed in the table below.
|
Arduino |
SD card module |
|
+5V |
Vcc |
|
Gnd |
Gnd |
|
Pin 12 |
MISO (Master In Slave out) |
|
Pin 11 |
MOSI (Master Out Slave In) |
|
Pin 13 |
SCK (Synchronous Clock) |
|
Pin 4 |
CS (Chip Select) |
Now the Arduino will be able to read the music file from the SD card and play it on the pin number 9. But the audio signals produced by the Arduino on pin 9 will not be audible much. Hence we amplify it by using the LM386 Low voltage Audio amplifier IC.
The amplifier shown above is designed for a Gain of 200 and the Vdd (pin 6) is powered by the 5V pin of the Arduino. If you want to increase/decrease the sound you can increase/decrease the voltage provided to this pin. It can withstand a maximum of 15V. Learn more about this 200 gain amplification configuration for LM386 here.
We also have two push buttons connected to the pin 2 and 3 of the Arduino. These switches are used to play the next track of the song and play/pause the music respectively. I have used these buttons just to demonstrate its abilities; you can play the song whenever required. Check the Demo Video at the end.
You can assemble this circuit completely over a Breadboard as shown in the picture below

Programming your Arduino:
Once we are ready with the Hardware and the SD card, we are just one step away playing those songs. Insert the card into your SD card module and follow the steps below.
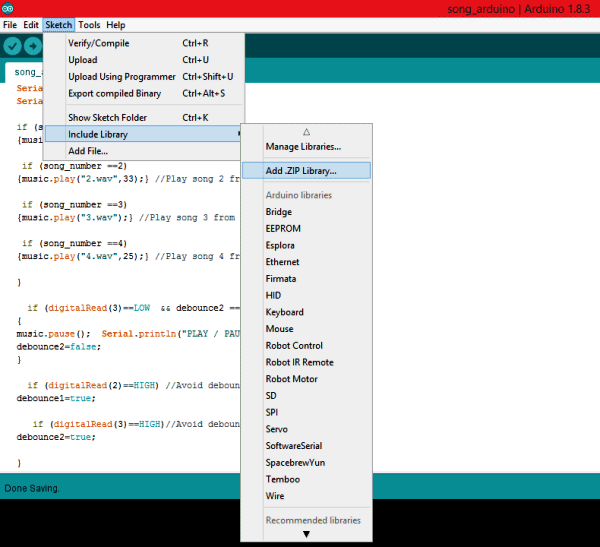
Step 1: As said earlier we will be using a library to make this project work. The link for the library is given below. Click on it and select “Clone or download” and choose download as ZIP.
Step 2: Add this Zip file into your Arduino IDE by selecting Sketch->Include Library -> Add .ZIP Library as shown below and select the ZIP file that we just downloaded.
Step 3: The complete program of the arduino music player project is given at the end of this article, simply copy it and paste it in the Arduino Program. Now, click on Upload and get ready to play your audio files.
The program is self explanatory since they have the comment lines. But, I have also explained the ability of the TMRpcm library below.
Playing an audio file:
You can play any audio that is stored in Wav format inside the SD card module by using the line below.
music.play("3.wav");
//object name.play (“FileName.wav”);
You can use this line at places where you want to trigger the Audio
Pause an audio File:
To pause an Audio file, you can simply call the line below.
music.pause();
//objectname.pause();
Forwarding/Rewinding an Audio:
There are not direct ways to forward or rewind an Audio file, but you can use the line below to play a song at a particular time. This can be used to forward/rewind with some additional programming.
music.play("2.wav",33); //Plays the song from 33rd second
//objectname.play(“Filename.wav”,time in second);
Setting the quality of the audio:
The library gives us two qualities to play the music, one is to play as normal mode the other to play with 2X oversampling.
music.quality(0); //Normal Mode
music.quality(1); //2X over sampling mode
Setting the Volume of the audio:
Yes, you can control the volume of the audio through software. You can simply set the volume by using the line below. Higher music volumes tend to affect the quality of the audio, hence use hardware control when possible.
music.setVolume(5);        //Plays the song at volume 5
//objectname.setVolume(Volume level);
Working of this Arduino Music Player:
After programming your Arduino simply press the button connected to pin 2 and your Arduino will play the first song (saved as 1.wav) for you. Now you can press the button again to change your track to the next song that is to play 2.wav. Likewise you can navigate to all four songs.
You can also play/Pause the song by pressing the button connected to pin 3. Press it once to pause the song and press it again to play it from where it stopped. Watch the video below for complete working (or maybe to relax yourself with some songs).

Hope you enjoyed the project. Now it is up to your creativity to use them in your projects. You can make a speaking clock, voice assistant, talking robot, voice alert security system and much more. Let me know how you are planning to use it through the comment section and also if you have any problems in getting this thing work you can reach me through the forums or the comment section below.
Complete Project Code
/*

Arduino Based Music Player
 This example shows how to play three songs from SD card by pressing a push button
 The circuit:

 * Push Button on pin 2 and 3

 * Audio Out - pin 9

 * SD card attached to SPI bus as follows:

 ** MOSI - pin 11

 ** MISO - pin 12

 ** CLK - pin 13

 ** CS - pin 4
 created  25 Jun 2017

 by Aswinth Raj
 This example code was created for CircuitDigest.com
 */


#include "SD.h" //Lib to read SD card

#include "TMRpcm.h" //Lib to play auido

#include "SPI.h" //SPI lib for SD card
#define SD_ChipSelectPin 4 //Chip select is pin number 4

TMRpcm music; //Lib object is named "music"
int song_number=0;

boolean debounce1=true;

boolean debounce2=true;

boolean play_pause;
void setup(){

music.speakerPin = 9; //Auido out on pin 9

Serial.begin(9600); //Serial Com for debugging

if (!SD.begin(SD_ChipSelectPin)) {

Serial.println("SD fail");

return;

}
pinMode(2, INPUT_PULLUP); //Button 1 with internal pull up to chage track

pinMode(3, INPUT_PULLUP); //Button 2 with internal pull up to play/pause

pinMode(3, INPUT_PULLUP); //Button 2 with internal pull up to fast forward
music.setVolume(5);    //   0 to 7. Set volume level

music.quality(1);        //  Set 1 for 2x oversampling Set 0 for normal

//music.volume(0);        //   1(up) or 0(down) to control volume

//music.play("filename",30); plays a file starting at 30 seconds into the track

}
void loop()

{


  if (digitalRead(2)==LOW  && debounce1 == true) //Button 1 Pressed

  {

  song_number++;

  if (song_number==5)

  {song_number=1;}

  debounce1=false;

  Serial.println("KEY PRESSED");

  Serial.print("song_number=");

  Serial.println(song_number);
  if (song_number ==1)

  {music.play("1.wav",10);} //Play song 1 from 10th second
  if (song_number ==2)

  {music.play("2.wav",33);} //Play song 2 from 33rd second
  if (song_number ==3)

  {music.play("3.wav");} //Play song 3 from start
  if (song_number ==4)

  {music.play("4.wav",25);} //Play song 4 from 25th second
  if (digitalRead(3)==LOW  && debounce2 == true) //Button 2 Pressed

  {

  music.pause();  Serial.println("PLAY / PAUSE");

  debounce2=false;

  }
  if (digitalRead(2)==HIGH) //Avoid debounce

  debounce1=true;
  if (digitalRead(3)==HIGH)//Avoid debounce

  debounce2=true;

}
}
Comments
The part list says you need a
The part list says you need a 10uF and 100uF capacitor but the diagram shows 1uF and 10uF in the circuit....which is the correct combination?
Both will work
Hi Pat,
I have tested the circuit will both the combinations and they worked fine. You can use either one and the performance will be the same.
-/+ inverted
hey, I see in your fritzing pic you put the ground in the + line and the + in the ground line, but the speaker's black wire is connected to the breadbard's blue line (where is connected 5V) and the red wire to the red line (where is connected gnd). Where should I connect amplifier pins?
Follow the circuit diagram.
Yes the firtzing pic has a small representation problem. But, the connections are correct and will work as expected.
I have mistakenly swapped the positive and ground rails (representation) of the breadboard with the actual positive and ground rails of the circuit. This will not be a problem since the logic of the connection remais the same.
but the speaker's black wire is connected to the breadbard's blue line (where is connected 5V) and the red wire to the red line (where is connected gnd).No, You have completely misunderstood the circuit. The upper positive and ground rails are only powered by +5V and ground. The lower potive and ground rails have not other connection other than the speaker itself.
You can know more about audio amplifier circuit from here. https://circuitdigest.com/electronic-circuits/lm386-audio-amplifier-circuit
help
Hi I had one other comment but it has not posted yet so please disregard it. I'm getting the following error how should I resolve it? /Users/milesrichie/Documents/Arduino/sketch_sep10a/sketch_sep10a.ino: In function 'void loop()':
/Users/milesrichie/Documents/Arduino/sketch_sep10a/sketch_sep10a.ino:54:25: warning: deprecated conversion from string constant to 'char*' [-Wwrite-strings]
{music.play("1.wav",10);} //Play song 1 from 10th second
^
/Users/milesrichie/Documents/Arduino/sketch_sep10a/sketch_sep10a.ino:56:25: warning: deprecated conversion from string constant to 'char*' [-Wwrite-strings]
{music.play("2.wav",33);} //Play song 2 from 33rd second
^
/Users/milesrichie/Documents/Arduino/sketch_sep10a/sketch_sep10a.ino:58:22: warning: deprecated conversion from string constant to 'char*' [-Wwrite-strings]
{music.play("3.wav");} //Play song 3 from start
^
/Users/milesrichie/Documents/Arduino/sketch_sep10a/sketch_sep10a.ino:60:25: warning: deprecated conversion from string constant to 'char*' [-Wwrite-strings]
{music.play("4.wav",25);} //Play song 4 from 25th second }
^
Sketch uses 12676 bytes (39%) of program storage space. Maximum is 32256 bytes.
Global variables use 1118 bytes (54%) of dynamic memory, leaving 930 bytes for local variables. Maximum is 2048 bytes.
avrdude: ser_open(): can't open device "COM1": No such file or directory
Problem uploading to board. See http://www.arduino.cc/en/Guide/Troubleshooting#upload for suggestions.
Hi Miles, The above problem
Hi Miles, The above problem is not because of the program but because of your PORT settings. As the error states "can't open device "COM1": No such file or directory" Meaning you have either not selected the correct COM port or have not connected Arduino to PC properly. Try uploading a Blink program to verify your settings before trying this program. Thanks!
I have the same problem ,,
I have the same problem ,, have you solved it??
Project with Arduino Mega 2560 without buttons
Hey!! can you please update this project with arduino mega board without the buttons which you've used in this circuit.Also if I removed the buttons is it possible to play multiple files ?
HeadPhones
Will this work without the LM386 and go direct to head phones?
Yes Luke, LM386 circuit is
Yes Luke, LM386 circuit is only for the speaker
pololu MicroSD module
Hi,
I was able to purchase pololu microSD card breakout board with a 3.3V regulator and level shifters and I am getting error (SD Fail)
Is it related to Module vendor ?
Best regards
Noam
So you have a 3.3V module
So you have a 3.3V module with 5V level shifter right?
Make sure the level shifter is working by manually measuirng voltage.
The can be either because of your connections or because of your module
warning
Hi. i got this error /Users/milesrichie/Documents/Arduino/sketch_sep10a/sketch_sep10a.ino: In function 'void loop()':
/Users/fitrihanun/Documents/Arduino/sketch_sep10a/sketch_sep10a.ino:54:25: warning: deprecated conversion from string constant to 'char*' [-Wwrite-strings]
{music.play("1.wav",10);} //Play song 1 from 10th second
^
/Users/fitrihanun/Documents/Arduino/sketch_sep10a/sketch_sep10a.ino:56:25: warning: deprecated conversion from string constant to 'char*' [-Wwrite-strings]
{music.play("2.wav",33);} //Play song 2 from 33rd second
^
/Users/fitrihanun/Documents/Arduino/sketch_sep10a/sketch_sep10a.ino:58:22: warning: deprecated conversion from string constant to 'char*' [-Wwrite-strings]
{music.play("3.wav");} //Play song 3 from start
^
/Users/fitrihanun/Documents/Arduino/sketch_sep10a/sketch_sep10a.ino:60:25: warning: deprecated conversion from string constant to 'char*' [-Wwrite-strings]
{music.play("4.wav",25);} //Play song 4 from 25th second }
^
"TMRpcm WITH ATMEGA 8
hI,can i use this library with atmega 8 mcu.I tried it but it shows some error.like "exit status 1
Error compiling for board Arduino NG or older."
Sorry ANAND,
Sorry ANAND,
The libraries will not support Atmega8, you should have to upgrade your hardware for this project
reset
Mr Raj. it was a wonderful example. I am thinking to revise the code, but this time using only a single button to turn on and off the music. Here is what i want, im going to used a toggle switch ( on and off). When the button is closed(permanently closed) ,the music will play. When the button is press again the button will be open and the music will stop. However, i wanted to play the music from start again when the button is closed again. Can you help me on this. many thanks
RE: play file from flash
Hello,
Has anyone tried playing the wav clip stored in onboard flash, without the sd card?
Thanks
Hi Bitman,
Hi Bitman,
I have not tried it yet. But yes it should work even without a SD card module
Hi, I am looking to build
Hi, I am looking to build something like this, but with an option to play one of four .wav files. Is it fairly simple to instead have four buttons to play an audio track, and another to stop. Pressing of any button halting any other .wav file and playing just the programmed .wav file?
Would appreciate any help as it is for a non-profit group that I help out
arduino player
Sir, Will you please give me a sample coding for arduino program to play the audio files one by one at exact pre- scheduled time interval and switch off as the song ends.
Nothing happening
hi i think ive wired everything correctly but no sound is coming out except an occasional tap? and my lm386 chip is getting really hot.
im trying to make it so that i can move the buttons off away from the breadboard if possible.
update the heating problem is
update the heating problem is fixed but no music is playing when i press the buttons only a tap. checked sd card is being read ok and files are found but still cant get music to play. any suggestions would be helpful
ok final update before my
ok final update before my head explodes!
im getting a warning about the files when i compile which reads;
warning: deprecated conversion from string constant to 'char*' [-Wwrite-strings]
{music.play("1.wav");}
repeats for other files
ive looked on the forums and responses just make me more confused as i dont know how to apply the changes they suggest out of the context theyre suggested in. (if that makes sense)
something along the lines of making the song files constants?
could this be why my files wont play?
I not sure how you ended up
I not sure how you ended up on his error. But was the code working for you properly the first time. I assume the Amplifier was heating mostly because of a wrong connection. When you rectified the correction the IC might have been completely burnt. So try replacing the IC, incase if you dont have one ignore the amplifier part they will still work just fine but sound will be low. I tried compiling the same code given here, yet dint get the error you are speaking about
Hi. How is it possible to for
Hi. How is it possible to for arduino to give smooth analog signal for music since it can only produce pwm? Can you answer me please. I am confused.
It is because of the library
It is because of the library
TMRpcm.h
This produces analog signal to play music. You have dive deep into how the library works to understand how the signal is produced.
Hello Mr. Raj.
Hello Mr. Raj.
I was successful in doing the same. However, everytime i press the buttton to play the music i can a loud ticking sound in which i believed coming from the switch. Is there anyway i can eliminate this "click" sound.
Thanks
Yes you can add a delay after
Yes you can add a delay after every time the arduino reads the switch
some doubt on your project
I am use the headset if u need any amplification
No i don't think you will
No i don't think you will need amplification for Headphones. Let me know how it turns out !
Regarding files not plays
Default test file provided in library plays well.But another file not playes properly even i have convered as per your suggestion like
1. into .wav
2.sample :1600Hz
3.Channel :Mono
4.Bits 8
Advance pcm format :PCM unsigned 8 bit
Not play properly in the
Not play properly in the sense? Are you getting wired sounds? or is it just mute?
what kind speaker you use in this project ?
hello sir my name is awan first sorry to interrupt your time, what kind a speaker when you use in this project because from this tutorial I can't rise up my volume and noise everywhere when I play the music
thanks
You can use any speaker, you
You can use any speaker, you can also use your computer speakers.
Try with a simple speaker first, if you are satisfied remove the small speaker and replace it with a bigger one. The model of speaker will not affect the working of the circuit. All the best
Regarding errors
SD fail
KEY PRESSED
song_number=1
PLAY / PAUSE
(in serial monitor)
the memory card is ok and formatted also.
I am getting this errors
please reply for me as soon as possible
These are not errors, this
These are not errors, this means that your buttons are not wired properly check your connections
Hello. I have the same
Hello. I have the same problem. The buttons are connected as shown, with one pin to pin2, respectively pin3 from Arduino, and another pin from both of them to GROUND. The other pins are left unconnected.
hey thanks, but i have a
hey thanks, but i have a problem ....... when i push the push button first time , track 1 play but when i push it the second ,track 2 didn't play please tell me why and thank you
Sounds odd, it should have
Sounds odd, it should have played. Make sure the button is working properly
The code has a "}" in the
The code has a "}" in the wrong place. Move the second to last "}" above the line "if (digitalRead(3)==LOW && debounce2 == true) //Button 2 Pressed"
Can you specify where the
Can you specify where the error is in the fritzing diagram? I am trying to build this circuit based off the fritzing, but earlier comments make is seem like the fritzing is inaccurate.
You can build it, if you have
You can build it, if you have any problem use the forum. The circuit diagram is good
It plays only noise .No
It plays only noise .No playback.what can be the error??
Output low pass filter?
Hi, thanks for posting this project. I have a question. What's the purpose of putting a 10k resistor in series with a 10uF capacitor to ground at the output? Usually a low resistance (10ohm) and low capacitance (0.05uF) are used in that manner to filter out high frequencies. I think that way you filter out also desired frequencies. Let me know please. Thank you.
Can you please CLEARLY
Can you please CLEARLY specify where the errors are in the breadboard diagram? I am having trouble building the circuit and would like to use the breadboard diagram instead of the schematic. Are there any errors in the schematic, or can I build safely off of that?
Adding Stop button with the project
Hi,
You have done a very good job. I am also doing a project like this. I want to add one more button for stopping the music. I tried with the "audio.stopPlayback(); " function . But is not working properly. Do have any idea how to fix this?
Say, in your current project if you add one more button then what will be the code for stopping the music?
Difficulty in initialisation of sd card
Hi. We are currently working on a project to convert ASL into normal speech using Arduino mega 2560. The code and the connections are exactly as given on various sites (CS pin 53 on mega), but at each time it is failing to initialise. Please help us if possible! Thank You
Which code and circuit are
Which code and circuit are you using? I used the one given here and dint find any problem? What error are you facing? What do you mean by failing to initialise?
I connected everything and
I connected everything and put code on arduino but it doesnt play the music. You can just hear some noise, buttons do nothing, Whats the problem?
Regrading the audio output.
hlo, I have tried all the things u have mentioned in ur list. But v r unable to get the audio from the speaker. We hve used a 3ohm speaker. We are getting mgs on monitor screen as"KEY PRESSED
song_number=1". And no any sound is heard. Can u plz help us out wdt this issue.
If you are getting this
If you are getting this message it means the code is working properly. The problem is most likely on your hardware share a pic of your set-up that might help to figure out the problem
We have replaced the
We have replaced the amplifier circuit with the lm386 module directly. Can you please share the pin connection diagram. Because yet we are getting the same message.
is it possible to use a lm358
is it possible to use a lm358 istead of lm386
Yes you can also use a lm358
Yes you can also use a lm358 in place of lm386. The circuit will vary a bit, google for LM358 amplifier circuits and you will get one.
Also you can make this project even without the amplifier part
memory requirements?
How much Arduino microcontroller memory does this project use?
Just complie the program on
Just complie the program on the Arduino IDE and at the end of compilation read the logs and you will find the information your looking for
getting some errors
C:\Users\Acer\Documents\Arduino\sketch_mar21a\sketch_mar21a.ino: In function 'void loop()':
C:\Users\Acer\Documents\Arduino\sketch_mar21a\sketch_mar21a.ino:66:25: warning: deprecated conversion from string constant to 'char*' [-Wwrite-strings]
{music.play("1.wav",10);} //Play song 1 from 10th second
^
C:\Users\Acer\Documents\Arduino\sketch_mar21a\sketch_mar21a.ino:69:25: warning: deprecated conversion from string constant to 'char*' [-Wwrite-strings]
{music.play("2.wav",33);} //Play song 2 from 33rd second
^
C:\Users\Acer\Documents\Arduino\sketch_mar21a\sketch_mar21a.ino:72:22: warning: deprecated conversion from string constant to 'char*' [-Wwrite-strings]
{music.play("3.wav");} //Play song 3 from start
^
C:\Users\Acer\Documents\Arduino\sketch_mar21a\sketch_mar21a.ino:75:25: warning: deprecated conversion from string constant to 'char*' [-Wwrite-strings]
{music.play("4.wav",25);} //Play song 4 from 25th second
^
Mr Raj, Thank you very much
Mr Raj, Thank you very much for this project. I found this is very useful and cost saving (no buying mp3 shield), I will build mini music player for my kids.
thank you :)
Connections
Hey, there is something not clear in the circuit. Are pins 2 and 4 of the amplifier connected to the positive pin of the speaker? Because in the arduino picture it's not showing
sound
Hey, thanks a lot for the project! However, I am having trouble when the music starts playing, sometimes songs just start fast forwarding alone and skipping parts. Also the the code just stops sometimes when the skipping gets really bad. Is this a problem with the wires? or the sampling of my wav files?
hello, i just want to us if
hello, i just want to us if it is possible to control the speed of the stepper motor using the music mp3 plays? and how if it is possible, i need that on our project, i just want to know if it is possible because our professor want our project music box to control the rotation of the balerina through the beat of music, for example the music is upbeat therefore the balerina rotates fast and if the music is slow, the balerina rotates slowly. Thank you.
Can I attach servo & Bluetooth
Hello,
I want to attach HC05 Bluetooth to control song & servo with mobile. So what is code??
increasing volume
Hi, can you tell me how to increase the volume through hardware.can i do it either by changing capacitors or increase power to the circuit or any other ways you know? thanks!
Increasing the operating
Increasing the operating voltage of the Op-amp will help. If you are looking for more volume use a more powerful audio amplifier circuit
Simple Audio Amplifier Using Arduino
The errors occurred in the code given above is due to music.play() function typecasting is required in this function
music.play("4.wav",25);
Corrected function argument is:
music.play((char *)"4.wav",25);
can i use LM358/LM741 instead
can i use LM358/LM741 instead of LM386?
Yes cyrille you can also use
Yes cyrille you can also use LM358/LM741 as an amplifier but LM386 has a high gain and will work perfect for an audio amplifier. But still LM358/741 will also work
Nothing happens when power is on
I did everything on this page my professor checked it and said its good but when i power it on nothing happens.
Not everyone (even the
Not everyone (even the experienced) gets a circuit to work in the first try. Learn to debug a circuit when you don't get an output, this is an important skill in electronics. So break the circuit into smaller parts and check where the output is messing up.
In this case bypass the amplifier section and connect the speaker directly to check if you are getting any audio
About Capacitors
what are the alternative capacitors i can use for 1uF 25v capacitor?
hi, this is good, but how can
hi, this is good, but how can I change the buttons to have one play one track and the other to play all. thanks for your help
hey my friend, anyone have
hey my friend, anyone have bips sounds? when um push the bottom i have only the bips.
Hi, its not entirely clear to
Hi, its not entirely clear to me regarding the connections to the push buttons. Do both buttons have a connection to GND and then to the pins 2 and 3 respectively? So the idea is that pulling those pins to GND will trigger the appropriate function?
Thanks

Hi,
Just curious what speaker you are using for this project? It sounds very nice.
Pat