
Servo motors are very useful in electronics and embedded systems. You can find the use of Servo motor everywhere around you, they are used in toys, robots, CD tray of computer, cars, aeroplane etc. The reason of this wide scope is that, servo motor is very reliable and precise. We can rotate it to any particular angle. They are available in wide range, form high torque motor to low torque motors. In this tutorial we are going to interface a servo motor to 8051 microcontroller (AT89S52).
First we need to understand the working principle of servo motors. Servo motor works on PWM (Pulse width modulation) principal, means its angle of rotation is controlled by the duration of applied pulse to its Control PIN. Basically servo motor is made up of DC motor which is controlled by a variable resistor (potentiometer) and some gears. High speed force of DC motor is converted into torque by Gears. We know that WORK= FORCE X DISTANCE, in DC motor Force is less and distance (speed) is high and in Servo, force is High and distance is less. Potentiometer is connected to the output shaft of the Servo, to calculate the angle and stop the DC motor on required angle.
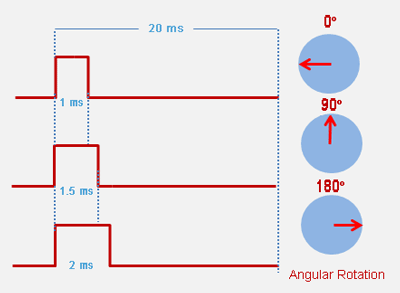
Servo motor can be rotated from 0 to 180 degree, but it can go up to 210 degree, depending on the manufacturering. This degree of rotation can be controlled by applying a LOGIC level 1 pulse for a duration between 1ms to 2ms. A 1 ms can rotate servo to 0 degree, 1.5ms can rotate to 90 degree and 2 ms pulse can rotate it to 180 degree. Duration between 1 to 2 ms can rotate Servo motor to any angle between 0 to 180 degree.
Circuit Diagram and Working Explanation

Servo motor has three wires Red for Vcc (power supply), Brown for Ground, and Orange is control wire. Control wire can be connected to 8051, we have connected it to Pin 2.1 of 8051. Now we have to keep this pin to Logic 1 for 1ms to rotate it 0 degree, 1.5ms for 90 degree, 2 ms for 180 degree. We have used on chip Timers of 8051 to create delay. We have created delay of 50us through the function “servo_delay”, and used “for” loop to create delay in multiple of 50us.
We are using Timer 0 and in Mode 1, so we have put 01H in TMOD register. Mode 1 is 16 bit timer mode and TH0 contain High byte and TL0 contain Low byte of 16 bit timer. We have put FFD2 in 16 bit timer register, FF in TH0 and D2 in TL0. Putting FFD2 will create the delay of approx. 50 us with the crystal of 11.0592MHz. TR0 and TF0 are the bits of TCON register, TR pin used to start timer when set and stop when reset(0). TF is overflow flag, set by hardware when overflow and need to reset it by software. Basically TF tells the completion of Timer, and set by hardware when 16 timer transit from FFFFH to 0000H. You can read about the “8051 Timers” to understand the calculation of value in timers registers, to create the 50 us delay.
Now when measured from CRO, 13 loops of servo_delay function will give the delay of 1ms, so we have started from 1ms (13 loops) and gone to 2 ms (26 loops) to rotate the servo from 0 to 180 degree. But we have slowly incremented the delay from 1ms, we have divided 1ms to 2 ms window into 7 parts like 1.14ms, 1.28 ms, 1.42ms and so on, so the servo will rotate in multiple of approx. 26 degrees(180/7). After 180 it will automatically return to 0 degree.
Complete Project Code
// C program for interfacing servo motor with 8051 microcontroller
#include<reg51.h>
sbit output=P2^0;
void msdelay(unsigned int time)  // Function for creating delay in milliseconds.
{
    unsigned i,j ;
    for(i=0;i<time;i++)
    for(j=0;j<1275;j++);
}
void servo_delay(int times)     // Creating Delay in multilple of 50us using 8051 Timers
{
    int m;
    for(m=0;m<times;m++)
    {
        TH0=0xFF;
        TL0=0xD2;
        TR0=1;
        while(TF0==0);
        TF0=0;
        TR0=0;
    }
}
void main()
{
    int n;
    TMOD=0x01;                // Selecting Timer 0, Mode 1
    output=0;
    while(1)
    {
        for(n=13;n<28;n=n+2)
        {
            output=1;
            servo_delay(n);
            output=0;
            servo_delay(260);
            msdelay(200);
        }
    }
}
Comments
Hi Murugan,
Hi Murugan,
This is clearly mentioned in last paragraph that 1ms delay can be created by passing 13 in servo_delay function and we are passing "n" in servo_delay(n); that means "for" loop inside servo_delay function will be executed 13 times to create a delay of 1ms (for 0 degree). Then again passed n+2, means 13+2 in servo_delay to create delay of 1.14ms to rotate the servo by 26 degrees then again increment it by 2 (13+2+2) for further 26 degrees rotation, and so on.
Hope its clear now.
sir can you please send me
sir can you please send me the assembly code for this program
servo motor coding from 8051
hy there i need some help...i was looking to rotate my motor 0-90°(when power is turn on) n then 90-0°(when power ids turn off). can any one hlp me in coding....?
servo program
sir I didn't understand about the last line mentioning servo delay (n) and servo delay (260) can u explain
To rotate the servo we need
To rotate the servo we need to provide HIGH signal for some time (1.5ms for 90 degree) and then low signal for some time. (20-1.5= 18.5ms for 90 degree). Check the diagram given, so servo delay (n) is for applying high logic and servo delay (260) for applying low logic to servo.
8051 assembly program
I tried to recreate this program in assembly program using a DXW90 micro servo motor.
The program only rotates the motor in steps withoutstopping it anywhere. Can anyone tell me what's wrong with it and how do I rotate the motor anticlockwise?
The program -
strt: mov r0,#13
loop1: setb p1.0
acall servo_delay
clr p1.0
acall servo_delay_260
acall delay
mov a,r0
add a,#2
mov r0,a
cjne r0,#19,loop1
sjmp strt
servo_delay: mov tmod,#01h
mov th0,#0ffh
mov tl0,#0d2h
setb tr0
back: jnb tf0,back
clr tr0
clr tf0
djnz r0,$
ret
servo_delay_260: mov th0,#0d1h
mov tl0,#32h
setb tr0
back1: jnb tf0,back1
clr tr0
clr tf0
ret
delay: mov r1,#20
here: mov th0,#0dbh
mov tl0,#0ffh
setb tr0
back2: jnb tf0,back2
clr tf0
djnz r1,here
clr tr0
ret
end
SERVO motor
hey Nikta,
did you find something about rotating the servo in reverse direction???
Aman, there is no clockwise
Aman, there is no clockwise or anti-clockwise direction for a servo motor. There are only degrees. For each duty cycle the motor will position itself at a degree as explained above
The servo_delay function
The servo_delay function gives delay in multiples of 50 us. So when we pass argument n = 13, it should logically be a pulse of (50 * 13)/1000 = 0.65 ms and not 1 ms as mentioned. Kindly clarify...
Hi. This is nithin. while I…
Hi. This is nithin. while I run this code the servo motor is rotating from -90° to +67°. So please help me in this to rotate from 0° to +180° please help me

hi this is murugan, i did not understand this line " for(n=13;n<28;n=n+2) , wil u pls explain ? y ur using n=13.......13?????????