

Raspberry Pi has always been fun and easy to build projects. Its powerful ARM architecture and open-source Linux based Operating System has help us a lot in getting our projects online in no time. In this tutorial we will learn another interesting way to share data (files/photos/videos/audios/text) between Raspberry Pi and our Mobile phone through a popular chat application called Telegram.
For those who are new to Telegram, it is a chat based application available in play store for Android (also available for Iphone and windows) that is very similar to Whatsapp. It has over 100 million downloads (as on 5-10-2017) on play store and people claim it to be faster and more functional than Whatsapp (fingers crossed). One special features of this application is that they support bots. Meaning this smart phone application can not only be used by Humans but also by machine. In our case the machine will be Raspberry Pi. Once you train Raspberry Pi on how to act as a bot, anyone (if you make it public) can chat with your Raspberry Pi like chatting to any normal person and even share Photos Pictures Documents and Audio files. You can even train it to be your own Personal assistant, sounds cool right? Lets learn how to build a Raspberry pi telegram bot.
Materials Required:
- Any Raspberry Pi connected to Internet
- A mobile running Telegram Application.
There is not much hardware involved in this project so relax on your chair with your Pi and follow the steps below. If you are new to Raspberry Pi then follow our Raspberry Pi Introduction article and other Raspberry Pi Tutorials.
Note: This tutorial assumes that your Pi is already connected to internet and you know how to use the Lx terminal on you Pi. So connect your Pi to internet before proceeding.
Step 1: Installing Telegram on your Mobile
The first step would be to install Telegram on your Mobile. Telegram is available for Android, IOS and even for Windows platform so just go ahead and download your Telegram application. Just like all application there will be a small Sign Up procedure to start using Telegram, continue with it until you reach your home screen.
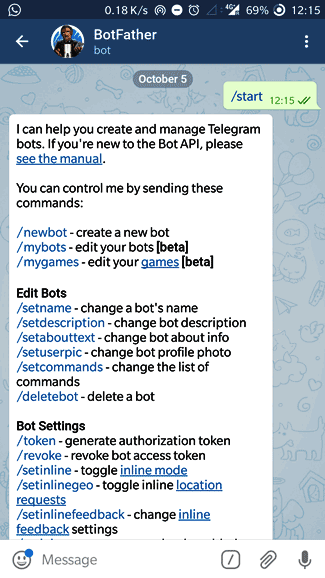
Step2: Talk to Bot Father
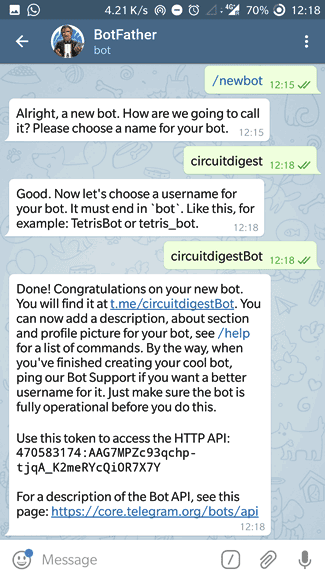
The next step would be to request the Bot Father to create us a new Bot. On the top right corner of the Home screen there will be a search icon, click on it to search for the name “botfather”. Botfather is a Bot by itself, it will guide you to create a new bot for you. Click on start and select /newbot as shown in the picture below. Now, the bot will ask for few details like name of your Bot and the user name of the bot. Fill those details and remember the username for we will needing it in future.
Step3: Getting your token for access
I have named bot as circuitdigest and the username as circuitdigestBot. After this process the botfather will give you a Token for access. This is like the password for your bot, people can control program your bot using this token key. So keep it safe and do not share it with anyone. Once you have received this token key it is time to move on to Raspberry Pi.
Step4: Telepot for installing Telegram on Raspberry Pi
Using Telegram Bot in Raspberry Pi is made possible by the python package called Telepot. We need to install this package on Raspberry Pi by using the following commands on Lx terminal
sudo apt-get install python-pip
sudo pip install telepot
Once Telepot is imported into Raspberry we can use this package in our python program to communicate with our Telegram Bot.
Step 5: Programming your Raspberry Pi
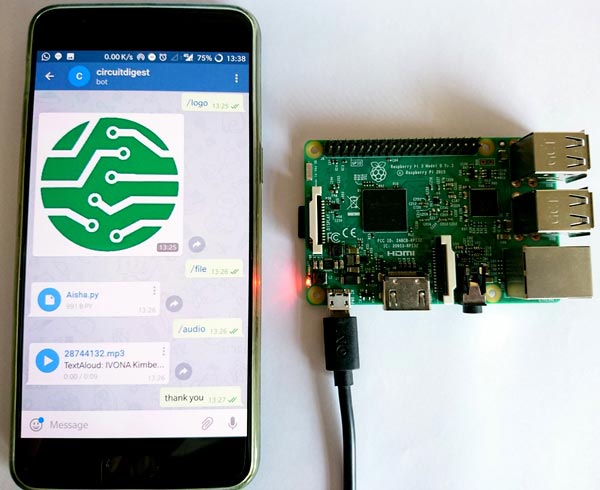
The bot that we just created on Telegram is just like a baby, it cannot do anything on its own unless we teach it what and how to do things. This teaching can be done through Raspberry Pi and Python script. In this tutorial I have programmed the bot to perform some basic actions like sending a message, Photo, Audio and Document. So when you say a particular command it will respond with a particular action the command and action is listed in the table below
|
Command from Telegram |
Response by Raspberry Pi |
|
/hi |
Replies with a string “Hi! CircuitDigest” |
|
/time |
Replies with current time |
|
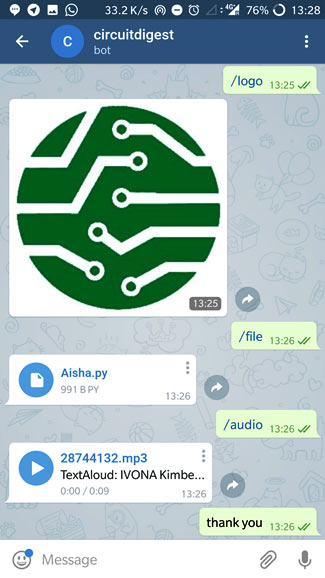
/logo |
Replies with an Image (logo of CircuitDigest) |
|
/file |
Replies with a file ( that contains current program) |
|
/audio |
Replies with a demo audio file |
The complete program to make the above actions is given at the bottom of this page. But just below, I have explained the important snippets in the program to help you understand how the program works.
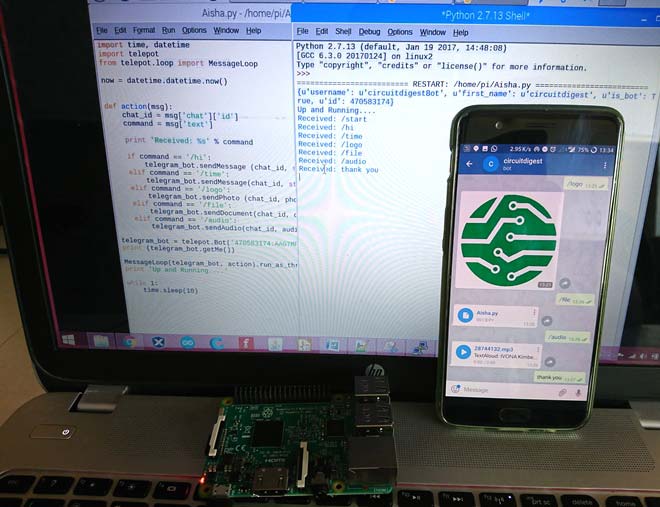
The first step is to import all the libraries, here we will obviously need the teleport library to use the Telegram bot. We also make use of the time, timedate library to read the current time for Raspberry pi. Then we create a object now in which the value is stored.
import time, datetime
import telepot
from telepot.loop import MessageLoop

now = datetime.datetime.now()
The next step is to create a function for taking actions based on incoming commands from Telegram app on Mobile. Here the name of the function is action. It is inside this function where the bot comes to life. Our bot cannot initiate a conversation on its own, it can only reply if we ask something. So each time we ask something there will be chat id. This chat id is something similar to a address, only using this chat id a bot can reply back to us. So the first step is to read the chat id and the message it is trying to say to us. We also print the received message for debugging purpose.
def action(msg):
    chat_id = msg['chat']['id']
    command = msg['text']

    print 'Received: %s' % command
Further down inside the function we compare this command with a predefined text and perform particular tasks. This first command will be /hi to which we reply “Hi! CircuitDigest”
if command == '/hi':
        telegram_bot.sendMessage (chat_id, str("Hi! CircuitDigest"))
The next command will be /time, to which we reply the current time. We already have the time and date in now, here simply split it based on hour and minute and add it as using the str function.
elif command == '/time':
        telegram_bot.sendMessage(chat_id, str(now.hour)+str(":")+str(now.minute))
The next command will be /logo, to which the bot will fetch an image from a url and send it to us. A image can be sent either from a URL or from the hard disk. Here I have just used the URL which displays the logo of CircuitDigest.
elif command == '/logo':
        telegram_bot.sendPhoto (chat_id, photo="https://i.pinimg.com/avatars/circuitdigest_1464122100_280.jpg")
The next command will be /file, which will send the file named Aisha.py from the hard disk. You can send any file that you wish to by changing the address of the directory
elif command == '/file':
        telegram_bot.sendDocument(chat_id, document=open('/home/pi/Aisha.py'))
The last command will be /audio. This can send any mp3 file from the hard disk, I have just used a audio file called test.mp3 as a demo here
elif command == '/audio':
        telegram_bot.sendAudio(chat_id, audio=open('/home/pi/test.mp3'))
Okay now comes the most important step, this is where we give access of our Telegram bot to the Python script. Here we name out bot as telegram_bot and assign it the token address that was given by our botfather in step 3. In the line below I have removed the last few digits of my token as a matter of privacy. We also use the print get me to display the details of the Bot on the shell screen, this will help us notice things working.
telegram_bot = telepot.Bot('468382312:AAFhURMxpVlMWEdFzbIQLszBPFEUpXXXXXX')
print (telegram_bot.getMe())
Hope you understood how the program works, now let us move to next step.
Step6: Running the Program in your Raspberry Pi
As said earlier the complete program is given at the end of this page, you can also download the same from here. Once you open the code make sure you change the token address of the program to your token address.
Now run the python code and you should see the details of your bot on the shell window like this
Here, my bot user name is circuitdigestBot. If you get your bots name here it means everything is going fine.

Once you see “up and running” it means that you bot is ready for action and can now reply to your commands.
Step 7: Enjoying the Output
Now, all that is left is to check how good your bot is responding for your program. Search for your bot name in my case it is “circuitdigestBot”. Search for username and not or Bot name, you user name should end with bot.
Once you open your bot, click on start and type in any commands like /hi, /time, /file, /logo, or /audio and you should be replied accordingly.
Note: You might have problem with /audio and /file if you have not changed your directory to a proper file that is available on your Raspberry Pi.
You can use the shell script to see what your script is currently responding to. The complete working can be found at the video given at the end of this page.

Step 8: Give me a High Five
Hope you understood the tutorial and now will be able create this Raspberry pi telegram bot and communicate with Raspberry Pi using Telegram App. Alas! If you have any problems let me know through the comment section and I will try to get back to you. Also, let me know how you liked this project or what you would like me to build using this in upcoming projects.
Also, in our next tutorial. We will make this look cooler by changing the way we are sending commands and to something more related to hardware on Raspberry Pi.
Complete Project Code
import time, datetime

import telepot

from telepot.loop import MessageLoop
now = datetime.datetime.now()

def action(msg):

    chat_id = msg['chat']['id']

    command = msg['text']
    print 'Received: %s' % command
    if command == '/hi':

        telegram_bot.sendMessage (chat_id, str("Hi! CircuitDigest"))

    elif command == '/time':

        telegram_bot.sendMessage(chat_id, str(now.hour)+str(":")+str(now.minute))

    elif command == '/logo':

        telegram_bot.sendPhoto (chat_id, photo = "https://i.pinimg.com/avatars/circuitdigest_1464122100_280.jpg")

    elif command == '/file':

        telegram_bot.sendDocument(chat_id, document=open('/home/pi/Aisha.py'))

    elif command == '/audio':

        telegram_bot.sendAudio(chat_id, audio=open('/home/pi/test.mp3'))
telegram_bot = telepot.Bot('468382312:AAFhURMxpVlMWEdFzbIQLszBPFEUpAeOLFQ')

print (telegram_bot.getMe())
MessageLoop(telegram_bot, action).run_as_thread()

print 'Up and Running....'
while 1:

    time.sleep(10)
Comments
i have done every thing but i had an issue
there are errors in your code plesae fix
Posting a error report would
Posting a error report would be more helpful to figure out what caused the error for you. For I just compiled the code and it compiles properly
Error in line 6
I had to fix all the indents and spaces, but the code functions. Adding # -*- coding: utf-8 -*- to define the character set helped me figure out it was the indents.
Sometimes python does really
Sometimes python does really irritate with these indent problems
fix this error
Traceback (most recent call last):
File "/home/pi/Desktop/VIN/telegram.py", line 20, in <module>
print (telegram_bot.getMe())
File "/usr/local/lib/python2.7/dist-packages/telepot/__init__.py", line 503, in getMe
return self._api_request('getMe')
File "/usr/local/lib/python2.7/dist-packages/telepot/__init__.py", line 491, in _api_request
return api.request((self._token, method, params, files), **kwargs)
File "/usr/local/lib/python2.7/dist-packages/telepot/api.py", line 155, in request
return _parse(r)
File "/usr/local/lib/python2.7/dist-packages/telepot/api.py", line 147, in _parse
raise e(description, error_code, data)
UnauthorizedError: (u'Unauthorized', 401, {u'error_code': 401, u'ok': False, u'description': u'Unauthorized'})
Check your token address! Is
Check your token address! Is it correct?
syntax error
hi! i am beginner in raspberry. i tried to run your code on my rasperry pi 3 with jessi. when ibstart the script, there is a syntax error in line one. independentbofbwhat thereisbwritten in line one.
I think you pasted the code
I think you pasted the code dorectly and ran!
Follow all the steps in the tutorial, without following each step your program will not work. You have to assign the token mainly
I have the same error like
I have the same error like vinutha:
pi@raspberrypi:~ $ sudo python botroll.py
I am listening ...
Traceback (most recent call last):
File "/usr/local/lib/python2.7/dist-packages/telepot/loop.py", line 60, in run_forever
allowed_updates=allowed_updates)
File "/usr/local/lib/python2.7/dist-packages/telepot/__init__.py", line 993, in getUpdates
return self._api_request('getUpdates', _rectify(p))
File "/usr/local/lib/python2.7/dist-packages/telepot/__init__.py", line 491, in _api_request
return api.request((self._token, method, params, files), **kwargs)
File "/usr/local/lib/python2.7/dist-packages/telepot/api.py", line 155, in request
return _parse(r)
File "/usr/local/lib/python2.7/dist-packages/telepot/api.py", line 147, in _parse
raise e(description, error_code, data)
UnauthorizedError: (u'Unauthorized', 401, {u'error_code': 401, u'ok': False, u'description': u'Unauthorized'})
@B.Aswinth Raj: what do you mean with "You have to assign the token mainly "?
Did you chat with Bot father
Did you chat with Bot father from your telegram application and get the taken address from him? "Aswinth Raj" also mentiones the same. The procedure is explained above as Step 1 2 and 3
Sending a particular image
Instead of sending circuit diagram image, what should be done to send a particular image we have in our raspberry pi?
To send a particular image
To send a particular image you just have to change the python code by pointing to the directory where your image is present
How would i do if i want to
How would i do if i want to receive a message to my telegram everytime the python progam is run? My wish is to receive a message without writing anything on the telegram chat.
After setting up the bot as
After setting up the bot as instructed above and use the below line
telegram_bot.sendMessage (chat_id, str("Python program launched"))
You will receive this message everytime the program is launched
Follow the steps given above
Follow the steps given above and that is the "how to"
ImportEror
Hi, I am getting this ImportError: No module named loop.
Any idea on how can I help this?
Thanks alot
I think you copied only half
I think you copied only half the program please check if the program is exactly as same as the one given here
How many person can chat with a telegram bot simultaneously
How many person can chat with a telegram bot simultaneously
I think the number of persons
I think the number of persons does not matter. You can share it with as many users you would like
Unauthorized
Hey...
I'm new to raspberry pi and i am trying to send a photo taken from pi cam to my telegram...
When i used the telegram module, it worked just fine... but when i used the telepot module, it said error unauthorized, even when i used the same token as i used before (in the telegram module), even when i directly typed my chat id...
I could just use the telegram module,but i want to know why this error happened. Could someone explain it?
Thank you.
If your token address is
If your token address is correct then the telepot module should also work. I am not sure why you are facing problem, I will try re-creating the problem on my side when I find time and will let you know. Meanwhile if you have solved the problem let us know
Hi, thanks for this tutorial.
Hi, thanks for this tutorial. How can I start it automatically when I turn on raspberry?
how to fix this Error
how to fix this Error
- Import Error : No Module named "Telepot"
Hi, thanks for this tutorial.
Hi, thanks for this tutorial.
How to send photo or record video from picamera for realtime?
Thanks
Hi, Please using the code, I
Hi, Please using the code, I am having challenges in terms of line 11, "print 'Received: %s'% command " syntaxError: missing parentheses in call to 'print'. How do I go about it?

hey, thanks for this cool tutorial. There's just one problem that all the files uploaded are corrupted!
what should I do?