
Finger Print Sensor, which we used to see in Sci-Fi moives few years back, is now become very common to verify the identity of a person for various purposes. In present time we can see fingerprint-based systems everywhere in our daily life like for attendance in offices, employee verification in banks, for cash withdrawal or deposits in ATMs, for identity verification in government offices etc. We have already interfaced it with Arduino, today we are going to interface FingerPrint Sensor with Raspberry Pi. Using this Raspberry Pi FingerPrint System, we can enroll new finger prints in the system and can delete the already fed finger prints. Complete working of the system has been shown in the Video given at the end of article.
Required Components:
- Raspberry Pi
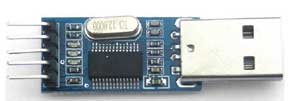
- USB to Serial converter
- Fingerprint Module
- Push buttons
- 16x2 LCD
- 10k pot
- Bread Board or PCB (ordered from JLCPCB)
- Jumper wires
- LED (optional)
- Resistor 150 ohm -1 k ohm (optional)
Circuit Diagram and Explanation:
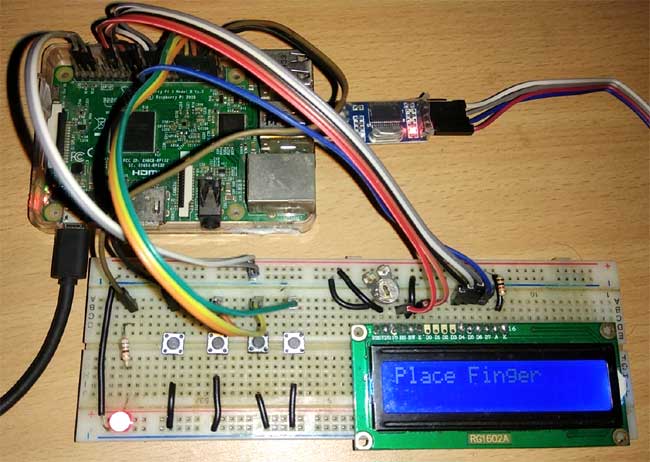
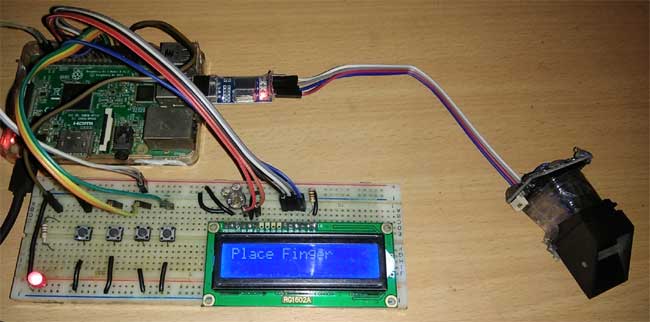
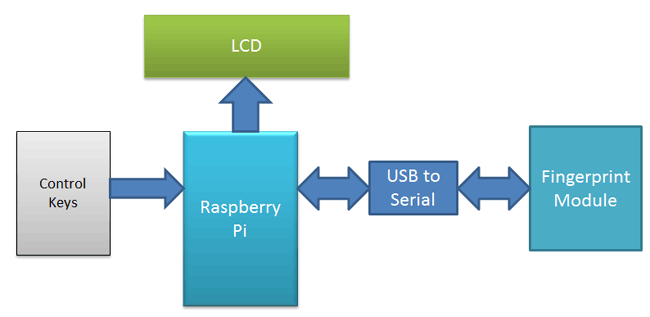
In this Raspberry Pi Finger Print sensor interfacing project, we have used a 4 push buttons: one for enrolling the new finger pring, one for deleting the already fed finger prints and rest two for increment/decrement the position of already fed Finger prints. A LED is used for indication that fingerprint sensor is ready to take finger for matching. Here we have used a fingerprint module which works on UART. So here we have interfaced this fingerprint module with Raspberry Pi using a USB to Serial converter.
So, first of all, we need to make the all the required connection as shown in Circuit Diagram below. Connections are simple, we have just connected fingerprint module to Raspberry Pi USB port by using USB to Serial converter. A 16x2 LCD is used for displaying all messages. A 10k pot is also used with LCD for controlling the contrast of the same. 16x2 LCD pins RS, EN, d4, d5, d6, and d7 are connected with GPIO Pin 18, 23, 24, 25, 8 and 7 of Raspberry Pi respectively. Four push buttons are connected to GPIO Pin 5, 6, 13 and 19 of Raspberry Pi. LED is also connected at pin 26 of RPI.

Installing Library for Finger Print Sensor:
After making all the connections we need to power up Raspberry Pi and get it ready with terminal open. Now we need to install fingerprint library for Raspberry Pi in python language by following the below steps.
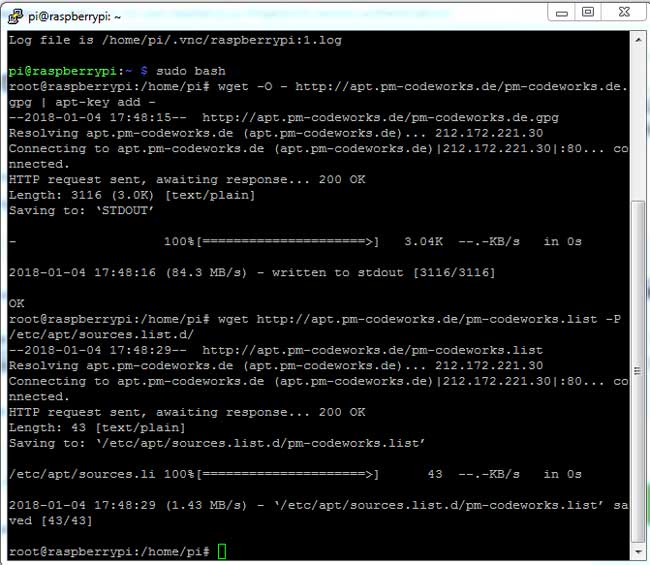
Step 1: To install this library, root privileges are required. So first we enter in root by given command:
sudo bash
Step 2: Then download some required packages by using given commands:
wget –O – http://apt.pm-codeworks.de/pm-codeworks.de.gpg | apt-key add –
wget http://apt.pm-codeworks.de/pm-codeworks.list -P /etc/apt/sources.list.d/
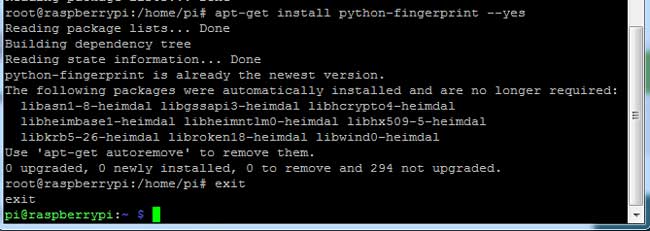
Step 3: After this, we need to update the Raspberry pi and install the downloaded finger print sensor library:
sudo apt-get update
sudo apt-get install python-fingerprint –yes
Step 4: After installing library now we need to check USB port on which your finger print sensor is connected, by using given the command:
ls /dev/ttyUSB*
Now replace the USB port no., with the USB port you got over the screen and replace it in the python code. Complete Python code is given at the end of this project.
Operation of Fingerprint Sensor with Raspberry Pi:
Operation of this project is simple, just run the python code and there will be some intro messages over LCD and then user will be asked to Place Finger on Finger Print Sensor. Now by putting a finger over fingerprint module, we can check whether our finger prints are already stored or not. If your fingerprint is stored then LCD will show the message with the storing position of fingerprint like ‘Fount at Pos:2’ otherwise it will show ‘No Match Found’.
Now to enroll a finger Print, user needs to press enroll button and follow the instructions messages on LCD screen.
If the user wants to delete any of fingerprints then the user needs to press delete button. After which, LCD will ask for the position of the fingerprint which is to be deleted. Now by using another two push button for increment and decrement, user can select the position of saved Finger Print and press enroll button (at this time enroll button behave as Ok button) to delete that fingerprint. For more understanding have a look at the video given at the end of the project.

Python Programming:
Python for interfacing Finger Print Sensor with RPi is easy with using fingerprint library functions. But if the user wants to interface it himself, then it will be little bit difficult for the first time. In finger print sensor datasheets, everything is given that is required for interfacing the same module. A GitHub code is available to test your Raspberry pi with Finger Print sensor.
Here we have used the library so we just need to call library function. In code, first we need to import libraries like fingerprint, GPIO and time, then we need to define pins for LCD, LED and push buttons.
import time
from pyfingerprint.pyfingerprint import PyFingerprint
import RPi.GPIO as gpio

RS =18
EN =23
D4 =24
D5 =25
D6 =8
D7 =7

enrol=5
delet=6
inc=13
dec=19
led=26

HIGH=1
LOW=0
After this, we need to initialize and give direction to the selected pins
gpio.setwarnings(False)
gpio.setmode(gpio.BCM)
gpio.setup(RS, gpio.OUT)
gpio.setup(EN, gpio.OUT)
gpio.setup(D4, gpio.OUT)
gpio.setup(D5, gpio.OUT)
gpio.setup(D6, gpio.OUT)
gpio.setup(D7, gpio.OUT)

gpio.setup(enrol, gpio.IN, pull_up_down=gpio.PUD_UP)
gpio.setup(delet, gpio.IN, pull_up_down=gpio.PUD_UP)
gpio.setup(inc, gpio.IN, pull_up_down=gpio.PUD_UP)
gpio.setup(dec, gpio.IN, pull_up_down=gpio.PUD_UP)
gpio.setup(led, gpio.OUT)
Now we have initialized fingerprint Sensor
try:
    f = PyFingerprint('/dev/ttyUSB0', 57600, 0xFFFFFFFF, 0x00000000)
    if ( f.verifyPassword() == False ):
        raise ValueError('The given fingerprint sensor password is wrong!')
except Exception as e:
    print('Exception message: ' + str(e))
    exit(1)
We have written some function to initialize and drive the LCD, check the complete code below in code section:
def begin(), def lcdcmd(ch), def lcdwrite(ch), def lcdprint(Str), def setCursor(x,y)
After writing all LCD driver functions, we have placed functions for fingerprint enrolling, searching and deleting.
def enrollFinger() function is used for enrol or save the new finger prints.
def searchFinger() function is used to searthc the already stored finger prints
def deleteFinger() functinos is used to deoted the already saved finger print by pressing the correspontind push button.
All above function’s Code is given the in python code given below.
After this, finally, we need to initialize system by in while 1 loop by asking to Place Finger on finger print sensor and then system will check whether this finger print it valid or not and display the results accordingly.
begin()
lcdcmd(0x01)
lcdprint("FingerPrint ")
lcdcmd(0xc0)
lcdprint("Interfacing ")
time.sleep(3)
lcdcmd(0x01)
lcdprint("Circuit Digest")
lcdcmd(0xc0)
lcdprint("Welcomes You  ")
time.sleep(3)
flag=0
lcdclear()

while 1:
    gpio.output(led, HIGH)
    lcdcmd(1)
    lcdprint("Place Finger")
    if gpio.input(enrol) == 0:
        gpio.output(led, LOW)
        enrollFinger()
    elif gpio.input(delet) == 0:
        gpio.output(led, LOW)
        while gpio.input(delet) == 0:
            time.sleep(0.1)
        deleteFinger()
    else:
        searchFinger()
Complete Python Code and a Working Video is given below.
Complete Project Code
import time

from pyfingerprint.pyfingerprint import PyFingerprint

import RPi.GPIO as gpio
RS =18

EN =23

D4 =24

D5 =25

D6 =8

D7 =7
enrol=5

delet=6

inc=13

dec=19

led=26
HIGH=1

LOW=0
gpio.setwarnings(False)

gpio.setmode(gpio.BCM)

gpio.setup(RS, gpio.OUT)

gpio.setup(EN, gpio.OUT)

gpio.setup(D4, gpio.OUT)

gpio.setup(D5, gpio.OUT)

gpio.setup(D6, gpio.OUT)

gpio.setup(D7, gpio.OUT)
gpio.setup(enrol, gpio.IN, pull_up_down=gpio.PUD_UP)

gpio.setup(delet, gpio.IN, pull_up_down=gpio.PUD_UP)

gpio.setup(inc, gpio.IN, pull_up_down=gpio.PUD_UP)

gpio.setup(dec, gpio.IN, pull_up_down=gpio.PUD_UP)

gpio.setup(led, gpio.OUT)
try:

    f = PyFingerprint('/dev/ttyUSB0', 57600, 0xFFFFFFFF, 0x00000000)
    if ( f.verifyPassword() == False ):

        raise ValueError('The given fingerprint sensor password is wrong!')
except Exception as e:

    print('Exception message: ' + str(e))

    exit(1)
def begin():

  lcdcmd(0x33)

  lcdcmd(0x32)

  lcdcmd(0x06)

  lcdcmd(0x0C)

  lcdcmd(0x28)

  lcdcmd(0x01)

  time.sleep(0.0005)


def lcdcmd(ch):

  gpio.output(RS, 0)

  gpio.output(D4, 0)

  gpio.output(D5, 0)

  gpio.output(D6, 0)

  gpio.output(D7, 0)

  if ch&0x10==0x10:

    gpio.output(D4, 1)

  if ch&0x20==0x20:

    gpio.output(D5, 1)

  if ch&0x40==0x40:

    gpio.output(D6, 1)

  if ch&0x80==0x80:

    gpio.output(D7, 1)

  gpio.output(EN, 1)

  time.sleep(0.005)

  gpio.output(EN, 0)

  # Low bits

  gpio.output(D4, 0)

  gpio.output(D5, 0)

  gpio.output(D6, 0)

  gpio.output(D7, 0)

  if ch&0x01==0x01:

    gpio.output(D4, 1)

  if ch&0x02==0x02:

    gpio.output(D5, 1)

  if ch&0x04==0x04:

    gpio.output(D6, 1)

  if ch&0x08==0x08:

    gpio.output(D7, 1)

  gpio.output(EN, 1)

  time.sleep(0.005)

  gpio.output(EN, 0)


def lcdwrite(ch):

  gpio.output(RS, 1)

  gpio.output(D4, 0)

  gpio.output(D5, 0)

  gpio.output(D6, 0)

  gpio.output(D7, 0)

  if ch&0x10==0x10:

    gpio.output(D4, 1)

  if ch&0x20==0x20:

    gpio.output(D5, 1)

  if ch&0x40==0x40:

    gpio.output(D6, 1)

  if ch&0x80==0x80:

    gpio.output(D7, 1)

  gpio.output(EN, 1)

  time.sleep(0.005)

  gpio.output(EN, 0)

  # Low bits

  gpio.output(D4, 0)

  gpio.output(D5, 0)

  gpio.output(D6, 0)

  gpio.output(D7, 0)

  if ch&0x01==0x01:

    gpio.output(D4, 1)

  if ch&0x02==0x02:

    gpio.output(D5, 1)

  if ch&0x04==0x04:

    gpio.output(D6, 1)

  if ch&0x08==0x08:

    gpio.output(D7, 1)

  gpio.output(EN, 1)

  time.sleep(0.005)

  gpio.output(EN, 0)

def lcdclear():

  lcdcmd(0x01)


def lcdprint(Str):

  l=0;

  l=len(Str)

  for i in range(l):

    lcdwrite(ord(Str[i]))


def setCursor(x,y):

    if y == 0:

        n=128+x

    elif y == 1:

        n=192+x

    lcdcmd(n)
def enrollFinger():

    lcdcmd(1)

    lcdprint("Enrolling Finger")

    time.sleep(2)

    print('Waiting for finger...')

    lcdcmd(1)

    lcdprint("Place Finger")

    while ( f.readImage() == False ):

        pass

    f.convertImage(0x01)

    result = f.searchTemplate()

    positionNumber = result[0]

    if ( positionNumber >= 0 ):

        print('Template already exists at position #' + str(positionNumber))

        lcdcmd(1)

        lcdprint("Finger ALready")

        lcdcmd(192)

        lcdprint("   Exists     ")

        time.sleep(2)

        return

    print('Remove finger...')

    lcdcmd(1)

    lcdprint("Remove Finger")

    time.sleep(2)

    print('Waiting for same finger again...')

    lcdcmd(1)

    lcdprint("Place Finger")

    lcdcmd(192)

    lcdprint("   Again    ")

    while ( f.readImage() == False ):

        pass

    f.convertImage(0x02)

    if ( f.compareCharacteristics() == 0 ):

        print "Fingers do not match"

        lcdcmd(1)

        lcdprint("Finger Did not")

        lcdcmd(192)

        lcdprint("   Mactched   ")

        time.sleep(2)

        return

    f.createTemplate()

    positionNumber = f.storeTemplate()

    print('Finger enrolled successfully!')

    lcdcmd(1)

    lcdprint("Stored at Pos:")

    lcdprint(str(positionNumber))

    lcdcmd(192)

    lcdprint("successfully")

    print('New template position #' + str(positionNumber))

    time.sleep(2)
def searchFinger():

    try:

        print('Waiting for finger...')

        while( f.readImage() == False ):

            #pass

            time.sleep(.5)

            return

        f.convertImage(0x01)

        result = f.searchTemplate()

        positionNumber = result[0]

        accuracyScore = result[1]

        if positionNumber == -1 :

            print('No match found!')

            lcdcmd(1)

            lcdprint("No Match Found")

            time.sleep(2)

            return

        else:

            print('Found template at position #' + str(positionNumber))

            lcdcmd(1)

            lcdprint("Found at Pos:")

            lcdprint(str(positionNumber))

            time.sleep(2)
    except Exception as e:

        print('Operation failed!')

        print('Exception message: ' + str(e))

        exit(1)


def deleteFinger():

    positionNumber = 0

    count=0

    lcdcmd(1)

    lcdprint("Delete Finger")

    lcdcmd(192)

    lcdprint("Position: ")

    lcdcmd(0xca)

    lcdprint(str(count))

    while gpio.input(enrol) == True:   # here enrol key means ok

        if gpio.input(inc) == False:

            count=count+1

            if count>1000:

                count=1000

            lcdcmd(0xca)

            lcdprint(str(count))

            time.sleep(0.2)

        elif gpio.input(dec) == False:

            count=count-1

            if count<0:

                count=0

            lcdcmd(0xca)

            lcdprint(str(count))

            time.sleep(0.2)

    positionNumber=count

    if f.deleteTemplate(positionNumber) == True :

        print('Template deleted!')

        lcdcmd(1)

        lcdprint("Finger Deleted");

        time.sleep(2)
begin()

lcdcmd(0x01)

lcdprint("FingerPrint ")

lcdcmd(0xc0)

lcdprint("Interfacing ")

time.sleep(3)

lcdcmd(0x01)

lcdprint("Circuit Digest")

lcdcmd(0xc0)

lcdprint("Welcomes You  ")

time.sleep(3)

flag=0

lcdclear()
while 1:

    gpio.output(led, HIGH)

    lcdcmd(1)

    lcdprint("Place Finger")

    if gpio.input(enrol) == 0:

        gpio.output(led, LOW)

        enrollFinger()

    elif gpio.input(delet) == 0:

        gpio.output(led, LOW)

        while gpio.input(delet) == 0:

            time.sleep(0.1)

        deleteFinger()

    else:

        searchFinger()
Comments
can u plzz help me in connecting this fingerprint sensor to esp2866 module
Nice work bro
which software did you use
and i need lib files for proteus software
I tried installing fingerprint library to my pi but couldn't complete the installation as, it showed me an error in the last command which was, unable to locate package -yes. Could you please help me to resolve this?
Could u pls tell me the changes required...
if we want to send the result over internet
I tried installing fingerprint library. But it showed an error stating unable to locate package.Please help
Which fingerprint scanner you have used?
When I try to run this, it says that there is an ImportError in line 3:
ImportError: No module named 'pyfingerprint'
I can't figure out what the problem is. Please help!
The Python library isn't installed or loaded. If you cant figure that out get a python book and do a little troubleshooting
Hi there,
It's not necessary to use the rs232 to usb converter. You can also use the rs-232 port on the Pi.
In raspi-config go to 5 Interfacing Options, then go to P6 Serial and on the question "Would you like a login shell to be accessible over serial?" select NO.
then select yes to the question "Would you like the serial port hardware to be enabled?" and reboot the Pi.
If you have a look at /dev you'll see that there is a device which is called "ttyAMA0"
This is your serial port on the Pi.
Replace "ttyUSB0" in the programs by "ttyAMA0"
That's all.
Keep in mind that the inputs and outputs on the Pi are 3.3V, but with a "Logic Level Converter Bi-Directional Module 5V to 3.3V" you can put it all safely together
sir in python shell It's show "Exception message: The received packet do not begin with a valid header!" that type of error
and in terminal "Exception message: The fingerprint sensor port "/dev/ttyUSB0" was not found!"
please solve my problem..
hi all
is it possible to add fingerprints after setuping the divice with out display
can I interface fingerprint sensor r307 with raspberry pi without using TTL convertor?
I tried installing fingerprint library to my pi but couldn't complete the installation as, it showed me an error in the last command which was, unable to locate package -yes. Could you please help me to resolve this?
I have sparkfun GT-521F52 fingerprint device. will this code work on the device?
I tried to run the code but it gives error of no module found with name pyfingerprint in python 3 version . I have installed the python fingerprint package also but still it gives the same error of no module found
I tried to run the code but it gives error of no module found with name pyfingerprint in python 3 version . I have installed the python fingerprint package also but still it gives the same error of no module found
step 3 is not working properly could you please give the solution i.e.
we need to update the Raspberry pi and install the downloaded finger print sensor library:
this step is not working properly
I followed the Fingerprint Sensor Interfacing with Raspberry Pi tutorial.
When I executed the code, an error message was displayed saying: "SyntaxError: invalid character in identifier" with a small ^ indicating the letter f on the line of the code where is written "f = PyFingerprint ('/ dev / ttyUSB0 ', 57600, 0xFFFFFFFF, 0x00000000) "
Please help me correct this error.

waou this is a nice project