

In this project we are going to use one of the features of ATmega32A to adjust the brightness of 1 Watt LED. The method that is used to adjust the speed of LED is PWM (Pulse Width Modulation). This AVR Microcontroller PWM tutorial explains the PWM concept and generation of PWM in detail (You can also check this simple PWM generator circuit). Consider a simple circuit as shown in figure.
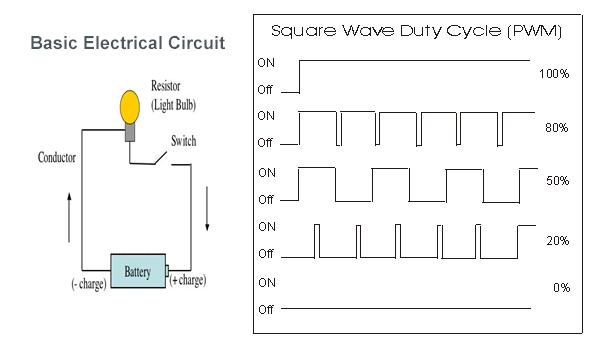
Now if the switch in above figure is closed continuously over a period of time then the bulb will continuously on during that time. If the switch is closed for 8ms and opened for 2ms over a cycle of 10ms, then the bulb will be ON only in the 8ms time. Now the average terminal over across the over a period of 10ms = Turn ON time/ (Turn ON time + Turn OFF time), this is called duty cycle and is of 80% (8/ (8+2)), so the average output voltage will be 80% of the battery voltage.
In the second case, the switch is closed for 5ms and opened for 5ms over a period of 10ms, so the average terminal voltage at the output will be 50% of the battery voltage. Say if the battery voltage is 5V and the duty cycle is 50% and so the average terminal voltage will be 2.5V.
In the third case the duty cycle is 20% and the average terminal voltage is 20% of the battery voltage.
In ATMEGA32A we have four PWM channels, namely OC0, OC1A, OC1B, and OC2. Here we are going to use OC0 PWM channel to vary the brightness of the LED.
Components Required
Hardware:
ATmega32 microcontroller
Power supply (5v)
AVR-ISP Programmer
100uF capacitor,
1Watt LED
TIP127 transistor
Buttons (2 pieces)
100nF (104) capacitor (2 pieces),
100Ω and 1kΩ resistors (2 pieces).
Software:
Atmel studio 6.1
Progisp or flash magic
Circuit Diagram and Working Explanation

The above figure shows the circuit diagram of LED dimmer with AVR Microcontroller (You can also check this simple LED dimmer circuit).
In ATmega, for four PWM channels, we have designated four pins. We can only take PWM output on these pins only. Since we are using PWM0 we should take PWM signal at OC0 pin (PORTB 3rd PIN). As shown in figure we are connecting the base of transistor to OC0 pin to drive the power LED. Here another thing is over four PWM channels, two are 8-bit PWM channels. We are going to use a 8-bit PWM channel here.
A capacitor is connected to each of the buttons to avoid bouncing. Whenever a button is pressed there will be some noise at the pin. Although this noise stabilizes in milliseconds. For a controller the sharp peaks before stabilization acts as triggers. This effect can be eliminated either by software or hardware, for the program to be simple. We are using hardware method by adding debouncing capacitor.
The capacitors nullify the effect of bouncing of buttons.
In ATMEGA there are couple of ways to generate PWM, they are:
1. Phase correct PWM
2. Fast PWM
Here we are going to keep everything simple, So we are going to use FAST PWM method to generate the PWM signal.
First to choose the frequency of PWM, This depend on application usually, for an LED any frequency greater than 50Hz would do. For this reason we are choosing the counter clock 1MHZ. So we are choosing no prescalar. A prescalar is a number which is so selected to get a lesser counter clock. For example if the oscillator clock is 8Mhz, we can chose a prescalar of ‘8’ to get a 1MHz clock for counter. The prescalar is selected based on frequency. If we want more time period pulses we have to chose higher prescalar.
Now to get the FAST PWM of 50Hz clock out of the ATMEGA, we need to enable the appropriate bits in “TCCR0” register. This is the only register we need to bother, for getting 8bit FAST PWM.

Here,
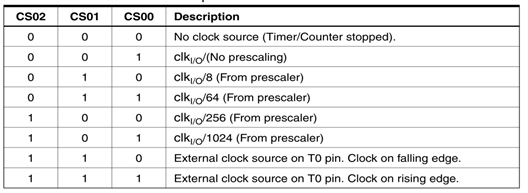
1. CS00, CS01, CS02 (YELLOW) — select the prescalar for choosing counter clock. The table for appropriate prescalar is shown in below table. So for prescaling one (oscillator clock=counter clock) .
so CS00=1, other two bits are zero.
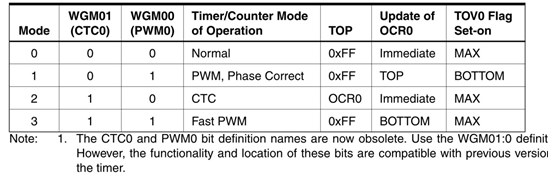
2. WGM01and WGM00 are altered to choose waveform generation modes, based on the table below, for fast PWM. We have WGM00=1 and WGM01=1;
3. Now we know that PWM is a signal with different duty ratio or different turn ON turn OFF times. Until now we have chosen frequency and type of PWM. The main theme of this project lies in this section. For getting different duty ratio, we are going to choose a value between 0 and 255 (2^8 because of 8 bit). Say we choose a value 180, as the counter start counting from 0 and reaches the value 180, the output response may be triggered. This trigger may be inverting or non inverting. That is the output can be told to pulled up on reaching the count, or it can be told to pulled down on reaching the count.
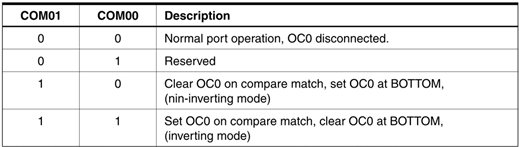
This selection of pulling up or down is chosen by CM00 and CM01 bits.
As shown in table, for the output to go high on compare and the output will stay high until max value (as shown in figure at bottom). We have to choose inverting mode to do that, so COM00=1; COM01=1.
As shown in below figure, OCR0 (Output Compare Register 0) is the byte which stores the user chosen value. So if we change OCR0=180, the controller triggers the change (high) when counter reaches 180 from 0.
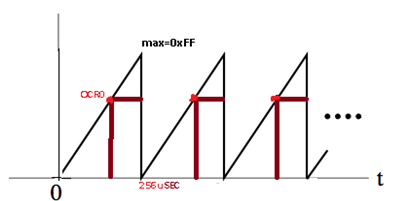
Now for varying the brightness of LED we have to change the DUTY RATIO of PWM signal. In order to change duty ratio, we need to change the OCR0 value. When we change this value of OCR0, the counter takes different time, to reach the OCR0. So the controller pulls the output high at different times.
So for PWM of different duty cycles, we need to change OCR0 value.
In circuit we have two buttons. One button is for increasing the OCR0 value and so the DUTY RATIO of PWM signal, other is for decreasing the OCR0 value and so the DUTY RATIO of PWM signal.
Complete Project Code
// C Code for ATmega32 Microcontroller PWM
#include <avr/io.h>
#define F_CPU 1000000UL
#include <util/delay.h>
int main(void)
{
    DDRD = 0;
    DDRB = 0xFF;
    TCCR0 |=(1<<WGM00)|(1<<WGM01)|(1<<COM00)|(1<<COM01)|(1<<CS00);
    OCR0 = 0;
    while(1)
    {
        if (bit_is_clear(PIND,5))
        {
            if (OCR0<255)
            {
                OCR0++;
            }
            _delay_ms(50);
        }
        if (bit_is_clear(PIND,6))
        {
            if (OCR0>0)
            {
                OCR0--;
            }
            _delay_ms(50);
        }
    }
}
Comments
thank u for this . but can u
thank u for this . but can u plz explain me that where should i run this code. and which software are required to run
You need AVR-ISP Programmer
You need AVR-ISP Programmer (hardware) and ProgISP (software) to burn the code into AVR.
Applying PWM to LED through any GPIO, may be PORTA, B,C,D
Want to apply PWM to control the intensity of matrix of LED , thereforei need to generate the PWM through the General purpose IO's, Itcan be any PORT. might be PORTA,B,C,D.
Therefore please guide me further to accomplish my project.
Thanking you
Vishal
please camn i get the same
please camn i get the same code in assembly? I'm working on a project where lamp intensity is controlled manually using a keyboard by varying pwm. i need some help regarding that.
Burn code to avr
I am working on a project to control intensity, the project is working well on proteus, but it can't be programmed well. When I want to program fuse bites it doesn't work properly anymore. What shall I do ? P. C I use avrisp mkii programmer
I'm yet to get help. Any help
I'm yet to get help. Any help pls?

thanks for you.this was good