
Tachometer is a RPM counter which counts the no. of rotations per minute. There are two types of tachometer - one is mechanical and the other one is digital. Here we are going to design an Arduino based digital tachometer using IR sensor module to detect object for count rotation of any rotating body. As IR transmits IR rays which reflect back to IR receiver and then IR Module generates an output or pulse which is detected by the arduino controller when we press start button. It counts continuously for 5 seconds.
After 5 seconds arduino calculate RPM for a minute using given formula.
RPM= Count x 12 for single object rotating body.
But here we demonstrate this project using ceiling fan. So we have done some changes that is given below:
RPM=count x 12 / objects
Where
object = number of blade in fan.

Required Components for Arduino Tachometer
- Arduino Pro Mini
- IR sensor Module
- 16x2 LCD
- Push button
- Bread board
- 9 volt battery
- Connecting wires
Circuit Diagram and Explanation

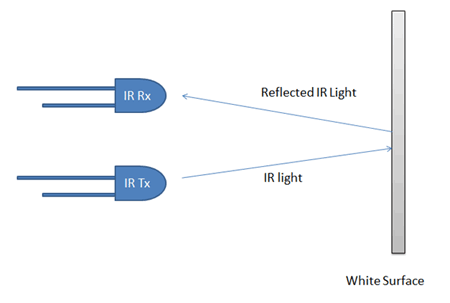
As shown in the above tachometer circuit, it contains Arduino Pro Mini, IR sensor module, buzzer and LCD. Arduino controls the whole process like reading pulse that IR sensor module generate according to object detection, calculating RPM and sending RPM value to LCD. IR sensor is used for sensing object. We can set sensitivity of this sensor module by inbuilt potentiometer situated on IR module. IR sensor module consist an IR transmitter and a photo diode which detects or receives infrared rays. IR transmitter transmits infrared rays, when these rays fall on any surface, they reflect back and sensed by photo diode (You can understand more about it in this Line Folloewr Robot). The output of photo diode is connected to a comparator, which compare photo diode output with reference voltage and result is given as output to arduino.
IR sensor module output pin is directly connected to pin 18 (A4). Vcc and GND are connected to Vcc and GND of arduino. A 16x2 LCD is connected with arduino in 4-bit mode. Control pin RS, RW and En are directly connected to arduino pin 2, GND and 3. And data pin D4-D7 is connected to pins 4, 5, 6 and 7 of arduino. A push button is also added in this project. When we need to count RPM we press this button to start this Arduino Tachometer to count RPM for five seconds. This push button is connected to pin 10 of arduino with respect to ground. You can learn more about the working of IR transmitter and receiver circuit in this circuit tutorial.
Arduino Tachometer Code Description
In code we have used digital read function to read output of IR sensor module and then calculate RPM.

Complete Project Code
// Code for Arduino Tachometer using IR Sensor

#include <LiquidCrystal.h>
LiquidCrystal lcd(3, 2, 4, 5, 6, 7);
#define sensor 18
#define start 10
int delay1()
{
  //unsigned int long k;
    int i,j;
    unsigned int count=0;
    for(i=0;i<1000;i++)
    {
      for(j=0;j<1227;j++)
      {
       if(digitalRead(sensor))
       {
         count++;
         while(digitalRead(sensor));
       }
    }
  }
    return count;
}
void setup()
{
  pinMode(sensor, INPUT);
  pinMode(start, INPUT);
  pinMode(13, OUTPUT);
  lcd.begin(16, 2);
  lcd.print("Techometer");
  lcd.setCursor(0,1);
  lcd.print("Circuit Digest");
  delay(2000);
  digitalWrite(start, HIGH);
}
void loop()
{
     unsigned int time=0,RPM=0;
     lcd.clear();
     lcd.print("  Please Press  ");
     lcd.setCursor(0,1);
     lcd.print("Button to Start ");
     while(digitalRead(start));
     lcd.clear();
     lcd.print("Reading RPM.....");
     time=delay1();
     lcd.clear();
     lcd.print("Please Wait.....");
     RPM=(time*12)/3;
     delay(2000);
     lcd.clear();
     lcd.print("RPM=");
     lcd.print(RPM);
     delay(5000);
}
Comments
What if I flipped the direction switch on the fan to make it spin backwards? How could you sense direction as well as RPM?
You would need to IR modules connected to the Arduino, and code that would detect which one is "tripped" first.
Hello,
Great project! I'm curious as to what the double count loop is doing, and what the 1227 count has to do with. I suspect it's related to the processor speed of the board... but how?
Thanks!
Sir please tell me which arduino (3.3V or 5V) is used in arduino based digital tachometer
The project uses an "Arduino Pro Mini" If you look that up on Google, you will see that it has an onboard voltage controller and can accept up to 12v (this project is using a 9v battery) when connected to the "RAW" terminal. For 5v or 3.3 v, connect to the appropriate 5v or 3.3v terminal
Is it possible to count 300rpm
in code ,rpm = count *12/3 ,what it is indicate?(12???)
If you read the instructions, you will see that the code runs for 5 seconds. Multiply the revolutions found after 5 seconds by 12 to get revolutions per minute.
can you please tell me what's the PinMode(13,OUTPUT) means? there seems to be nothing connected to the 13 pin
Pin 13 connects to the onboard LED on the Arduino, and so the code will flash that.
I get a bunch of errors while trying to upload the code,. Such as expected initializer before int
Mine keeps reading the rpm forever and then gives wrong values
Great project and exactly what I was looking for! I have a question though:
Could you please explain the nested loop?
Thank you.
A nested loop is a loop which is present inside another loop. In that case there is no nested loop for this project
I meant nested >FOR< statement.
This is what I was asking about:
int delay1()
{
//unsigned int long k;
int i,j;
unsigned int count=0;
for(i=0;i<1000;i++)
{
for(j=0;j<1227;j++)
{
if(digitalRead(sensor))
{
count++;
while(digitalRead(sensor));
}
}
}
return count;
}
I know what it's doing, just don't know the significance of sampling the RI sensor 1227 times, each for a total of 1000 times.
Thanks,
Ray
Sir above code is for LCD/
thank you soo mutch
John. what is the maximum rpm that you can measure with this setup?
I am trying to use this example to make a tach for my home built cnc router. I am having trouble getting accurate counts. I am aiming the ir module at the chromed surface of a cylinder (fan shroud)on the spindle. I have tried using a strip of painters tape as the indicator. Should I cover most of the cylinder with the tape and read a small area of the chrome? vice Versa? Use flat black paint?
Does the same code work for ardunio UNO?
can you exlain the code line by line,
do this for the startups who is learning the programs.
will this program works for the motor runs in 100 rpm.
what is the minimum rpm and maximum rpm which this code detecting.
this is a one of the nice project which i have seen,
thank you.

nice project