
Raspberry Pi is an ARM cortex based popular development board designed for Electronic Engineers and Hobbyists. With the processing speed and memory, Raspberry Pi can be used for performing different functions at a time, like a normal PC, and hence it is called Mini Computer in your palm. We have created a series of Raspberry Pi tutorials, to start with Raspberry Pi from scratch and then create high level IoT projects using Raspberry Pi.
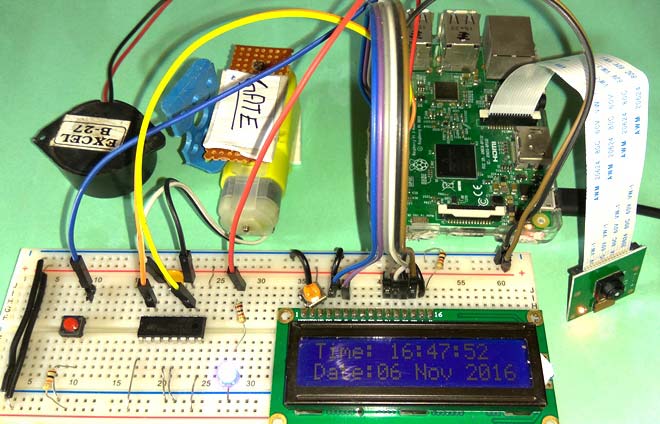
This time we are here with our next interesting project which is Visitors Monitoring System with Image capture functionality. Here we are interfacing Pi camera with Raspberry Pi to capture the image of every visitor which has entered through the Gate or door. In this project, whenever any person is arrived at the Gate, he has to press a button to open the Gate, and as soon as he/she press the button, his/her picture will be captured and saved in the system with the Date and time of the entry. This can be very useful for security and surveillance purpose.
This system is very useful in offices or factories where visitor entry record is maintained for visitors and attendance record is maintained for employees. This Monitoring system will digitize and automate the whole visitor entries and attendances, and there will be no need to maintain them manually. This system can be either operated by the person himself or there can be operator for pressing the button for very visitor. This is a good project for getting started with Pi camera and interface it with Raspberry Pi.
Components Required:
- Raspberry Pi
- Pi camera
- 16x2 LCD
- DC Motor
- IC L293D
- Buzzer
- LED
- Bread Board
- Resistor (1k,10k)
- Capacitor (100nF)
- Push Button
- Connecting wires
- 10k Pot
- Power supply
Working Explanation:
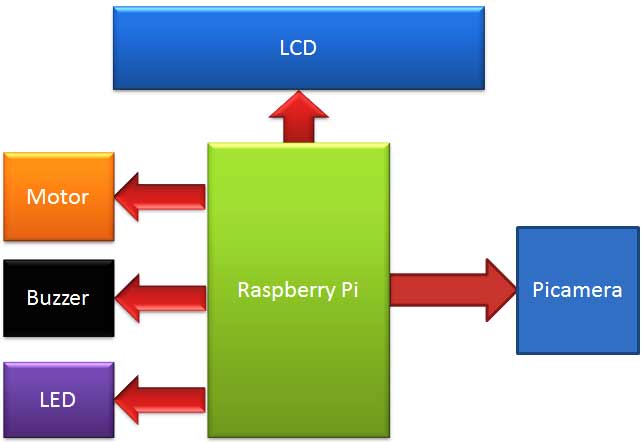
Working of this Raspberry Pi Monitoring System is simple. In this, a Pi camera is used to capture the images of visitors, when a push button is pressed or triggered. A DC motor is used as a gate. Whenever anyone wants to enter in the place then he/she needs to push the button. After pushing the button, Raspberry Pi sends command to Pi Camera to click the picture and save it. After it, the gate is opened for a while and then gets closed again. The buzzer is used to generate sound when button pressed and LED is used for indicating that Raspberry Pi is ready to accept Push Button press, means when LED is ON, system is ready for operation.
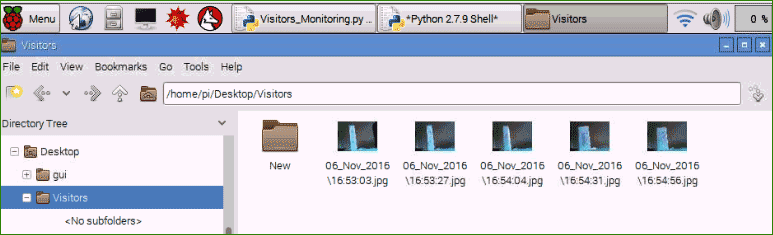
Here the pictures of visitors are saved in Raspberry Pi with the name which itself contains the time and date of entry. Means there is no need to save date and time separately at some other place as we have assigned the time and date as the name of the captured picture, see the image below. We have here taken the image of a box as visitor, check its full demonstration in the Video at the end.
Circuit Explanation:
Circuit of this Raspberry Pi Visitor Surveillance System is very simple. Here a Liquid Crystal Display (LCD) is used for displaying Time/Date of visitor entry and some other messages. LCD is connected to Raspberry Pi in 4-bit mode. Pins of LCD namely RS, EN, D4, D5, D6, and D7 are connected to Raspberry Pi GPIO pin number 18, 23, 24, 16, 20 and 21. Pi camera module is connected at camera slot of the Raspberry Pi. A buzzer is connected to GPIO pin 26 of Raspberry Pi for indication purpose. LED is connected to GPIO pin 5 through a 1k resistor and a push button is connected to GPIO pin 19 with respect to ground, to trigger the camera and open the Gate. DC motor (as Gate) is connected with Raspberry Pi GPIO pin 17 and 27 through Motor Driver IC (L293D). Rest of connections are shown in circuit diagram.

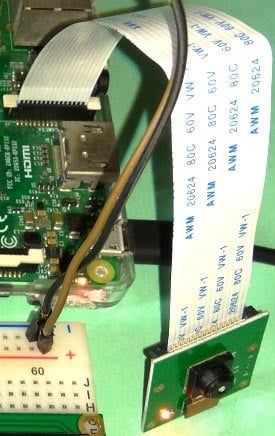
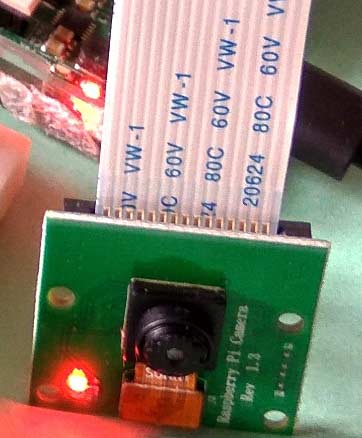
To connect the Pi Camera, insert the Ribbon cable of Pi Camera into camera slot, slightly pull up the tabs of the connector at RPi board and insert the Ribbon cable into the slot, then gently push down the tabs again to fix the ribbon cable.
Raspberry Pi Configuration and Programming Explanation:
We are using Python language here for the Program. Before coding, user needs to configure Raspberry Pi. You should below two tutorials for Getting Started with Raspberry Pi and Installing & Configuring Raspbian Jessie OS in Pi:
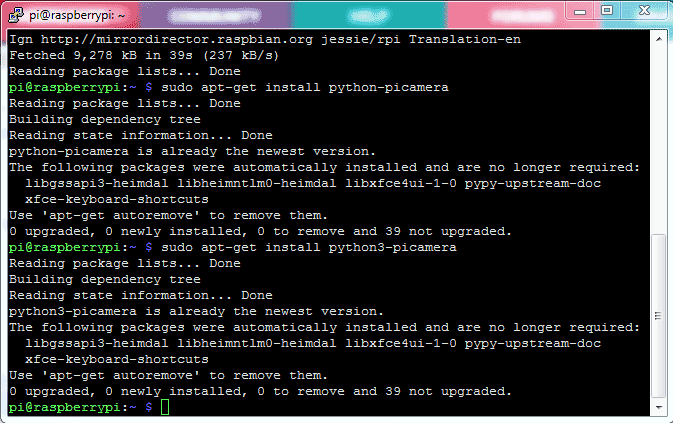
After successfully installing Raspbian OS on Raspberry Pi, we need to install Pi camera library files for run this project in Raspberry pi. To do this we need to follow given commands:
$ sudo apt-get install python-picamera
$ sudo apt-get install python3-picamera
After it, user needs to enable Raspberry Pi Camera by using Raspberry Pi Software Configuration Tool (raspi-config):
$ sudo raspi-config
Then select Enable camera and Enable it.
Then user needs to reboot Raspberry Pi, by issuing sudo reboot, so that new setting can take. Now your Pi camera is ready to use.
$ sudo reboot
The Python Program of this project plays a very important role to perform all the operations. First of all, we include required libraries, initialize variables and define pins for LCD, LED, Motor and other components.
import RPi.GPIO as gpio
import picamera
import time

m11=17
m12=27
led=5
buz=26

button=19

RS =18
... ....
... .....
Function def capture_image() is created to capture the image of visitor with time and date.
def capture_image():
    lcdcmd(0x01)
    lcdprint("Please Wait..");
    data= time.strftime("%d_%b_%Y\%H:%M:%S")
    camera.start_preview()
    time.sleep(5)
    print data
    camera.capture('/home/pi/Desktop/Visitors/%s.jpg'%data)
    camera.stop_preview()
    lcdcmd(0x01)
    lcdprint("Image Captured")
    lcdcmd(0xc0)
    lcdprint(" Successfully ")
    time.sleep(2)
Function def gate() is written for driving the DC motor which is used as a Gate here.
def gate():
            lcdcmd(0x01)
            lcdprint("    Welcome  ")
            gpio.output(m11, 1)
            gpio.output(m12, 0)
            time.sleep(1.5)
            gpio.output(m11, 0)
            gpio.output(m12, 0)
            time.sleep(3)
            gpio.output(m11, 0)
            gpio.output(m12, 1)
            time.sleep(1.5)
            gpio.output(m11, 0)
            gpio.output(m12, 0)
            lcdcmd(0x01);
            lcdprint("  Thank You  ")
            time.sleep(2)
Some functions are defined for LCD like def begin() function is used to initialize LCD, def lcdcmd(ch) function is used for sending command to LCD, def lcdwrite(ch) function is used for sending data to LCD and def lcdprint(Str) function is used to send data string to LCD. You can check all these functions in Code given afterwards.
Then we have initialized the LCD and Pi Camera, and continuously read the Push button using while loop. Whenever the push button is pressed, to open the gate for entry, image of the visitor is captured and saved at the Raspberry pi with date & time and gate gets opened. Check the Full code and Demonstration Video below.
while 1:
        d= time.strftime("%d %b %Y")
        t= time.strftime("%H:%M:%S")
        lcdcmd(0x80)
        lcdprint("Time: %s"%t)
        lcdcmd(0xc0)
        lcdprint("Date:%s"%d)
        gpio.output(led, 1)
        if gpio.input(button)==0:
            gpio.output(buz, 1)
            gpio.output(led, 0)
            time.sleep(0.5)
            gpio.output(buz, 0)
            capture_image()
            gate()
        time.sleep(0.5)
This Camera Monitoring System has lot of scope to upgrade, like a software can be built in Computer Vision or in OpenCV to match the captured picture of visitor with the already stored images and only authorized the visitor if some match has been found, this will only open the gate for authorised people.
Complete Project Code
import RPi.GPIO as gpio
import picamera
import time
m11=17
m12=27
led=5
buz=26
button=19
RS =18
EN =23
D4 =24
D5 =16
D6 =20
D7 =21
HIGH=1
LOW=0
gpio.setwarnings(False)
gpio.setmode(gpio.BCM)
gpio.setup(RS, gpio.OUT)
gpio.setup(EN, gpio.OUT)
gpio.setup(D4, gpio.OUT)
gpio.setup(D5, gpio.OUT)
gpio.setup(D6, gpio.OUT)
gpio.setup(D7, gpio.OUT)
gpio.setup(led, gpio.OUT)
gpio.setup(buz, gpio.OUT)
gpio.setup(m11, gpio.OUT)
gpio.setup(m12, gpio.OUT)
gpio.setup(button, gpio.IN)
gpio.output(led , 0)
gpio.output(buz , 0)
gpio.output(m11 , 0)
gpio.output(m12 , 0)
data=""
def capture_image():
    lcdcmd(0x01)
    lcdprint("Please Wait..");
    data= time.strftime("%d_%b_%Y\%H:%M:%S")
    camera.start_preview()
    time.sleep(5)
    print data
    camera.capture('/home/pi/Desktop/Visitors/%s.jpg'%data)
    camera.stop_preview()
    lcdcmd(0x01)
    lcdprint("Image Captured")
    lcdcmd(0xc0)
    lcdprint(" Successfully ")
    time.sleep(2)
def gate():
            lcdcmd(0x01)
            lcdprint("    Welcome  ")
            gpio.output(m11, 1)
            gpio.output(m12, 0)
            time.sleep(1.5)
            gpio.output(m11, 0)
            gpio.output(m12, 0)
            time.sleep(3)
            gpio.output(m11, 0)
            gpio.output(m12, 1)
            time.sleep(1.5)
            gpio.output(m11, 0)
            gpio.output(m12, 0)
            lcdcmd(0x01);
            lcdprint("  Thank You  ")
            time.sleep(2)
def begin():
  lcdcmd(0x33)
  lcdcmd(0x32)
  lcdcmd(0x06)
  lcdcmd(0x0C)
  lcdcmd(0x28)
  lcdcmd(0x01)
  time.sleep(0.0005)
def lcdcmd(ch):
  gpio.output(RS, 0)
  gpio.output(D4, 0)
  gpio.output(D5, 0)
  gpio.output(D6, 0)
  gpio.output(D7, 0)
  if ch&0x10==0x10:
    gpio.output(D4, 1)
  if ch&0x20==0x20:
    gpio.output(D5, 1)
  if ch&0x40==0x40:
    gpio.output(D6, 1)
  if ch&0x80==0x80:
    gpio.output(D7, 1)
  gpio.output(EN, 1)
  time.sleep(0.005)
  gpio.output(EN, 0)
  # Low bits
  gpio.output(D4, 0)
  gpio.output(D5, 0)
  gpio.output(D6, 0)
  gpio.output(D7, 0)
  if ch&0x01==0x01:
    gpio.output(D4, 1)
  if ch&0x02==0x02:
    gpio.output(D5, 1)
  if ch&0x04==0x04:
    gpio.output(D6, 1)
  if ch&0x08==0x08:
    gpio.output(D7, 1)
  gpio.output(EN, 1)
  time.sleep(0.005)
  gpio.output(EN, 0)
def lcdwrite(ch):
  gpio.output(RS, 1)
  gpio.output(D4, 0)
  gpio.output(D5, 0)
  gpio.output(D6, 0)
  gpio.output(D7, 0)
  if ch&0x10==0x10:
    gpio.output(D4, 1)
  if ch&0x20==0x20:
    gpio.output(D5, 1)
  if ch&0x40==0x40:
    gpio.output(D6, 1)
  if ch&0x80==0x80:
    gpio.output(D7, 1)
  gpio.output(EN, 1)
  time.sleep(0.005)
  gpio.output(EN, 0)
  # Low bits
  gpio.output(D4, 0)
  gpio.output(D5, 0)
  gpio.output(D6, 0)
  gpio.output(D7, 0)
  if ch&0x01==0x01:
    gpio.output(D4, 1)
  if ch&0x02==0x02:
    gpio.output(D5, 1)
  if ch&0x04==0x04:
    gpio.output(D6, 1)
  if ch&0x08==0x08:
    gpio.output(D7, 1)
  gpio.output(EN, 1)
  time.sleep(0.005)
  gpio.output(EN, 0)
def lcdprint(Str):
  l=0;
  l=len(Str)
  for i in range(l):
    lcdwrite(ord(Str[i]))
begin()
lcdcmd(0x01)
lcdprint("Visitor Monitoring")
lcdcmd(0xc0)
lcdprint("    Using RPI     ")
time.sleep(3)
lcdcmd(0x01)
lcdprint("Circuit Digest")
lcdcmd(0xc0)
lcdprint("Saddam Khan")
time.sleep(3)
lcdcmd(0x01)
camera = picamera.PiCamera()
camera.rotation=180
camera.awb_mode= 'auto'
camera.brightness=55
lcdcmd(0x01)
lcdprint(" Please Press ")
lcdcmd(0xc0)
lcdprint("    Button      ")
time.sleep(2)
while 1:
        d= time.strftime("%d %b %Y")
        t= time.strftime("%H:%M:%S")
        lcdcmd(0x80)
        lcdprint("Time: %s"%t)
        lcdcmd(0xc0)
        lcdprint("Date:%s"%d)
        gpio.output(led, 1)
        if gpio.input(button)==0:
            gpio.output(buz, 1)
            gpio.output(led, 0)
            time.sleep(0.5)
            gpio.output(buz, 0)
            capture_image()
            gate()
        time.sleep(0.5)
Comments
sir i want to project report
sir i want to project report on visitor monitoring system using raspberry pi

Do you know where to buy all the parts in order to build this surveillance monitoring project? Also, is the software open source?
Thanks,
Joey