
Security is major concern now days and there are lot of technologies present today to keep your place secure and monitored. CCTV cameras are very useful to keep an eye on your house or office. Although prices of these types of cameras have been reduced significantly since their beginning but still IP cameras, which have ability to send and receive the date over the network, are very expensive. And for True Surveillance, a camera must have ability to send its feed over the internet so that it can be watched from anywhere in the world.
Today we are making a very cheap Surveillance Motion Capture Camera using Raspberry Pi and a webcam. This is a great and very cheaper security tool, which have many configurable options and can be built in few minutes. Here we are using only Raspberry Pi and a USB web camera to build this Motion Capture camera. We have Raspbian Jessie OS installed on our Raspberry Pi board. You should check this article to install the Raspbian OS and getting started with Raspberry Pi.
Here we will go through a quick start guide first, so that you can have your Surveillance Camera ready in few minutes with all the default configurations and after that we will dive into the other details and configurations options to customize it according to your need. If you do not have a raspberry pi and you are looking for a more cheaper option you can consider the ESP32 based DIY CCTV Security Camera System, it is much more compact and easy to build.
But before that, let’s know something about the Motion (Surveillance Software), which is the heart of this project. Motion is free, open source motion detector CCTV software, developed for Linux. It detects the motion and start recording video of it. With ‘Motion’ installed in your Raspberry Pi, you can magically turn your Raspberry Pi into a Security Camera and can get following functionalities:
1. You can watch Live Video feed on a web browser by entering the IP address of Pi along with the port.
2. It will record and saves the Video whenever it detects Motion or any disturbance in the view area. It will keep recording the Video until there is some motion, then it stops and save the file, which can be watched later.
3. It can create a beautiful Timelapse Video.
4. It can take snapshots at regular interval or when there is some motion. Snapshots are also saved in the disk for later use.
Apart from that, It has several configuration options which we will discuss shortly and we can also set user defined ‘triggers’ on certain events. Motion currently only support USB camera out of the box, if you want to use Pi Camera then you need to use special build of Motion.
Quickly Build Motion Capture Security Camera with Raspberry Pi:
Here you need to run only few commands to start getting you first video feed over the network. Before that, properly check that your Raspberry Pi is connected to the internet, either using LAN or Wi-Fi and then follow below steps:
Step 1: First run the below command to update the Raspbian OS on Raspberry Pi:
sudo apt-get update
Step 2: Then install ‘Motion’ Library by using below command:
sudo apt-get install motion
Step 3: Now set Motion daemon to yes by editing the file: /etc/default/motion so that it will be always running. Edit this file using ‘nano’ editor with ‘sudo’ like given below:
sudo nano /etc/default/motion
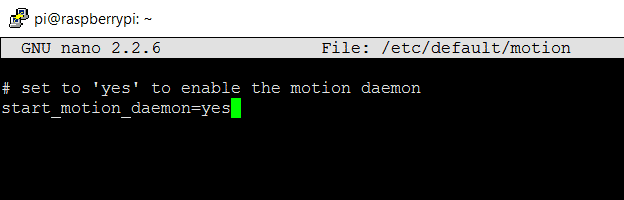
Then save the file by pressing ‘CTRL+X’, then ‘Y’ and the Enter.
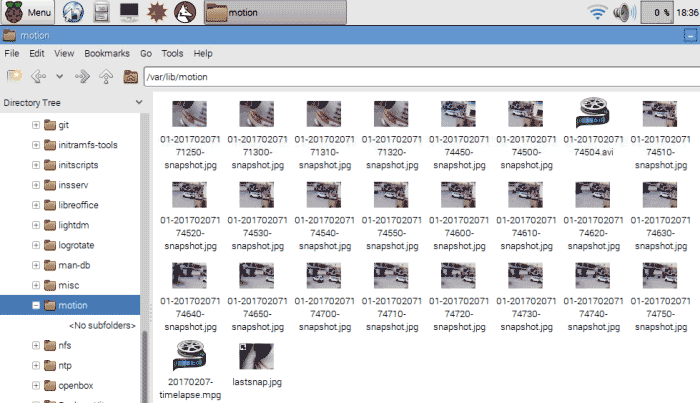
Step 4: Now we need to set the permission for the Target Directory (/var/lib/motion/), in which Motion saves all the Video recordings and picture files. We need to set ‘Motion’ as owner of this directory by issuing below command:
sudo chown motion:motion /var/lib/motion/
This permission is necessary otherwise you will get below error, when you check Motion service Status using this command: sudo service motion status

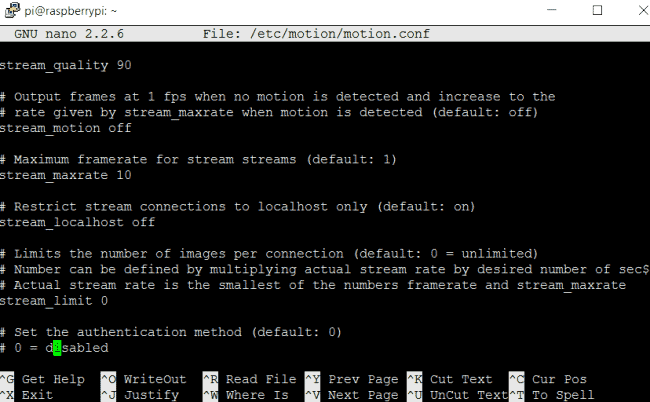
Step 5: Now we are almost done, only we need to change one config option in Motion configuration file (/etc/motion/motion.conf) which is stream_localhost off. We have to turn off this local host streaming, otherwise we will not be able to access the Video feed on our network and it will be only accessible from the Raspberry Pi itself. To doing so, edit the Motion Configuration file with ‘nano’ editor and turn it off, like shown below:
sudo nano /etc/motion/motion.conf
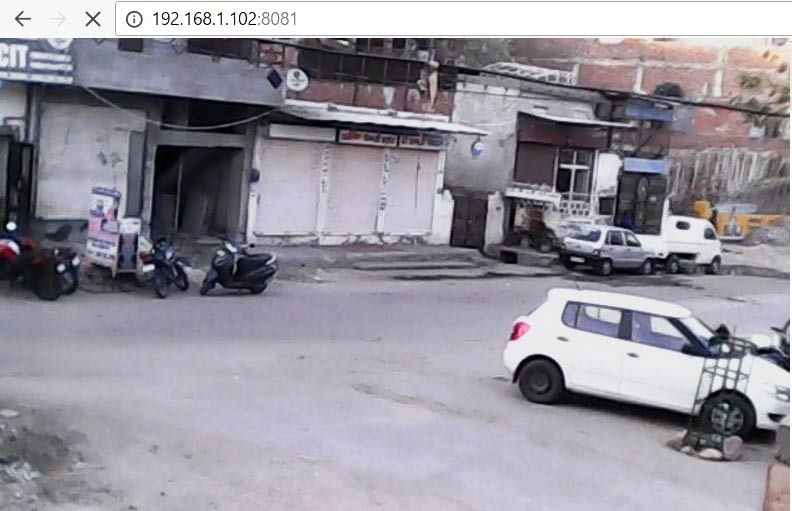
Now we are done and ready to get our live feed from the USB web camera connected to Pi. Just start the Motion service using below command and open your Raspberry Pi’s IP, with port 8081, in your browser (like 192.168.1.103:8081):
sudo /etc/init.d/motion start
And you will see the live feed from your web camera like below. Here we have used a low cost USB web camera (Quantum web camera QHM500LM), which worked smoothly with our Raspberry Pi, but you can further use a good quality camera for better resolution.
As it will show in browser, you can use any device, to watch the feed, which supports web browser like Mobile, tablet etc. Below is one snapshot from Mobile Phone:

You can always start, stop, restart and get status of Motion service using below four commands:
sudo /etc/init.d/motion start
sudo /etc/init.d/motion stop
sudo service motion restart
sudo service motion status
or you can reboot the Raspberry Pi as a troubleshooting step when necessary:
sudo reboot
Note: If you are Raspberry Pi model below the version 3, then you may need a Wi-Fi dongle to wirelessly connect raspberry Pi to router. Raspberry Pi 3 has Wi-Fi inbuilt in it. Here we have used Raspberry Pi 2 Model B with a Wi-Fi dongle.
Customizing Media settings in Motion:
So we are now having our Surveillance Camera running and working. Now we can look into some very useful configurations options, using which we can optimize it according to our need and can get very impressive results. In Motion Configuration file, all the settings are explained very nicely with their default and recommenced value, just check it using below command:
sudo nano /etc/motion/motion.conf
Apart from getting the live feed, Motion records and saves video files whenever it detects Motion. So you can adjust the framerate, quality, width/height of the streaming videos. You can set the frame rate high for real time videos, but your network must be fast enough for this one. Below are the values which we have used, you can change them accordingly:
# Image width (pixels). Valid range: Camera dependent, default: 352
width 640
# Image height (pixels). Valid range: Camera dependent, default: 288
height 480
# Maximum number of frames to be captured per second.
# Valid range: 2-100. Default: 100 (almost no limit).
framerate 50
stream_quality 90
It will be good to save some pictures before and after it detects the motion and start recording the video. Use below settings for that:
# Specifies the number of pre-captured (buffered) pictures from before motion
# was detected that will be output at motion detection.
# Recommended range: 0 to 5 (default: 0)
pre_capture 0
# Number of frames to capture after motion is no longer detected (default: 0)
post_capture 0
Motion by default takes too many pictures when it detects Motion and you will end up with so many ‘jpg’ files for a small motion. So it will be good to either set this setting (output_pictures off) off or set it to ‘best’:
output_pictures best
You can also take snapshots at regular intervals, defined by you, by using below option:
# Make automated snapshot every N seconds (default: 0 = disabled)
snapshot_interval 0
The most attractive features for me, is timelapse Video, it’s a very good arrangement for beautiful timelapse videos in very low cost. Here you can define the interval for the snapshots for Timelapse Video:
# Default value 0 = off - else save frame every Nth second
ffmpeg_timelapse 2
You can change the Target Directory to save all the recorded files and pictures by using ‘target_dir’ and don’t forget to set ‘Motion’ as owner of this directory, as explained earlier.
# Target base directory for pictures and films
# Recommended to use absolute path. (Default: current working directory)
target_dir /var/lib/motion
You can change the web streaming port (default is 8081):
# The mini-http server listens to this port for requests (default: 0 = disabled)
stream_port 8081
If you don’t want a long Video file then you can instruct Motion to make several clips of particular duration instead of one big file. You can mention the clips duration in seconds (0 for infinite):
# Maximum length in seconds of a movie
# When value is exceeded a new movie file is created. (Default: 0 = infinite)
max_movie_time 30
You can also decide like how to define a motion and can set the numbers of pixels or frames that needs to be changed for detecting a True Motion:
# Threshold for number of changed pixels in an image that
# triggers motion detection (default: 1500)
threshold 1500
# Picture frames must contain motion at least the specified number of frames
# in a row before they are detected as true motion. At the default of 1, all
# motion is detected. Valid range: 1 to thousands, recommended 1-5
minimum_motion_frames 5
By default Motions saves the logs in ‘syslog’ but you can define dedicated Log file for Motion:
# Use a file to save logs messages, if not defined stderr and syslog is used. (default: not defined)
logfile /tmp/motion.log
Don’t forget to save and restart the Motion service after changing any setting. To save the motion.conf, press CTRL+X then Y and then Enter.
So these are some common settings that can be used to achieve good results. But if you are curious then dig the configuration file more and start playing with settings. There are lot of options to set brightness, contrast, bit rate, triggers, password authentication and many more.
How to get the Video Feed over the internet:
Here we have monitored the web cam’s feed over the local network using the local IP of Raspberry Pi. But if you want to monitor it from anywhere over the internet then you need to set Port Forwarding in your Router/Modem. Basically you need to forward the port 80 (used for HTTP or internet) to your local or private IP address of you Raspberry Pi (like (192.168* in our case). After port forwarding all the incoming connections to port 80 will be forwarded to this local address and you can watch the live feed by entering your public IP address on the internet with the streaming port which we have set earlier (8081). Every Router has different user interface for setting up Port Forwarding, so you can log into your router (192.168.1.1) and can find the option for the same. But remember that, to access the Raspberry Pi over internet you need to have static Public IP address and it should not be changed on every restart of modem. Static IP address is provided by your ISP.
So this is how we can easily setup a Very Low Cost Surveillance Camera by using Raspberry Pi and a Simple Web Camera.
Comments
Hi,
i have also same problem but after updating the time in my raspberry pi it works fyn. follow this link for help on how to update the time on rpi... https://raspberrypi.stackexchange.com/questions/47542/raspberry-pi-wont-update-time
Yes this should work, or you
Yes this should work, or you can even make the pi to update time from internet each time it boots up by specifing a time zone. However this will need a permanent internet connection, but will come in handy for all future projects
cannot connect
I too am having issues connecting to the IP. I updated the time as stated above and i still get an error. Any suggestions?
Thanks!
Gsm Module
bu projeye gsm modülü ekleyerek uzaktan bağlanabilir miyiz ?
The above guide is amazing.
The above guide is amazing. Worked like a charm.
I am only confused about accessing the security camera server from a different network. You say that we need a static IP. Is this because of the inconvenience that a dynamic IP keeps changing every once in a while or does the static IP have a specific format that is required for this task?
What I am trying to say is that I access my RPi either via SAMBA or VNC without having a static IP. I just edit the device IP in the SAMBA or VNC settings once in a while that the IP changes. Could I do the same with Motion?
When trying to access the camera server from all devices in the local network everything works out fine. Not sure though what I have to do to access the camera from another network. Should I use the other IP (the one we are not allowed to share) in the palce of the device IP, followed by :8081?
Ans one final question: Have you tried recently the command on_motion_captured that allows triggering? A lot of people complain taht it does not work any more.
Nevermind, I used the public
Nevermind, I used the public IP from another network and it worked! Super cool project. Thanks again!

Hello,
I tried this project but at the last step when I typed 192.168.1.103:8081 into my web browser it says not reachable! Please advise...
Thanks