

Introduction
Flashing or updating the firmware is an essential step in setting up and maintaining your LiteWing drone, ensuring it runs the latest features, performance improvements, and bug fixes. This guide walks you through a simple, browser-based method to update your device using the LiteWing Firmware Flasher - eliminating the need for complex software installations or command-line tools. With just a compatible browser, a USB cable, and a few minutes, you’ll have your drone updated and ready for flight.
Prerequisites
If you want to modify the firmware or compile the firmware by yourself, you will need to install some prerequisites:
- Use the latest version of Chrome or Microsoft Edge browser for flashing the firmware, since our flashing tool depends on the
- Web Serial API and it's only supported in Chrome-based (version greater than V86) browsers.
- Close any other application using the serial port (Arduino IDE, serial monitors, etc.).
- Use a data-capable USB cable - charge-only cables will not work.
Launching the Firmware Flasher
Go to the Firmware and Programming section on the LiteWing Wiki page. You will see the embedded LiteWing Firmware Flasher web tool - a browser-based flashing utility that uses the Web Serial API. Click "Click to Start Flashing" to launch the tool.
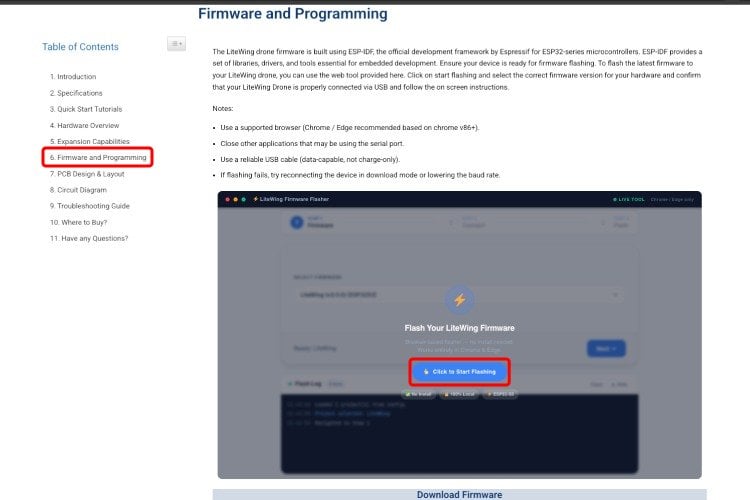
The flasher is a web app that runs entirely in the browser via the Web Serial API. No driver installation or desktop software is needed.
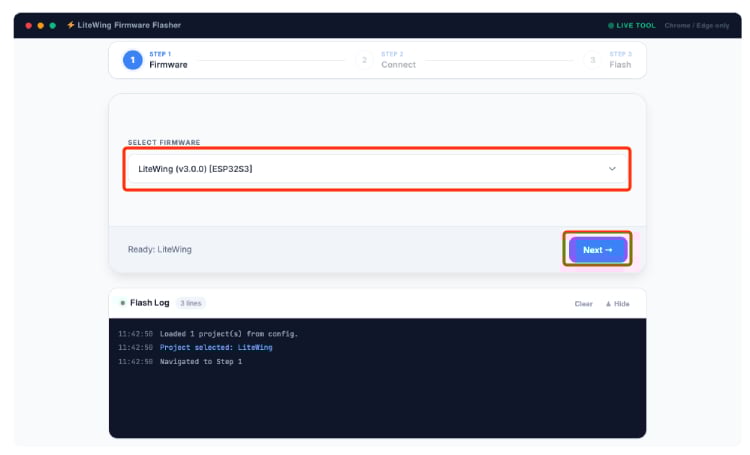
In the next step, select the latest firmware version from the dropdown menu and click Next - to continue.
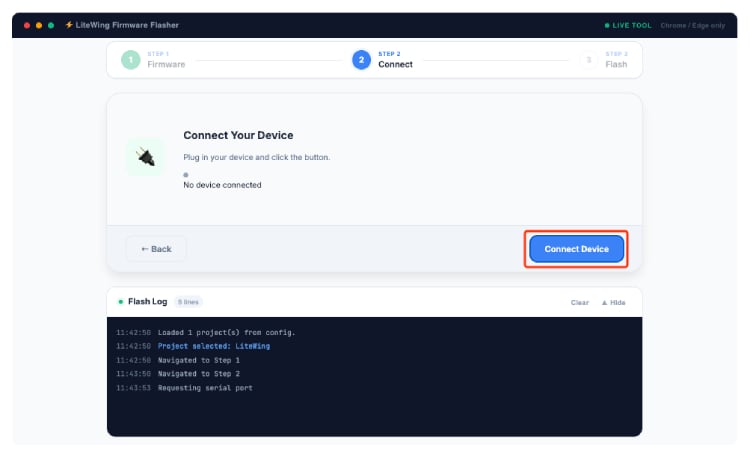
Connect. Plug your LiteWing drone into your computer using a USB-C cable. The page shows "No device connected" initially. Click the Connect Device button to open the browser's serial port selector.
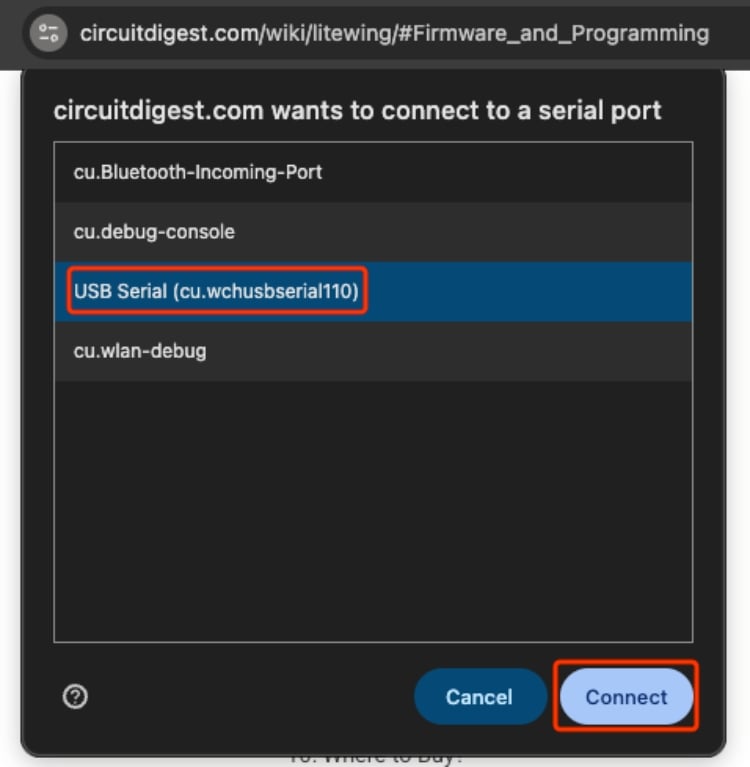
A browser dialog pops up listing available ports. Look for USB Serial - for example, here in my Mac cu.wchusbserial110. Select it and click Connect.
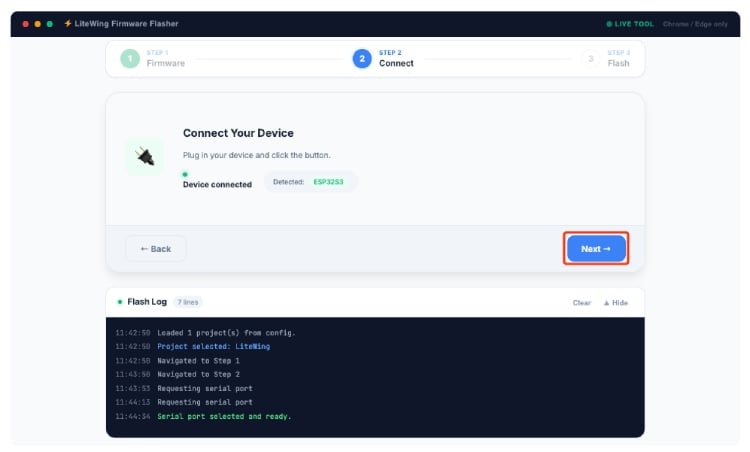
After connecting, the flasher confirms "Device connected" and automatically detects the chip as an ESP32 S3. Click Next to move to Step 3.
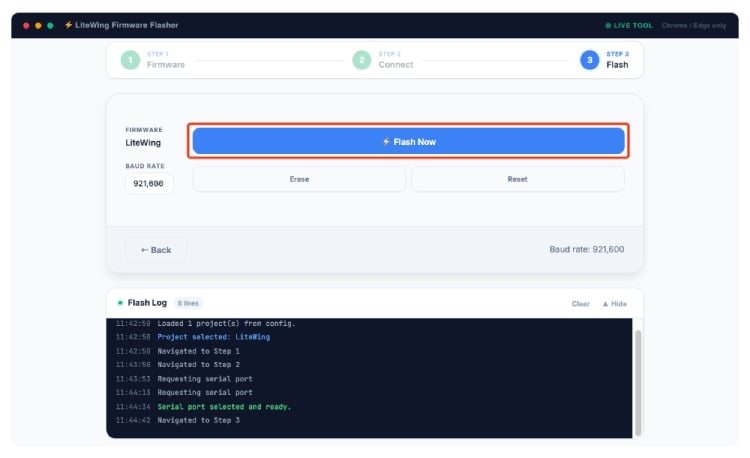
The tool shows the selected firmware (LiteWing) and the default baud rate. Click the large Flash Now button to begin writing.
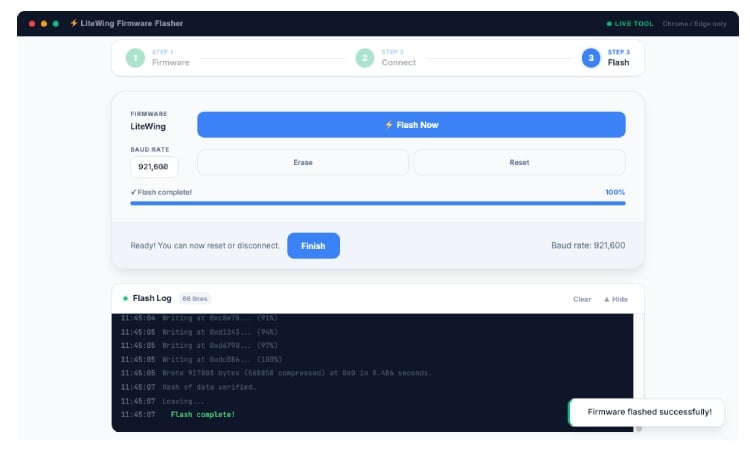
The Flash Log panel shows real-time progress. The blue progress bar fills to 100%. When complete, you will see "Flash complete!" in the log and a "Firmware flashed successfully!". Click Finish. That's it, the LiteWing will reset automatically and it's ready to fly.
Troubleshooting
- Port not appearing
Switch USB cables (charge-only cables lack data lines). Try a different USB port on your computer. - Flash fails partway
Use the Erase button first to wipe flash memory, then retry. Lower the baud rate if errors persist. - The browser says "not supported"
Only Chrome v86+ (released after October 2020 or later) and Edge support the Web Serial API. Firefox and Safari are not supported. - Drone unresponsive after flash
Press the Reset button on the PCB, or disconnect and reconnect the battery after removing the USB cable.
Document Index
Last Updated: December 8, 2025 | Build Status: Tested & Verified
Hi, You can find the full source code in the LiteWing GitHub repo linked in the tutorial.
Hi, Can you tell me how to change the ssid and password of this drone?
Hi,
You have to use ESP_IDF as described by Jobit Joseph
use menuconfig
Select EspDrone config
then select Wireless config
all what you need is there
hi Jobit Joseph,
Can you confirm link for ESP IDF source code, The one linked in this tutorial is ARDUINO one
Kind regards
Hi jobit Joseph,
thanks a lot for all your great work on this project.
I finally succeed to install the ESP IDF and your firmware;
now I am developing a hardware remote controller for this but I cannot find the UDP port parameter.
Would you be kind to tell me witch UDP port is used or where I can find it in the ESP IDF
Rgds
OK I spy and get it !
Hi jobit Joseph,
I am now trying to have a ESP_now version to controle liteWing
I try you esp_now sketch on github but cannot compile directly and had to adapt a little bit to my own configuration.
Now it compile , run and say joystick data has been sended but nothing happen on drone side.
Is there any too I can use with ESP-IDF to check what the drone receive and then fix my coding ?
Thanks
under powershell I can see some information that seem MAC
I (612) wifi:mode : softAP (dc:b4:d9:06:13:a9)
then
I (626) espnow: mac: dc:b4:d9:06:13:a8, version: 2
Witch one should I use in the sketch for the remote controler for
i want to use a commercial transmitter like the fsi6 with it how can i do that ?
Thanks for this great explanation. I've assembled drone personally. when connecting to the laptop It's com port does not appear. what might be the problem?
Could please elaborate more about your hardware setup?
Sir,I had the same problem which is not finished yet,and I don't want to give up even though I‘m taking part in the national postgraduate entrance examination,could you give me some advise,please?
Hi,bro,did you overcome the problem? I had the same problem which is not finished yet.
I wish to add holybro pmw3901 UART, I have made some changes, however as soon as i connect it to the litewing app, the motors keep rotating and nothing happens
The LiteWing drone communicate with the PMW3901 over SPI, not UART.
Why is it that when i connect my 3.7 lipo 25C battery to the drone, that the wing motors starts and there is no way to stop it. Is this a faulty esp32 drone. I ordered this drone from tindie " LiteWing - ESP32 based Programmable Drone". Is there a way to fix this ;( please help
Check the motor driver mosfets and their pull down resistors. Make sure they are properly soldered and working.
My hardware version is 2.6, but the webpage for flashing the firmware is 3.0 instead of 2.6. How should I proceed?

Hi,
Thanks for those clear explanations, flashing the ready-made (Bin) firmware work like a charm, but how to modify and adapt some more functions as the source code you provide is not the one that is ready-made !
Would you be kind to share the latest source code, as this is supposed to be open source and open to analysis and upgrade ?