
Starting out as a beginner with the Arduino, can be quite challenging for people without electronics background, you’d come across errors, some of which may have simple solutions but might take you days to solve. So to make things a little bit easier, I have created a list of 10 most popular Arduino errors along with possible solutions to them.
1. Arduino Board not Recognized
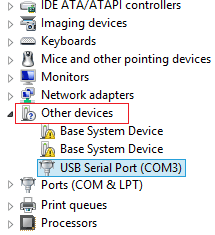
This refers to a situation where an Arduino board, connected to a computer is not recognized by the computer. When this happens, the board is usually not listed under the port lists of the Arduino IDE and is sometimes labeled USB2.0 under the device manager.
Solution
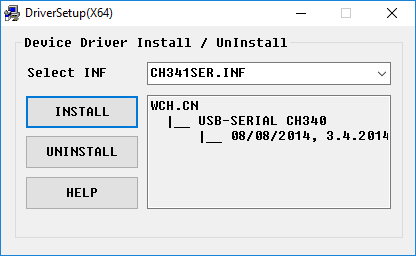
This happens when you use certain cheap Arduino clones which use the CH340g USB to Serial converter chip instead of the FTDI (FT232RL) and others used by the standard Arduino boards. The drivers for USB to Serial Chips used by the Standard Arduino boards are always packaged along with the Arduino IDE Setup file, so when you install the IDE, the drivers are automatically installed on your PC. To be able to use this CH340g USB to Serial converter based Arduino boards, you will have to download and install the driver for the chip. The driver can be downloaded from this link. Installing it is as simple as clicking the install button on the setup interface shown below.
With this done, you should now be able to locate the port to which the board is connected on the Arduino IDE.
2. Board not in Sync
Usually, when this happens, You will not be able to upload code (Although the IDE at times will display “done uploading”) to the Arduino board and the IDE will display the error code; “avrdude: stk500_getsync(): not in sync: resp=0x00”.
Solution
The sync: resp = 0x00 is a generic response that translates to the “Atmega chip is not working” on the Arduino. When this happens, there is a whole bunch of things that could be wrong. Here are some steps that could be taken to clear this error.
1. Ensure there is nothing connected to digital pins 0 and 1 on the Arduino (including shields).
2. Ensure the correct com port and board were selected under the tools menu.
3. Press the reset button on the Arduino couple of times and re-upload the code.
4. Disconnect and reconnect the Arduino to the PC.
5. Restart the Arduino IDE.
If any of this does not work, it might be time to try using a different Arduino board with the PC or using the “faulty” Arduino board with another PC. This should help you identify which of them is the origin of the problem. If you discover the problem is with the PC, reinstall the Arduino IDE. However, if the “faulty” Arduino board is the problem source, an ultimate solution will be to flash the board with the Arduino firmware. If none of the above works, it might be time for you to change the Arduino Board.
3. The code doesn't start on Power Reset
This refers to cases where the Arduino does not run the sketch uploaded to it when powered On and in most cases, just reverts back to the blink sketch associated with the bootloader.
Solution
Just like the other problems treated there are a number of things that could cause this.
If the board hangs and does nothing, you should check your code to ensure you are not sending serial data to the board as it comes on. When the Arduino is switched on, the bootloader, in the first few seconds, listens for the computer to send it a new sketch for upload to the board. If no new sketch is received, after a short while, the bootloader will time out and run the last sketch uploaded to the board. If your code is sending serial data during the first few minutes, the bootloader will not time out and the last sketch uploaded to the board will not start.
If sending serial data as soon as the board comes on is an important part of your project, you may need to find a way to give it some delay to stop serial data from arriving immediately the Arduino comes on. If making adjustments will affect the task the project is to perform, then you may have to upload your sketch to the board using an external programmer, as the bootloader can be bypassed by them.
If the board doesn’t hang but returns to the Arduino blink sketch (Led on pin 13 blinks every now and then), a straightforward fix will be to flash the board with the Arduino bootloader, as the one on the board may have been corrupted.
4. Invalid Device Signature Error

This error is displayed when an attempt is made to upload code, to a board, different from the one selected under the tools>board list on the Arduino IDE. This error usually occurs as a result of the device signature on the target board is different from that of the board selected on the IDE.
Solution
The solution to this error is as simple as ensuring the correct board is selected on the Arduino IDE. If this does not work, there might be a need to flash the microcontroller with the latest version of the Arduino bootloader.
5. Launch4j Error
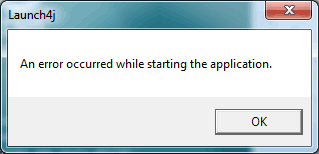
The Arduino IDE sometimes takes a while before loading and when it loads, if you click on anything, it will display the Launch4J error as shown above. Launch4j is a tool used for wrapping Java applications (jars) in Windows native executable, allowing them to be used as a regular Windows program.
The Arduino IDE itself is written in JAVA and this error occurs due to the incompatibility of the Java Run Time Environment (JRE) library supplied with the Arduino IDE.
Solution
From experience, this error can be cleared by something as simple as turning off your PC’s Bluetooth or WiFi Connectivity. However, a more complete and permanent solution is to replace the JRE in the Arduino package with a recent version.
6. Serial Port Already in Use

This is probably one of the easiest errors to resolve. It usually occurs when you try to upload code to an Arduino while the serial monitor is opened (this is no longer an issue if using recent IDE versions) or when you try to launch the serial monitor when the Arduino is talking to another software or device via the serial port. Essentially, it occurs when you try to use the Arduino serial port for two different things at the same time.
Solution
Just like the IDE suggested, close every other software/tool (including the serial monitor/plotter) that may be using the com port. If you are not sure of the particular software, unplug the Arduino. It should be ready to go by the time you plug it back.
7: Sketch Uploads Successfully but Nothing Happens
This error is similar to some of the other errors already treated above. For this error, the Arduino IDE will suggest the code has been uploaded successfully, but the board does nothing.
Solution
- Ensure the board selected in the IDE is the same as the target board.
- This could be as a result of the sketch size being larger than the board’s capacity. Check the sketch size and use some of the methods mentioned above to reduce the size.
- Lastly, this error could occur when a noisy power supply is being used. Ensure the power supply is stable enough.
8. Unsatisfied Link Error
This is probably the only rare error that made it onto this list. This occurs when you have an old version of the communication library lying around on your PC, most likely from a previous install.
Solution
To solve this error, search for comm.jar or jcl.jar in /System/Library/Frameworks/JavaVM.framework/ or in directories on your PC’s CLASSPATH or PATH environment variables.
9. Sketch Too Large
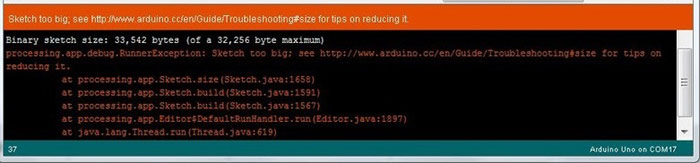
This error occurs when your code is larger than the flash memory of that particular Arduino board. The size of the flash memory of the Arduino Uno, for instance, is 32Kb with 2KB already being used by the Arduino bootloader. If you should upload a code with a size higher than 32Kb, the Arduino will display this warning.
Solution
As mentioned above, this occurs when your sketch is larger than the flash memory of the particular board you are using, thus, to solve this, you have to find ways of reducing the amount of space occupied by your code. Some of the tips for achieving this include;
- Where possible, use integer data types in place of a float.
- Where possible use the “const” qualifier when declaring variables.
- Include necessary libraries only. Where possible, use the lightweight versions of the most important libraries.
- Improve on the code generally. Develop algorithms that could help make your code shorter and generally lightweight.
A more radical solution will be to move the project to another board, like the Arduino Mega, which has a larger flash memory compared to the Uno.
10. java.lang.StackOverflowError
When processing the sketch, the Arduino uses some regular expressions for processing and sometimes gets confused when it encounters certain strings related errors like missing quotes.
Solution
This error is solved by taking a second look at the code, especially the parts where string sequences are used. Ensure the quotes are complete, backslashes are rightly used etc.
There is a limit to the number of errors that one can fit into a single tutorial and for that reason, we will stop here. However, this list contains some of the most common errors beginners face when using the Arduino. Are you battling a particular error, feel free to drop a comment, hopefully, we can work through it together.
Next time.
