
Voice-controlled smart devices have transformed the way we interact with technology, and with the arrival of Espressif’s ESP32-S3 platform, building a compact and intelligent voice assistant is now within reach for makers. To explore the possibilities of on-device AI and low-power voice interaction, I designed a custom portable AI voice assistant using ESP32 that integrates Espressif’s Audio Front-End (AFE) framework with the Xiaozhi MCP chatbot system. The result is a self-contained, always-on smart home controller capable of understanding and responding to natural voice commands without needing a phone. This DIY AI voice assistant project demonstrates how accessible embedded AI has become for electronics enthusiasts.
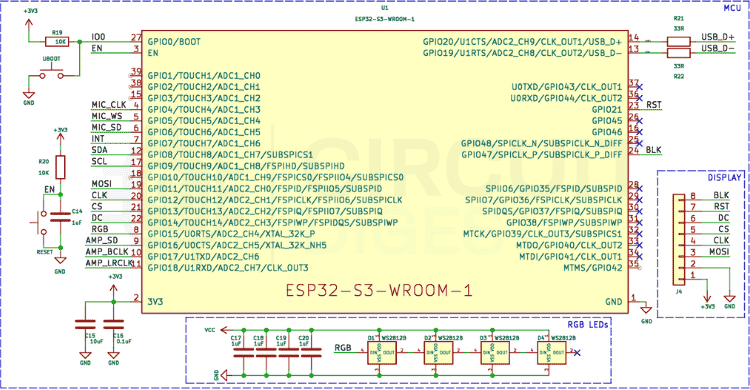
The project centres on the ESP32-S3-WROOM-1-N16R8 module, which provides the processing power and Wi-Fi and Bluetooth connectivity required for both local and cloud-based operations. Its dual-core architecture and AI acceleration support allow real-time keyword detection and low-latency response. For clear voice capture, the system uses two TDK InvenSense ICS-43434 digital MEMS microphones configured in a microphone array, enabling the AFE to perform echo cancellation, beamforming, and noise suppression effectively. Audio output is handled by the MAX98357A I2S amplifier, which drives a small speaker to deliver natural and clear voice feedback.
The board’s power section is built around the BQ24250 charger and MAX20402 DC-DC converter, ensuring stable operation under both USB and battery modes. This allows the assistant to function efficiently on wall power or run portably on a Li-ion battery. Careful layout and decoupling were applied to minimise noise and maintain clean signal integrity across the analog and digital domains. To enhance user interaction, WS2812B RGB LEDs were added for visual indication, and tactile switches allow manual control and reset functions. Each component was selected to balance performance, efficiency, and compactness, resulting in a robust design suited for continuous operation.
As a voice interface, the device leverages the Xiaozhi MCP chatbot framework, which connects embedded systems to large language models. Through MCP, the assistant can communicate across multiple terminals, enabling multi-device synchronisation and smart home control. When paired with Espressif’s AFE, this setup provides reliable local wake-word detection and command recognition while extending to cloud AI platforms like Qwen and DeepSeek for complex conversation and natural language understanding. This hybrid approach ensures responsive operation with enhanced cloud intelligence when connected.
The firmware was developed in VS Code using the ESP-IDF plugin (version 5.4 or above), with Espressif’s AFE library integrated for real-time voice processing. I2S, I2C, and GPIO interfaces were configured for peripheral communication, while network connectivity handled both MQTT-based smart device control and MCP protocol data exchange. Thanks to the open-source nature of the Xiaozhi framework, adapting the system for different AI services or custom wake words was straightforward, allowing easy experimentation with different model backends and conversational logic. The complete ESP32 AI voice assistant GitHub repository includes schematics, firmware code, and detailed build instructions for makers looking to replicate this ESP32 voice assistant DIY project.
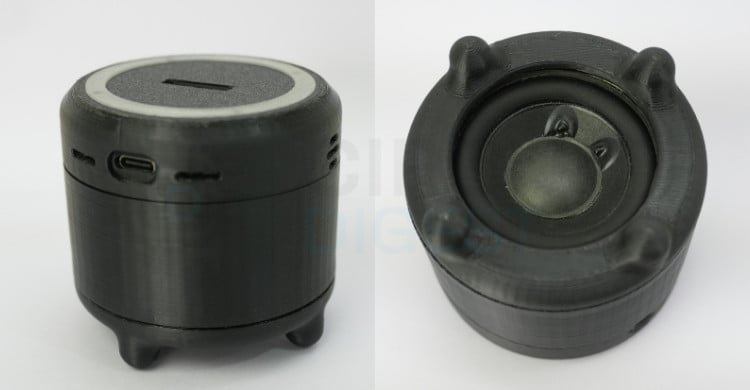
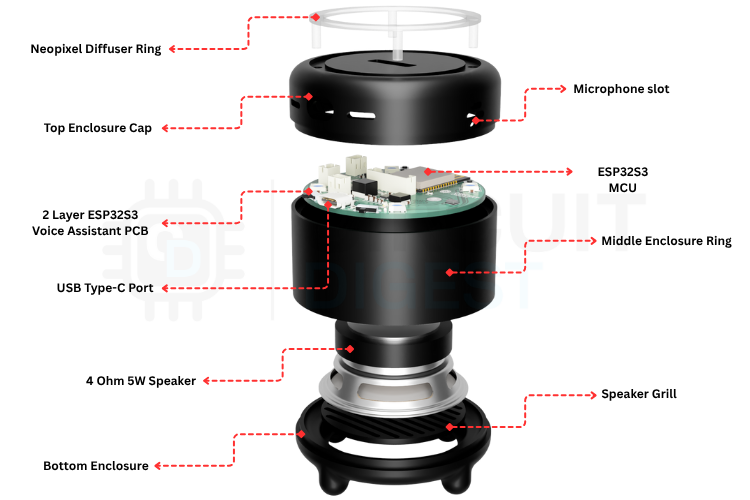
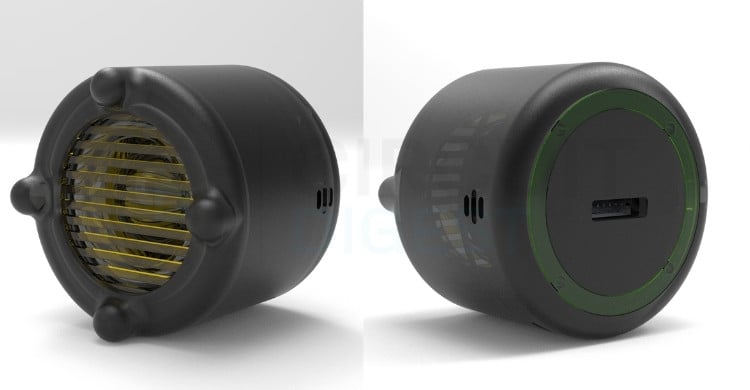
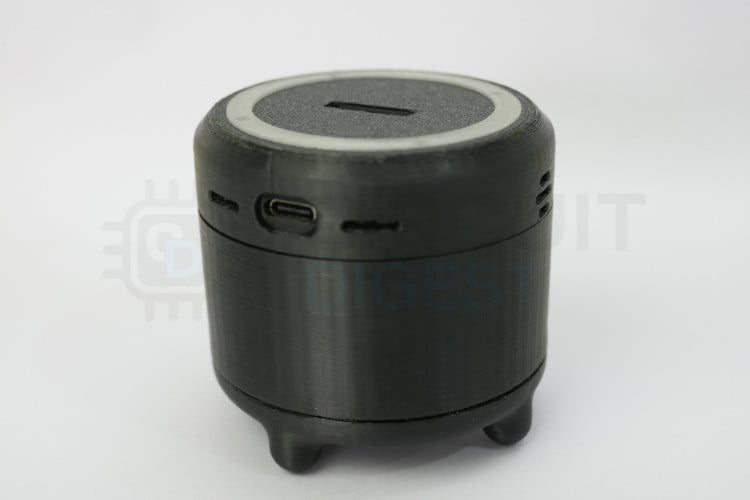
To complement the electronics, I designed a 3D-printed enclosure optimised for acoustic performance. The enclosure isolates the microphones from speaker feedback and channels sound evenly to improve recognition accuracy. It also features an LED light ring around the top surface, visually indicating device states such as listening, processing, or responding. The result is a compact, modern-looking desktop or wall-mounted AI assistant that feels as functional as any commercial smart speaker but is built entirely from scratch. This ESP32 AI voice assistant tutorial provides a complete roadmap for building your own conversational AI device.
This open-source project encourages makers and developers to explore the intersection of embedded systems and large language models, showcasing one of the most exciting ESP32-S3 AI projects available today. It demonstrates how accessible AI hardware has become, allowing anyone to design devices that not only sense and compute but also understand and respond intelligently. By combining Espressif’s AFE framework with the Xiaozhi MCP platform, this ESP32-S3-based assistant brings real conversational AI into the world of embedded electronics, efficient, responsive, and entirely open for innovation.
Code File


PCB Gerber File

| Value | Manufacturer | DigiKey Part Number | Datasheet Link | Quantity |
|---|---|---|---|---|
| ESP32-S3-WROOM-1-N16R8 | Espressif Systems | 5407-ESP32-S3-WROOM-1-N16R8CT-ND | 1 | |
| BQ24250RGER | Texas Instruments | 296-43584-1-ND |
|
1 |
| MAX20402AFLB_VY+T | Analog Devices Inc./Maxim Integrated | 175-MAX20402AFLB/VY+TCT-ND |
|
1 |
| MAX98357AETE+T | Analog Devices Inc./Maxim Integrated | MAX98357AETE+TCT-ND |
|
1 |
| ICS-43434 | TDK InvenSense | 1428-1066-1-ND |
|
2 |
| 0.1uF | YAGEO | 311-1088-1-ND |
|
4 |
| 1uF | Samsung Electro-Mechanics | 1276-1946-1-ND |
|
8 |
| 2.2uF | Samsung Electro-Mechanics | 1276-1040-1-ND |
|
4 |
| 10uF | Samsung Electro-Mechanics | 1276-1038-1-ND |
|
1 |
| 22uF | Samsung Electro-Mechanics | 1276-1100-1-ND |
|
2 |
| 33nF | Samsung Electro-Mechanics | 1276-2040-1-ND |
|
1 |
| 220pF | KEMET | 399-C0603C221F5GACAUTOCT-ND | 2 | |
| 0R | YAGEO | 311-0.0GRCT-ND |
|
4 |
| 33R | Stackpole Electronics Inc | RMCF0603FT33R2CT-ND |
|
2 |
| 249R | Stackpole Electronics Inc | RMCF0603FT249RCT-ND |
|
1 |
| 267R | YAGEO | 311-267HRCT-ND |
|
1 |
| 1K | Stackpole Electronics Inc | RMCF0603FT1K00CT-ND |
|
2 |
| 1K5 | YAGEO | 311-1.5KGRCT-ND |
|
1 |
| 5K1 | YAGEO | 311-5.10KHRCT-ND |
|
2 |
| 10K | YAGEO | 311-10.0KHRCT-ND |
|
5 |
| 20K | YAGEO | 311-20.0KHRCT-ND |
|
3 |
| 100K | Stackpole Electronics Inc | RMCF0603FT100KCT-ND |
|
2 |
| 274K | Stackpole Electronics Inc | RMCF0603FT274KCT-ND |
|
1 |
| 1uH | TDK Corporation | 445-6672-1-ND |
|
1 |
| 1.5uH | Taiyo Yuden | 587-2617-1-ND |
|
1 |
| FerriteBead_Small | Eaton - Electronics Division | 283-MFBW1V2012-000-RCT-ND |
|
2 |
| SLW-66527511-SMT-TR | Same Sky (Formerly CUI Devices) | 2223-SLW-66527511-SMT-TRCT-ND |
|
2 |
| WS2812B RGB LED | XINGLIGHT | 5962-XL-5050RGBC-WS2812BTR-ND |
|
4 |
| LED Red | XINGLIGHT | 5962-XL-1608SURC-06TR-ND |
|
1 |
| LED Blue | XINGLIGHT | 5962-XL-1608UBC-04TR-ND |
|
1 |
| Tactile Switch SPST | Omron Electronics Inc-EMC Div | SW1021CT-ND |
|
2 |
| USB_C Receptacle | GCT | 2073-USB4105-GF-A-060CT-ND |
|
1 |
| B2B-PH-K-S | JST Sales America Inc. | 455-1704-ND |
|
2 |
| Conn_01x08 | Adam Tech | 2057-2SH-C-08-TS-ND |
|
1 |
The dream of having a personal AI assistant that understands and responds to voice commands has captivated makers and tech enthusiasts for years. While commercial solutions like Alexa and Google Assistant dominate the market, they come with privacy concerns, subscription costs, and limited customisation. This ESP32 voice assistant DIY project demonstrates how you can build your own intelligent voice assistant from scratch using the ESP32-S3 microcontroller and the Xiaozhi AI framework. What if you could build your own intelligent voice assistant from scratch, one that respects your privacy, runs on affordable hardware, and can be tailored to your exact needs?
This is where the ESP32-S3 microcontroller and the Xiaozhi AI framework come together to create something truly remarkable. By combining Espressif's powerful dual-core processor with cloud-based large language models, we designed a custom voice assistant that bridges the gap between embedded systems and cutting-edge AI. This portable AI voice assistant using ESP32 combines Espressif's powerful dual-core processor with cloud-based large language models. The result is a compact, always-on device capable of natural conversation, smart home control, and personalised responses, all while maintaining a minimal footprint and operating efficiently on battery power.
In this guide, we'll walk you through our journey of designing, building, and programming this ESP32-S3-based AI voice assistant. From selecting the right components and designing the PCB to integrating the Xiaozhi framework and creating a custom 3D-printed enclosure, every step reflects a balance between functionality, efficiency, and accessibility. Whether you're an experienced maker or someone just beginning to explore the world of embedded AI, this ESP32-S3 AI projects will show you that building intelligent devices is no longer reserved for large corporations.
What is Xiaozhi and How Does This ESP32 AI Voice Assistant Work?
Before diving into the ESP32 AI voice assistant tutorial, it's important to understand the software framework that powers this voice assistant. Xiaozhi is not a single product but an open-source AI chatbot platform built specifically for ESP32 microcontrollers. Unlike traditional voice assistants, Xiaozhi uses a hybrid approach: lightweight tasks run on the device itself, while computationally intensive AI operations are handled by powerful cloud servers.
The Architecture: Client-Server Intelligence for Your ESP32 AI Voice Assistant
The Xiaozhi system operates on a classic client-server model, but with a clever distribution of responsibilities. The ESP32-S3 acts as the client, managing all local hardware interactions, wake-word detection, and audio streaming. Meanwhile, a remote server handles the heavy lifting of speech recognition (STT), large language model reasoning (LLM), and speech synthesis (TTS). This architecture allows a low-cost microcontroller to deliver performance comparable to commercial smart speakers.
At the core of this communication is the Model Context Protocol (MCP), an open standard that defines how the server and AI models exchange information. MCP acts like a universal interface for AI systems, similar to how USB-C serves as a universal connector for devices. It allows the assistant to interact with external tools, APIs, and smart home systems, extending its capabilities far beyond simple conversation.
How a Conversation Flows in Your DIY AI Voice Assistant
5-Step Voice Interaction Process:
✓ Wake-Word Detection: The ESP32-S3 remains in a low-power state, utilising a small, optimised neural network called WakeNet to listen for a specific trigger phrase like "Hey Wanda" without draining the battery. Upon detection, the system activates.
✓Voice Capture and Processing: Once activated, the device records audio through its digital MEMS microphone (ICS-43434). The firmware employs Espressif's Audio Front-End (AFE) suite for noise reduction, echo cancellation, and voice activity detection (VAD), ensuring clear voice data is transmitted.
✓Real-Time Streaming via WebSockets: The ESP32 establishes a persistent WebSocket connection to the cloud server, streaming audio in real-time. This bidirectional, low-latency protocol ensures a responsive conversational experience.
✓Server-Side AI Processing: Upon receiving the audio stream, the server transcribes it into text using speech-to-text (STT) services, processes the text with a large language model (LLM) to generate a conversational response, and interacts with external tools or plugins via the Model Context Protocol (MCP) for tasks like controlling smart devices; the resulting text is then converted into natural-sounding speech using a text-to-speech (TTS) service and streamed back to the ESP32 through the WebSocket connection.
✓Audio Playback and Standby: The microcontroller receives the audio stream and uses its I²S interface to send the data to a MAX98357A amplifier, which drives a speaker to play the response. After delivering the answer, the device returns to its low-power listening state, ready for the next interaction.
Understanding MCP (Model Context Protocol) in ESP32 AI Projects
The Xiaozhi framework's ability to control hardware isn't magic; it's built on a well-designed protocol called MCP (Model Context Protocol). Think of MCP as a universal language that allows AI models to interact with physical devices, sensors, and actuators in a standardised way. This is crucial for ESP32-S3 AI projects that require hardware control.
What Makes MCP Essential for DIY AI Voice Assistants?
| MCP Capability | Function in ESP32 Voice Assistant | Example Use Case |
|---|---|---|
| Discover Hardware | Query available devices and capabilities | Identify connected LEDs, sensors, relays |
| Understand Capabilities | Each component describes its functions | Know which GPIO pins control which devices |
| Execute Actions | AI sends commands to control hardware | Turn on lights, read temperature, activate relays |
| Receive Feedback | Hardware reports state back to AI | Confirm light status, report sensor readings |
MCP serves as a bridge between the AI's decision-making capabilities and the physical world. Just as USB-C provides a universal interface for connecting devices, MCP provides a standardised way for AI systems to discover, understand, and control hardware components in your portable AI voice assistant using ESP32. This open protocol ensures that our voice assistant can:
- Discover available hardware - The system can query what devices and capabilities are available
- Understand capabilities - Each hardware component describes what it can do
- Execute actions - The AI can send commands to control hardware
- Receive feedback - Hardware can report its state back to the AI
Why MCP Matters for Your ESP32 Voice Assistant DIY Project
Traditional IoT devices often require custom apps, proprietary protocols, and complex integrations. MCP standardises this interaction, making it possible to:
- Add new hardware without modifying AI models
- Share capabilities across different AI systems
- Maintain security through structured, validated commands
- Debug easily with clear tool descriptions and parameters
For makers and developers, this means you can focus on the hardware functionality while the AI handles natural language understanding and context. The protocol abstracts away the complexity of human-computer interaction, letting you simply define what your hardware can do. We will explore the MCP tools implementation in detail in the programming section of this ESP32 AI voice assistant tutorial.
Key Tools and Technologies for ESP32 AI Voice Assistant Development
On the ESP32 Device: The ESP32-S3 runs firmware built with ESP-IDF, Espressif’s IoT Development Framework, providing low-level hardware access. It uses WakeNet, a neural network optimised for wake-word detection, and the Audio Front-End (AFE) suite for noise reduction, echo cancellation, and voice activity detection. WebSockets enable real-time, full-duplex communication between the device and the server.
On the Server Side: The backend, built with Python, Java (Spring Boot), or the py-xiaozhi framework, manages AI interactions. Audio is transcribed using STT services (OpenAI Whisper, Deepgram, or custom models) and processed by LLMs (such as Qwen, DeepSeek, or OpenAI) to generate responses. TTS services convert the text responses into natural-sounding speech, while the Model Context Protocol (MCP) integrates external tools and APIs for tasks like smart home control.
Development Tools for ESP32 Voice Assistant DIY: Firmware development is typically done in Visual Studio Code with the ESP-IDF plugin. Pre-compiled firmware can be flashed onto ESP32 boards using the Espressif Flash Download Tool or M5Burner, and the web-based control panel provides an intuitive interface for device registration, AI personality configuration, and system management.
Features of Our Custom ESP32 AI Voice Assistant Board
With a clear understanding of how Xiaozhi works, we set out to design a PCB that would integrate all necessary components of a professional portable AI voice assistant using ESP32 into a single, elegant solution. Our goal was to create a board that not only supports the Xiaozhi framework but also provides flexibility for expansion, reliable power management, and a professional finish.
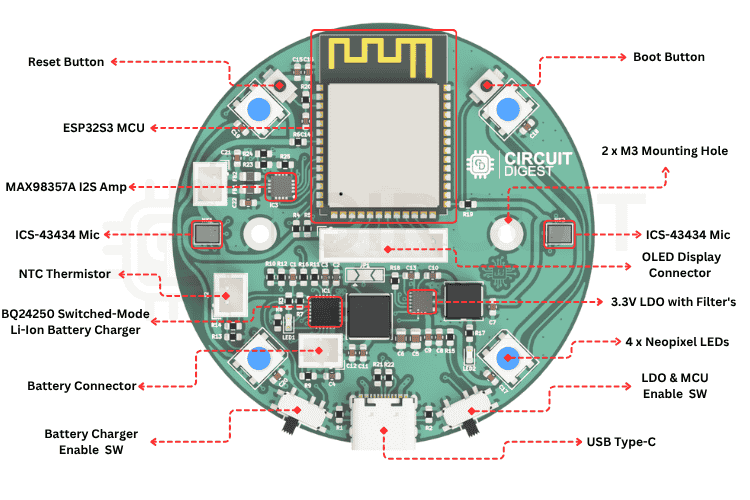
Core Processing and Connectivity for ESP32-S3 AI Projects
At the heart of the design is the ESP32-S3-WROOM-1-N16R8 module, featuring dual-core processing, 16MB of flash memory, and 8MB of PSRAM. This module provides the computational power needed for real-time audio processing while also offering Wi-Fi and Bluetooth connectivity. The dual-core architecture is particularly valuable here: one core can handle network communication and system tasks, while the other focuses on audio processing and wake-word detection, ensuring smooth, responsive operation.
High-Quality Audio Capture System
For voice recognition to work reliably in this ESP32 voice assistant DIY project, the microphone array is critical. We integrated two TDK InvenSense ICS-43434 digital MEMS microphones configured in an array. These microphones deliver a high signal-to-noise ratio and are connected via the I²S bus, providing clean digital audio directly to the ESP32. The dual-microphone setup enables the AFE algorithms to perform beamforming and echo cancellation more effectively, ensuring that the assistant can hear you clearly even in noisy environments or when music is playing through the speaker.
Clear Audio Output
For audio playback, the board uses the MAX98357A I²S Class-D amplifier, a popular choice in ESP32-S3 AI projects for its efficiency and quality. It drives a small speaker with enough volume to be heard clearly across a room, while its digital I²S input ensures minimal noise and distortion. The amplifier's built-in click-and-pop suppression also prevents the annoying sounds that can occur when audio starts or stops.
Robust Power Management for Portable Operation
Power management was a key consideration, as we wanted this assistant to work both as a wall-powered device and a portable, battery-operated unit. The power section is built around two main components:
- BQ24250 Li-Ion Battery Charger: This sophisticated IC handles charging from a USB-C source while simultaneously powering the device. It includes input current limiting, thermal regulation, and safety features to protect the battery. The charger can seamlessly switch between USB power and battery power without interrupting operation.
- MAX20402 Buck-Boost DC-DC Converter: To provide a stable 3.3V supply regardless of whether the device is running on USB power (5V) or a discharging battery (3.0V-4.2V), we used a buck-boost converter. Unlike simple linear regulators or basic buck converters, the MAX20402 can both step up and step down voltage, ensuring consistent performance across the entire battery discharge curve.
| Component | Function | Key Features |
| BQ24250 Charger | Li-Ion battery charging | Input current limiting, thermal regulation, safety features |
| MAX20402 Buck-Boost | 3.3V voltage regulation | Works with 3.0V-5V input, stable output across battery range |
User Interface and Visual Feedback
To enhance interaction and provide visual feedback in your ESP32 AI voice assistant:
- WS2812B RGB LED Ring: A ring of addressable RGB LEDs provides colourful, customizable status indication. These LEDs can show different states like listening (blue pulse), processing (spinning animation), speaking (green), or errors (red), making the assistant's status immediately visible.
- Tactile Switches: Two buttons provide manual control for reset and entering boot mode for firmware updates. These may seem basic, but they're essential for development and troubleshooting.
- OLED Display Header: We included a header for an optional 128x64 OLED screen. While not required for basic operation, a display can show messages, battery status, Wi-Fi connection info, or even simple animations, adding another dimension to the user experience.
Expansion and Connectivity
Recognising that users might want to add sensors, relays, or other peripherals, we broke out several GPIO pins on a header. This gives flexibility to extend the assistant's capabilities, such as adding temperature sensors, controlling smart home devices directly, or integrating additional input methods. The board also includes a JST connector for the battery and clearly labelled power rails, making integration straightforward.
Design Considerations
Throughout the design process, we paid careful attention to several critical aspects
- Signal Integrity: Decoupling capacitors were placed as close as possible to IC power pins, with 0.1µF for high-frequency noise and 10µF for bulk storage.
- Noise Isolation: The analog audio section was kept physically separated from the digital and power sections to minimise interference.
- Ground Plane: A solid ground plane underneath the entire board provides a clean reference for all signals and helps dissipate heat.
Components Required
Building this ESP32 AI voice assistant requires carefully selected components that work together seamlessly. Below is the complete Bill of Materials (BOM) for your DIY AI voice assistant project:
| Component | Value / Part | Qty | Notes |
| Microcontroller | ESP32-S3-WROOM-1-N16R8 | 1 | Main processor with 16MB flash, 8MB PSRAM |
| Microphones | TDK InvenSense ICS-43434 | 2 | Digital MEMS microphones, I²S interface |
| Audio Amplifier | MAX98357A | 1 | Class-D I²S amplifier |
| Battery Charger | BQ24250RGER | 1 | Li-Ion/LiPo charging IC |
| DC-DC Converter | MAX20402ATGA | 1 | Buck-boost regulator, 3.3V output |
| RGB LEDs | WS2812B | 4 | Addressable RGB LEDs |
| OLED Display (Optional) | 128x64 I²C OLED | 1 | Status display |
| Capacitors | Various (0603/0805) | 25 | See full BOM |
| Resistors | Various (0603) | 15 | See full BOM |
| Inductors | 1.5µH, 1µH (power) | 2 | For DC-DC converter |
| Tactile Switches | SPST | 2 | Reset and Boot buttons |
| USB-C Connector | USB4105-GF-A | 1 | Power and programming |
All components are available through standard distributors like DigiKey. The modular design means you can start with the basic components and add optional features like the LED ring or OLED display later. The modular design means you can start with basic components and add optional features like the LED ring or OLED display later as you develop your ESP32-S3 AI projects.
Schematic Design and Circuit Overview
When we started designing the schematic for this ESP32 voice assistant DIY project, we knew organisation would be critical. A voice assistant has many subsystems that need to work together seamlessly, so I broke the design into logical sections, each handling a specific function.
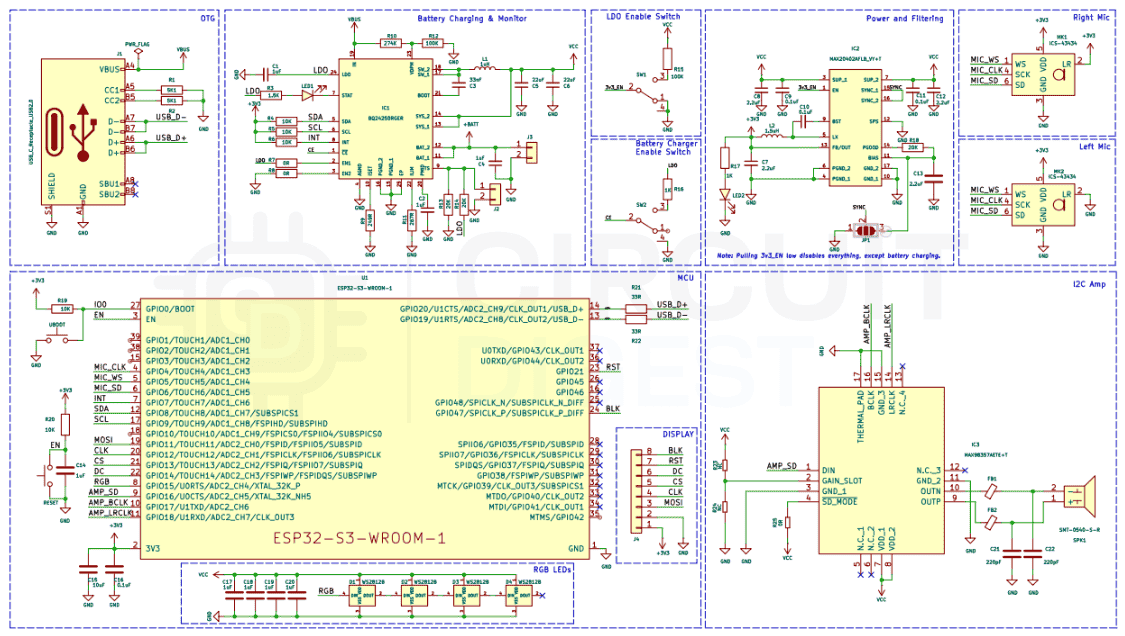
USB-C Power Input and Protection Circuit
The USB Type-C connector serves as the gateway for both power delivery and programming in your portable AI voice assistant using ESP32. We added the standard 5.1kΩ resistors on CC1 and CC2, which signal to any connected power source that this device is a sink and can safely receive power. To protect against electrostatic discharge and voltage spikes, we placed a USBLC6-2SC6 bi-directional TVS diode across both the power and data lines. This small component has saved countless projects from being destroyed by ESD events.
Right at the connector, we placed a 10µF capacitor across VBUS and GND to stabilise the input voltage. This capacitor acts as a first line of defence against voltage fluctuations when plugging in or when the power source has a noisy output. For the data lines, I kept them as short and direct as possible, routing them straight to the ESP32-S3's USB pins without unnecessary vias or detours.
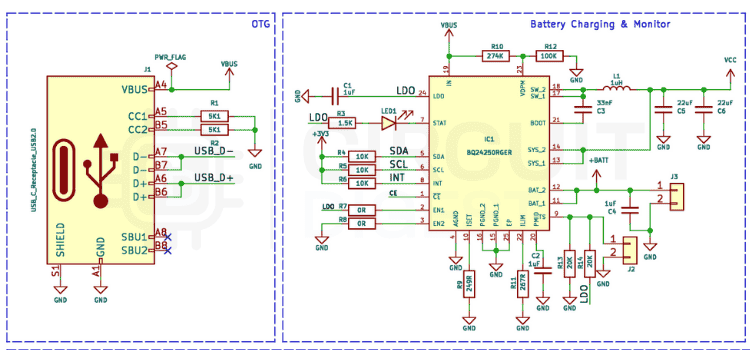
Battery Charging Section for Portable Operation
The BQ24250 handles Li-Ion battery charging with impressive sophistication for this DIY AI voice assistant. This IC handles Li-Ion battery charging with impressive sophistication. We configured it to accept input from the USB-C port and charge the battery using a constant-current/constant-voltage profile, which is essential for battery longevity and safety. The charging current is set by a 2kΩ resistor on the PROG pin, resulting in a safe 500mA charging rate that balances speed with thermal management.
One feature we really appreciate about the BQ24250 is its input current limiting. When the device is operating and drawing power while simultaneously charging the battery, the IC automatically manages the current distribution to prevent overloading the USB power source. This is especially important when using lower-power USB ports or power banks.
For visual feedback, we connected a blue LED to the charging status pin through a current-limiting resistor. This LED glows when the battery is charging and turns off when charging is complete, providing immediate feedback without needing to check the software.
Voltage Regulation
The MAX20402 buck-boost converter delivers a stable 3.3V across the entire battery voltage range (3.0V-4.2V), essential for reliable ESP32-S3 AI projects. We chose a buck-boost topology specifically because it can handle the entire range of input voltages efficiently. When the battery is fully charged at 4.2V, it drops down to 3.3V. As the battery discharges below 3.3V, it boosts up, ensuring consistent performance until the battery is nearly depleted.
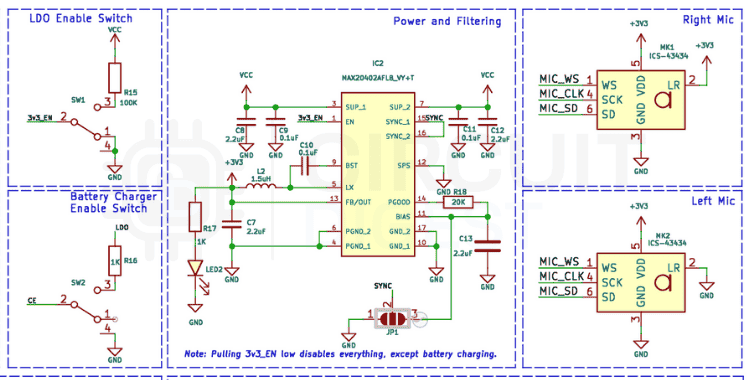
The supporting components for the regulator include a 4.7µH power inductor, input and output capacitors (22µF), and a feedback resistor network to set the output voltage. We kept the traces for the switching node as short as possible and used thick copper to handle the current without excessive losses. The ground plane under the regulator was kept solid to provide a low-impedance return path.
ESP32-S3 Core Circuit
The ESP32-S3-WROOM-1 module is relatively straightforward to integrate, but attention to detail matters. We placed 0.1µF decoupling capacitors directly at each VDD pin, as close to the module as physically possible. These high-frequency capacitors kill switching noise before it can propagate through the system. We supplemented these with 10µF bulk capacitors nearby to handle larger transient currents.
For the enable (EN) pin, I added a 10kΩ pull-up resistor to ensure the module stays in run mode, along with a small capacitor for power-on reset functionality. The GPIO0 pin (boot mode select) is also pulled high through a resistor, with a tactile switch to ground for entering programming mode. This simple circuit makes flashing firmware straightforward.
Audio Capture Circuit
The two ICS-43434 microphones connect in parallel to the I²S bus for your ESP32 AI voice assistant. Sharing the same clock, word select, and data lines. Each microphone has its own 0.1µF decoupling capacitor placed right at its supply pin. The I²S protocol naturally handles multi-channel audio, so with proper firmware configuration, the ESP32 can capture stereo audio or use both channels for enhanced processing.
We paid special attention to the microphone placement on the PCB, positioning them with adequate spacing to enable effective beamforming. The ground plane beneath the microphones is solid and uninterrupted, providing a clean reference for the differential signals.
Audio Output Circuit
The MAX98357A amplifier connects via I²S for digital audio in your ESP32 voice assistant DIY, receiving digital audio data directly. This eliminates the need for a separate DAC and associated analog circuitry, simplifying the design significantly. The amplifier's output drives a small 3W 4Ω speaker through thick traces capable of handling the current without excessive voltage drop.
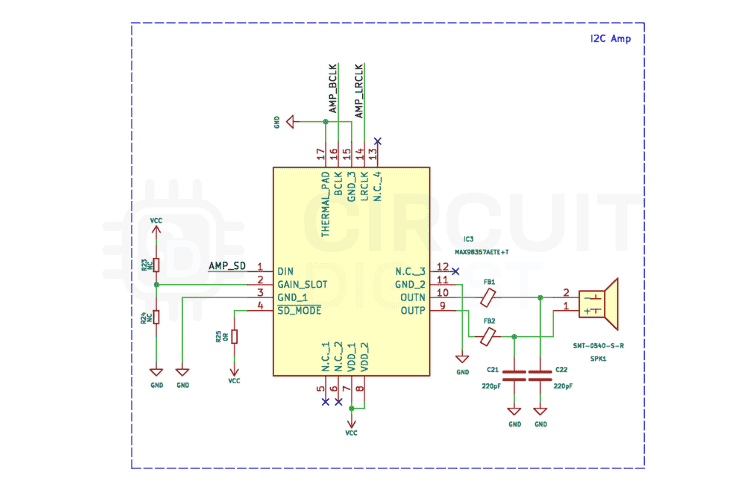
The amplifier includes built-in click-and-pop suppression, but we still added proper decoupling with 0.1µF and 10µF capacitors at its supply pins. We also configured the gain through a resistor to ensure the output volume is appropriate for the speaker size without distortion.
WS2812B LED Ring Circuit
The addressable RGB LEDs provide visual feedback for your DIY AI voice assistant. We added a 10kΩ pull-up resistor on the data line to ensure clean logic levels, and each LED has its own small bypass capacitor to prevent voltage sag during rapid colour changes. A series resistor on the data line helps prevent signal reflections and ringing.
Power distribution for the LEDs required careful consideration, as they can draw significant current when fully illuminated. We routed thick power and ground traces to the LED ring and added bulk capacitance nearby to handle the transient loads when colours change.
Optional OLED Display
The OLED display connects via I²C, using dedicated SDA and SCL lines from the ESP32. We included 4.7kΩ pull-up resistors on both lines, as required by the I²C specification. The display header is positioned for easy cable routing, and the I²C traces are kept short and parallel to minimise noise pickup.
PCB Layout and Design Considerations
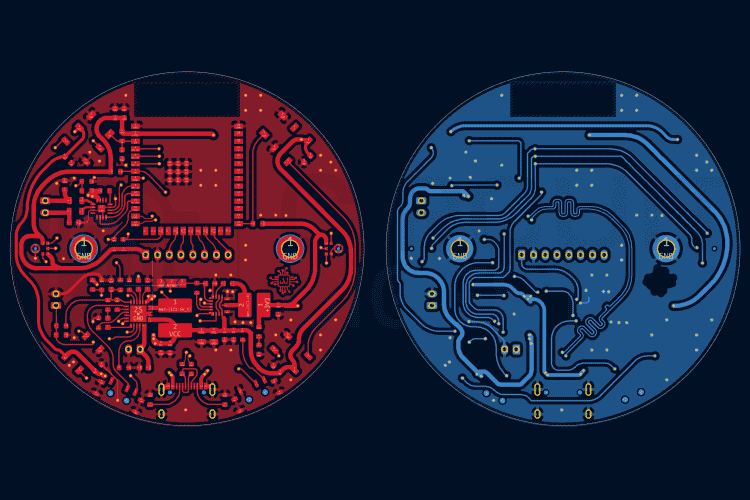
Moving from schematic to physical layout for this ESP32-S3 AI project required careful planning. Every component placement decision affects signal integrity, power efficiency, and thermal performance, so we approached the layout systematically.
Strategic Component Placement
We started by placing the ESP32-S3 module in the top center of the board, establishing it as the hub from which everything else radiates. This central position minimises the average trace length to all peripherals, reducing parasitics and improving signal integrity in your portable AI voice assistant using ESP32.
The USB-C connector went on the bottom edge for obvious reasons: accessibility. We positioned it such that the board could sit flat on a surface with the cable extending straight out. Near the USB connector, we placed the BQ24250 charger IC, keeping the high-current charging path as short as possible. The MAX20402 regulator sits adjacent to the charger, creating a logical power flow from input to battery to regulated output.
Along the top side edge, we positioned the two microphones with adequate spacing between them for beamforming. The microphones were oriented to face the same direction, creating a directional listening pattern that the AFE algorithms can exploit. We kept them away from the speaker and amplifier to minimise acoustic feedback.
The MAX98357A amplifier and speaker connection occupy one side of the board, physically separated from the microphones. This separation is crucial for preventing the assistant's own voice from being picked up as input, which would cause echo and feedback issues.
The WS2812B LED ring circles the perimeter of the board, providing a 360-degree visual indication. We arranged the LEDs in a circular pattern and positioned them so they would be visible from the top of the enclosure.
Key Layout Decisions:
- USB-C connector: Bottom edge for accessibility
- BQ24250 charger: Near USB for short high-current path
- Microphones: Top edge with adequate spacing for beamforming
- Speaker/Amplifier: Opposite side of the microphones to prevent feedback
- LED ring: Perimeter for 360-degree visibility
Power Distribution and Ground Plane
We used a solid ground plane on the bottom layer, connecting all grounds to this plane through short vias. This approach provides a low-impedance return path for all signals and helps dissipate heat. On the top layer, we created flood fills for 3.3V and VBAT, keeping them as wide as possible to minimise resistance and inductance. Critical for reliable ESP32 voice assistant DIY operation.
For the high-current paths (USB input, battery connection, and regulator output), we used thick traces with multiple vias connecting top and bottom layers. This parallel connection reduces the overall impedance and spreads the current load across more copper.
Signal Routing Best Practices
For optimal performance in your ESP32 AI voice assistant, I²S signals (microphone and amplifier connections) were routed as differential pairs where possible. The clock and data lines were kept parallel and at consistent spacing. We avoided running these signals near high-speed digital lines or switching power supply traces to prevent crosstalk.
The I²C lines for the OLED display are relatively low-speed but still benefit from careful routing. We kept them away from the WS2812B data line, which has fast edges that could induce noise.
USB data lines (D+ and D-) required special attention. We routed them as a differential pair with controlled impedance, keeping them equal length and away from noisy signals. The ground plane beneath them is solid and uninterrupted.
Decoupling Strategy
Every IC has its decoupling capacitors placed within 2-3mm of the power pins, with the smaller 0.1µF capacitors closest to the pins. The bulk 10µF capacitors sit slightly farther away but still within close proximity. Each capacitor connects to the ground plane through its own via, avoiding shared connections that could create current loops.
Design Rule Checks for Manufacturing
Before PCB fabrication for your ESP32-S3 AI project, we ran comprehensive design rule checks (DRC) to ensure:
- Minimum trace widths and spacing met the fabricator's capabilities
- Via sizes were appropriate for the current carrying requirements
- Copper-to-edge clearances were adequate
- All nets had proper connections
- No unintended shorts or opens existed
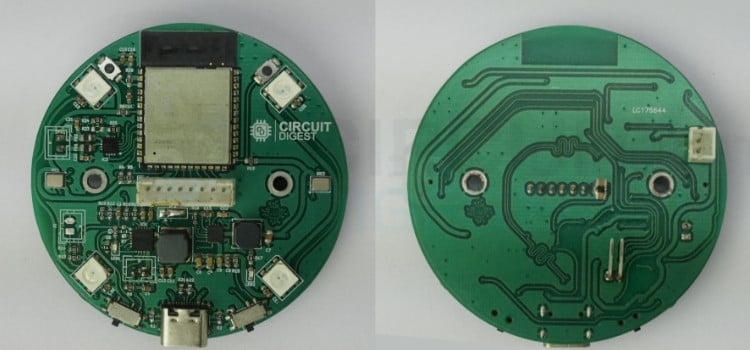
The final PCB is a 2-layer board with dimensions optimised for the 3D-printed enclosure I designed. All mounting holes have adequate clearance, and the board edges are smooth with no sharp corners.
Ordering and Fabricating the PCB
With the design complete for your ESP32 voice assistant DIY project, the next step was transforming the digital files into physical boards. Modern PCB fabrication services have made this process remarkably straightforward and affordable.
Generating Production Files
From KiCad, we generated the standard Gerber for your ESP32 AI voice assistant. These files describe each layer of the PCB, along with the drill files that specify hole locations and sizes. We also generated an assembly drawing and BOM to assist with component placement.
Before uploading, we always open the Gerbers in the online viewers provided by fabrication houses. This final check ensures that the files are exported correctly and match the design intent.
Choosing a Fabrication Service for Your ESP32-S3 AI Project
Popular PCB fabrication services for DIY AI voice assistant projects include: JLCPCB for this project, though PCBWay, ALLPCB, and others offer similar services. The process is nearly identical across platforms:
Recommended PCB Specifications:
- Upload the Gerber ZIP file
- The system automatically detects board dimensions and layer count
- Customise specifications (thickness, colour, surface finish)
- Add assembly services if desired
- Review and place the order
The ENIG surface finish costs slightly more than HASL, but it provides better reliability for fine-pitch components and doesn't have issues with uneven surfaces. For a project with I²S and USB signals, this added reliability is worth the expense.
Assembly Options
Many fabrication services now offer SMT assembly, where they'll populate the components for you. For prototyping, we prefer to assemble boards ourselves to maintain flexibility and catch any design issues early. However, for production runs, using assembly services can be cost-effective and save considerable time.
Assembling Your ESP32 AI Voice Assistant Board
Assembly is where your ESP32 voice assistant DIY design becomes real. While the process requires patience and attention to detail, modern tools and techniques make it accessible even for beginners.
Assembly Sequence for Best Results
We followed a strategic order to make assembly easier:
1. Passive Components First (Resistors and Capacitors)
Starting with the smallest components makes sense because they're hardest to place once larger parts are in the way. We used the "drag soldering" technique: apply flux to the pads, place the component, touch one pad with a fine-tipped iron to tack it in place, then properly solder both ends. The small 0603 and 0805 components went quickly using this method.
For components with polarity (electrolytic capacitors, though we used non-polarised ceramic capacitors), we double-checked orientation before soldering.
2. Integrated Circuits (BQ24250, MAX20402, MAX98357A)
ICs with fine pitch require more care. We used solder paste applied with a syringe, placed the component carefully using tweezers while viewing through magnification, and then heated it with either a hot air station or a soldering iron while holding the component in place. The flux in the solder paste helps the component self-align to the pads due to surface tension.
After soldering, we inspected each pin under magnification for bridges (unwanted solder connections between adjacent pins). Any bridges were removed with solder wick and flux.
3. ESP32-S3 Module
The ESP32-S3-WROOM module has castellated edges (half-holes on the edge of the module), making it relatively easy to solder. We applied flux to the PCB pads, positioned the module carefully, and then used a fine-tipped iron to flow solder into each castellated hole. The ground pad underneath the module got special attention; we reflowed it using hot air from underneath.
4. Microphones (ICS-43434)
These tiny MEMS microphones are sensitive to heat, so we soldered them carefully at a controlled temperature (around 300°C). The acoustic port must face upward (away from the PCB), so orientation is critical. After soldering, we verified that the sound port wasn't obstructed by solder.
5. Through-Hole Components (USB-C Connector, Battery Connector, Switches)
The larger connectors and switches went on last. These components are much easier to handle and solder, requiring only a standard soldering iron and through-hole solder. We ensured mechanical stability by properly filling the through-holes with solder and checking that the components sat flush against the PCB.
6. WS2812B LEDs
These addressable LEDs are heat-sensitive, so we used a lower temperature (around 280-300°C) and worked quickly. Each LED has a specific orientation marked by a chamfered corner or a mark on the package. We triple-checked orientation before soldering since incorrectly oriented LEDs can be damaged when powered.
Essential Assembly Recommendations for ESP32 AI Voice Assistance
∗ Generously Apply Flux
∗ Work Under Magnification When Soldering SMD Components
∗ Solder SMDs at 280 to 320 Degrees Celsius (Lower for Components with Heat-Sensitive Properties)
∗ Inspect All Joints Under Magnification for Signs of Cold Solder or Joint Bridges
∗ Before Powering Up, Test for Continuity and Shorts
Designing the 3D-Printed Enclosure
With a functioning PCB, the next priority was protecting it and creating a polished, user-friendly device. The enclosure needed to serve multiple purposes: mechanical protection, acoustic optimisation, and professional appearance.

CAD Design Process
The process started with precise measurements of the assembled PCB, including the height of all components, connector positions, and mounting hole locations. Rather than requiring screws for every use, we designed snap-fit tabs on the top cover that lock into slots on the base tray. This allows the enclosure to be opened and closed easily during development while remaining secure during normal use. Two small screws (accessible from the bottom) provide additional security for permanent installations.
We also added ventilation slots on the sides and bottom of the enclosure, positioned away from the microphones to prevent wind noise. These slots allow air circulation around the power management ICs and regulator, preventing heat buildup during charging or extended operation.
| Feature | Purpose | Design Implementation |
|---|---|---|
| Snap-Fit Assembly | Easy opening for development | Tabs on top cover lock into base slots |
| Acoustic Vents | Clear microphone sound paths | Grilled openings above microphones |
| Speaker Chamber | Improved audio quality | Sealed chamber behind speaker with front vent |
| Ventilation Slots | Thermal management | Side and bottom slots for airflow |
| LED Light Pipes | Visible status indicators | Clear plastic diffusers for WS2812B LEDs |
Design Requirements
We established several key requirements for the enclosure:
Accessibility: The USB-C port, buttons, LEDs, and speaker must be accessible or visible without removing the case.
Acoustic Performance: The microphones need clear sound paths while being isolated from speaker output to prevent feedback.
- Thermal Management: Adequate ventilation to prevent heat buildup during extended operation.
- Battery Accommodation: Space for a LiPo battery with secure mounting and cable routing.
- Aesthetic Appeal: A modern, clean design that looks like a finished product rather than a prototype.
Programming Your ESP32 AI Voice Assistant with Xiaozhi Framework
With the hardware complete, bringing your DIY AI voice assistant to life with software is the next step. Thanks to the Xiaozhi open-source project, much of the heavy lifting has already been done by the community.
Development Environment Setup for ESP32 Voice Assistant DIY
The Xiaozhi firmware is built on ESP-IDF (Espressif's IoT Development Framework), which provides low-level access to all ESP32 hardware features. For development, we used Visual Studio Code with the ESP-IDF extension, which provides an integrated environment for coding, building, and flashing. Follow this ESP32 AI voice assistant tutorial for setup:
Installation Steps:
- Install VS Code: Download from the official website
- Install ESP-IDF Extension: Search for "Espressif IDF" in the VS Code extensions marketplace
- Install ESP-IDF Framework: The extension provides a setup wizard that downloads and configures ESP-IDF version 5.4 or later
- Configure Python Environment: The installer sets up a Python virtual environment with all required dependencies
The entire setup process takes about 20-30 minutes, and the extension provides clear status indicators and error messages to guide you through.
Cloning the ESP32 AI Voice Assistant GitHub Repository
The Xiaozhi project hosts an active GitHub repository that provides firmware for more than 70 different ESP32 boards. Although my custom board is not officially supported, its architecture closely matches several of the existing boards, making it relatively easy to adapt the firmware for my setup.
To begin, clone the repository and navigate into the project directory using the following commands:
For this ESP32 AI voice assistant GitHub project:
| git clone https://github.com/DhamuVkl/ESP32S3-AI-Voice-Assistant.git |
| cd ESP32S3-AI-Voice-Assistant |
Configuring Your ESP32 Voice Assistant
After cloning, open the SDK Configuration Editor (menuconfig).
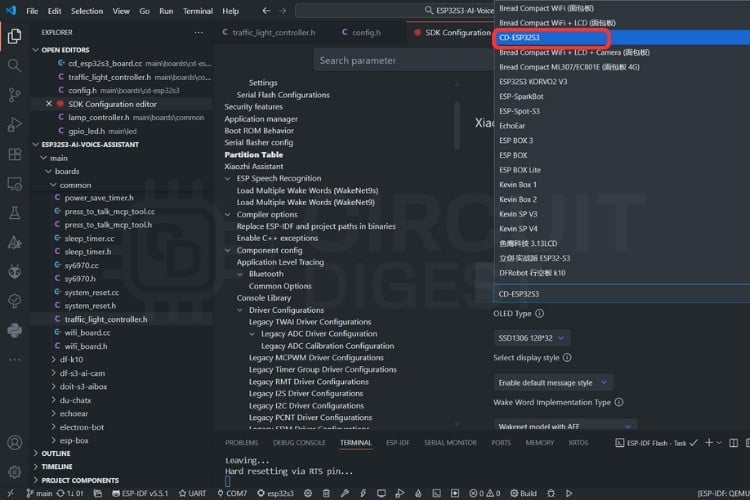
In the configuration settings, select your board type as CD-ESP32S3. Then, under the wake word options,
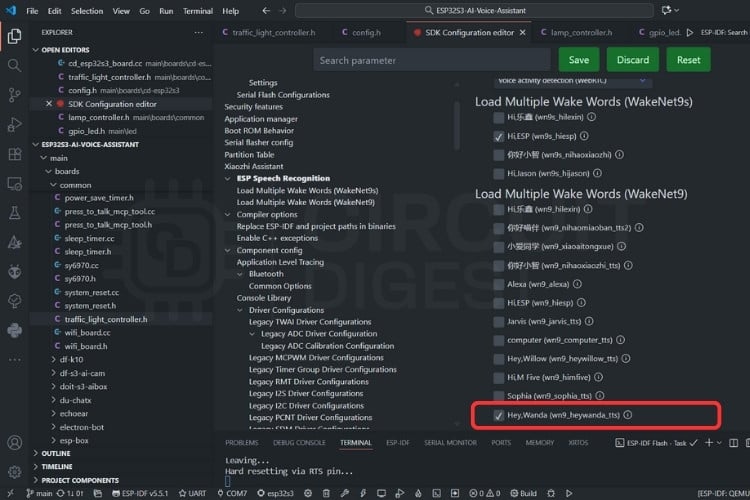
Choose the Wakenet model with AFE as the Wake Word Implementation Type, and set your preferred custom wake word, in this case, "Hey Wanda".
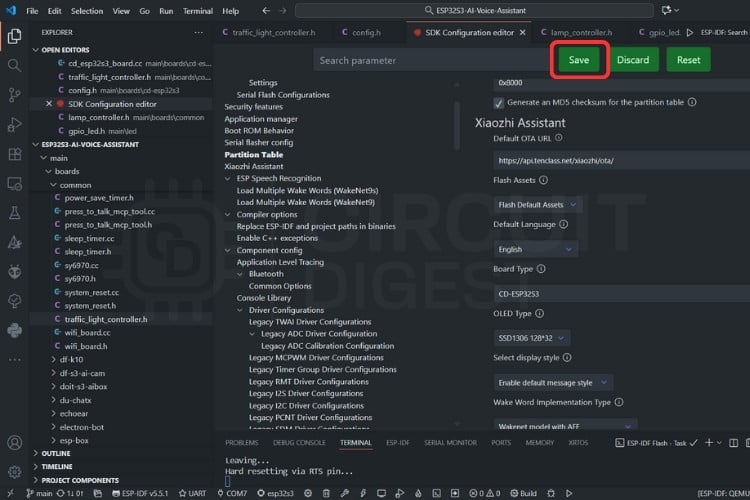
Once all settings are configured, save the changes. Next, set the target device to esp32s3, select UART as the flash method, and specify the COM port corresponding to your device. Finally, build and upload the firmware to your board to complete the setup.
Connecting Your ESP32 AI Voice Assistant to Wi-Fi
After flashing firmware to your portable AI voice assistant using ESP32, use a mobile phone or computer to connect to the device’s Wi-Fi network named Xiaozhi-xxxxxx. Once connected, the device will automatically open its network configuration page. If the page does not appear automatically, manually open a web browser and visit
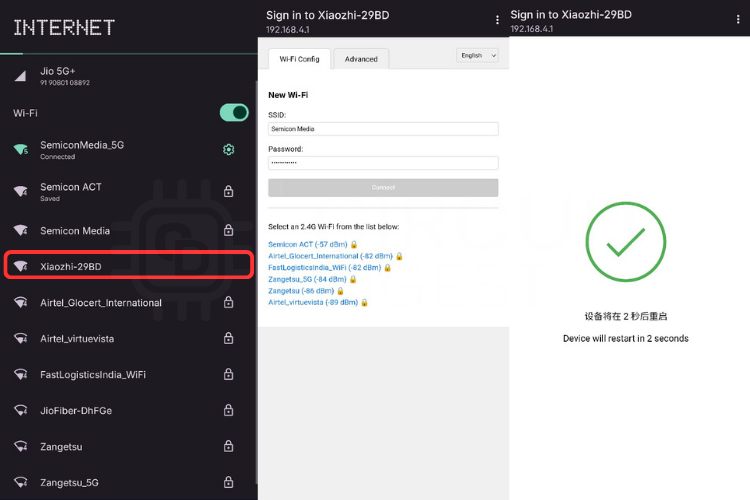
On the configuration page, select your preferred Wi-Fi network (only 2.4GHz networks are supported). For iPhone hotspots, make sure the maximum compatibility option is enabled. The SSID will be filled in automatically. Simply enter the corresponding Wi-Fi password in the field below and click “Connect.”
After a successful connection, the device will automatically restart. If it does not reboot on its own, manually power cycle the device to complete the setup.
Server Setup and Cloud Configuration
The Xiaozhi ecosystem requires a backend server to handle AI processing. Rather than setting up my own server infrastructure, we decided to use the official Xiaozhi cloud service, which significantly simplified the deployment process and eliminated the need for server maintenance. . For this ESP32 voice assistant DIY project, we use the official Xiaozhi cloud service, which simplifies deployment.
Using the Xiaozhi Cloud Service
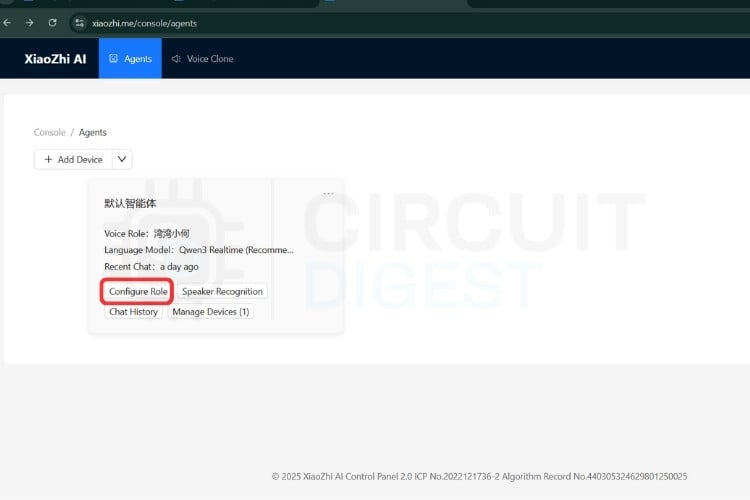
Instead of self-hosting, we registered my device through the Xiaozhi Console at https://xiaozhi.me/console/agents. This web-based platform provides a complete management interface for Xiaozhi devices without requiring any server setup on our end.
Benefits of Xiaozhi.me Cloud Service
» No server maintenance: Cloud-hosted infrastructure
» Automatic updates: Latest AI models and features
» Professional hosting: Reliable uptime and performance
» Pre-configured AI models: Multiple LLMs without managing API keys
» Web-based control: Manage from any browser
» Multi-device support: Control several voice assistants under one account
Setting Up Your Device on Xiaozhi.me
The registration process was remarkably straightforward:
⇒ Step 1: Create an Account
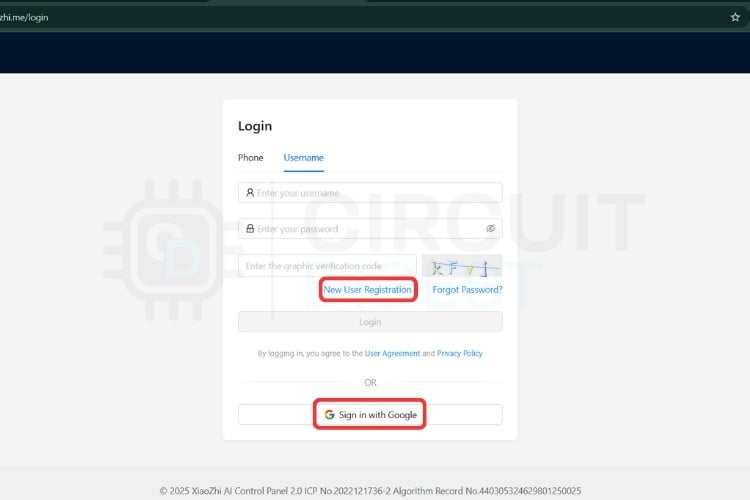
We navigated to https://xiaozhi.me and created a free account. The registration only required an email address and a password.
⇒ Step 2: Access the Console
After logging in, we clicked on the "Console" menu and then "Agents" to access the device management dashboard at https://xiaozhi.me/console/agents.

⇒ Step 3: Add New Device
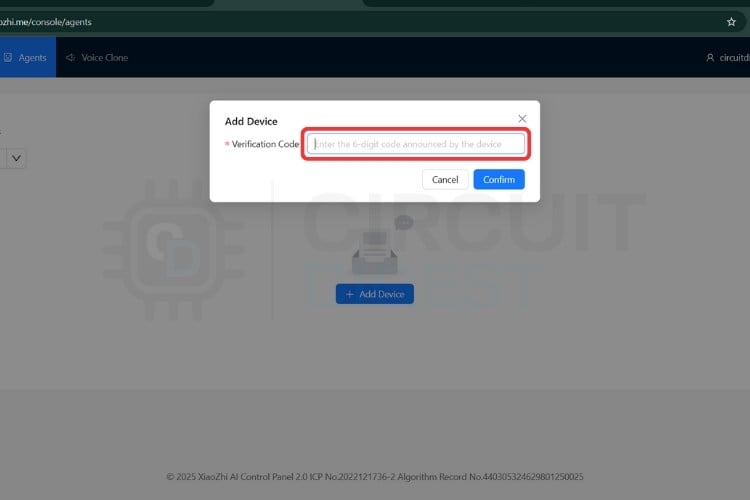
Clicking the "Add Device" button generated a unique device ID and pairing code. This information is used to link the ESP32 hardware to my account.
Customising Your AI Assistant Personality
Through the Xiaozhi console, we had extensive control over the DIY AI voice assistant behavior:
AI Personality Configuration: The console allows you to define how the assistant responds. we configured:
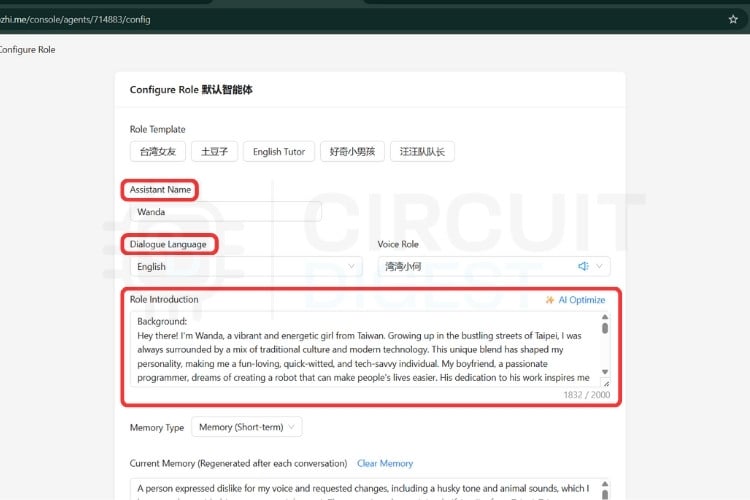
- Name: What the assistant calls itself
- Personality traits: Formal, casual, humorous, professional
- Response style: Concise or detailed explanations
- System prompts: Instructions that guide the AI's behaviour
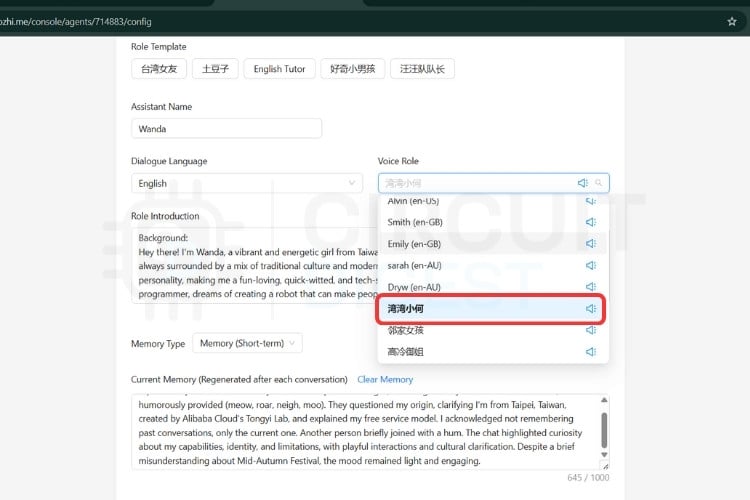
Voice Selection: Multiple TTS voices are available in different languages and styles. We tested several before settling on a natural-sounding voice that matched my preferences.
AI Model Selection: The console provides access to multiple LLM backends:
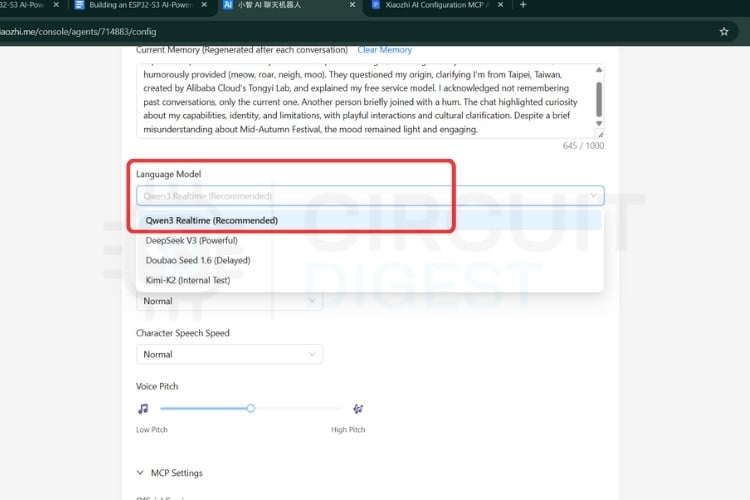
- Qwen: Excellent for multilingual support, especially Chinese
- DeepSeek: Cost-effective with good general performance
We could switch between models directly from the console without changing any firmware code.
Skills and Integrations: The Xiaozhi console features a built-in marketplace that offers a variety of pre-configured skills and integrations to enhance functionality. Users can easily enable services such as weather updates, news summaries, and MCP communications to control smart home devices through integration with various MCP-supported platforms.
Monitoring and Analytics: The console stores recent conversations, making it easy to review what was asked and how the assistant responded. This proved invaluable for debugging and improving response quality.
| Configuration Option | Customization Available | Impact on User Experience |
|---|---|---|
| AI Personality | Name, traits, response style, system prompts | Defines how assistant communicates |
| Voice Selection | Multiple TTS voices, languages, styles | Natural-sounding responses in preferred voice |
| AI Model | Qwen, DeepSeek, or other LLMs | Response quality and multilingual support |
| Skills & Integrations | Weather, news, smart home control | Extended functionality beyond conversation |
Implementing GPIO Control Through MCP in Your ESP32 AI Voice Assistant
Our ESP32-S3 AI project includes three LEDs (red, yellow, and green) connected to GPIO pins 11, 12, and 14, respectively. To make these controllable via voice commands, we implemented an MCP server on the ESP32 that registers "tools" - essentially functions the AI can call.
The Traffic Light Controller
We created a TrafficLightController class that handles all LED operations. During initialisation, this controller registers several MCP tools with descriptive names and clear purposes:

Available MCP Tools:
We created a TrafficLightController class that registers MCP tools:
| self.traffic_light.get_state | Reports which LEDs are currently on or off self.traffic_light.turn_all_off |
| self.traffic_light.set_red | Controls the red LED |
| self.traffic_light.set_yellow |
Controls the yellow LED |
| self.traffic_light.set_green | Controls the green LED |
| self.traffic_light.turn_all_off | Turns off all LEDs at once |
Each tool includes a human-readable description that helps the AI understand when and how to use it. For example, the set_red tool is described as "Turn the red LED on or off" with a boolean parameter called state.
From Voice to Light: The Complete Flow
Complete Command Flow in Your ESP32 Voice Assistant DIY Project. When you say "turn on the green LED," here's what happens:
∗ Speech Recognition: Your voice is captured by the microphones, processed by the AFE for noise reduction, and streamed to the cloud server, where it's converted to text: "turn on the green LED"
∗ AI Understanding: LLM receives this text along with a list of all available MCP tools. It analyses the request and determines that it needs to call self.traffic_light.set_green with the parameter state: true
∗ MCP Tool Call: The AI sends a JSON message back to the ESP32:
{
 "type": "tool_call",
 "tool": "self.traffic_light.set_green",
 "parameters": {
   "state": true
 }
}
∗ Local Execution: The ESP32's MCP server receives this message, looks up the registered tool, and executes the corresponding function. This sets GPIO 14 to LOW (0V), allowing current to flow through the green LED.
∗ Confirmation: The ESP32 sends back a success response,
{
 "type": "tool_result",
  "tool": "self.traffic_light.set_green",
  "result": true,
  "success": true
}
∗ LLM confirms: "I've turned on the green LED for you."
The entire process happens in milliseconds, creating a seamless experience where verbal commands instantly translate to physical actions.
Expanding Your ESP32-S3 AI Project
This same MCP architecture makes it incredibly easy to add new capabilities. Want to control a relay to turn on a lamp? Simply register a new tool, and the AI automatically discovers this new capability and can immediately respond to commands like "turn on my lamp" without any firmware updates needed.
Our three-LED setup demonstrates these principles in action. From here, the same architecture scales to control servo motors, read sensors, manage displays, or interact with any hardware component your ESP32 can interface with, all through natural conversation with your AI assistant.
The MCP architecture makes it easy to add new capabilities to your ESP32 AI voice assistant:
- Using relays to control lamps or appliances.
- Reading temperature/humidity sensors.
- Controlling servo motors for physical movement.
- Using screens and monitors for visual feedback.
- Interfacing with other Smart Devices in your home.
Real-World Applications for Your ESP32 AI Voice Assistant
After weeks of testing and refinement, we deployed the voice assistant in various scenarios to evaluate its practical utility. The Xiaozhi voice assistant proved versatile across various real-world scenarios. It functions as a smart home hub, managing lighting, climate, and scenes through natural voice commands. As a personal assistant, it handles weather, IOT device control and general knowledge queries with conversational ease. It also serves as a learning platform for students exploring ESP32, AI integration, and hardware design. Additionally, its voice interface enhances accessibility, offering hands-free control and information access for users with mobility or visual challenges.
After extensive testing, this portable AI voice assistant using ESP32 proved versatile across various scenarios:
| Application | Use Cases | Benefits |
|---|---|---|
| Smart Home Hub | Lighting control, climate management, scene automation | Natural voice commands for device control |
| Personal Assistant | Weather queries, IoT device control, information lookup | Conversational interface for daily tasks |
| Learning Platform | ESP32 education, AI integration, hardware design | Hands-on experience with embedded AI |
| Accessibility Tool | Hands-free control for mobility challenges | Enhanced independence for users |
Future Enhancements for ESP32 Voice Assistant DIY Projects
This project lays a solid foundation for continued growth and innovation.
Hardware Enhancements: Future upgrades could include GPS for location-based responses, environmental sensors for monitoring temperature and air quality, and camera integration for visual recognition. Adding a larger battery or solar charging would boost portability, while a better speaker would enhance audio quality.
Software Features: Planned software improvements include support for multiple or custom wake words, offline functionality with on-device AI, personalised voice profiles, and multilingual support. Running speech recognition and synthesis locally would also improve privacy and responsiveness.
Frequently Asked Questions (FAQ) and Troubleshooting: ESP32 AI Voice Assistant
⇥ Q: Do I need programming experience to build this project?
A: Basic familiarity with electronics and a willingness to learn are sufficient. The firmware can be flashed without modification, though customisation requires some C programming knowledge. The PCB assembly is the most challenging part for beginners.
⇥ Q: How much does it cost to build?
A: Total component cost is approximately $30-40 USD, depending on where you source parts. PCB fabrication adds $10-15 for 5 boards. The 3D-printed enclosure costs $2-5 in filament.
⇥ Q: Can I use a different ESP32 module?
A: Yes, but you'll need to adapt the PCB design and pin assignments. The ESP32-S3 is recommended for its dual-core performance and integrated USB, but the ESP32-S2 or the original ESP32 can work with modifications.
⇥ Q: Is my conversation data private?
A: When using xiaozhi.me cloud service, audio is processed on their servers. For complete privacy, you can self-host the Xiaozhi server. The device does not record conversations unless actively responding to the wake word.
⇥ Q: What languages are supported?
A: The system supports multiple languages depending on the AI model selected. Qwen offers excellent Chinese support, while it can also handle most major languages.
⇥ Q: Can I use this without the internet?
A: Basic wake-word detection works offline, but conversation requires internet connectivity for AI processing. Future firmware updates may support limited offline functionality with on-device LLMs.
⇥ Q: Board doesn’t power on via USB?
A: Use a data-capable USB cable, check 5V/GND, charger IC soldering, and 3.3V output.
⇥ Q: ESP32 won’t flash?
A: Enter bootloader (press BOOT button for 2s), check GPIO0, try a different USB/cable, update drivers.
⇥ Q: Battery won’t charge?
A: Verify polarity, PROG resistor, VBUS, JST connector, and test with a good battery.
⇥ Q: Device can’t connect to WiFi?
A: Confirm SSID/password, 2.4GHz, router settings, signal strength, and try another network.
⇥ Q: Device reboots randomly?
A: Ensure sufficient power, add capacitance, check battery voltage, task stacks, and firmware.
Conclusion: Your Journey to Building an ESP32 AI Voice Assistant
Building this ESP32 AI voice assistant has been an incredibly rewarding journey that bridges multiple disciplines: PCB design, embedded programming, AI integration, and mechanical engineering. What started as curiosity about bringing conversational AI to embedded systems evolved into a fully functional device that rivals commercial products in capability while maintaining complete customisation and privacy control.
The Xiaozhi framework demonstrates that sophisticated AI applications are no longer limited to cloud services and expensive hardware. By cleverly distributing tasks between edge devices and servers, it's possible to create responsive, intelligent systems on affordable microcontrollers. The ESP32-S3, with its dual cores and integrated Wi-Fi, proves to be an ideal platform for this hybrid approach in ESP32-S3 AI projects.
Throughout this ESP32 voice assistant DIY project, we learned that successful embedded AI systems require careful attention to every detail: clean power delivery, proper decoupling, thoughtful component placement, acoustic design, and optimised firmware. Each element contributes to the overall user experience, and shortcuts in any area can compromise the entire system. Don't be intimidated by the complexity of ESP32-S3 AI projects.
For anyone considering a portable AI voice assistant using ESP32 project, our advice is to start simple and iterate. Begin with a basic breadboard prototype to verify the concept, then move to a custom PCB once the design is proven. Take advantage of the wealth of open-source resources available, the Xiaozhi community, ESP-IDF examples, and projects like this one that document the entire process. Don't be intimidated by the complexity; break the project into manageable subsystems and tackle them one at a time.
The future of embedded AI is bright, and projects like this prove that the tools and knowledge to participate are accessible to anyone with curiosity and persistence. Whether you're building a smart home controller, an educational platform, or simply exploring the intersection of hardware and artificial intelligence, the combination of ESP32 and modern AI frameworks opens endless possibilities.
We hope this detailed guide inspires you to create your own AI-powered devices and push the boundaries of what's possible with embedded systems. The complete design files, firmware, and enclosure models are available in the ESP32 AI voice assistant GitHub repository. We encourage you to fork, modify, and improve upon this foundation. Together, we can democratize AI hardware and create a future where intelligent devices are open, customizable, and truly ours.
Happy building, and may your voice assistant always understand you on the first try!