

Lora Networks are getting increasingly popular, with so many IoT devices popping around this, this low power long-range wireless communication could fit into a plethora of application. We have already used the popular SX1278 LoRa Transceiver Module to build an Arduino Lora Node and a Raspberry Pi Lora Node to perform Peer to Peer Communication. But if you want to explore the full power of LoRaWAN, you would have to set up your own gateway and enable your nodes to communicate with it. This way you can have multiple devices talking to your gateway over long distances.
But when I started with the process, I faced quite a few confusions, especially because of the non-standard frequency range for LoRa here in India. So in this article, I will guide you from selecting the most affordable gateway to registering it with The Things Network and monitor your data traffic over it. So let’s get started.
Basic Topology of a LoRaWAN Network
But before we get there, it is important to understand the basic topology of a LoRaWAN Network.
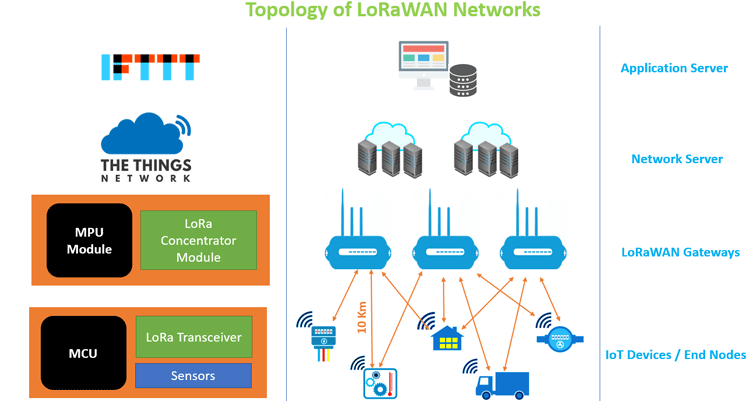
At the most bottom level, we have the actual IoT Devices like a temperature sensor or water meter or a GPS tracker. These are normally devices with a microcontroller, sensors and a LoRa transceiver and they are called the End Nodes. Then on top of this, we have our Gateways, which you can think of like a fusion of a Cell Tower and a Wi-Fi Router. basically, it gets information from our end nodes that are as far as 10km theoretically and pushes the information to the internet. A gateway will also have a powerful microprocessor that runs packet forwarder software and a concentrator module.
Note how one node can communicate with more than one gateway, to manage these duplicate data packets and to control uplink and downlink, all gateways are connected to something called Network server. You can think of the network server as your cell network providers like T-Mobile or Jio. For LoRaWAN, one of the popular and open-source network provider is The Things Network among many others. Finally, on top of all, we have the Application server which normally is a website or mobile application that gets information from the network server and presents it with analytics to the end-user.
Selecting the right LoRAWAN Gateway
Now we know what a gateway does in the entire LoRaWAN Ecosystem. The questions are how to select and deploy one in your area? Frankly, there are so many options including some DIY solutions but with reliability and affordability in mind, I decided to go with the Sentrius RG186 LoRaWAN Gateway from Liard Connectivity. Here are the specifications that you should check while selecting a gateway for your applications
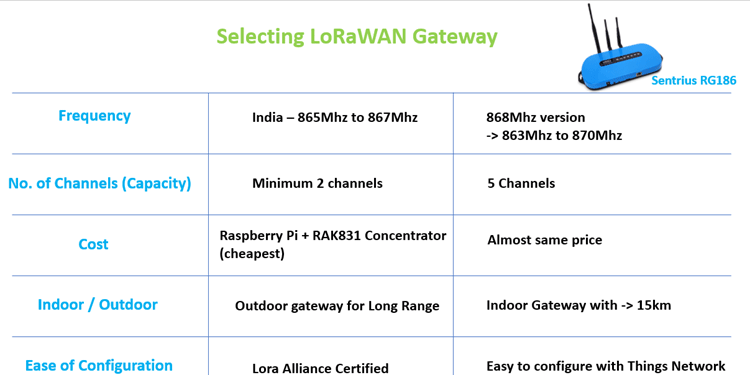
The first and foremost thing to consider is Operating Frequency, in India, the legal operating frequency for Lora is between 865Mhz to 867Mhz. The gateway that we have is the Sentrius RG186 which is 868Mhz version but it can support frequency from 863Mhz to 870Mhz which very well falls within our requirements. Next is the number of channels, a LoRaWAN Gateway should have a minimum of two channels, our gateway has 5 channels, meaning it can communicate with 5 end nodes at the same time. Next is the cost of the gateway, now the cheapest option here is to build your own lora gateway using Raspberry Pi and RAK831 Concentrator board but this will have only one channel and hence it cannot be called as a LoRaWAN Gateway. Also comparing its price with RG186, there was not much of a difference. Then we have to select between Indoor and outdoor gateway. The outdoor gateways have a long-range but they are pretty expensive. The RG186 is an indoor gateway and can technically cover a distance of 15km line of sight. I am eager to do a range test on this one but let’s have that for some other video. Finally, the last thing is the ease of configuration, here if the gateways are certified by Lora Alliance then things get a lot easier but those gateways are very expensive. Anyhow, if you are planning to use your gateway with the Things Network, then even the RG186 gateway makes it pretty simple.
Sentrius RG186 LoRaWAN Gateway
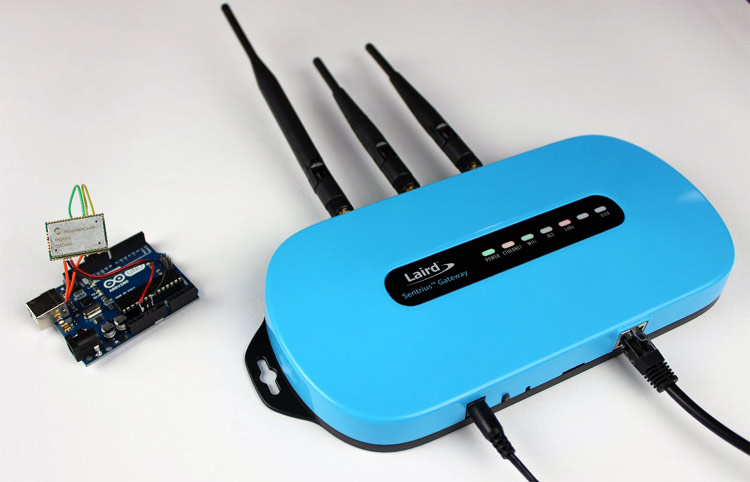
When you purchase your RG186 gateway, you almost get everything you need, as you can see in the unboxing video earlier. We have our gateway modem itself, then a 12V 2.5A adapter with a European plug, so you would have to find an adapter to use it in India. Then we have three antennas and an Ethernet cable. This is everything we will need to set-up our gateway. Do note that our gateway also supports Bluetooth Low Energy but at the time of making this video, there is no documentation released by Liard so as to how to use it, so that’s something for the future.
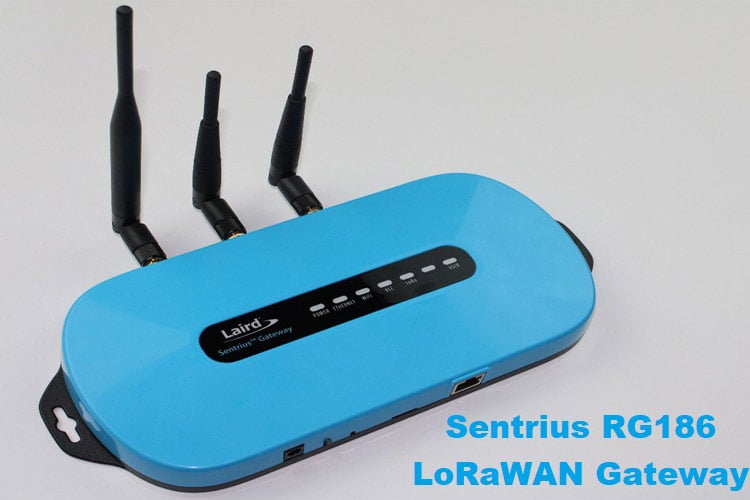
Of the three antennas, two of the short ones are for 2.4/5.5GHz Wi-Fi communication, so connect them to the respective connectors. The long one is for 868Mhz LoRa communication which goes into this last connector. On the front side, you can notice a power connector, a user button, a reset button, and an SD card slot. The gateway can be connected to the internet either using this ethernet connector or through Wi-Fi. On the backside, we have some important information like MAC ID and EUI. Make a note of the last of our digits of your Ethernet MAC ID since we will need it later.
Now that we have got our Gateway completely assembled, all that we have to do is to power it up with the adapter they provided and follow some very simple instructions to connect it with The Things Network. Once that is done, we will also use a simple Lora node to send some test payload to the TTN Network server to check how it works. Let me show you how it is done.
Connecting LoRaWAN Gateway with The Things Network
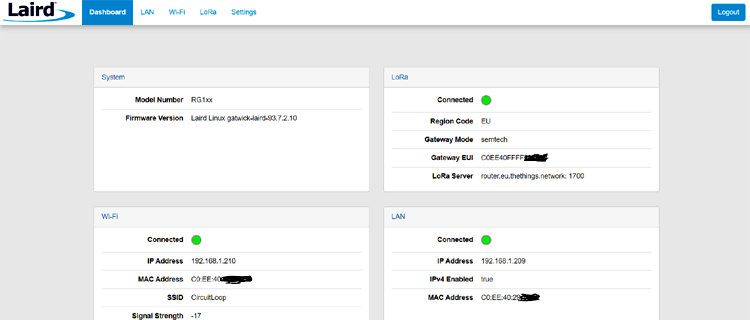
Power your Sentrius RG186 gateway with the DC adapter and plug in the ethernet cable from your gateway to your router. Then make sure your laptop is also connected to the same router and enter the following address. https://rg1xx and then the last 6 digits of your gateway MAC ID that we noted earlier, let's say mine is 29378B and then complete with .local. If it says, the connection did not secure, just get into advanced and click on proceed. By default, the user name will be sentrius and the password will be RG1xx. I have already configured everything, so my dashboard looks like this.
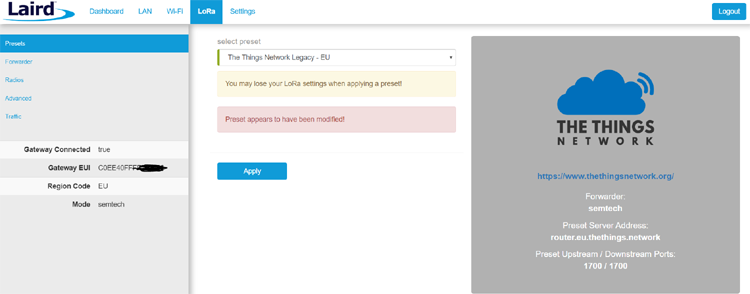
But you have to get into Wi-Fi, click on scan and connect to your wi-fi router. Then click on LoRa and under preset, select things network legacy and click on apply. Also, make sure to copy the gateway EUI Number shown on the left side because we will need it while registering the Gateway with Things network.
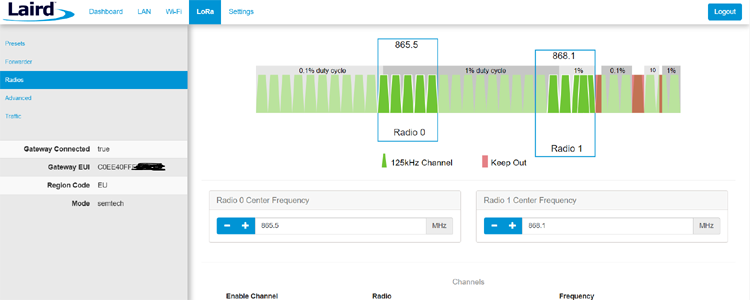
Then under the radio, we have to select the frequency channels at which our gateway has to operate. Note that we have two radio modules here, I am using the Radio 0 module here to work in the Indian frequency which is 865 to 867 MHz and the Radio 1 module to work in the European frequency of 868Mhz. because for some reason even though I am operating the gateway in India it is mandatory to set one radio in European frequency as well. So I have set the Radio 0 center Frequency at 868.5 Mhz and set the center frequency of Radio 1 at 868.1 Mhz. If you scroll down, you can see each radio module has up to 5 channels for which the frequencies are automatically allocated based on the center frequency. For our Radio 0 modules, the Indian frequency channels 865.1, 865.3, 865.5, 865.7, and 865.9 are allocated. After checking these values click on Update.
Registering the Gateway with Things Network Server
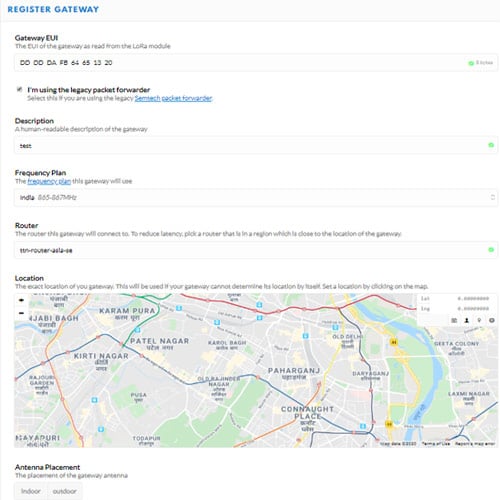
The next step is to register your gateway with TTN, to do that open thethingsnetwork.org and sign up if you have not already done that. Then under consoles click on the gateway and then register gateway. First, click on “I’m using legacy packet forwarder” and paste the EUI number that we copied earlier. Then give a description for your gateway and select the frequency plan. I am selecting India and the nearest router option for me is Asia SE. Then use the map to select the location of our gateway so that TTN can also display it on its map and then select indoor and finally register your gateway.
Like that, your gateway is all registered and if everything has worked fine you should notice the status as connected. Also, check out the traffic section here, which will show us if our gateway has processed any data packets from nearby Lora nodes. Since we don’t have one, yet this page is empty.
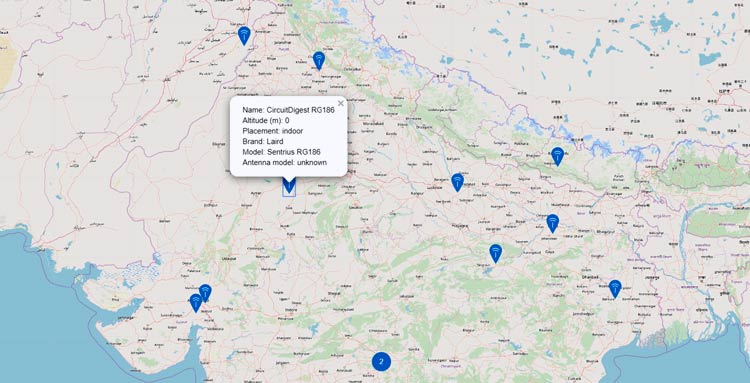
Also, if you get into the TTN gateway map, you will see your Gateway being listed. Like you can see mine here. Once this is done, our LoRaWAN Gateway is all set for action. Now any LoRa End Device in this region can communicate with the things network through our Gateway to test this out, I built a simple Lora node using Arduino.
Arduino Lora Node using RN2483
It uses the popular RN2483 LoRa Transceiver IC from Microchip and it is directly plugged into Arduino for testing purposes. Then I have programmed the Arduino to communicate with the Things network in 868Mhz Indian Frequency so that it stays legal to operate it here. If you want to know how I build this, do let me know in the comment section and I will make a separate video for it.
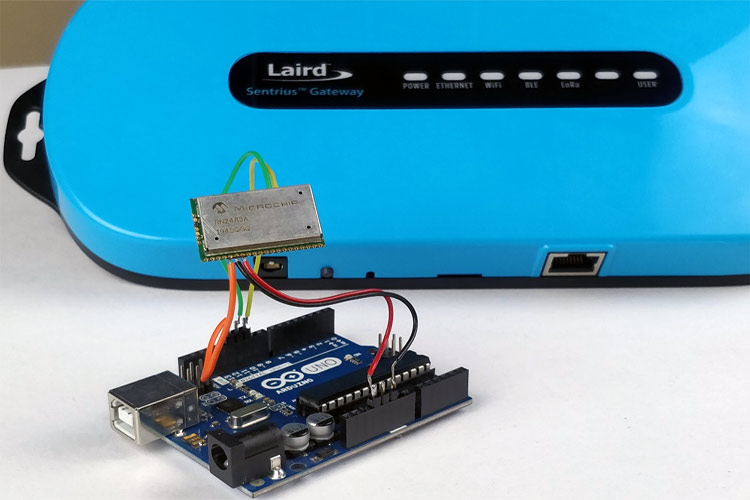
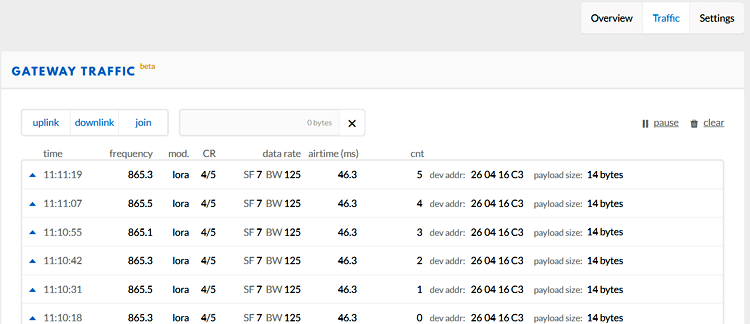
Just upload the code to Arduino and keep it powered on. Now we have a Lora node in the proximity of our Gateway sending some test payload to the TTN server. Let’s check if our gateway has processed any packets by getting into the traffic section again.
And yes, as you can see, we are getting details about the packets that are being forwarded. Of course, you can't see the actual data but we see other information like the frequency at which the packets were received, its airtime, device address, and payload size.
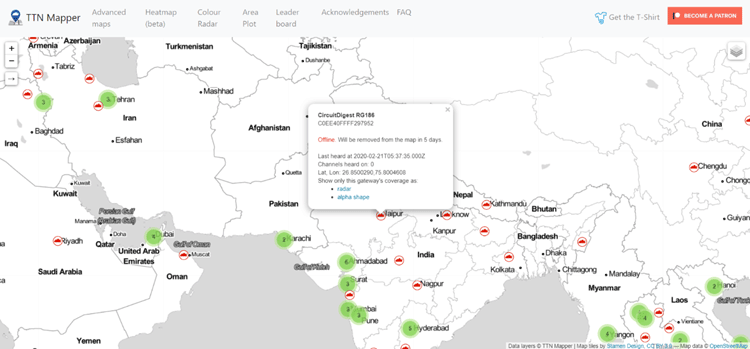
Once your gateway gets active by sending some payload to the TTN server, it will also be listed on the ttnmapper like this so any lora node in your locality can make use of your gateway to send their data to TTN server.
So this pretty much sums up my article on RG186 LoRaWAN gateway. I hope it was useful and you learned something on the way. If you have any questions, do leave them in the comment section or use our forums for other technical queries.
