

E88 Drone Overview: What You Get in This Teardown
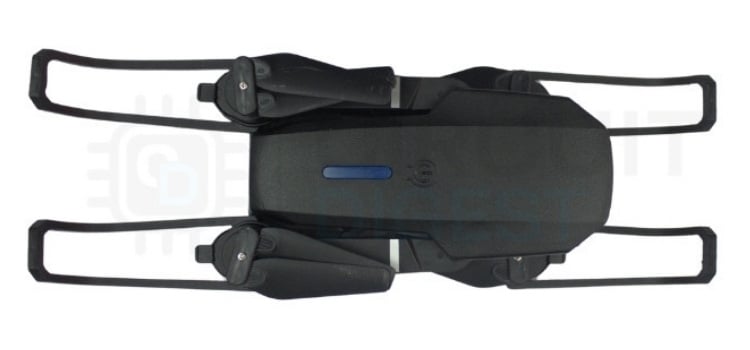
The E88 quadcopter drone is a consumer-grade quadcopter drone designed for indoor and outdoor recreational flying. Featuring a foldable design, a WiFi camera, and altitude-hold capabilities, this detailed E88 drone teardown represents a typical entry-level drone in the sub-₹2000 market segment. The drone's compact size and user-friendly features make it ideal for beginners, while its technical implementation provides valuable insights into modern drone electronics.
This deep dive goes beyond what a user manual covers. We’ll examine the drone’s internal architecture, including its microcontroller, transceivers, sensors, and supporting circuitry. By tracing and identifying key ICs, this reverse-engineering study aims to explain how the drone operates at a hardware level. The goal is to provide educational insight for hobbyists, students, and anyone interested in understanding the electronics behind an entry-level consumer drone.
What's Included in the E88 Package
The E88 drone arrives pre-assembled with all propellers already installed, making it ready to fly right out of the box for most users. For this drone teardown project, the package includes a dedicated 2.4GHz remote controller featuring a Mode 2 stick layout with dual joysticks and multiple function buttons for comprehensive control. Two rechargeable 3.7V Li-ion batteries are provided along with a USB charging cable and a drone case. Also, spare propeller sets are included, with separate clockwise and counter-clockwise propellers clearly marked for proper installation.
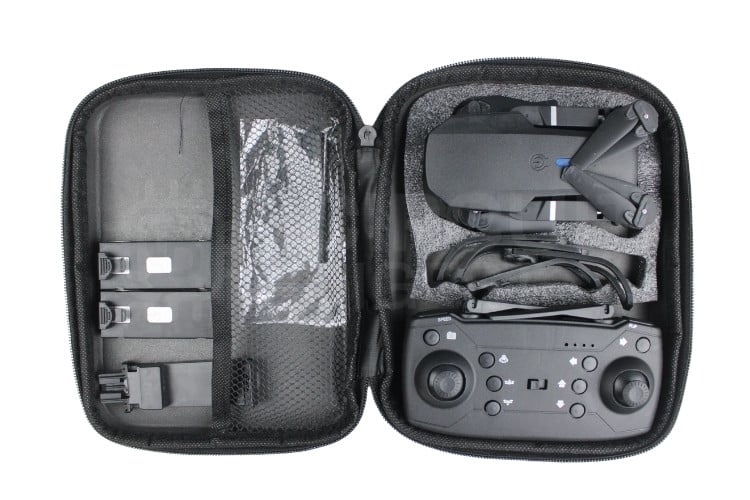
The basic user manual provides essential setup and flying instructions, while optional propeller guards offer additional safety during indoor operation.
Controller Layout
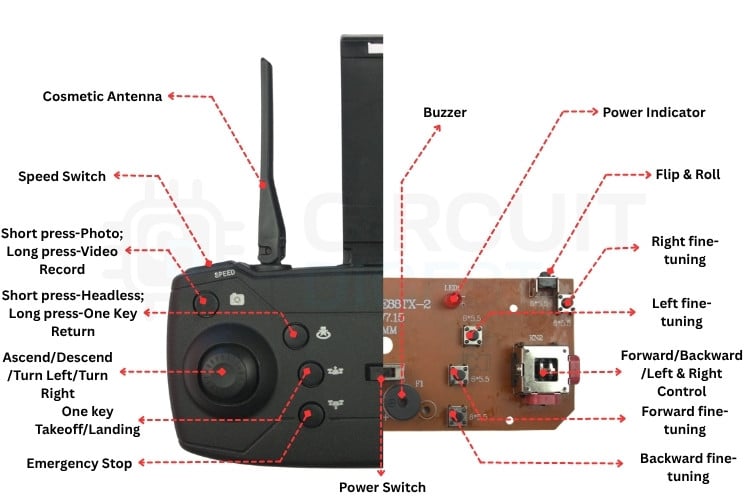
The E88 controller follows the industry-standard Mode 2 layout, featuring dual joysticks positioned for comfortable right-handed operation. The left stick controls throttle and yaw movements, with upward motion increasing motor power for ascent and downward motion decreasing power for descent, while left and right movements control the drone's rotation around its vertical axis. The right stick manages pitch and roll, where pushing forward tilts the drone downward for forward movement and pulling back tilts it upward for backward flight, while left and right movements roll the drone side to side for lateral movement.
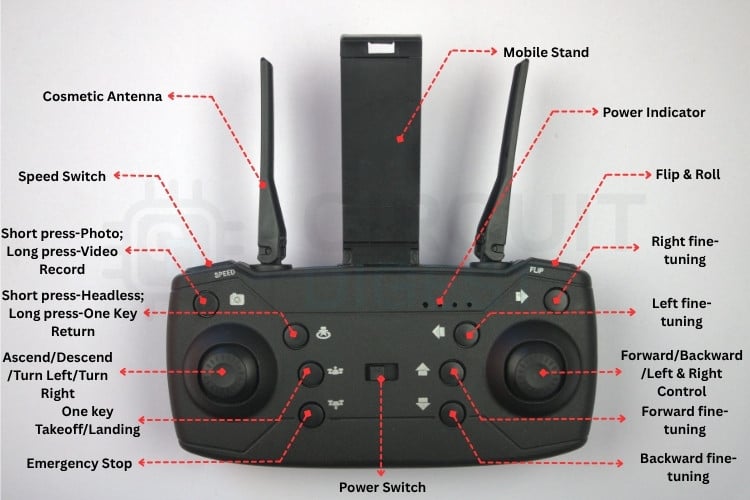
The controller also includes multiple function buttons for enhanced control capabilities. The power button serves as the main on/off switch for the entire controller system. One-key takeoff and landing buttons provide automatic launch and recovery sequences that handle the complex throttle and attitude adjustments automatically. A headless mode button switches the control system to orientation-independent operation, where forward always means away from the pilot, regardless of which direction the drone is actually facing. Speed control cycles through low, medium, and high sensitivity modes to match different pilot skill levels. Photo and video buttons control the camera functions, with short presses capturing still images and long presses starting or stopping video recording. An emergency stop button provides immediate motor shutdown for safety situations. The power management system is critical in any drone teardown
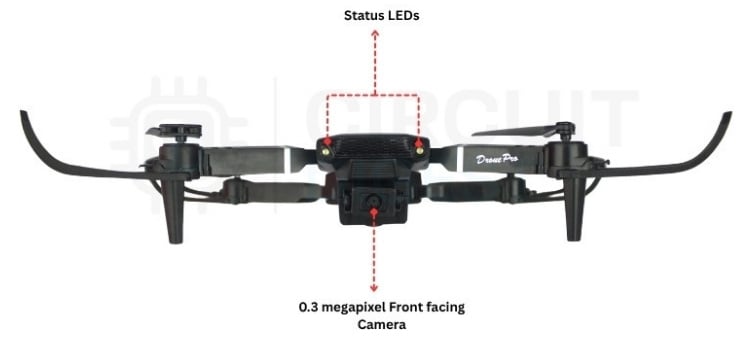
Visual feedback is handled by two multifunction LEDs on the drone that communicate all status information to the pilot. This LED changes its blinking pattern to indicate different conditions, such as power level, signal/binding status, and flight mode. Even though there is only one LED, the controller encodes multiple states through distinct flashes and timing patterns, allowing the pilot to quickly understand the drone’s current status.
Battery Installation
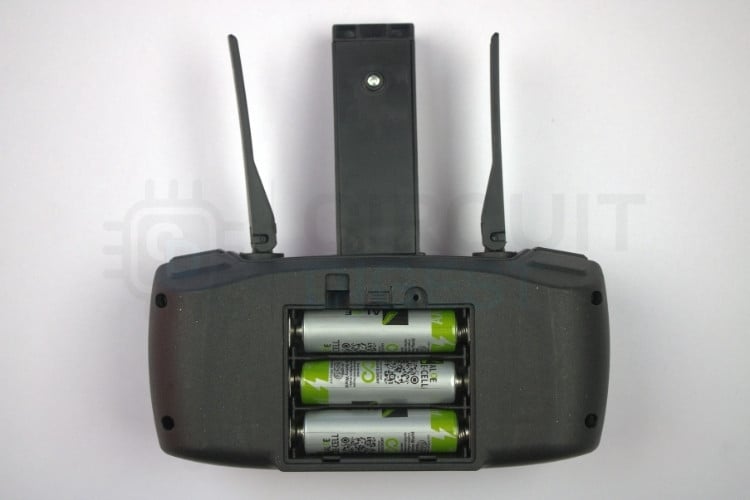
The controller requires three AAA batteries installed in series to provide the necessary 4.5 volts for operation. These should be inserted with correct polarity orientation, following the markings inside the battery compartment. For best performance and reliability, alkaline batteries are recommended over basic zinc-carbon types.
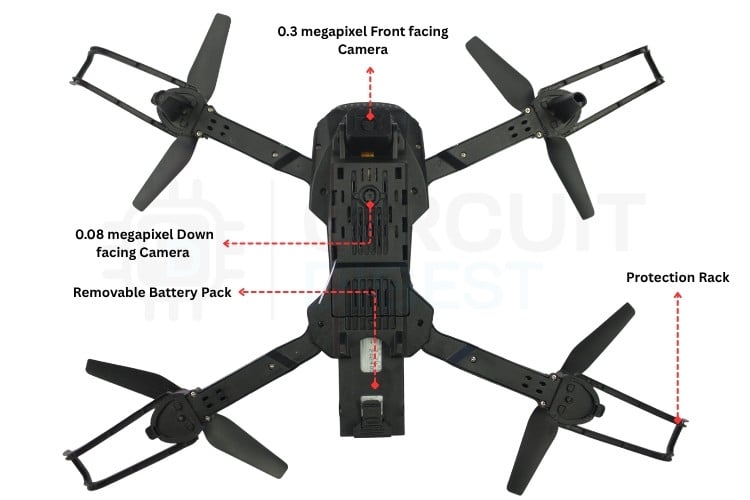
The drone itself uses a dedicated rechargeable 3.7V Li-ion battery that connects via a small two-pin connector. Before first use, this battery should be fully charged using the provided USB cable connected to any standard USB power source. During charging, a red LED indicator illuminates and turns off when the battery reaches full charge. The charging process typically takes 60-90 minutes, depending on the battery's capacity and the USB power source used.
Propeller Installation
The E88 employs a quadcopter configuration. The drone uses two clockwise (CW) propellers marked with an "A" and two counterclockwise (CCW) propellers marked with a "B". The CW propellers must be installed on the upper-left motor (M1) and lower-right motor (M3), while the CCW propellers go on the upper-right motor (M2) and lower-left motor (M4). Installing propellers on the wrong motors will result in uncontrollable flight behaviour and potential crashes.
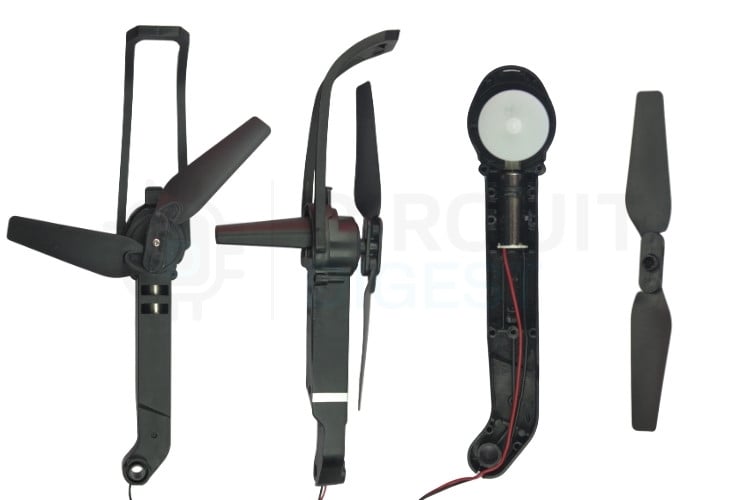
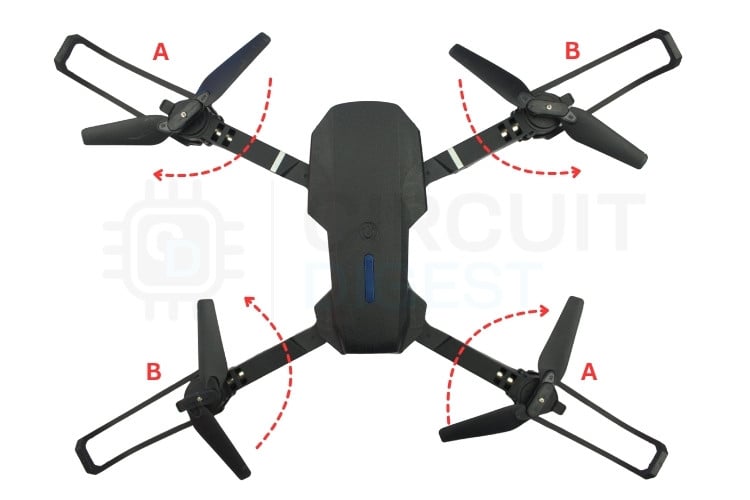
To install a propeller, first align the base of the propeller with the flat spot on the motor shaft to ensure proper orientation. Press the propeller firmly onto the shaft, then secure it with the propeller screw by hand-tightening only. After installation, verify that each propeller sits level and doesn't wobble, which could indicate improper seating or a damaged propeller that should be replaced.
Binding Process
Establishing the wireless connection between the controller and the drone requires a specific binding procedure. Begin by ensuring both the controller and drone are powered off completely. Power on the controller while powering it on, and it places the controller into pairing mode. Then connect the fully charged battery to the drone to power it up. The binding process typically takes 3-5 seconds, during which both the controller and drone LEDs will flash rapidly before becoming solid to indicate successful connection.
If binding fails initially, ensure the controller batteries are fresh and provide adequate power. Move away from sources of 2.4GHz interference such as WiFi routers, microwave ovens, or other wireless devices. Reset both units by powering them completely off, then attempt the binding process again. Once successfully bound.
Flying the E88 Drone
Control Modes
The E88 utilises the industry-standard Mode 2 control scheme, where the left stick controls power and rotation, while the right stick manages directional movement. In this layout, pushing the left stick upward increases throttle for ascent, while pushing downward decreases power for descent. Moving the left stick left or right controls yaw, causing the drone to rotate clockwise or counterclockwise around its vertical axis. The right stick handles pitch and roll movements, with forward motion tilting the drone downward to move forward and backward motion tilting it upward to move backward. Left and right movements on the right stick roll the drone side to side for lateral movement.
Basic Flight Maneuvers
Taking off with the E88 requires placing the drone on a level surface, then moving the left side joystick to the top end after the bottom end to arm the drone. Next, gradually increase the left stick throttle until the drone lifts off the ground. Once airborne, maintain steady throttle while keeping all sticks centered to achieve stable hovering. For forward flight, push the right stick forward to tilt the drone downward, generating forward momentum. To slow down or stop, pull the right stick backwards to bring the drone back to level flight. Landing involves reducing throttle gradually while the drone descends, then touching down gently on all four legs before cutting power completely.
Turning maneuvers utilize the left stick for yaw control, with left movements rotating the drone counterclockwise and right movements rotating it clockwise. These rotations can be combined with pitch and roll inputs for complex flight paths and maneuvers. Throughout all flight operations, small corrections with the sticks help maintain stability and control the drone's position in the air.
Flight Modes Explained
Manual mode provides full pilot control over all flight axes without any automatic stabilization assistance. In this mode, the pilot must actively manage the throttle to maintain altitude and make constant stick corrections to keep the drone steady. This mode offers maximum responsiveness but requires significant pilot skill and attention, making it best suited for experienced users who want complete control over the drone's flight characteristics.
Altitude hold mode utilizes the barometric pressure sensor to automatically maintain the drone's height above ground level. Once engaged, throttle input changes from direct motor power control to climb/descend rate control, allowing the pilot to focus on directional movement while the drone automatically holds its altitude. This mode makes hovering much easier and provides smoother flight, especially for beginners or when capturing stable video footage.
Headless mode transforms the control scheme to be relative to the pilot's position rather than the drone's orientation. In this mode, forward on the sticks always means away from the pilot, backwards always means toward the pilot, left and right maintain their absolute directions, and yaw continues to rotate the drone. This eliminates confusion about which way is "forward" when the drone has rotated, making it much easier for beginners to maintain proper orientation during flight.
Speed levels offer three different control response settings to match various pilot skill levels and flying conditions. Low speed provides gentle, precise control responses with maximum stability, making it ideal for beginners learning to fly or for indoor operation where precision matters more than speed. Medium speed offers balanced control response suitable for most general flying scenarios. High speed delivers aggressive, responsive control for experienced pilots who want maximum performance and rapid maneuvers.
Special Features
The one-key takeoff feature allows for automatic launch sequences with a single button press. When activated, the drone automatically increases throttle and adjusts attitude to ascend smoothly to approximately 1 meters above the ground, establishing a stable hover position. This feature eliminates the need for manual throttle management during takeoff, making it easier for beginners to get airborne safely and consistently.
One-key landing provides automatic recovery with a single button press, handling the complex throttle and attitude adjustments needed for a smooth descent. The drone gradually reduces power while maintaining its orientation, descending in a controlled manner until it touches down gently. This feature ensures consistent, safe landings without requiring precise manual throttle control.
The flip & roll enables acrobatic manoeuvres where the drone performs a complete rotation in any direction. When activated, pushing any stick fully in one direction triggers an automated flip sequence in that orientation. The drone handles all the complex motor speed changes and attitude adjustments automatically, providing an exciting aerial display while maintaining flight stability.
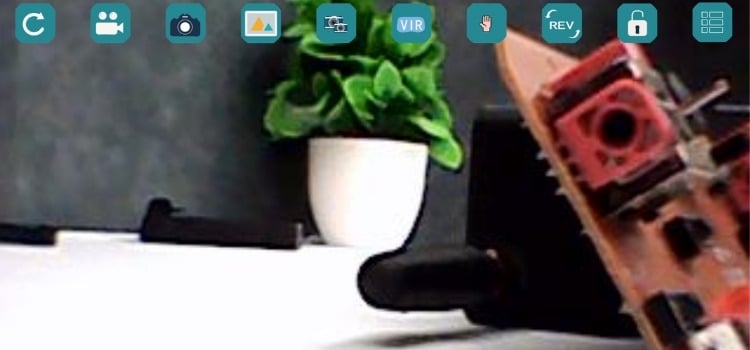
The WiFi FPV camera system provides live video streaming to a smartphone app by creating its own WiFi network. Although the camera supports up to 720p resolution, the actual video bitrate is quite low. As a result, real-time streaming often isn’t smooth; the feed can stutter or drop frames, especially in environments with interference or weak WiFi performance. This limitation is typical for budget drones that use simple WiFi video transmitters.
Calibration
When to Calibrate
Calibration ensures optimal flight performance and should be performed regularly to maintain accurate sensor readings and stable flight characteristics. Perform calibration after purchasing the drone or after any significant impact or crash that might have affected the sensors. If the drone shows signs of drifting or instability during flight, recalibration often resolves these issues. Changing propellers or motors can affect the drone's balance, requiring recalibration to compensate.
Calibration Procedure
Calibration is essential for stable flight, and it must be performed on a perfectly level, vibration-free surface.
Place the drone on a flat table, power on both the drone and controller, and ensure they are properly bound. To correct issues such as drifting in one direction or rotating in place, activate the horizontal calibration function by holding both joysticks bottom outward for about three seconds. The controller will beep, and the drone’s LEDs will flash, indicating that calibration has begun. Keep the drone still, and after about three seconds, the LEDs will turn solid, confirming that the calibration process is complete.
TECHNICAL ANALYSIS
System Architecture Overview
The E88 drone consists of two main subsystems: the drone airframe and the handheld controller, connected via 2.4GHz RF communication. Each subsystem contains a microcontroller, sensors, and power management circuitry.
Drone Side Components
| IC Name | Qty | Identified in E88 Drone | Description |
| STM32F030F4P6 MCU | 1 | Suspected (markings removed) | Main flight control microcontroller |
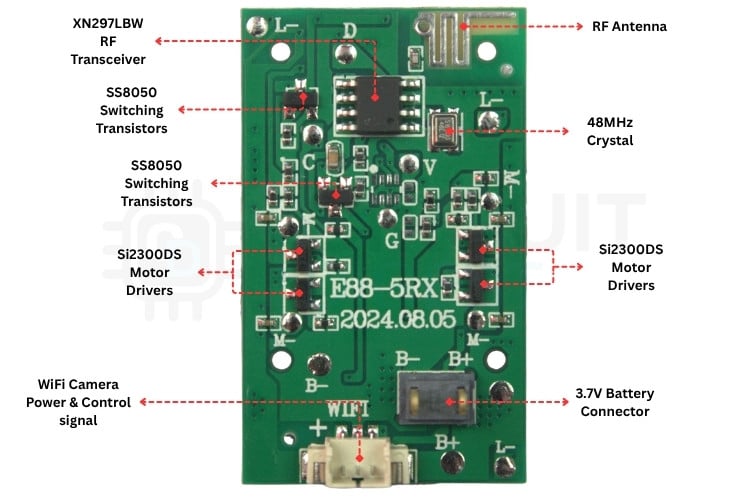
| XN297LBW RF Transceiver | 1 | Confirmed | 2.4GHz wireless communication transceiver |
| L3GD20H Gyroscope | 1 | Suspected | 3-axis angular rate sensor for flight stabilization |
| BMP180 Barometric Sensor | 1 | Confirmed | Atmospheric pressure sensor for altitude hold |
| Si2300DS Motor Drivers | 4 | Confirmed | N-channel MOSFETs for PWM motor control |
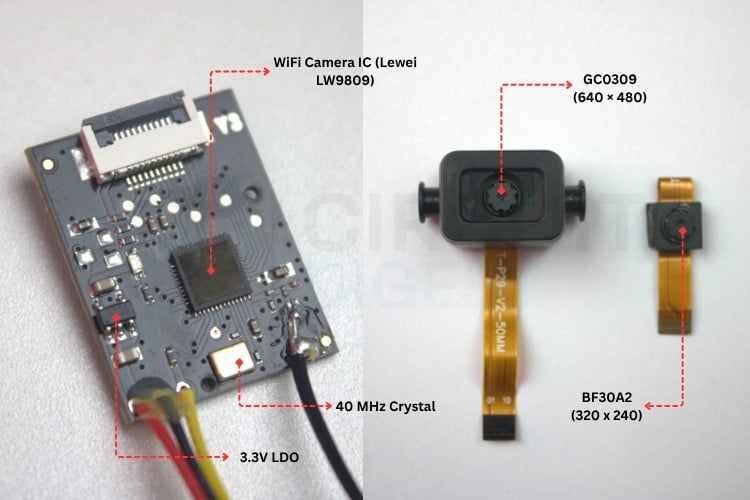
| Lewei LW9809 WiFi Camera IC | 1 | Suspected | WiFi streaming camera module |
| XC6206P282MR 2.8V LDO | 1 | Confirmed | Low dropout voltage regulator for MCU and sensors |
| AAA-marked 3.3V LDO | 1 | Confirmed | Low dropout voltage regulator for WiFi camera |
| SI2301 Reverse Polarity Protection | 1 | Confirmed | P-channel MOSFET for battery reverse polarity protection |
| SS8050 Switching Transistors | 2 | Confirmed | NPN transistors for power control switching |
Controller Side Components
| IC Name | Qty | Identified in E88 Drone | Description |
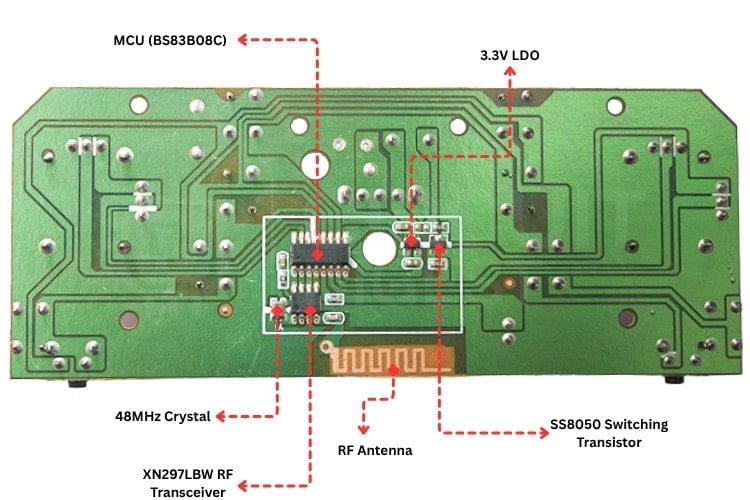
| BS83B08C MCU | 1 | Suspected | Controller microcontroller for user interface processing |
| XN297LBW RF Transceiver |
Confirmed |
2.4GHz wireless communication transceiver | |
| Buzzer | Confirmed | Audio feedback device for alerts and confirmation | |
| CDQ-marked 3.3V LDO | Confirmed | Low dropout voltage regulator for Controller MCU | |
| SS8050 Switching Transistors | Confirmed | NPN transistors for buzzer control |
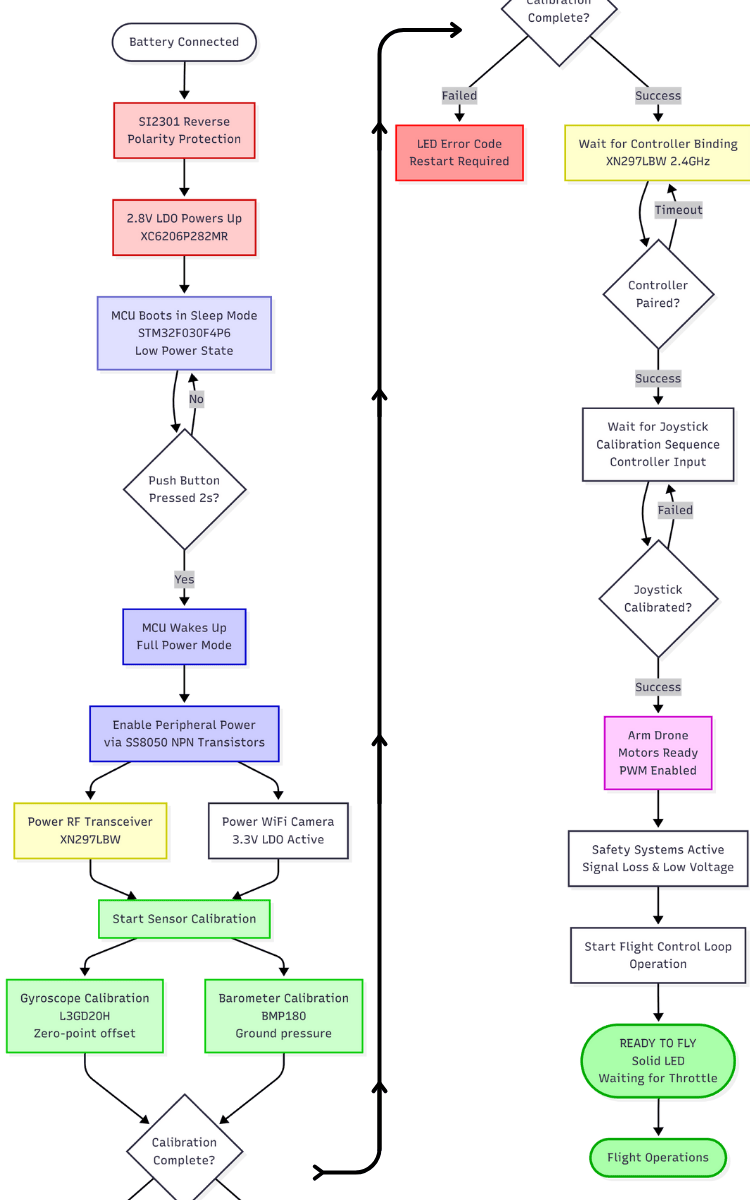
E88 Drone Hardware Initialization Flowchart
This flowchart illustrates the complete hardware initialization sequence of the E88 drone from battery connection to ready-to-fly state.
Power Management System
The E88 drone uses a 3.7V Li-ion battery with approximately 1200mAh capacity (funfact: 1200mAh mentioned on batterypack but the battery itself shows 1800mAh), providing 8-10 minutes of flight time depending on usage patterns. This rechargeable battery connects to the drone through a 2-pin connector and powers all onboard systems. The battery voltage ranges from 4.2V when fully charged down to 3.0V at discharge cutoff, with the drone's flight controller continuously monitoring voltage levels to prevent over-discharge.
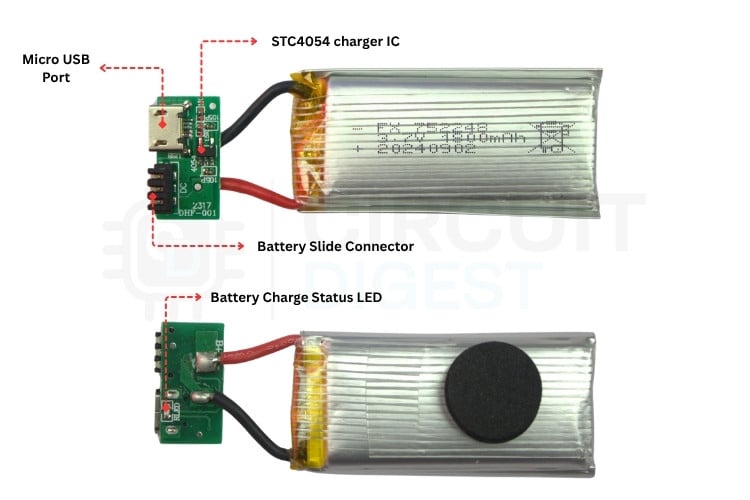
Battery charging is handled by the STC4054 IC, a dedicated linear charger that implements a constant current/constant voltage (CC/CV) charging algorithm. The charger provides 500mA charge current during the CC phase, then switches to CV mode, holding 4.2V until the battery reaches full capacity. A red LED illuminates during charging, turning green when complete. The STC4054 includes thermal shutdown and current limiting protection to prevent charging faults.
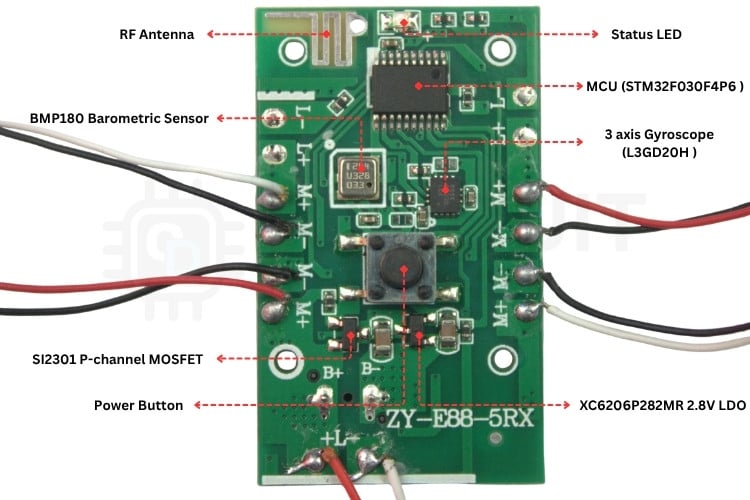
Voltage regulation is critical for stable operation of the E88's various subsystems. The XC6206P282MR LDO provides a clean 2.8V supply for the flight controller MCU and sensors, while the AAA-marked LDO delivers 3.3V for the WiFi camera module. These regulators ensure consistent power despite battery voltage fluctuations during flight. The controller uses a CDQ-marked LDO to convert 4.5V from three AAA batteries to 3.3V for its electronics.
Power switching allows the flight controller to conserve energy by selectively powering subsystems. Two SS8050 NPN transistors, controlled by MCU GPIO pins, switch power to the RF transceiver and WiFi camera module. This software-controlled approach prevents unnecessary power drain when these features aren't in use, extending flight time.
Reverse polarity protection safeguards the E88 against incorrect battery installation. The SI2301 P-channel MOSFET acts as a smart switch - when the battery is connected correctly, it conducts normally with only a 0.1V voltage drop at 1A current. If reversed, the MOSFET's body diode blocks current flow, protecting all downstream electronics from damage without requiring any control circuitry.
Microcontroller Analysis
MCU in E88 Flight Control
The suspected STM32F030F4P6 MCU serves as the central flight controller in the E88 drone, executing a control loop that processes sensor data and generates motor commands. This 32-bit ARM Cortex-M0 microcontroller runs at 48MHz, providing sufficient processing power for quadcopter flight control while maintaining low power consumption.
Key E88 Operational Specs:
-
Control Loop Frequency: 250Hz (4ms period) for responsive flight control
-
Sensor Integration: Processes gyroscope data at 500Hz and barometric pressure at 100Hz
-
PWM Generation: Drives four motors with 16kHz PWM signals using advanced timer TIM1
-
RF Processing: Handles XN297LBW transceiver communication at 100-250Hz update rates
-
Safety Monitoring: Continuous battery voltage monitoring and signal loss detection
Peripheral Usage in E88: -
SPI1: Connected to XN297LBW RF transceiver for command reception
-
I2C1: Interfaces with BMP180 barometric sensor for altitude hold
-
PWM: Timer generates complementary PWM pairs for motor control
-
ADC: Monitors battery voltage and potentially gyro/accelerometer inputs
-
GPIO: Controls power switching transistors for RF and WiFi modules
Memory Utilization: The 16KB flash memory stores the flight control firmware, while 4KB SRAM handles real-time variables including PID controller states, sensor fusion data, and motor mixing calculations.
BS83B08C Controller MCU
The BS83B08C microcontroller in the handheld controller samples analog joystick positions and transmits commands to the drone via the XN297LBW transceiver. This 8-bit MCU provides reliable control input processing with a 4-channel ADC for precise stick positioning.
Key E88 Operational Specs:
-
ADC Resolution: 8-bit conversion of joystick X/Y positions for throttle, pitch, roll, yaw
-
SPI Interface: Drives XN297LBW transceiver for 2.4GHz command transmission
-
Update Rate: 100-250Hz command packet transmission, depending on flight mode
-
Power Management: Operates from a 3.3V supply with low current consumption for extended battery life
Controller Functions:
-
Input Processing: Converts analog stick positions to digital commands
-
Mode Switching: Handles altitude hold, headless mode, and speed scaling
-
User Interface: Controls LED indicators and buzzer for status feedback
-
Binding Process: Manages initial pairing with drone transceiver
Sensor Suite
L3GD20H Gyroscope in E88 Flight Stabilization
The suspected L3GD20H provides the primary angular rate sensing for the E88's flight stabilization system, operating at a ±2000 dps range for maximum sensitivity. This 3-axis gyroscope is sampled at 500Hz by the STM32F030F4P6 MCU, providing real-time rotation feedback for the 250Hz control loop.
Key E88 Operational Specs:
-
Sampling Rate: 500Hz for high-frequency motion detection
-
Range Selection: ±2000 dps for acrobatic maneuvers and precise hovering
-
Interface: I2C bus for data collection
-
Calibration: Zero-point offset calibration performed during the startup sequence
-
Filtering: Digital low-pass filtering to reduce vibration-induced noise
Flight Control Integration:
-
Orientation Tracking: Angular rates integrated to estimate drone attitude
-
Stability Control: Provides feedback for PID stabilization algorithms
-
Drift Compensation: Works with the barometric sensor for long-term stability
-
Vibration Isolation: Digital filtering removes propeller vibration artifacts
BMP180 Barometric Sensor in E88 Altitude Control
E88-Specific Implementation: The BMP180 delivers altitude hold capability for the E88, measuring atmospheric pressure with ±1.0 hPa accuracy. This sensor enables the drone to maintain a stable hovering height, transforming throttle control into climb rate when altitude hold mode is active.
Key E88 Operational Specs:
-
Sampling Rate: 100Hz for smooth altitude control response
-
Resolution Mode: Ultra-high resolution (0.01 hPa) for precise measurements
-
Calibration: Factory coefficients stored in EEPROM for temperature compensation
-
Ground Reference: Pressure baseline established during startup calibration
-
Filtering: Software filtering reduces barometric pressure variations
Altitude Control Algorithm:
-
Pressure-to-Altitude: Uses standard atmospheric conversion formula
-
PID Control: Maintains setpoint height with proportional-integral-derivative control
-
Throttle Mapping: Converts direct throttle to climb rate in altitude hold mode
-
Wind Compensation: Filters out pressure changes from wind gusts
Sensor Fusion Strategy:
-
Complementary Filtering: Gyroscope provides short-term accuracy, barometer provides long-term stability
-
Startup Calibration: 2-5 second initialization period for sensor stabilization
-
Error Handling: Automatic fallback to manual mode if sensor failures are detected
RF Communication System
XN297LBW in E88 Control Link
The XN297LBW transceiver provides the critical 2.4GHz control link between the E88 drone and handheld controller, operating at 250kbps with GFSK modulation for reliable real-time command transmission. This transceiver is configured for Enhanced ShockBurst protocol with automatic ACK and retransmission, ensuring robust communication in the crowded 2.4GHz ISM band.
Key E88 Operational Specs:
-
Update Rate: 100-250Hz command packets, depending on flight mode
-
Range: 50-80 meters line-of-sight with automatic frequency hopping
-
Latency: <5ms total system latency for responsive control
-
Power Control: Software-controlled via the SS8050 transistor for power saving
-
Error Handling: Automatic retransmission with ACK confirmation
Command Protocol Structure:
-
Throttle: 8-bit value (0-255) for motor power control
-
Attitude: Three 8-bit signed values (-127 to +127) for pitch/roll/yaw
-
Mode Flags: Altitude hold, headless mode, and speed scaling indicators
-
Checksum: Simple error detection for data integrity
Motor Control System
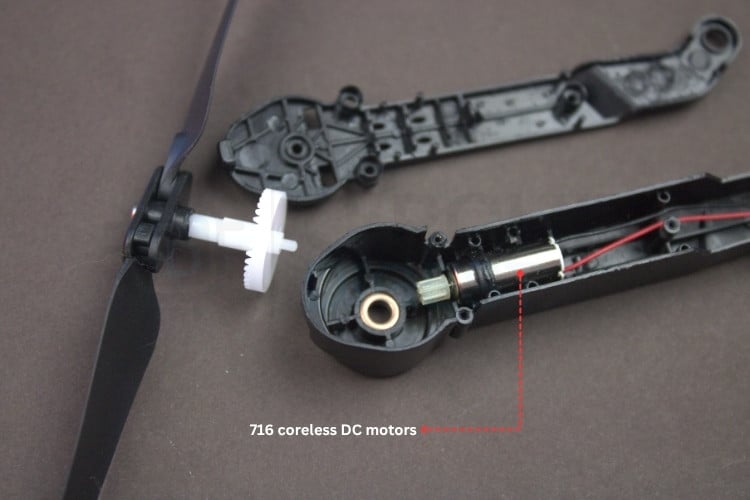
716 Coreless Motors in E88 Propulsion
The E88 uses four 716 coreless DC motors arranged in a quadcopter configuration, each driven by dedicated Si2300DS MOSFETs controlled by the STM32F030F4P6's PWM timer. This setup provides precise PWM control at a 16 kHz carrier frequency, enabling smooth thrust vectoring for stable flight.
Key E88 Operational Specs:
-
Motor Configuration: Quadcopter X-pattern with diagonal motor pairs counter-rotating
-
PWM Frequency: 16kHz inaudible carrier frequency for quiet operation
-
Thrust Mixing: Real-time motor mixing algorithm combining throttle, pitch, roll, and yaw inputs
-
Power Distribution: Direct battery connection with individual MOSFET switching
-
Efficiency: ~66% overall system efficiency at full throttle.
Si2300DS MOSFET Drivers
Four Si2300DS MOSFETs serve as low-side switches for the 716 motors, driven directly by STM32 PWM outputs. The low R_DS(on) of 70mΩ minimizes power dissipation while supporting peak currents up to 2.8A per motor.
Power Efficiency: At 1A motor current, each MOSFET dissipates only 70mW, keeping junction temperatures below 40°C for reliable operation.
PWM Generation: Timer provides precise 16kHz PWM with proper dead time to prevent shoot-through in the motor drive circuits.
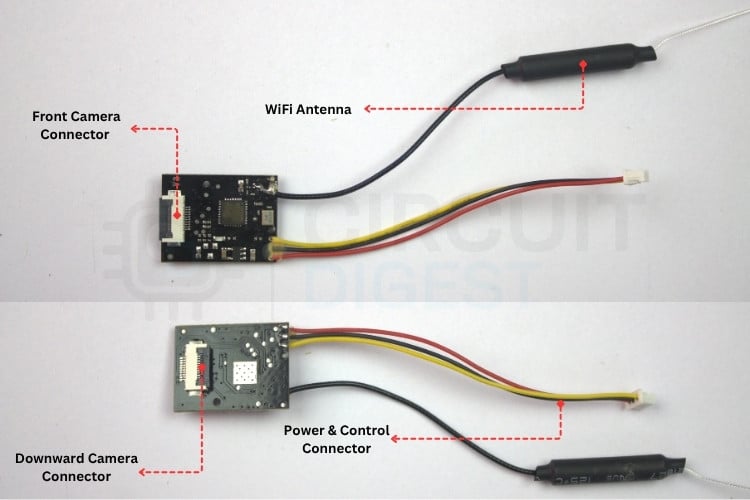
WiFi Camera Module Integration in E88
Camera Module in E88 Flight System
The E88 integrates a suspected (Markings removed) Lewei LW9809 WiFi camera module as an optional FPV (First Person View) system, providing live video feed to a smartphone app. Unlike the core flight control systems, the camera operates as a peripheral that can be powered on/off by the STM32F030F4P6 MCU to conserve battery life during non-camera flights.
Key Integration Points:
-
Software-Controlled Power: Camera power is managed by the MCU GPIO through the SS8050 transistor switching
-
Independent Power Rail: Dedicated 3.3V LDO (AAA marking) supplies 200-300mA during streaming
-
WiFi Access Point: Creates a Wi-Fi_XXXXXX network for direct smartphone connection.
-
Software: After connecting to the access point, download and start the app named “WiFi_CAM” in the Play Store.

Conclusion
The E88 drone teardown is a classic budget toy drone, cheap, cheerful, and aimed squarely at casual fun or kids taking their first flights. It strikes a good balance between low price and basic functionality, with foldable arms, a simple remote, and a low-res camera for goofy aerial shots. The plastic build is lightweight but undeniably fragile, and there’s no access to the flight controller, no programmable features, and no open-source code to tinker with.
Under the hood, it does use some reasonably mature components and hidden flight-control algorithms to stay surprisingly stable for the price, but everything is locked down and simplified. In the end, it’s very much a toy with a camera attached, perfect for messing around in the living room or backyard, but not a serious platform for learning embedded systems, control theory, or real drone engineering.
