

Arduino has been the go-to development platform for fast prototyping and idea validation. Many of us would have started with the Arduino UNO development board, but today as we progress towards the Internet of things, Computer Vision, Artificial Intelligence, Machine learning, and other futuristic technologies, the humble Arduino UNO could no longer cope up with its 8-bit Microcontroller. This called for the launch of new boards with more powerful processors that have built-in Wi-Fi, Bluetooth, GSM and other wireless capabilities, like the popular MKR1000 or MKR GSM 1400. In this context, Arduino has recently launched a new version of its Nano called the Arduino Nano 33.
There are totally two types of Arduino Nano 33 boards, namely Arduino Nano 33 IoT and Arduino Nano 33 BLE sense. The main difference between both the modules is that the Arduino Nano 33 BLE sense module has some built-in sensors (will get into details later) while the Arduino Nano 33 IoT does not have them. In this article we will review the Arduino Nano 33 BLE sense board, introduce you to its features and functionalities and finally write a sample code to read the sensor values and display on serial monitor. So let’s get learning….!
Arduino Nano 33 BLE Sense
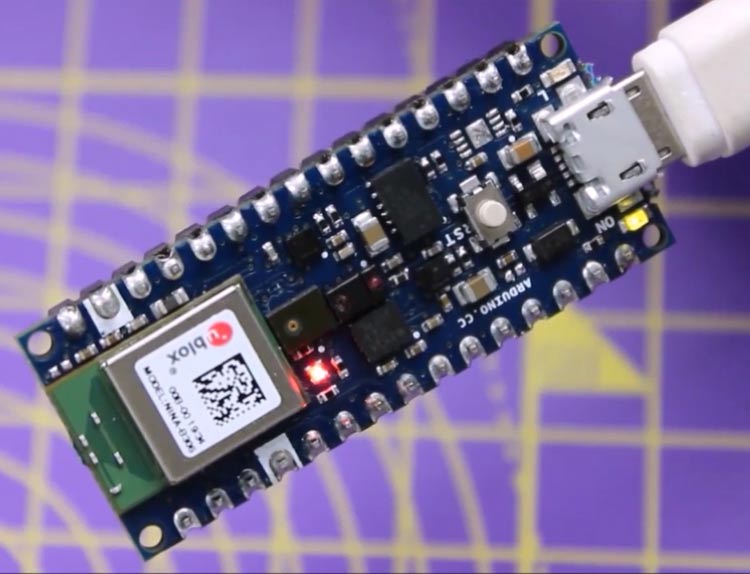
The name “Arduino Nano 33 BLE Sense” is mouthful, but the name itself puts out some important information. It is called “Nano” because the dimensions, pinout and form factor is very similar to the classic Arduino Nano, it is actually planned to be used as replacement for Arduino Nano in your existing projects, but the catch is that this new module operates on 3.3V while the classic Nano operates on 5V. So I think this is where is the name “33” comes in, to indicate that the board operates on 3.3V. Then the name “BLE” indicates that the module supports Bluetooth Low Energy (BLE5 5.0) and the name “sense” indicates that it has on-board sensors like accelerometer, gyroscope, magnetometer, temperature and humidity sensor, Pressure sensor, Proximity sensor, Colour sensor, Gesture sensor, and even a built-in microphone. We will get into the details of BLE and other sensors later but for now this is how an Arduino Nano 33 BLE sense board looks straight of un-boxing.
Arduino Nano 33 BLE Sense Hardware Overview
At the first look of the board you can find a lot of components crowded on the top, most of which are sensors that I told earlier. But the main brain is hidden behind the metal casing on the right side. This casing holds the Nordic nRF52840 processor that contains a powerful Cortex M4F and the NINA B306 module for BLE and Bluetooth 5 communication. This allows the board to operate on very low power and communicate using Bluetooth 5 making for ideal for low power mesh network applications in home automation and other connected projects. Also since the nRF processor supports the ARM Mbed OS it also provides some software improvements which we will discuss later. The sensors, LEDs, pushbuttons and other important stuff that you should know on your board are marked in the below image.

As you can see from the above image, the board is power-packed with sensors that can help you in building the right of the box without even having to connect the board to any external sensors. The board is aimed to be used in wearable devices and other smart portable devices like Fitness bands, Glucose monitoring, Pedometers, smartwatch, weather station, Home security etc where you will be using most of these sensors. And like always all these sensors have pre-built libraries for Arduino which you can use readily. At the end of this article we will read values from all these sensors and display it on the serial monitor. The sensor details on Arduino Nano 33 BLE sense board along with its required libraries are tabulated below
Sensor Name | Parameters | Links |
LSM9DSI – ST Microelectronics | Accelerometer, Gyroscope, Magnetometer
| |
LPS22HB – ST Microelectronics | Pressure | |
HTS221 – ST Microelectronics | Temperature and Humidity | |
APDS9960 – Avago Tech. | Proximity, Light, Colour, Gesture | |
MP34DT05 – ST Microelectronics | Microphone |
Most of these sensors are from ST Microelectronics and they support low power operation making it ideal for battery operated designs. Few people might already be familiar with the APDS9960 sensor since it is already available as a spate module and we have also used the APDS9960 sensor with Arduino previously. For more information on these sensors, you can visit the respective datasheet and also make sure you have added the entire provided library to your Arduino IDE to begin using them with your Arduino Nano 33 BLE sense board. To add a library you can use the given link to get to the respective GitHub page and download the ZIP file, then use Sketch -> Include Library -> Add.ZIP Library or you can also use the library manager on Arduino IDE and add these libraries.
Arduino Nano 33 BLE sense Board Technical Specifications:
Powered by the Nordic nRF52840 Processor the Arduino Nano 44 BLE board has the following technical specifications
- Operating Voltage: 3.3V
- USB-Input Voltage: 5V
- Input-pin Voltage: 4.5V to 21V
- Chip: NINA-B3 – RF52840
- Clock: 64MHz
- Flash : 1MB
- SRAM: 256 KB
- Wireless Connectivity: Bluetooth 5.0 / BLE
- Interfaces: USB, I2C, SPI, I2S, UART
- Digital I/O Pins: 14
- PWM Pins: 6 (8-bit resolution)
- Analog Pins: 8 (10-bit or 12-bit configurable)
Software improvements with Arduino Nano 33 BLE sense
Just like all Arduino boards out there, the Arduino Nano 33 BLE sense can be programmed with the Arduino IDE. But, you have to use the board manager and add the board details to your IDE before you can begin. As we know the nRF 52840 can be programmed using ARM Mbed OS, this means that our Arduino Nano 33 board supports Real-Time Operating System (RTOS). With Mbed OS programming we can run multiple threads at the same time in the program to perform multi-tasking. Also, the power consumption of the board will be greatly reduced, every time we call the delay function the board will enter into tickles mode during the delay time to save power and would jump back into operation once the delay is over. It is reported that this operation will consume 4.5uA less than a normal Arduino delay operation.
That being said, the Mbed OS integration with Arduino IDE is relatively new and it is going to take some time before we can fully utilize the full power of Mbed OS with Arduino IDE. So for a quick start-up, we will write a program to read all the sensor's values and display it on the serial monitors.
Preparing your Arduino IDE for Arduino Nano 33 BLE sense
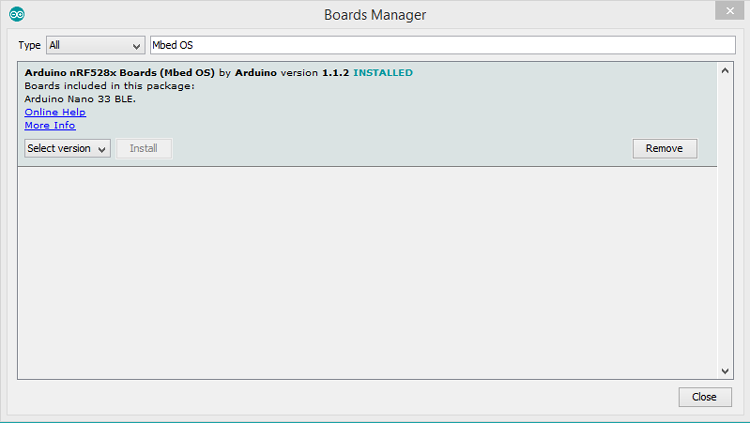
Launch your Arduino IDE and go to Tools -> Boards -> Board Manger to launch your Arduino Board manager. Now search for “Mbed OS” and install the package. It should take some time for the installation to complete.
Once the installation is done, close the dialog box and connect your Arduino 33 board using a micro USB cable with your laptop. As soon as you connect the board windows will automatically start installing the required drivers for the board. Then open your Arduino IDE and select Tools -> Board -> Arduino Nano 33. Then also select the right COM port by checking Tools -> Port, mine is connected to port COM3 but yours might vary. After the port is selected your IDE bottom right corner should look like this

Now to quickly check if everything is working we can use an example program, let’s try the one provided at File -> Examples -> PDM -> PDMSerialPlotter. This program will use the on-board microphone to listen for audio and plot it on a serial plotter. You can upload the program and check if the board and the IDE are working.
Now if you experience a ridiculously slow compiling then you are not alone, many people including me face this issue and at the time of writing this article, there seems to be no solution. It takes me around 2-3 minutes to compile and upload simple programs and when I tried some BLE programs or tried to work with Mbed OS the compilation time increased to more than 10 minutes which did not encourage me to try anything further. This is because of the Mbed OS integration with Arduino IDE, let’s hope someone from the wonderful Arduino Community comes up with a solution for this.
Program to read sensor data and display on Serial Monitor
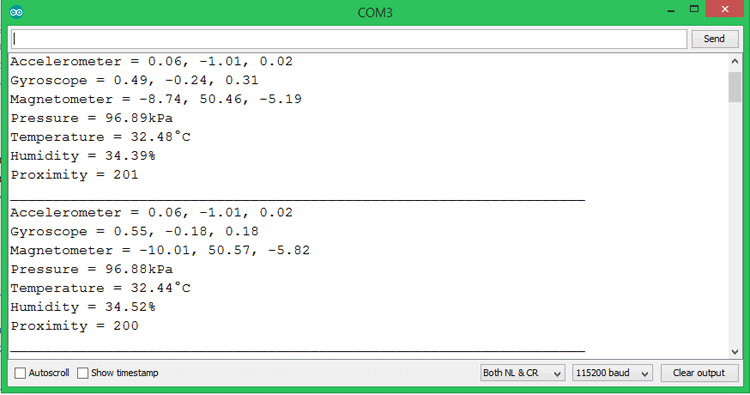
If we do not use the BLE or core Mbed OS functionalities of the board the compile time was reasonable. So I wrote a simple sketch to read all the sensor values and display it on the serial monitor like show below
The complete code to do the same is given at the bottom of this page, but make sure you have installed all the libraries mentioned above. The explanation of the code is as follows.
Start the program by including all the required header files. Here we will be using all the four sensors except for the microphone
#include <Arduino_LSM9DS1.h> //Include the library for 9-axis IMU
 #include <Arduino_LPS22HB.h> //Include library to read Pressure
 #include <Arduino_HTS221.h> //Include library to read Temperature and Humidity
 #include <Arduino_APDS9960.h> //Include library for colour, proximity and gesture recognition
Inside the setup function we initialize the serial monitor at 9600 baud rate to display all the sensor values and also initialize all the required libraries. The code inside setup is shown below
void setup(){
  Serial.begin(9600); //Serial monitor to display all sensor values
  if (!IMU.begin()) //Initialize IMU sensor
  { Serial.println("Failed to initialize IMU!"); while (1);}
  if (!BARO.begin()) //Initialize Pressure sensor
  { Serial.println("Failed to initialize Pressure Sensor!"); while (1);}
  if (!HTS.begin()) //Initialize Temperature and Humidity sensor
  { Serial.println("Failed to initialize Temperature and Humidity Sensor!"); while (1);}
  if (!APDS.begin()) //Initialize Colour, Proximity and Gesture sensor
  { Serial.println("Failed to initialize Colour, Proximity and Gesture Sensor!"); while (1);}
 }
Inside the loop function, we read the required sensor values from the library and then print them on the serial monitor. The syntax can be referred from the example program of each library, we have read the accelerometer, gyroscope, magnetometer, pressure, temperature, humidity and proximity sensor values and displayed them on the serial monitor. The code to measure the accelerometer value is shown below, likewise, we can measure for all sensors.
//Accelerometer values
  if (IMU.accelerationAvailable()) {
    IMU.readAcceleration(accel_x, accel_y, accel_z);
    Serial.print("Accelerometer = ");Serial.print(accel_x); Serial.print(", ");Serial.print(accel_y);Serial.print(", ");Serial.println(accel_z);
  }
delay (200);

Arduino Nano 33 BLE- Uploading the code
Uploading the code to Nano 33 is similar to any other boards, but do note that the board has two COM ports. When you click on the upload button the Arduino IDE compiles the code and then resets the board automatically through software command, this will put the board in boot loader mode and upload your code. Because of this, once the upload is done you might notice that the Arduino IDE has automatically changed its COM port to a different number and you might want to change it back before you open your serial monitor.
So this is pretty much my experience with the Arduino Nano 33 board so far, I will try building something with its sensors and BLE features sometime later in the future. How was your experience with the board? What would you want me to build with it? Leave the answers in the comment section and we will discuss more.
Complete Project Code
#include <Arduino_LSM9DS1.h> //Include the library for 9-axis IMU
#include <Arduino_LPS22HB.h> //Include library to read Pressure
#include <Arduino_HTS221.h> //Include library to read Temperature and Humidity
#include <Arduino_APDS9960.h> //Include library for colour, proximity and gesture recognition
void setup(){
  Serial.begin(9600); //Serial monitor to display all sensor values
  if (!IMU.begin()) //Initialize IMU sensor
  { Serial.println("Failed to initialize IMU!"); while (1);}
  if (!BARO.begin()) //Initialize Pressure sensor
  { Serial.println("Failed to initialize Pressure Sensor!"); while (1);}
  if (!HTS.begin()) //Initialize Temperature and Humidity sensor
  { Serial.println("Failed to initialize Temperature and Humidity Sensor!"); while (1);}
  if (!APDS.begin()) //Initialize Colour, Proximity and Gesture sensor
  { Serial.println("Failed to initialize Colour, Proximity and Gesture Sensor!"); while (1);}
 }
float accel_x, accel_y, accel_z;
float gyro_x, gyro_y, gyro_z;
float mag_x, mag_y, mag_z;
float Pressure;
float Temperature, Humidity;
int Proximity;
void loop()
{
  //Accelerometer values
  if (IMU.accelerationAvailable()) {
    IMU.readAcceleration(accel_x, accel_y, accel_z);
    Serial.print("Accelerometer = ");Serial.print(accel_x); Serial.print(", ");Serial.print(accel_y);Serial.print(", ");Serial.println(accel_z);
  }
delay (200);
  //Gyroscope values
  if (IMU.gyroscopeAvailable()) {
    IMU.readGyroscope(gyro_x, gyro_y, gyro_z);
    Serial.print("Gyroscope = ");Serial.print(gyro_x); Serial.print(", ");Serial.print(gyro_y);Serial.print(", ");Serial.println(gyro_z);
  }
delay (200);
  //Magnetometer values
  if (IMU.magneticFieldAvailable()) {
    IMU.readMagneticField(mag_x, mag_y, mag_z);
    Serial.print("Magnetometer = ");Serial.print(mag_x); Serial.print(", ");Serial.print(mag_y);Serial.print(", ");Serial.println(mag_z);
  }
delay (200);
  //Read Pressure value
  Pressure = BARO.readPressure();
  Serial.print("Pressure = ");Serial.println(Pressure);
  delay (200);
  //Read Temperature value
  Temperature = HTS.readTemperature();
  Serial.print("Temperature = ");Serial.println(Temperature);
  delay (200);
  //Read Humidity value
  Humidity = HTS.readHumidity();
  Serial.print("Humidity = ");Serial.println(Humidity);
  delay (200);
  //Proximity value
  if (APDS.proximityAvailable()) {
    Proximity = APDS.readProximity();
    Serial.print("Proximity = ");Serial.println(Proximity);
    }
  delay (200);
  Serial.println("_____________________________________________________");
  delay(1000);
}
Comments
Thank you very much for this comprehensive article. Very well written and really practical. It gives a clear overview of the possibilities of the board. I expect mine tomorrow and will run your code to get to know it.
The idea is the use the board to build trust vectoring. The 9-axis IMU should make this possible. In stage 2 it will be augmented by the u-blox SAM-M8Q GPS which also runs on 3.3V.
For this project the board will need to direct standard 6V servos with JR wiring. Can this be done directly from the output pins or is an amplification required due to the 3.3V? If so, what would be the best solutions?
Thanks for your advice on forehand and with Best Regards...
hey, i loved this, i just bought an arduino nano 33 ble, y just want to know how to use the bluetooth :( how to access to, in which pin?? how¡?? thanks if someone answer me :(
a very good article here, this helped me to develop my custom PCB

Thank you for this article. I would love to see more about the BLE features. I recently purchased one of these boards as my first entry into Arduino, and have been able to read sensor data as expected but can't seem to discover my Arduino bt peripheral from any of my devices (running Mac OSX, Windows, iOS). I'm using the ArduinoBLE library and everything seems to be initializing correctly from my Nano, but no dice. There's probably something very obvious I'm missing here.