

Today, in this project, we will learn how to interface a Thermal Printer with Raspberry Pi using hardware serial communication, to print a test receipt that contains various elements like a Logo, a QR Code, or a barcode, along with various other text and graphical characters. Learning how to connect a thermal printer to Raspberry Pi opens up exciting possibilities for DIY projects, from creating a Raspberry Pi receipt printer for your home business to building automated ticketing systems. As we all know, Raspberry Pi is a portable development board, and we have already built many Raspberry Pi-based projects previously. In this project, we will be interfacing a Thermal Printer with Raspberry Pi, then by using Serial communication and the python-escpos library, we will control the thermal printer from Raspberry Pi and print text and graphical images. This comprehensive Raspberry Pi thermal printer project guide will walk you through interfacing a thermal printer with Raspberry Pi using hardware serial communication and Python programming. You should check out our previous articles, where we already interfaced a thermal printer with ESP32, Arduino Uno and PIC16F877A. Whether you're working with a Raspberry Pi 3, Raspberry Pi Zero, or exploring Raspberry Pi Bluetooth thermal printer options, this tutorial covers everything you need to create a fully functional POS printer Raspberry Pi setup. A complete tutorial on building a smart shopping cart using a Raspberry Pi, USB barcode scanner, 20×4 LCD and POS thermal printer—scanning items, fetching prices from a Google Spreadsheet, and printing an invoice automatically.
Before going further, let us have a look at these steps that will be involved,
- Enable the Hardware Serial through raspi-config
- Connections for the Thermal printer and Pi 3
- Figure out how the ESC-POS commands work.
- Install the library from GitHub.
- We will do some basic coding to print text, image, barcode, QR Code, etc.
- We will try to print a sample Receipt
- Conclusion
Table of Contents
Components Required for Raspberry Pi Thermal Printer Setup
Before starting your Raspberry Pi thermal printer project, gather these essential components:
| Component Name | Qty |
|---|---|
| Thermal Printer MAXIM PNP-500 | 1 |
| Raspberry Pi 3 or Raspberry Pi 0 | 1 |
| Jumper Wires Male to Female | As required |
| 9V 1 Amp Adaptor | 1 |
The above table shows the list of components I am using as of now; you can have a different set of thermal printers and Raspberry Pi versions. Also, my printer requires at least 6 Volts to operate. (Please check the user manual while selecting the power source).
What is a Thermal Printer and How Does It Work?
A thermal printer is a printer that uses a heating head on thermal paper to produce images. Its quality of print, ease of installation, minimum use of external components, and low power consumption make it more popular among token or ticket counters, grocery stores, tiffin centres, entertainment centres, healthcare, corporate industries, etc. It's both eco-friendly as well as a cost-effective solution for small-scale use, as no ink Cartridge or ribbon, making it ideal for POS printer Raspberry Pi applications, ticket printing, and receipt generation.
Key Advantages of Thermal Printers for Raspberry Pi Projects
∗ Zero Ink Costs: Extensively cutting down on the operation costs due to no need for cartridges or ribbons
∗ Low Power Consumption: Ideal for Raspberry Pi projects that are portable and battery-operated
∗ Silent Operation: Absolutely no noise during printing, thus suitable for quiet places
∗ High Reliability: Very low maintenance due to fewer moving parts, and also using the printer longer (up to 50km of paper)
∗ Fast Printing: Receipt generation at a very quick rate of 250mm/sec
∗ Compact Design: Raspberry Pi systems with embedded applications can use the very little space occupied by the printer
It provides a noise-free operation along with faster monochromatic printing. Make sure to use the printer with an optimised temperature of the print head, as it may get damaged on operating at high temperatures.
In our case, we are using a thermal printer that can be interfaced using RS232 mode or Serial TTL. I am using a 9V adaptor to power it up. By default, the baud rate of most printers is 9600. We will use the TTL mode of communication in this case. For more technical details of the printer, please download the brochure.
Technical Specifications: MAXIM PNP-500 Thermal Printer
Print Method | Thermal Direct Line Printing |
Paper loading method | Easy paper loading |
Paper width | 57 mm |
Print width | 48 mm |
Print speed | 250 mm/sec |
Resolution ratio | 8 dots/mm (384 dots/line) |
Life of printing head | 50 km |
Printing speed | 50 mm/sec |
Max. printing speed | 80 mm/sec |
Character size | 9 x 17 • 12 x 24 |
Chinese character fonts | GB18030 |
Chinese character size | 12 x 24 dots • 24 x 24 dots |
Outline dimension | 76.8 x 77.4 x 47.6 (WxDxH mm) |
Installation | 72.8 x 73.4 (WxD mm) |
Embedded depth | 34.65 mm |
Paper roll specification | Width : 58 mm, max. diameter: 40 mm |
Interface | Serial (RS232C,TTL) / USB |
Input power | DC5-9V • 12V |
Operating temperature | 0°C~55°C |
Storage temperature | 25°C~70°C |
Operating humidity | 10°C~80°C |
Storage humidity | 10°C~90°C |
Understanding ESC/POS Command Protocol
Most of the printers work on ESC Point of Service commands for interfacing with computers, which were designed by EPSON. ESC/POS (Epson Standard Code for Point of Sale) is the industry-standard command language for controlling receipt printers and POS printer Raspberry Pi systems. It was mostly used in some inkjet printers, dot matrix printers and is still widely used in many receipt thermal printers for controlling them. As of 2014, few modern non-Epson printers use ESC/P instead, and most are driven through a standardised page description language, usually PCL or PostScript, or they use proprietary protocols such as Hardware Code Pages. The python-escpos library we'll use abstracts these low-level commands, making thermal printer Raspberry Pi Python programming straightforward even for beginners.
This thermal printer works on ESC/POS commands, for which we will be using the dedicated library.
How to Install a Thermal Printer on Raspberry Pi: Step-by-Step Setup
Step 1: Enable Hardware Serial Communication on Raspberry Pi
To connect thermal printer to Raspberry Pi, you must first enable the hardware serial port. In the terminal, write the following command and then press enter.
sudo raspi-configYou will see the configuration page, then navigate to ‘interfacing option’ through the arrow keys. After pressing enter, go to the ‘serial port enable/disable’ option. Press ‘no’ for enabling the serial login shell and then press ‘yes’ for enabling the ‘Hardware Serial port’. Click ‘ok’ and then click on the ‘finish button’ to reboot your Pi.
Step 2: Install Python Library for Thermal Printer Control
The python-escpos library simplifies thermal printer Raspberry Pi Python programming by providing high-level functions for all ESC/POS commands:
Now by doing so, you have enabled your Hardware Serial, i.e. ‘/dev/serial0’, which is dedicated to ‘ttyAMA0’. This can be determined by entering the following command on Pi-3.
ls -l /devYou'll see the following screenshot. Serial 1 is being used by the onboard Bluetooth of the Raspberry Pi 3. So, we will only be using the Serial 0 for the Thermal printer that is to be connected to GPIO 14 and GPIO 15 as TX-D0 and RX-D0.

Now we will connect the Printer with our Raspberry Pi and provide a 9V Supply to the Printer.
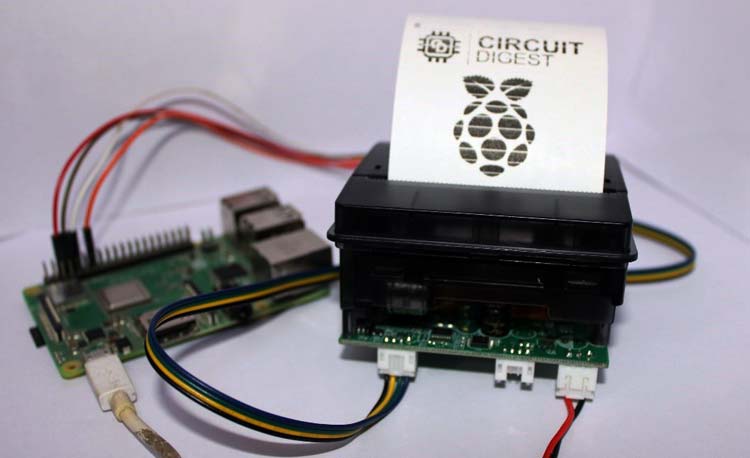
Connection Diagram: Wiring Thermal Printer to Raspberry Pi
Here you can see that the RXD of the Printer is connected to the TXD of the Raspberry Pi, and the TXD of the Thermal printer is connected to the RXD of the Raspberry Pi 3. Properly connecting your thermal printer to the Raspberry Pi is crucial for reliable communication.

Also, one can note that TDR and GND are set to GND as of now. My printer was not printing until I put TDR to the ground.
| Thermal Printer Pin | Raspberry Pi GPIO Pin | Pin Number | Function |
| RXD (Receive Data) | TXD (GPIO 14) | Pin 8 | Transmit data from Pi to Printer |
| TXD (Transmit Data) | RXD (GPIO 15) | Pin 10 | Receive data from Printer to Pi |
| GND (Ground) | GND | Pin 6 (or any GND) | Common ground reference |
| VCC (Power) | External 9V Adapter | N/A | Main power supply (DO NOT connect to Pi's 5V) |
| TDR (Thermal Detection) | GND | Pin 6 (or any GND) | Pull to ground to enable printing |
Programming the Raspberry Pi Receipt Printer with Python
Now that the hardware setup is complete, let's explore thermal printer Raspberry Pi Python programming. As we have discussed earlier, the thermal printer can be controlled by passing the appropriate ESC POS Command. But for now, we are using a library to interface it, as this library will send the data by using the same commands, and your desired print will become easy. It is quite complex to understand the basic nature of the printers based on ESC Command, but once you learn the basics, it will become a piece of cake for you. If everything is configured correctly, your Raspberry Pi receipt printer should print the test message.
Now, for the installation of the library, write the following command in the terminal.
sudo pip install python-escposBy doing so, you will be able to use the library. We will be using the serial UART protocol for interfacing.
Printing Text on a Thermal Printer
Here we will be testing our first code on the printer that will print the text “Hello World” followed by a QR code.
from escpos.printer import Serial
""" 9600 Baud, 8N1, Flow Control Enabled """
p = Serial(devfile='/dev/serial0,
           baudrate=9600,
           bytesize=8,
           parity='N',
           stopbits=1,
           timeout=1.00,
           dsrdtr=True)
p.text("Hello World\n")
Now you can have a look at the detailed documentation for learning and exploring the functions and methods of this amazing library.
Setting up the Text Properties on the Thermal Printer
The ‘set()’ function will be used to set the text properties like font style (‘a or ‘b’), alignment, or font size. The set() method provides comprehensive control over text appearance on your thermal printer Raspberry Pi Python project:
p.set(
        underline=1,
        align="left",
        font="a",
        width=2,
        height=2,
        density=3,
        invert=0,
        smooth=False,
        flip=False,
)
p.textln(“Hello World”)
The text can also be bold or normal, inverted to black and white, or flipped upside down or downside.
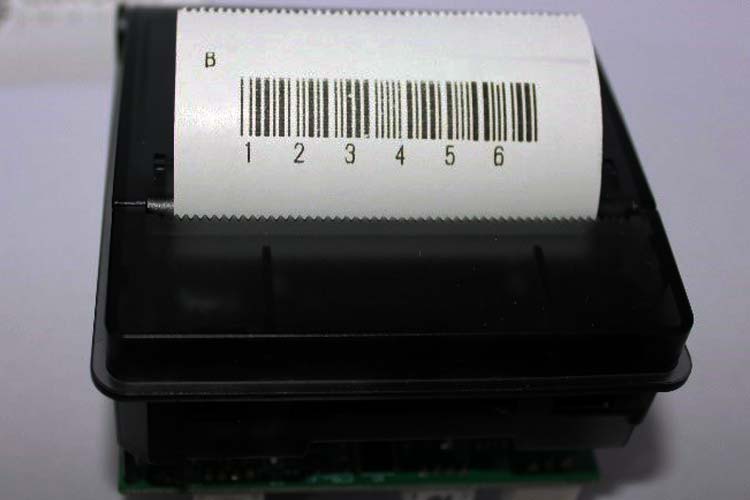
Printing Barcodes with Raspberry Pi Thermal Printer
Barcodes are essential for inventory management, ticketing, and product identification in POS printer Raspberry Pi applications. The barcode(data, code_type, pos) where the arguments will be as follows,
data= “any data to convert into Barcode”
code_type=”type of barcode for eg. CODE39, CODE128, UPC-1, etc. “
POS=”position of the barcode data for eg. ‘BELOW’, ABOVE, BOTH, OFF“
For further details about this method, please refer to the documentation page. It can be noted that the size of the barcode can also be adjusted by passing the respective arguments.
p.barcode('123456', 'CODE39')This will print the barcode that will store ‘123456’. Also, this will be of CODE39 type. Moreover, for the alignment of the barcode, you can use the set() function as we discussed earlier.
| Barcode Type | Use Case | Data Format |
| CODE39 | Inventory, logistics, labels | Alphanumeric (0-9, A-Z, special chars) |
| CODE128 | Shipping, packaging | All ASCII characters, high density |
| EAN13 | Retail products (international) | 12 digits + check digit |
| EAN8 | Small retail products | 7 digits + check digit |
| UPC-A | Retail products (North America) | 11 digits + check digit |
| UPC-E | Small products | 6-digit compressed UPC |
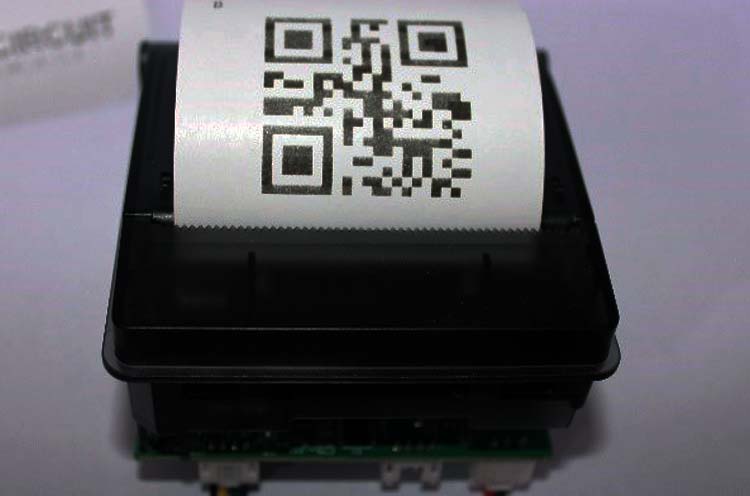
Creating QR Codes for Modern Applications
Now you will be amazed to know that the ESCPOS Library has the facility to convert your data into a QR Code directly by passing the desired string. For printing a QR Code of your desired information, you can use the following Function.
p.qr("Circuit Digest",native=True,size=12)Here you can pass the “String data in quotes”, the size of the QR code, and native as TRUE or FALSE.
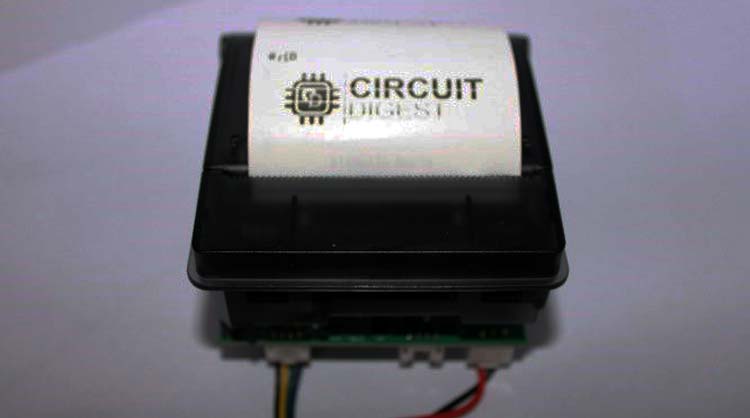
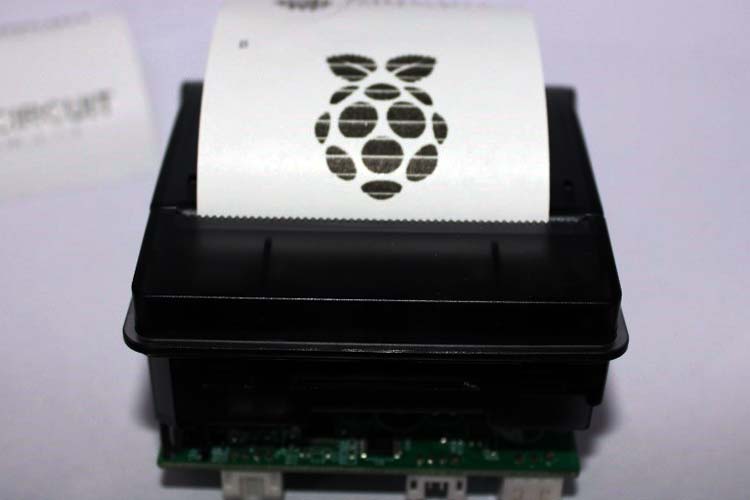
Printing Images and Logos
Add professional branding to receipts by printing logos and graphics on your Raspberry Pi receipt printer. Now it’s time for the image printing. Here, you can locate the image and pass the location as the argument of the image() function.
p.image("/home/pi/Raspberry_Pi_logp.png",impl="bitImageColumn")
Here, “the path of the image should be placed here”, followed by the impl as “imageRaster” or “bitImageColumn”, etc. You can have a look at the documentation part for more details. Just keep in mind that the pixels of width should not be more than 360, as the page size has a limited width.
Complete Sample Receipt: Building a Professional POS System
So, now it's time to print our first Receipt using a Thermal Printer, but before going further, please note that we are hard-coding the output for now and will try to make it dynamic next time.
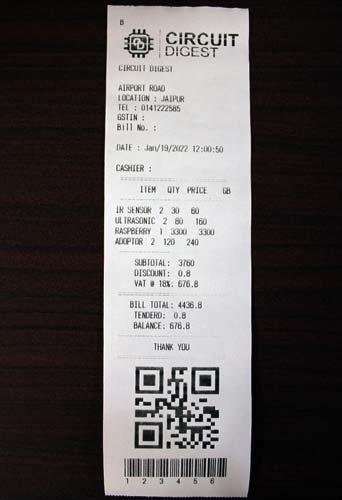
The code for printing the receipt is as follows:
from escpos.printer import Serial
from time import *
from datetime import date
from datetime import datetime
now = datetime.now()
dt_string = now.strftime("%b/%d/%Y %H:%M:%S")
print("Today's date:", dt_string)
""" 9600 Baud, 8N1, Flow Control Enabled ""'
p = Serial(devfile='/dev/serial0',
           baudrate=9600,
           bytesize=8,
           parity='N',
           stopbits=1,
           timeout=1.00,
           dsrdtr=True
)
p.set(
        underline=0,
        align="left",
        font="a",
        width=2,
        height=2,
        density=3,
        invert=0,
        smooth=False,
        flip=False,
)
p.text("\n")
p.set(
        underline=0,
        align="center",
        font="a",
        width=2,
        height=2,
        density=2,
        invert=0,
        smooth=False,
        flip=False,
)
#Printing the image
# here location can be your image path in “ ”
p.image("/home/pi/proj on pi0/CD_new_Logo_black.png",impl="bitImageColumn")
#printing the initial data
p.set(
        underline=0,
        align="left",
)
p.textln("CIRCUIT DIGEST\n")
p.text("AIRPORT ROAD\n")
p.text("LOCATION : JAIPUR\n")
p.text("TEL : 0141222585\n")
p.text("GSTIN : \n")
p.text("Bill No. : \n\n")
p.set(
        underline=0,
        align="left",
        font="a",
        width=2,
        height=2,
        density=2,
        invert=0,
        smooth=False,
        flip=False,
)
# print the date and time of printing every time
p.text("DATE : ")
p.text(dt_string)
p.textln("\n")
p.textln("CASHIER : ")
p.textln(" ===========================")
p.textln("      ITEM   QTY  PRICE    GB")
p.textln(" --------------------------")
p.textln("IR SENSOR  2  30   60")
p.textln("ULTRASONIC  2  80   160")
p.textln("RASPBERRY  1  3300   3300")
p.textln("ADOPTOR  2  120   240")
p.textln(" --------------------------")
p.textln("     SUBTOTAL:  3760")
p.textln("     DISCOUNT:  0.8")
p.textln("     VAT @ 18%: 676.8")
p.textln(" ===========================")
p.textln("    BILL TOTAL: 4436.8")
p.textln("     TENDERD:  0.8")
p.textln("     BALANCE: 676.8")
p.textln(" --------------------------")
p.textln("          THANK YOU")
p.textln(" ===========================")
p.set(
        underline=0,
        align="center",
        font="a",
        width=2,
        height=2,
        density=2,
        invert=0,
        smooth=False,
        flip=False,
)
p.qr("Circuit Digest",native=True,size=12)
p.textln("")
p.barcode('123456', 'CODE39')
#if your printer has paper cuting facility then you can use this function
p.cut()
print("done")
Technical Summary and GitHub Repository
This section outlines the key technical details of the project, covering its design, components, and working principles. The accompanying GitHub repository includes all source files and code for further exploration and development.


Advanced Features to Add to Your Raspberry Pi POS Printer System
After you have gotten used to the basics of Raspberry Pi Python thermal printer programming, consider adding some additional features:
» Database Integration: Hook up to an SQLite or MySQL source, look up product prices, and check the inventory
» Barcode scanner input: Attach a USB barcode scanner to look up products even more quickly
» Web app: Create a Flask or Django web app for remote printing capability from mobile devices
» Receipt templates: Create multiple receipt layouts for different types of sales
» Cloud Backup: Automatically upload receipt data to the cloud for accounting purposes
» Multilingual: Print receipts in preferred languages based on the customer's preference
» Auto-print on-event: Print when receiving data via GPIO, MQTT, or webhooks
Troubleshooting Common Raspberry Pi Thermal Printer Issues
| Problem | Possible Cause | Solution |
| Printer doesn't print anything | TDR pin not grounded, insufficient power, serial port disabled | Ground TDR pin, use 9V/1A adapter, verify serial enabled with ls -l /dev/serial* |
| Garbled or random characters | Wrong baud rate, incorrect serial settings | Verify baud rate is 9600, check bytesize=8, parity='N', stopbits=1 |
| Permission denied error | User lacks serial port access | Add user to dialout group: sudo usermod -a -G dialout pi, then reboot |
| Print quality is faint | Low density setting, old paper, low voltage | Increase density in set() function, check paper quality, verify 9V supply |
| Images don't print correctly | Image too wide, wrong format | Resize to max 384px width, convert to high-contrast B&W PNG |
| QR codes won't scan | Size too small, poor contrast | Increase size parameter (try 8-12), ensure high print density |
| Serial port conflict | Another process using serial port | Check with lsof /dev/serial0, kill conflicting process |
Frequently Asked Questions Raspberry Pi Thermal Printer Project
⇥ Q1: Is it possible to utilise a Raspberry Pi Zero for thermal printer projects?
Yes, both the Raspberry Pi Zero and Zero W are suitable for thermal printer projects because they both have hardware UART (serial) pins you can use to wire to the thermal printers. The Zero W has WiFi on board, which is useful for wireless POS printer Raspberry Pi projects, because instead of getting print jobs via a dongle, the print jobs come in via the network.
⇥ Q2: Is there a way to attach a thermal printer to a Raspberry Pi without a physical connection?
For a Raspberry Pi Bluetooth thermal printer setup, you can utilise Bluetooth-enabled thermal printers that have support for SPP (Serial Port Profile), or add a Bluetooth-to-serial adapter to standard serial thermal printers. Another option is to connect the printer via USB, then share it across the network using CUPS (Common Unix Printing System) for wi-fi printing from multiple devices.
⇥ Q3: What is the widest image width I can print on a 57mm thermal printer?
For standard 57mm thermal paper, the printable width is approximately 48mm, which is equivalent to 384 pixels wide at 8 dots/mm (203 DPI) resolution. Any image width greater than 384 pixels will automatically be cropped or resized to fit by the python-escpos library. Therefore, to obtain the best print outcome.
⇥ Q4: Which thermal printer choices can I use with the Raspberry Pi?
Many popular thermal printers utilise ESC/POS commands that can be used with the Raspberry Pi. Some of the more common models are the MAXIM PNP-500, CSN-A2, Adafruit Mini Thermal Receipt Printer, Goojprt QR203, and Epson TM-T20. Ensure the printer has either an RS-232/TTL serial or USB connection when selecting a thermal printer, and that it utilises the standard ESC/POS command set, allowing for easy connection to the Raspberry Pi.
⇥ Q5: Do I need different paper for thermal printers?
Yes, thermal printers require specific thermal paper coated with heat-sensitive chemicals that darken when heated. Typically, standard paper will not work. You will want to order thermal paper rolls that are the same width as your thermal printer (normally 57mm or 80mm). Be aware that thermal paper receipts degrade over time, depending on the environmental conditions, so it is critical for important documents to use quality thermal paper either received from your Raspberry Pi or placed into your Raspberry Pi receipt printer.
⇥ Q6: Is it possible for multiple Raspberry Pis to print to one thermal printer?
Yes! It will take a network-based solution, as the thermal printer only has one serial port. The best way I have found to handle this is to have one "print server" Raspberry Pi connected to the thermal printer, and two have CUPS or a custom Flask/FastAPI server that allows for the other Raspberry Pis on the network to send an HTTP POST request to it with the print data. This enables a Raspberry Pi network of thermal printer POS that can easily be expanded.
⇥ Q7: How long will thermal print last before fading?
The standard thermal paper receipt can last 1-3 years until the print is hardly readable, depending on how you store the receipt. Fading occurs at a faster rate depending on heat, light and humidity. If you have any receipts that you want to keep for a longer period of time for preservation from your Raspberry Pi receipt printer, usually use premium or "long-life," thermal paper (7-10 years rated), store in a cool, dark space and, of course, take a digital backup with a scan or photograph after you print them.
Conclusion
We can have multiple ideas of printing text in different fonts and various sizes on the thermal printer. In this article, we have learned some basic functionalities of the thermal printer and what commands it supports, i.e. ESCPOS in our case. Also, we come to know that thermal printers are the handiest in daily usage, have a long life, and require less maintenance. It can print up to 50 km of fully dense written paper rolls. We will try to print some more tables and aligned text next time. Till then, stay connected.
Similar Projects Using Raspberry Pi
Explore more innovative and hands-on projects built using Raspberry Pi. These tutorials demonstrate how to integrate sensors, cameras, and automation features to create smart systems and IoT applications.

Build a Raspberry Pi-Based SMS Alert System Using Cloud API
In this project, I’ll show you how I built a temperature alert system using a Raspberry Pi and a DHT11 sensor. The best part is it uses only Wi-Fi and a free SMS API from Circuit Digest Cloud, no SIM cards, no GSM shields.

Raspberry Pi Print Server: Setup a Network Server using CUPS
For this Raspberry Pi Print Server tutorial, we will be creating a Network Printer with the aid of the Raspberry Pi 3 and the almighty CUPS which makes it all possible.

QR Code Scanner using Raspberry Pi and OpenCV
In this tutorial, we will build a QR code scanner using Raspberry Pi and OpenCV, and the ZBar library. ZBar is the best library for detecting and decoding the different types of barcodes and QR codes.
Complete Project Code
from escpos.printer import Serial
from time import *
from datetime import date
from datetime import datetime
now = datetime.now()
dt_string = now.strftime("%b/%d/%Y %H:%M:%S")
print("Today's date:", dt_string)
""" 9600 Baud, 8N1, Flow Control Enabled """
p = Serial(devfile='/dev/serial0',
           baudrate=9600,
           bytesize=8,
           parity='N',
           stopbits=1,
           timeout=1.00,
           dsrdtr=True
           )
p.set(
        underline=0,
        align="left",
        font="a",
        width=2,
        height=2,
        density=3,
        invert=0,
        smooth=False,
        flip=False,
    )
p.text("\n")
p.set(
        underline=0,
        align="center",
        font="a",
        width=2,
        height=2,
        density=2,
        invert=0,
        smooth=False,
        flip=False,
    )
#Printing the image
p.image("/home/pi/ proj on pi0/CD_new_Logo_black.png",impl="bitImageColumn")
#printing the initial data
p.set(
        underline=0,
        align="left",
     )
p.textln("CIRCUIT DIGEST\n")
p.text("AIRPORT ROAD\n")
p.text("LOCATION : JAIPUR\n")
p.text("TEL : 0141222585\n")
p.text("GSTIN : \n")
p.text("Bill No. : \n\n")
p.set(
        underline=0,
        align="left",
        font="a",
        width=2,
        height=2,
        density=2,
        invert=0,
        smooth=False,
        flip=False,
    )
p.text("DATE : ")
p.text(dt_string)
p.textln("\n")
p.textln("CASHIER : ")
p.textln(" ===========================")
p.textln("      ITEM   QTY  PRICE    GB")
p.textln(" --------------------------")
p.textln("IR SENSOR  2  30   60")
p.textln("ULTRASONIC  2  80   160")
p.textln("RASPBERRY  1  3300   3300")
p.textln("ADOPTOR  2  120   240")
p.textln(" --------------------------")
p.textln("     SUBTOTAL:  3760")
p.textln("     DISCOUNT:  0.8")
p.textln("     VAT @ 18%: 676.8")
p.textln(" ===========================")
p.textln("    BILL TOTAL: 4436.8")
p.textln("     TENDERD:  0.8")
p.textln("     BALANCE: 676.8")
p.textln(" --------------------------")
p.textln("          THANK YOU")
p.textln(" ===========================")
p.set(
        underline=0,
        align="center",
        font="a",
        width=2,
        height=2,
        density=2,
        invert=0,
        smooth=False,
        flip=False,
    )
p.qr("Circuit Digest",native=True,size=12)
p.textln("")
p.barcode('123456', 'CODE39')
#if your printer has paper cuting facility then you can use this function
p.cut()
print("done")