
Human pose estimation technology is becoming increasingly popular due to the recent growth and popularity of Virtual and Augmented Reality. In our previous tutorial, we used Media pipe Hand Tracking module to control Raspberry Pi media player using hand gestures. In this project, we are going to use the MediaPipe Pose estimation package to build a push up counter. We will be using Pose estimation package to get the coordinates of both the shoulders and elbows. Coordinates of shoulders will be compared to coordinates of elbows. So, if the shoulders are at the same level as elbows or below the elbows, it will be counted as a push up. We are also connecting a speaker to Raspberry Pi to tell the count of the push-ups. Start your AI journey with practical AI projects and tutorials designed for beginners and innovators.
Components Required for Push-Ups Counting
- Raspberry Pi 4
- Pi Camera Module
- Speaker
Here, we only need Raspberry Pi 4 and Pi camera module with OpenCV and MediaPipe installed on it. OpenCV is used here for digital image processing while the MediaPipe is used for Pose estimation. The most common applications of Digital Image Processing are object detection, Face Recognition, and people counter.
What is MediaPipe?
MediaPipe is a framework for building cross platform (i.e Android, iOS, web, edge devices) multimodal (i.e. video, audio or any time series data) applied Machine Learning pipelines that consist of fast ML inference, classic computer vision, and media processing (e.g. video decoding). MediaPipe has released various prebuilt Python and other language packages like:
- Object Detection
- Face Detection
- Hand Tracking
- Pose Estimation
- Multi-hand Tracking
- Hair Segmentation
MediaPipe Python package is available on PyPI for Linux, macOS and Windows. Use the below command to install MediaPipe on Raspberry Pi 4:
sudo pip3 install mediapipe-rpi4
If you don’t have Pi 4 then you can install it on Raspberry Pi 3 using the below command:
sudo pip3 install mediapipe-rpi3
Installing OpenCV
Before installing the OpenCV and other dependencies, the Raspberry Pi needs to be fully updated. Use the below commands to update the Raspberry Pi to its latest version:
sudo apt-get update
Then use the following commands to install the required dependencies for installing OpenCV on your Raspberry Pi.
sudo apt-get install libhdf5-dev -y
sudo apt-get install libhdf5-serial-dev –y
sudo apt-get install libatlas-base-dev –y
sudo apt-get install libjasper-dev -y
sudo apt-get install libqtgui4 –y
sudo apt-get install libqt4-test –y
After that, use the below command to install the OpenCV on your Raspberry Pi.
pip3 install opencv-contrib-python==4.1.0.25
Programming Raspberry Pi for Push up Counter
Complete code for Push up counter using the OpenCV is given at the end of the documentation. Here, we are explaining the important sections of the code for better explanation.
Start the code by importing OpenCV and MediaPipe packages. As mentioned earlier, MediaPipe is the core package for Pose estimation while OpenCV is used for image processing.
import cv2
import mediapipe as mp
In next lines, we have created two new variables. First one is mp_drawing that will be used to get all the drawing utilities from MediaPipe Python package and second one is mp_pose that is used to import the pose estimation model.
mp_drawing = mp.solutions.drawing_utils
mp_pose = mp.solutions.pose
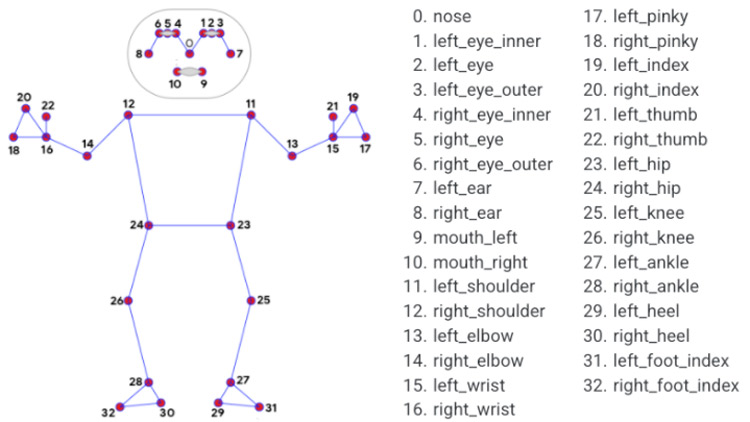
After that, define a function called findPosition(). As the name suggests, it is used to find X, Y coordinates of all the body landmarks like shoulders, eyes etc. Coordinated for all landmarks will be stored inside a variable called lmList[].
def findPosition(image, draw=True):
  lmList = []
  if results.pose_landmarks:
      mp_drawing.draw_landmarks(
         image, results.pose_landmarks, mp_pose.POSE_CONNECTIONS)
      for id, lm in enumerate(results.pose_landmarks.landmark):
          h, w, c = image.shape
          cx, cy = int(lm.x * w), int(lm.y * h)
          lmList.append([id, cx, cy])
  return lmList
Then start the video streaming from Raspberry Pi camera. Instead of using the live stream, you can even use a pre-recorded video. For that replace the ‘0’ with the video path.
cap = cv2.VideoCapture(0)
#cap = cv2.VideoCapture(“My Video.mp4”)
Then in next line, set up a new instance for mediapipe feed to access the pose estimation model that we imported earlier. We have also passed two keyword arguments i.e. minimum detection confidence and minimum tracking confidence. Next, we will read the video frames and store them in image variable.
with mp_pose.Pose(min_detection_confidence=0.7, min_tracking_confidence=0.7) as pose:
  while cap.isOpened():
     success, image = cap.read()
     image = cv2.resize(image, (1280, 720))
The image that we got from video feed is originally in BGR format. S, in this line, we will first flip the image horizontally for a later selfie-view display, and then convert the BGR image to RGB.
image = cv2.cvtColor(cv2.flip(image, 1), cv2.COLOR_BGR2RGB)
After that, we are going to pass the image through pose estimation model to make the detections and store the results in a variable called ‘results’. Then we converted the BGR image to RGB.
results = pose.process(image)
image = cv2.cvtColor(image, cv2.COLOR_BGR2RGB)
Now as we got the detection results, we will call the findPosition() function to draw these detections on the image and connect all the detections using the drawing utilities that we imported earlier.
mp_drawing.draw_landmarks(image,results.pose_landmarks,mp_pose.POSE_CONNECTIONS)
After that, we will store the ids and coordinates of all the detections inside a variable called lmList.
lmList = findPosition(image, draw=True)
Then in next lines, we will first get the coordinates of both the shoulders and then draw circles over then. As shown in below image, the ids for left and right shoulders are 12 and 11.
    if len(lmList) != 0:
      cv2.circle(image, (lmList[12][1], lmList[12][2]), 20, (0, 0, 255), cv2.FILLED)
      cv2.circle(image, (lmList[11][1], lmList[11][2]), 20, (0, 0, 255), cv2.FILLED)
      cv2.circle(image, (lmList[12][1], lmList[12][2]), 20, (0, 0, 255), cv2.FILLED)
      cv2.circle(image, (lmList[11][1], lmList[11][2]), 20, (0, 0, 255), cv2.FILLED)
Now, as we found the coordinates of the shoulders, we will compare these coordinates with the coordinates of both the elbows. So, if the shoulders are at the same level as elbows or below the elbows, we will set the stage as ‘Down’ and when the shoulders are above the elbows, the stage will change to up and it will be counted as a push up.
      if (lmList[12][2] and lmList[11][2] >= lmList[14][2] and lmList[13][2]):
        cv2.circle(image, (lmList[12][1], lmList[12][2]), 20, (0, 255, 0), cv2.FILLED)
        cv2.circle(image, (lmList[11][1], lmList[11][2]), 20, (0, 255, 0), cv2.FILLED)
        stage = "down"
      if (lmList[12][2] and lmList[11][2] <= lmList[14][2] and lmList[13][2]) and stage == "down":
        stage = "up"
        counter += 1
        print(counter)
Now, as the push ups are counted, we will print the push up count on the video stream using the cv2.putText().
text = "{}:{}".format("Push Ups", counter)
    cv2.putText(image, text, (10, 40), cv2.FONT_HERSHEY_SIMPLEX,
                1, (255, 0, 0), 2)
    cv2.imshow('MediaPipe Pose', image)
Lastly, we will save the video stream in our project folder.
    if create is None:
      fourcc = cv2.VideoWriter_fourcc(*'XVID')
      create = cv2.VideoWriter(opname, fourcc, 30, (image.shape[1], image.shape[0]), True)
    create.write(image)
Testing the Push up Counter Script
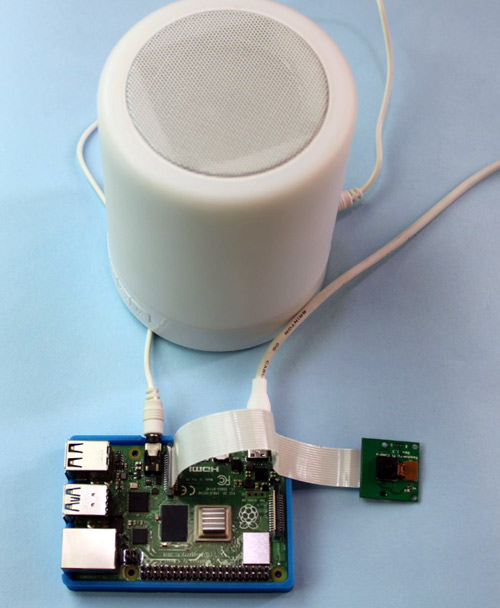
Now that the Push Up counter script is ready, let’s go ahead and test it. There are two ways of testing. Either you can use a pre-recorded video or you can use the Pi camera for live video stream. Here, we will use the Pi camera module, so, connect the Raspberry Pi Camera module with Pi as shown below:
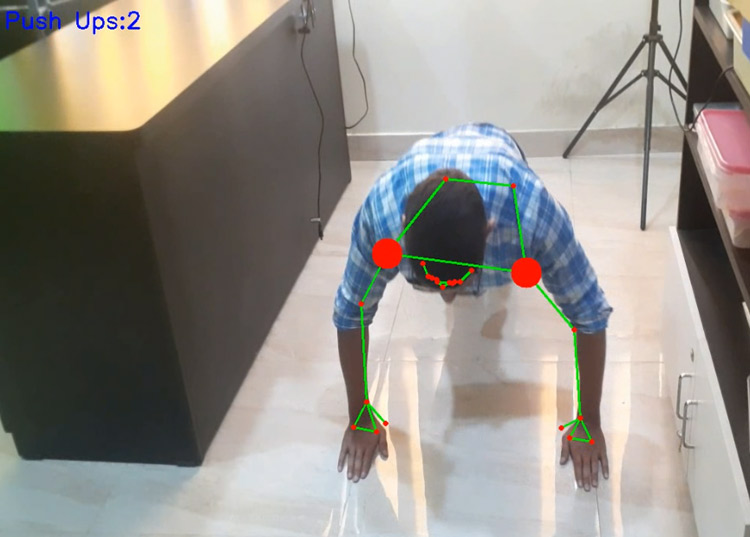
Now, check whether the Pi camera is working or not. After reviewing the camera, launch the python script, and you will find a window popping up with your video feed in it. While doing push-ups initially the dots on the shoulders will be red color:
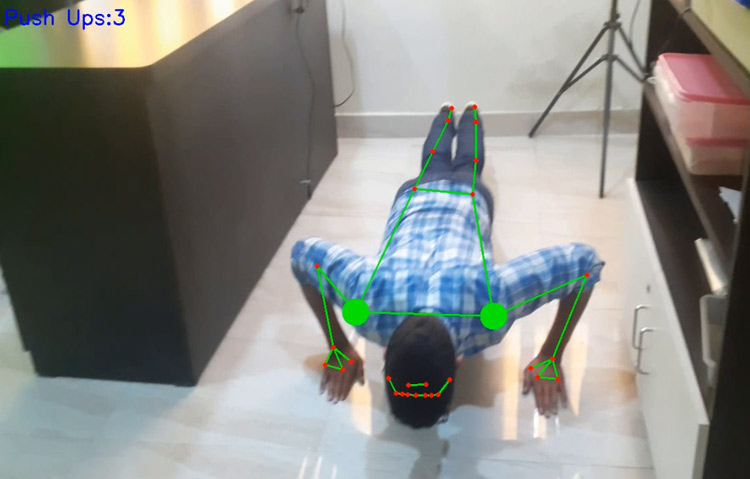
And when the shoulders are below the elbows the dots will change to green from red and push up count will be increased by one.
This is how you can use MediaPipe for counting push-ups. You can also use this library to count sit-ups or any other exercise. A complete working video and code are given below.
Complete Project Code
import cv2
import mediapipe as mp
import os
mp_drawing = mp.solutions.drawing_utils
mp_pose = mp.solutions.pose
counter = 0
stage = None
create = None
opname = "output.avi"
def findPosition(image, draw=True):
  lmList = []
  if results.pose_landmarks:
      mp_drawing.draw_landmarks(
         image, results.pose_landmarks, mp_pose.POSE_CONNECTIONS)
      for id, lm in enumerate(results.pose_landmarks.landmark):
          h, w, c = image.shape
          cx, cy = int(lm.x * w), int(lm.y * h)
          lmList.append([id, cx, cy])
          #cv2.circle(image, (cx, cy), 5, (255, 0, 0), cv2.FILLED)
  return lmList
cap = cv2.VideoCapture(0)
with mp_pose.Pose(
    min_detection_confidence=0.7,
    min_tracking_confidence=0.7) as pose:
  while cap.isOpened():
    success, image = cap.read()
    image = cv2.resize(image, (640,480))
    if not success:
      print("Ignoring empty camera frame.")
      # If loading a video, use 'break' instead of 'continue'.
      continue
    # Flip the image horizontally for a later selfie-view display, and convert
    # the BGR image to RGB.
    image = cv2.cvtColor(cv2.flip(image, 1), cv2.COLOR_BGR2RGB)
    # To improve performance, optionally mark the image as not writeable to
    # pass by reference.
    results = pose.process(image)
    # Draw the pose annotation on the image.
    image = cv2.cvtColor(image, cv2.COLOR_BGR2RGB)
    lmList = findPosition(image, draw=True)
    if len(lmList) != 0:
      cv2.circle(image, (lmList[12][1], lmList[12][2]), 20, (0, 0, 255), cv2.FILLED)
      cv2.circle(image, (lmList[11][1], lmList[11][2]), 20, (0, 0, 255), cv2.FILLED)
      cv2.circle(image, (lmList[12][1], lmList[12][2]), 20, (0, 0, 255), cv2.FILLED)
      cv2.circle(image, (lmList[11][1], lmList[11][2]), 20, (0, 0, 255), cv2.FILLED)
      if (lmList[12][2] and lmList[11][2] >= lmList[14][2] and lmList[13][2]):
        cv2.circle(image, (lmList[12][1], lmList[12][2]), 20, (0, 255, 0), cv2.FILLED)
        cv2.circle(image, (lmList[11][1], lmList[11][2]), 20, (0, 255, 0), cv2.FILLED)
        stage = "down"
      if (lmList[12][2] and lmList[11][2] <= lmList[14][2] and lmList[13][2]) and stage == "down":
        stage = "up"
        counter += 1
        counter2 = str(int(counter))
        print(counter)
        os.system("echo '" + counter2 + "' | festival --tts")
    text = "{}:{}".format("Push Ups", counter)
    cv2.putText(image, text, (10, 40), cv2.FONT_HERSHEY_SIMPLEX,
                1, (255, 0, 0), 2)
    cv2.imshow('MediaPipe Pose', image)
    if create is None:
      fourcc = cv2.VideoWriter_fourcc(*'XVID')
      create = cv2.VideoWriter(opname, fourcc, 30, (image.shape[1], image.shape[0]), True)
    create.write(image)
    key = cv2.waitKey(1) & 0xFF
    # if the `q` key was pressed, break from the loop
    if key == ord("q"):
      break
    # do a bit of cleanup
cv2.destroyAllWindows()
Comments
I just installed opencv-contrib-python and the latest version worked. Fair warning, it took over an hour to install. You can also try just installing opencv-python, I have both of them installed at the same time (oops) and it's working and I don't know which one it's using.
FYI for anyone wondering about the speed - it takes about 220ms for mediapipe to process each frame on a Raspberry Pi 4B (I have the 4GB RAM version). I also have tested the Tflite version of Multipose Lightning and it takes nearly identical time to run on a frame.

I would love to do this with my pi 3 but i run into a problem with the opencv install:
pip3 install opencv-contrib-python==4.1.0.25
As i read the error, that version is not found.
I tried without the == but it looks like it is compiling and runs for many hours without completing.
Any suggestions?