
Hand gesture recognition technology is becoming increasingly popular due to the recent growth and popularity of Virtual and Augmented Reality technologies. In our previous tutorial, we trained a Hand Gesture recognition model to play Rock Paper and Scissors with Raspberry Pi using Tensorflow and Keras. In this tutorial, we are going to use the MediaPipe Python library to detect our hand gestures and control the Raspberry Pi media player using that. Here we will use a total of six Hand Gestures, i.e. Open & Close Fist and Up, Down, Left, and Right movement of the hand. Open and Close fist gestures are used to Play and Pause the video. Up and Down Gestures are used to increase and Decrease Volume, and Left and Right gestures are used to fast Forward and reverse the video. So, let’s get started.
Components Required to Build a Gesture Controlled Media Player
- Raspberry Pi 4
- Pi Camera Module
Here, we only need Raspberry Pi 4 and Pi camera module with OpenCV and MediaPipe installed on it. OpenCV is used here for digital image processing while the MediaPipe is used for Hand Tracking. The most common applications of Digital Image Processing are object detection, Face Recognition, and people counter.
What is MediaPipe?
MediaPipe is a framework for building cross-platform (i.e. Android, iOS, web, edge devices) multimodal (e.g. video, audio, any time series data) applied Machine Learning pipelines that consist of fast ML inference, classic computer vision, and media processing (e.g. video decoding). MediaPipe has released various prebuilt python and other language packages like:
- Object Detection
- Face Detection
- Hand Tracking
- Pose Estimation
- Multi-hand Tracking
- Hair Segmentation
MediaPipe Python package is available on PyPI for Linux, macOS, and Windows. Use the below command to install MediaPipe on Raspberry Pi 4:
sudo pip3 install mediapipe-rpi4
If you don’t have Pi 4 then you can install it on Raspberry Pi 3 using the below command:
sudo pip3 install mediapipe-rpi3
Installing OpenCV on Raspberry Pi
Before installing the OpenCV and other dependencies, the Raspberry Pi needs to be fully updated. Use the below commands to update the Raspberry Pi to its latest version:
sudo apt-get update
Then use the following commands to install the required dependencies for installing OpenCV on your Raspberry Pi.
sudo apt-get install libhdf5-dev -y
sudo apt-get install libhdf5-serial-dev –y
sudo apt-get install libatlas-base-dev –y
sudo apt-get install libjasper-dev -y
sudo apt-get install libqtgui4 –y
 sudo apt-get install libqt4-test –y
After that, use the below command to install the OpenCV on your Raspberry Pi.
pip3 install opencv-contrib-python==4.1.0.25
Installing PyAutoGUI on Raspberry Pi
PyAutoGUI is a cross-platform GUI automation Python module that lets your Python scripts control the mouse and keyboard to automate interactions with other applications. PyAutoGUI works on Windows, macOS, and Linux, and runs on Python 2 and 3. To install PyAutoGUI on Raspberry Pi, run:
pip3 install pyautogui
Programming Raspberry Pi for Media Controller
Complete code for Controlling Media Player using Hand Gestures is given at the end of the document. Here we are explaining the important sections of the code for a better explanation.
Start the code by importing OpenCV, MediaPipe, and PyAutoGUI packages. As mentioned earlier MediaPipe is the core package for Hand Tracking while OpenCV is used for image processing. PyAutoGUI is used to control the keyboard according to gestures.
import cv2
import mediapipe as mp
import pyautogui
In the next lines, we have created two new variables. The first one is mp_drawing which will be used to get all the drawing utilities from the MediaPipe python package and the second one is mp_hands that is used to import the Hand Tracking model.
mp_drawing = mp.solutions.drawing_utils
mp_hands = mp.solutions.hands
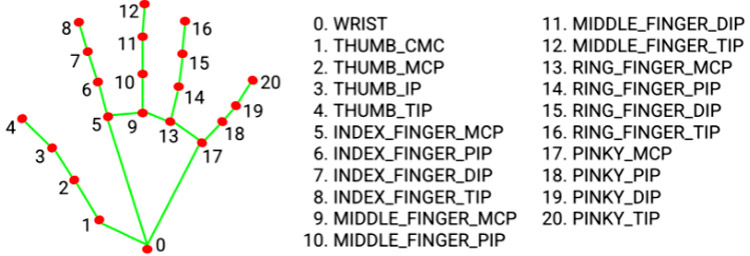
After that define a function called findPosition(). As the name suggests it is used to find X, Y coordinates of the Index, Middle, Ring and Pinky finger. Coordinates of all fingertips will be stored inside a variable called lmList[].
def fingerPosition(image, handNo=0):
    lmList = []
    if results.multi_hand_landmarks:
        myHand = results.multi_hand_landmarks[handNo]
        for id, lm in enumerate(myHand.landmark):
            # print(id,lm)
            h, w, c = image.shape
            cx, cy = int(lm.x * w), int(lm.y * h)
            lmList.append([id, cx, cy])
    return lmList
Then start the video streaming from Raspberry Pi camera with a frame height and width of 720, 640.
cap = cv2.VideoCapture(0)
cap.set(3, wCam)
cap.set(4, hCam)
Then in the next line set up a new instance for mediapipe feed to access the Hand Tracking model that we imported earlier. We have also passed two keyword arguments i.e. minimum detection confidence and minimum tracking confidence. Next, we will read the video frames and store them in the image variable.
with mp_hands.Hands(min_detection_confidence=0.8, min_tracking_confidence=0.5) as hands:
  while cap.isOpened():
  success, image = cap.read()
The image that we got from the video feed is originally in BGR format. So, in this line, we will first flip the image horizontally for a later selfie-view display, and then convert the BGR image to RGB. The image writeable flag is set to false.
image = cv2.cvtColor(cv2.flip(image, 1), cv2.COLOR_BGR2RGB)
image.flags.writeable = False
After that, we are going to pass the image through the Hand Tracking model to make the detections and store the results in a variable called ‘results.’
results = hands.process(image)
Once the detections are complete, we set the image writeable flag to true and convert the RGB image to BGR.
image.flags.writeable = True
image = cv2.cvtColor(image, cv2.COLOR_RGB2BGR)
Now, as we got the detection results, we will call the mp_drawing variable to draw these detections on the image and connect all the detections using the drawing utilities that we imported earlier.
    if results.multi_hand_landmarks:
      for hand_landmarks in results.multi_hand_landmarks:
        mp_drawing.draw_landmarks(
            image, hand_landmarks, mp_hands.HAND_CONNECTIONS)
After that, we will call the findPosition() function to get the ids and coordinates of all the detections. These values will be stored inside a variable called lmList.
lmList = findPosition(image, draw=True)
Now that we have coordinates for all of the hand landmarks, we will use them to detect different hand gestures and the first of them is detecting whether the fist is open or closed. For that, we will compare the coordinates of tips of fingers [8, 12, 16, 20] and middle points [6, 10, 14, 19] and if the fingertips are below the middle points, then the fist is closed and vice versa.
        for id in range(1, 5):
            if lmList[tipIds[id]][2] < lmList[tipIds[id] - 2][2]:
                fingers.append(1)
            if (lmList[tipIds[id]][2] > lmList[tipIds[id] - 2][2]):
                fingers.append(0)
Then in the next lines get the total number of fingers counted and save it in a variable called totalFingers.
totalFingers = fingers.count(1)
        print(totalFingers)
Now that we got the number of fingers, we will use them to play and pause the video.
        if totalFingers == 4:
            state = "Play"
        if totalFingers == 0 and state == "Play":
            state = "Pause"
            pyautogui.press('space')
            print("Space")
Then the next gesture that we want to detect are left, right, up, and down movement. To detect the left and right movement, first, we will get the X-coordinate of the index fingertip and if the values are less than 300 then it is left swipe and if the values are greater than 400 then it is right swipe.
        if totalFingers == 1:
            if lmList[8][1]<300:
                print("left")
                pyautogui.press('left')
            if lmList[8][1]>400:
                print("Right")
                pyautogui.press('Right')
Similarly, to detect up and down gestures we will get the Y-coordinates of the middle finger, and if the values are less than 210, then it is the Up slide, and if the values are greater than 230 then it is the low slide.
        if totalFingers == 2:
            if lmList[9][2] < 210:
                print("Up")
                pyautogui.press('Up')
            if lmList[9][2] > 230:
                print("Down")
                pyautogui.press('Down')
Testing our Gesture Controlled Media Controller Script
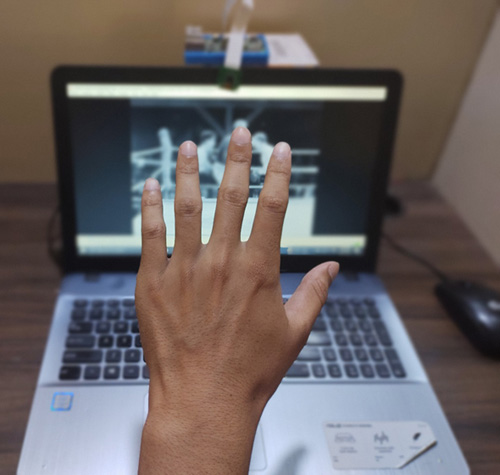
Now that the Media Counter script is ready, let’s go ahead and test it. So, connect the Raspberry Pi Camera module with Pi as shown below:
Now, check whether the Pi camera is working or not. After reviewing the camera, launch the Python script, and you will find a window popping up with a video feed in it. Now, you can control the video player by your hand gestures. You can find a working video for this project down below. You can change the video feed to any video of your choice and have fun controlling it with hand gestures.
Hope you enjoyed building the project and learned something new, if you have any questions leave them in the comment section below or use our forum.
Complete Project Code
import cv2
import mediapipe as mp
import pyautogui
mp_drawing = mp.solutions.drawing_utils
mp_hands = mp.solutions.hands
##################################
tipIds = [4, 8, 12, 16, 20]
state = None
Gesture = None
wCam, hCam = 720, 640
############################
def fingerPosition(image, handNo=0):
    lmList = []
    if results.multi_hand_landmarks:
        myHand = results.multi_hand_landmarks[handNo]
        for id, lm in enumerate(myHand.landmark):
            # print(id,lm)
            h, w, c = image.shape
            cx, cy = int(lm.x * w), int(lm.y * h)
            lmList.append([id, cx, cy])
    return lmList
# For webcam input:
cap = cv2.VideoCapture(0)
cap.set(3, wCam)
cap.set(4, hCam)
with mp_hands.Hands(
    min_detection_confidence=0.8,
    min_tracking_confidence=0.5) as hands:
  while cap.isOpened():
    success, image = cap.read()
    if not success:
        print("Ignoring empty camera frame.")
      # If loading a video, use 'break' instead of 'continue'.
        continue
    # Flip the image horizontally for a later selfie-view display, and convert
    # the BGR image to RGB.
    image = cv2.cvtColor(cv2.flip(image, 1), cv2.COLOR_BGR2RGB)
    image.flags.writeable = False
    results = hands.process(image)
    # Draw the hand annotations on the image.
    image.flags.writeable = True
    image = cv2.cvtColor(image, cv2.COLOR_RGB2BGR)
    if results.multi_hand_landmarks:
      for hand_landmarks in results.multi_hand_landmarks:
        mp_drawing.draw_landmarks(
            image, hand_landmarks, mp_hands.HAND_CONNECTIONS)
    lmList = fingerPosition(image)
    #print(lmList)
    if len(lmList) != 0:
        fingers = []
        for id in range(1, 5):
            if lmList[tipIds[id]][2] < lmList[tipIds[id] - 2][2]:
                #state = "Play"
                fingers.append(1)
            if (lmList[tipIds[id]][2] > lmList[tipIds[id] - 2][2] ):
               # state = "Pause"
               # pyautogui.press('space')
               # print("Space")
                fingers.append(0)
        totalFingers = fingers.count(1)
        print(totalFingers)
        #print(lmList[9][2])

        if totalFingers == 4:
            state = "Play"
           # fingers.append(1)
        if totalFingers == 0 and state == "Play":
            state = "Pause"
            pyautogui.press('space')
            print("Space")
        if totalFingers == 1:
            if lmList[8][1]<300:
                print("left")
                pyautogui.press('left')
            if lmList[8][1]>400:
                print("Right")
                pyautogui.press('Right')
        if totalFingers == 2:
            if lmList[9][2] < 210:
                print("Up")
                pyautogui.press('Up')
            if lmList[9][2] > 230:
                print("Down")
                pyautogui.press('Down')
    #cv2.putText(image, str("Gesture"), (10,40), cv2.FONT_HERSHEY_SIMPLEX,
     #              1, (255, 0, 0), 2)
    cv2.imshow("Media Controller", image)
    key = cv2.waitKey(1) & 0xFF
    # if the `q` key was pressed, break from the loop
    if key == ord("q"):
        break
cv2.destroyAllWindows()Comments
import cv2
import mediapipe as mp
import pyautogui
mp_drawing = mp.solutions.drawing_utils
mp_hands = mp.solutions.hands
##################################
tipIds = [4, 8, 12, 16, 20]
state = None
Gesture = None
wCam, hCam = 720, 640
############################
def fingerPosition(image, handNo=0):
lmList = []
if results.multi_hand_landmarks:
myHand = results.multi_hand_landmarks[handNo]
for id, lm in enumerate(myHand.landmark):
# print(id,lm)
h, w, c = image.shape
cx, cy = int(lm.x * w), int(lm.y * h)
lmList.append([id, cx, cy])
return lmList
# For webcam input:
cap = cv2.VideoCapture(0)
cap.set(3, wCam)
cap.set(4, hCam)
with mp_hands.Hands(
min_detection_confidence=0.8,
min_tracking_confidence=0.5) as hands:
while cap.isOpened():
success, image = cap.read()
if not success:
print("Ignoring empty camera frame.")
# If loading a video, use 'break' instead of 'continue'.
continue
# Flip the image horizontally for a later selfie-view display, and convert
# the BGR image to RGB.
image = cv2.cvtColor(cv2.flip(image, 1), cv2.COLOR_BGR2RGB)
image.flags.writeable = False
results = hands.process(image)
# Draw the hand annotations on the image.
image.flags.writeable = True
image = cv2.cvtColor(image, cv2.COLOR_RGB2BGR)
if results.multi_hand_landmarks:
for hand_landmarks in results.multi_hand_landmarks:
mp_drawing.draw_landmarks(
image, hand_landmarks, mp_hands.HAND_CONNECTIONS)
lmList = fingerPosition(image)
#print(lmList)
if len(lmList) != 0:
fingers = []
for id in range(1, 5):
if lmList[tipIds[id]][2] < lmList[tipIds[id] - 2][2]:
#state = "Play"
fingers.append(1)
if (lmList[tipIds[id]][2] > lmList[tipIds[id] - 2][2] ):
# state = "Pause"
# pyautogui.press('space')
# print("Space")
fingers.append(0)
total Fingers = fingers.count(1)
print(total Fingers)
#print(lm List[9][2])
if total Fingers == 4:
state = "Play"
# fingers.append(1)
if total Fingers == 0 and state == "Play":
state = "Pause"
pyautogui.press('space')
print("Space")
if total Fingers == 1:
if lm List[8][1]<300:
print("left")
pyautogui.press('left')
if lm List[8][1]>400:
print("Right")
pyautogui.press('Right')
if total Fingers == 2:
if lm List[9][2] < 210:
print("Up")
pyautogui.press('Up')
if lm List[9][2] > 230:
print("Down")
pyautogui.press('Down')
#cv2.putText(image, str("Gesture"), (10,40), cv 2.FONT_HERSHEY_SIMPLEX,
# 1, (255, 0, 0), 2)
cv2.imshow("Media Controller", image)
key = cv2.waitKey(1) & 0xFF
# if the `q` key was pressed, break from the loop
if key == ord("q"):
break
cv2.destroyAllWindows()

Nice project