
Previously we built a smart container using weight as a measurement parameter to send alerts. Now in this IoT smart jar, we will check the level of a Jar using Ultrasonic sensor and send an alert email to the user. The level of Jar will also be displayed on a webpage hosted on NodeMCU ESP8266.
This smart Jar allows us to keep track of the stocks, and it is easily accessible from using the internet. The Jar includes an ultrasonic sensor at the top of it and uses the ultra-sonic reflected waves to figure out at what extent the Jar is filled and how much space is left inside the jar. Whenever the amount of content changes in the jar, it is sensed by the NodeMCU, and the same is updated on the webserver. This can be helpful to track supplies and plan for restocking from anywhere in the world. Previously we used Arduino and ESP8266-01 to build smart dustbin using the same methodology.
Components Required
- NodeMCU ESP8266
- Ultrasonic Sensor HC-05
- Breadboard
- Jumper Wires
How does an Ultrasonic Sensor work?
Before we get any further, we should know how an Ultrasonic sensor works so that we can understand this tutorial much better. The ultrasonic sensor used in this project is shown below.
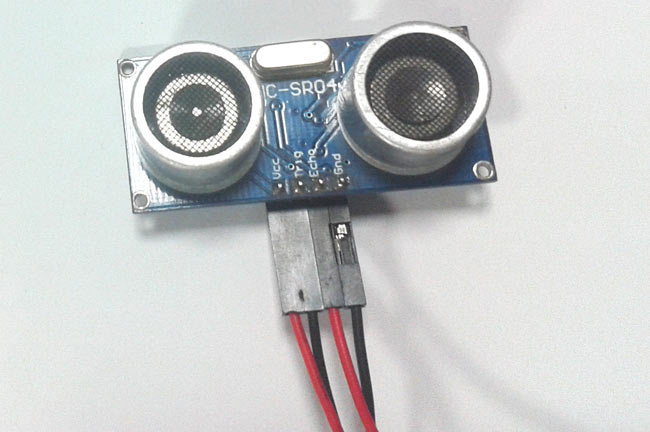
As you can see it has two circular eyes like projections and four pins coming out of it. The two eye like projections are the Ultrasonic wave (hereafter referred as US wave) Transmitter and receiver. The transmitter emits an US wave at a frequency of 40Hz, this wave travels through the air and gets reflected back when it senses an object. The returning waves are observed by the receiver. Now we know the time taken for this wave to get reflected and come back and the speed of the US wave is also universal (3400cm/s). Using this information and the below high school formulae we can calculate the distance covered.
Distance = Speed × Time
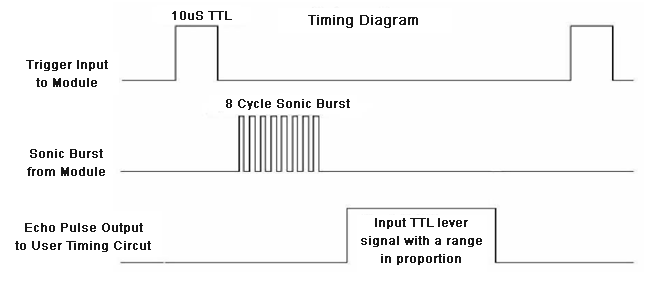
Now that we know how an US sensor works, let us how it can be interfaced with any MCU/CPU using the four pins. These four pins are Vcc, Trigger, Echo and Ground respectively. The module works on +5V and hence the Vcc and ground pin is used to power the module. The other two pins are the I/O pins using which we communicate to our MCU. The trigger pin should be declared as an output pin and made high for a 10uS, this will transmit the US wave into the air as 8 cycle sonic burst. Once the wave is observed the Echo pin will go high for the exact interval of time which was taken by the US wave to return back to the sensor module. Hence this Echo pin will be declared as input and a timer will be used to measure how long the pin was high. This could further be understood by the timing diagram below.
Circuit Diagram
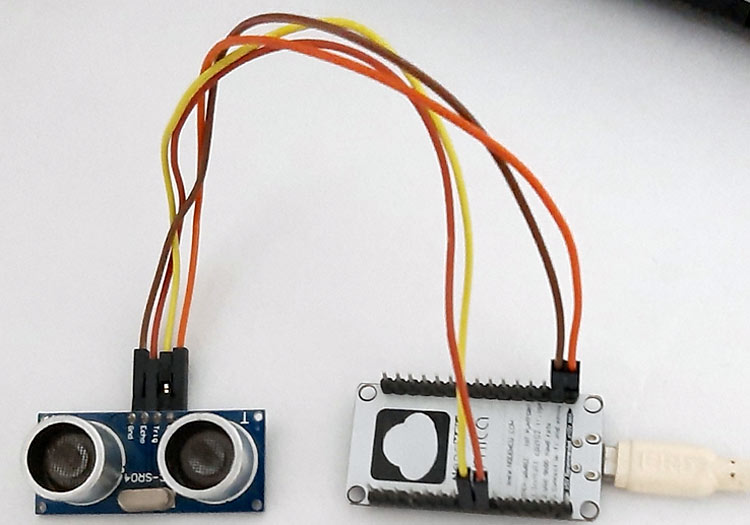
The circuit diagram for IoT-Smart Jar is given below-

The circuit is very simple as we are only using the ultrasonic sensor and NodeMCU. HC-SR04 ultrasonic sensor works on 5V, so if you connect it to 3.3V, it won’t work. VCC pin of the ultrasonic sensor is connected to the VIN pin of NodeMCU. Trig and Echo pins are connected to D5 and D6 pin of NodeMCU while the GND pin of the sensor is connected to the GND pin of NodeMCU. A 5V power supply powers NodeMCU.
IFTTT Setup for Smart Jar
IFTTT (If This Then That) is a web-based service using which we can create chains of conditional statements, called applets. Using these applets, we can send Emails, Twitter, Facebook notifications. Here we are using IFTTT to send Email notifications when the Jar is almost empty. We previously used IFTTT in many applications to send an email alert, like in this Wi-Fi doorbell project.
First login to IFTTT and search for ‘Webhooks’.

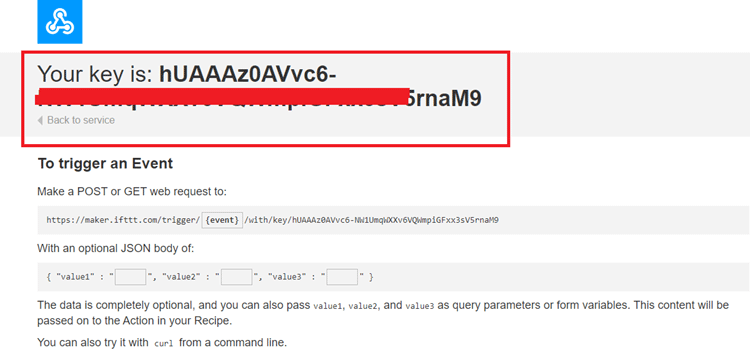
Now to get the Private key, click on ‘Documentation’. Copy this key somewhere, it will be used in the code.
As we have the private key, we will create an applet using Webhooks and Email services. To create an applet, click on your profile and then click on ‘Create’ from available options.

Now in the next window, select If This Then That.

In ‘This’ field we will use webhooks to get the web requests from the NodeMCU.
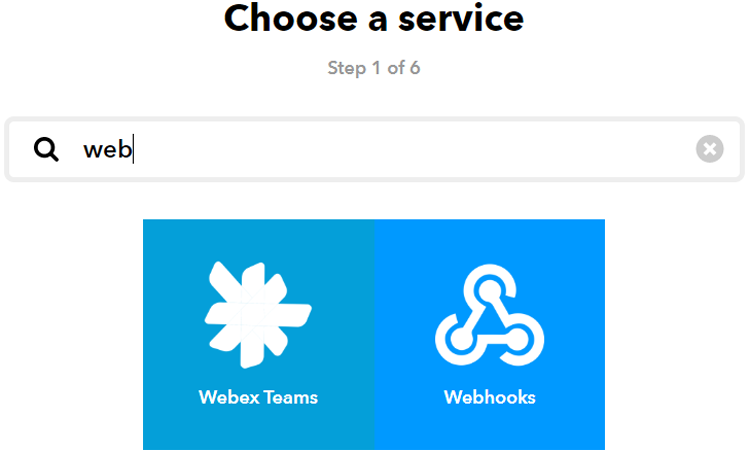
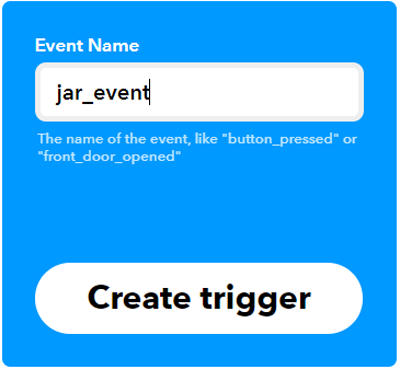
Now select ‘Receive a Web Request’ trigger and then enter the event name as jar_event and then click on ‘Create Trigger.’
After this, click on ‘Then That’ and then click on Email.
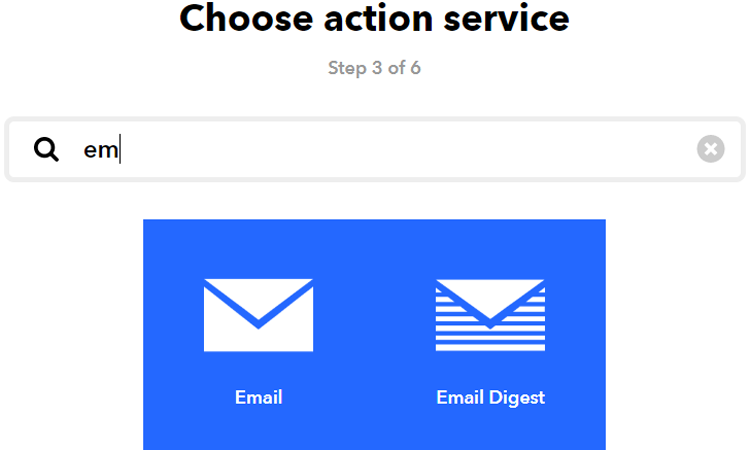
Now in Email, click on ‘send me an email’ and enter the email subject and body and then click on create action.

In the last step, click on ‘Finish’ to complete the Applet setup.
Code Explanation
We are using Arduino IDE to program NodeMCU. So, make sure you have downloaded NodeMCU board files. To learn more about programming NodeMCU with Arduino IDE, follow the link.
Complete code is given at the end of the document. Here we are explaining the code step by step.
So start your code by including all the required library files. The ultrasonic sensor doesn’t require a library file, so we only need ESP8266WiFi.h library file.
#include <ESP8266WiFi.h>
After that, define the pins where you connected the Trig and Echo pins and also define two variables for calculating distance and duration.
const int trigPin = D5;
const int echoPin = D6;
long duration;
int distance;
After that, make instances for Wi-Fi name, Wi-Fi password, IFTTT hostname, and private key.
const char* ssid = "Wi-Fi Name";
const char* password = "Password";
const char *host = "maker.ifttt.com";
const char *privateKey = "Private key";
Now to access the WiFiServer, we declared an object WifiServer library. 80 is the default port for HTTP.
WiFiServer server(80);
Now inside the void loop function, calculate the time between triggered and received signal. This time will be used to calculate the distance.
duration = pulseIn(echoPin, HIGH);
distance = duration * 0.0340 / 2;
After that, distance is converted into a percentage to show the Jar’s occupancy.
level =((14-distance)/14.0)*100;
Then we compared the jar’s occupancy, and if the occupancy level is less than 5, then it will trigger an IFTTT event to send warning Email.
if ( level <= 10) {
        send_event("jar_event");
        }
Testing the Smart Container
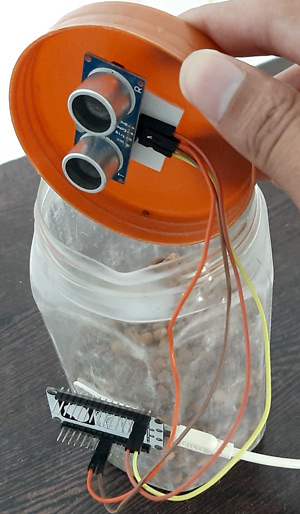
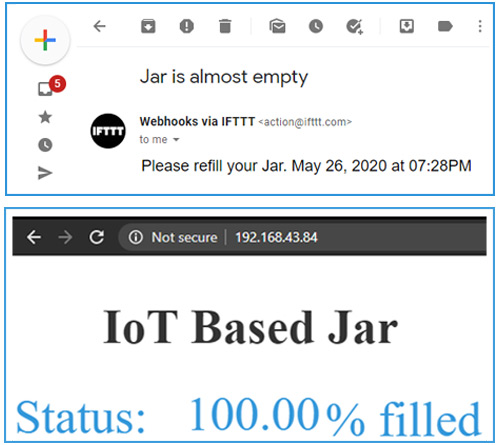
Once your hardware and code are ready, upload the code and put the ultrasonic sensor at the top of the Jar, or you can stick it to the cap of the Jar as shown in the figure. Now check the webpage using the IP address that is printed on Serial Monitor. It should show the Jar’s occupancy level. And if the Jar’s occupancy level is less than 10, then it will send you a warning email. Here the warning level is defined according to the length of my Jar. You can change it according to yours.
Complete code with a demonstration video is given at the end of the document.
Complete Project Code
#include <ESP8266WiFi.h>
const int trigPin = D5;
const int echoPin = D6;
long duration;
int distance;
float level;
const char* ssid = "Galaxy-M20";
const char* password = "ac312124";
void send_event(const char *event);
const char *host = "maker.ifttt.com";
const char *privateKey = "hUAAAz0AVvc6-NW1UmqWXXv6VQWmpiGFxx3sV5rnaM9";
WiFiServer server(80);
void setup() {
 pinMode(trigPin, OUTPUT);
 pinMode(echoPin, INPUT);
 Serial.begin(9600);
 Serial.print("Connecting to Wifi Network");
 Serial.println(ssid);
 WiFi.begin(ssid, password);
 while (WiFi.status() != WL_CONNECTED) {
 delay(500);
 Serial.print(".");
 }
 Serial.println("");
 Serial.println("Successfully connected to WiFi.");
 Serial.println("IP address is : ");
 Serial.println(WiFi.localIP());
 server.begin();
 Serial.println("Server started");
}
void loop() {
  digitalWrite(trigPin, LOW);
  delayMicroseconds(2);
  digitalWrite(trigPin, HIGH);
  delayMicroseconds(10);
  digitalWrite(trigPin, LOW);
  duration = pulseIn(echoPin, HIGH);
  distance = duration * 0.0340 / 2;
  Serial.println("Distance");
  Serial.println(distance);
  level =((14-distance)/14.0)*100;
  Serial.println("level");
  Serial.println(level);
  delay(1000);
  WiFiClient client = server.available();
  if (client)
{
Serial.println("Web Client connected ");
String request = client.readStringUntil('\r');
client.println("HTTP/1.1 200 OK");
client.println("Content-Type: text/html");
client.println("Connection: close");  // the connection will be closed after completion of the response
client.println("Refresh: 10");  // update the page after 10 sec
client.println();
client.println("<!DOCTYPE HTML>");
client.println("<html>");
client.println("<style>html { font-family: Cairo; display: block; margin: 0px auto; text-align: center;color: #333333; background-color: ##f3ffee;}");
client.println("body{margin-top: 50px;}");
client.println("h1 {margin: 50px auto 30px; font-size: 50px;  text-align: center;}");
client.println(".side_adjust{display: inline-block;vertical-align: middle;position: relative;}");
client.println(".text1{font-weight: 180; padding-left: 5px; font-size: 50px; width: 170px; text-align: left; color: #3498db;}");
client.println(".data1{font-weight: 180; padding-left: 1px; font-size: 50px;color: #3498db;}");
client.println(".data{padding: 1px;}");
client.println("</style>");
client.println("</head>");
client.println("<body>");
client.println("<div id=\"webpage\">");
client.println("<h1>IoT Based Jar</h1>");
client.println("<div class=\"data\">");
client.println("<div class=\"side_adjust text1\">Status:</div>");
client.println("<div class=\"side_adjust data1\">");
client.print(level);
client.println("<div class=\"side_adjust text1\">% filled</div>");
client.println("</div>");
client.println("</div>");
client.println("</body>");
client.println("</html>");
//client.println("<h1>Level Indicator</h1>");
   if ( level <= 10) {
        send_event("jar_event");
        }
}
}
void send_event(const char *event)
{
  Serial.print("Connecting to ");
  Serial.println(host);
  // Use WiFiClient class to create TCP connections
  WiFiClient client;
  const int httpPort = 80;
  if (!client.connect(host, httpPort)) {
    Serial.println("Connection failed");
    return;
  }
  // We now create a URI for the request
  String url = "/trigger/";
  url += event;
  url += "/with/key/";
  url += privateKey;
  Serial.print("Requesting URL: ");
  Serial.println(url);
  // This will send the request to the server
  client.print(String("GET ") + url + " HTTP/1.1\r\n" +
               "Host: " + host + "\r\n" +
               "Connection: close\r\n\r\n");
  while(client.connected())
  {
    if(client.available())
    {
      String line = client.readStringUntil('\r');
      Serial.print(line);
    } else {
      // No data yet, wait a bit
      delay(50);
    };
  }
  Serial.println();
  Serial.println("closing connection");
  client.stop();
}